

If you have a welding machine and at least some skills in working with it, it would be simply unreasonable to purchase a Chinese product that is not very durable. The entrance metal door, made by hand, will become more reliable protection against burglary and bad weather. We describe in detail the process of its manufacture.
Content:
 Read also: How to make a children's house with your own hands: from wood and other materials. Dimensional drawings | (80 Photo Ideas & Videos)
Required materials and tools

Free tool 50% success
Before proceeding with the manufacture of a metal structure, you should prepare the necessary materials and tools for work.
We will need:
- yardstick
- carpenter's square for measurements;
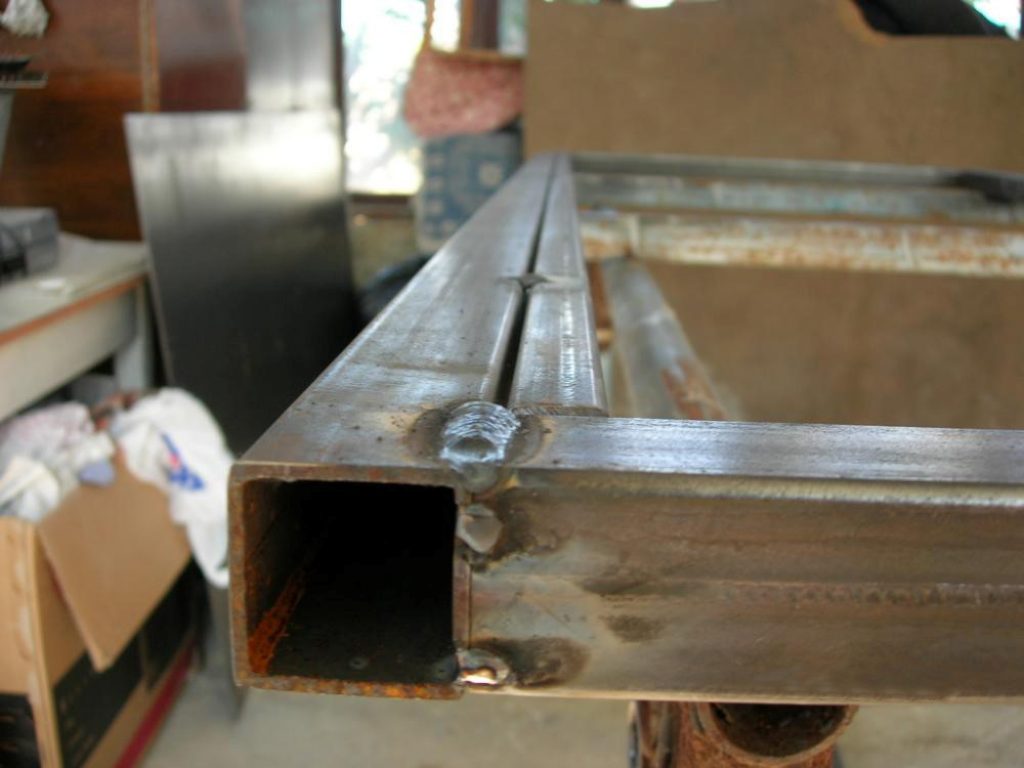
- metal corner for the door frame and the frame of the door leaf; you can replace it with a square pipe 40x40 mm; for the manufacture of the inner frame of the box, stiffeners use pipes of a slightly smaller size 40x20 mm
- sheets of metal: too thin material should not be taken, its thickness should be at least 1.5-2 mm
- welding machine
- grinder or brush for cleaning welds
- drill with drills
- metal anchors or pieces of reinforcement for fastening the structure to the wall
- screws, bolts
- a wrench of the right size for tightening the bolts
- screwdriver
- door hinges capable of supporting the weight of a door weighing from 100 kg
- padlock
- plywood, MDF, lining or laminate for finishing
 Read also: How to make a greenhouse with your own hands: for seedlings, cucumbers, tomatoes, peppers and other plants. From polycarbonate, window frames, plastic pipes (75 Photos & Videos) + Reviews
 Taking measurements
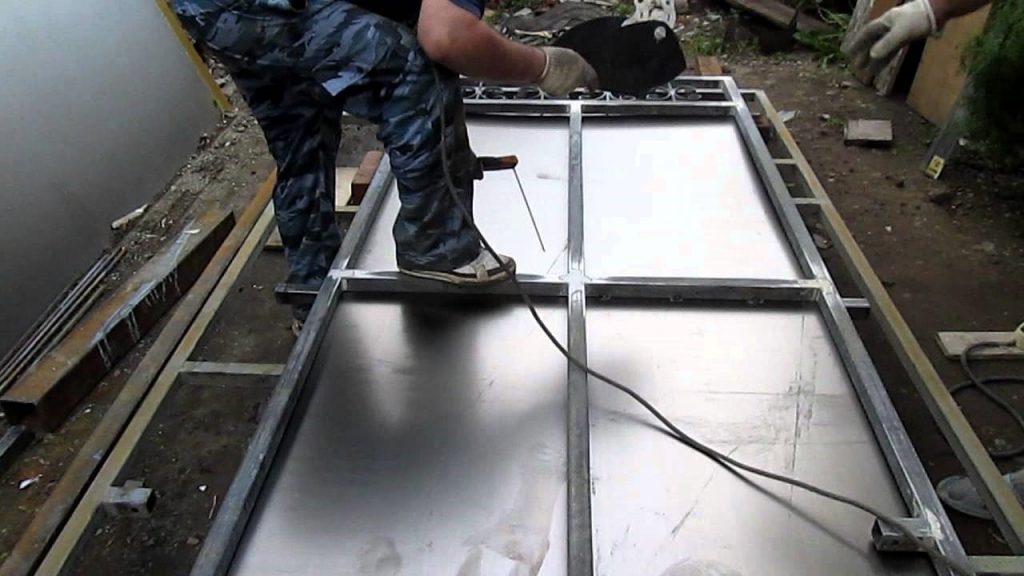
Welding of a metal structure
Even when using standard drawings to assemble an iron door, you will need to take measurements. Perfectly smooth, symmetrical doorways simply do not exist. Therefore, measurements must be taken with the utmost care.
One measurement will not be enough - you need to take measurements three times, and then choose the smallest number from those received. Measure the door leaf should be at the top, bottom, middle.
The height of the opening is determined in the same way. If the old doors have not yet been removed, it is easier to measure them.
In most cases, the width of the canvas is a multiple of 10 cm - its width can be 70, 80 or 90 cm. Please note that the size of the future opening should be 1.5-2 cm smaller than the size of the opening itself. The remaining gaps are subsequently filled with mounting foam. After all, inserting and perfectly aligning a door cut exactly to the size of the doorway will be difficult.
Immediately determine in which direction they will open. According to SNiP, entrance doors must necessarily open outward, so that in the event of an evacuation or transfer of a sick person, it can be opened without hindrance. In this case, it will also be possible to save useful hallway space.
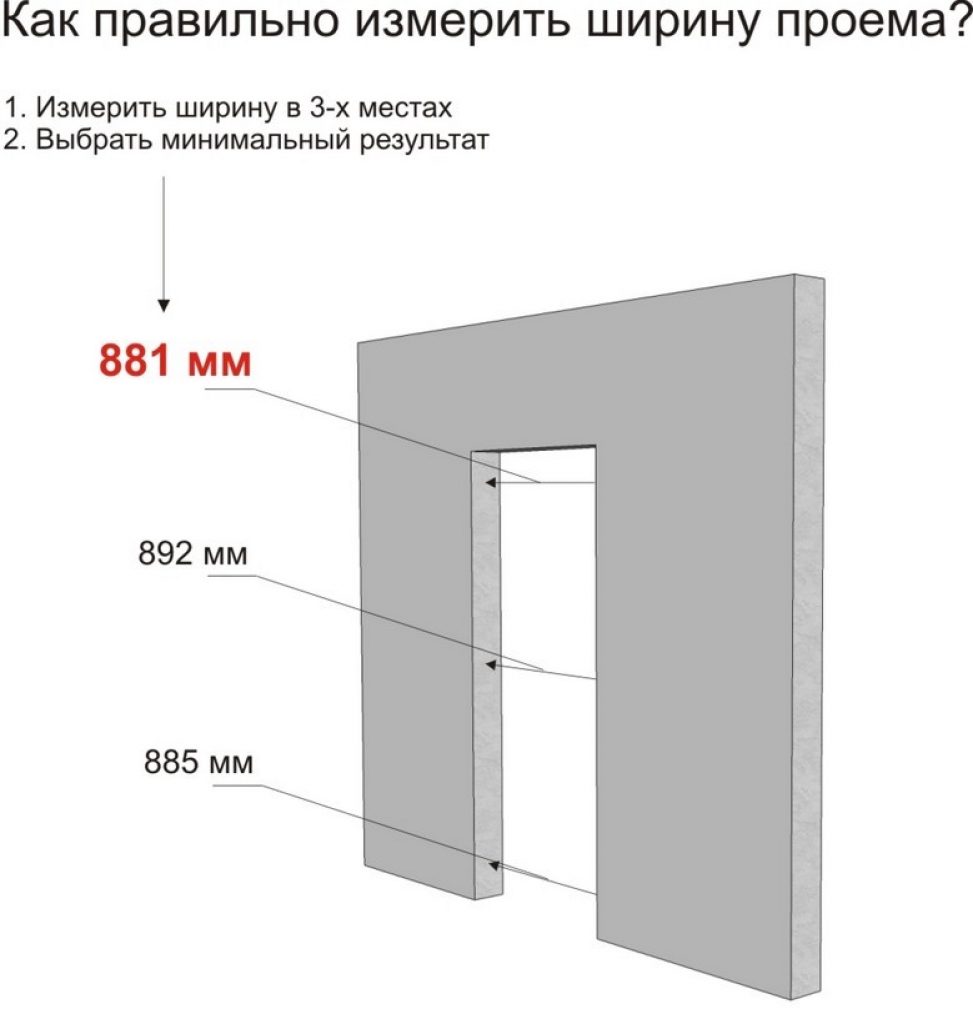
How to correctly measure the width of the opening
The opening side is chosen taking into account comfort and convenience. Traditionally, doors are made right-handed, so that when entering they can be opened with the help of the right hand. But this option can be changed to suit specific circumstances.
After all, the door should open in such a way as to occupy a minimum of free space without creating interference.In apartment buildings, the location of neighboring doors is also taken into account.
![[Instructions] How to make beautiful and unusual wall shelves with your own hands: for flowers, books, TV, kitchen or garage (100+ Photo Ideas & Videos) + Reviews](https://iherb.bedbugus.biz/wp-content/uploads/2018/05/19-6-300x213.jpg) Read also: [Instructions] How to make beautiful and unusual wall shelves with your own hands: for flowers, books, TV, kitchen or garage (100+ Photo Ideas & Videos) + Reviews
Read also: [Instructions] How to make beautiful and unusual wall shelves with your own hands: for flowers, books, TV, kitchen or garage (100+ Photo Ideas & Videos) + Reviews
door frame
So, we will describe in detail how to make an iron door yourself:
Strips of metal are joined end-to-end
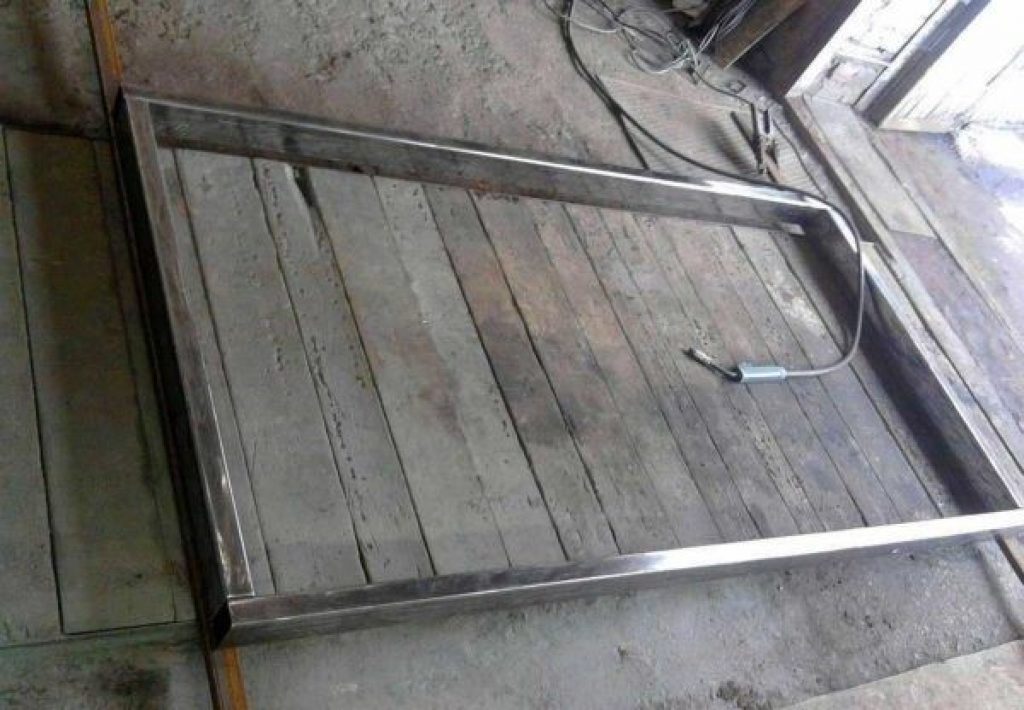
Frame with inner frame
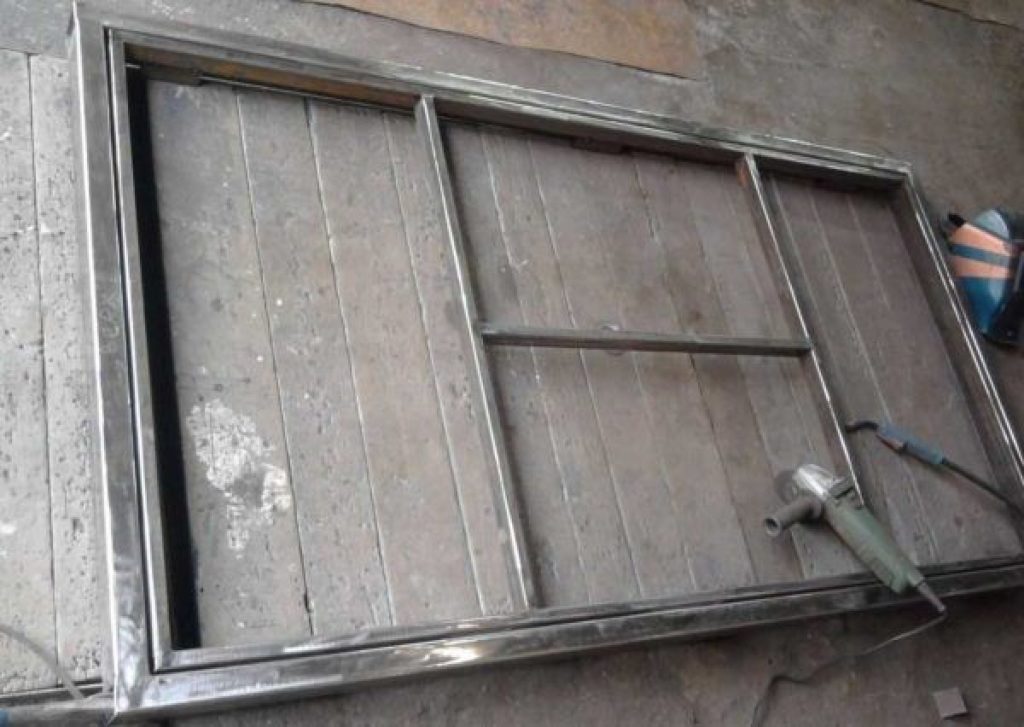
Finished door frame
![[Instruction] Do-it-yourself laminate on a wooden floor: a complete description of the process. Laying schemes, what materials should be used (Photo & Video) + Reviews](https://iherb.bedbugus.biz/wp-content/uploads/2018/05/laminat-300x200.jpg) Read also: [Instruction] Do-it-yourself laminate on a wooden floor: a complete description of the process. Laying schemes, what materials should be used (Photo & Video) + Reviews
Read also: [Instruction] Do-it-yourself laminate on a wooden floor: a complete description of the process. Laying schemes, what materials should be used (Photo & Video) + Reviews Door leaf
- The height, width of its frame must match the size of the door frame minus 5 mm on each side for the free movement of the door.
- After cutting the sheets (this can be done with a grinder), we clean the edges from burrs with a file or a grinder with emery.
- Metal sheets are attached to the frame in such a way that they protrude 10 mm at the top, bottom and side of the lock. The allowance on the side of the loops is made slightly smaller - 3-5 mm.
- After "tacking" the sheets, we check the correct fastening, and then we finally weld the seams. If the sheets did not lead, proceed to the final welding. First, we “sew” them to the main frame, and then we attach them to the intermediate stiffeners. It makes no sense to make continuous seams - it is enough to weld the sheets in small segments.
- A cutout for inserting a lock must be provided even before sheathing.
- At the same stage, a wood frame can be attached to the door leaf to attach the finish. To do this, holes are drilled in the right places in the metal.

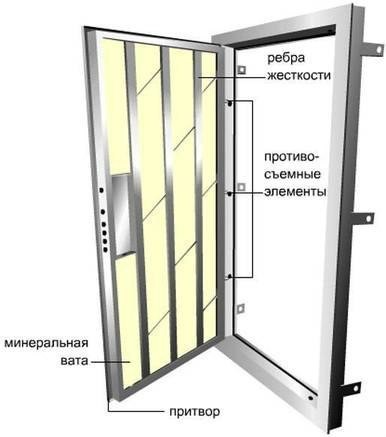
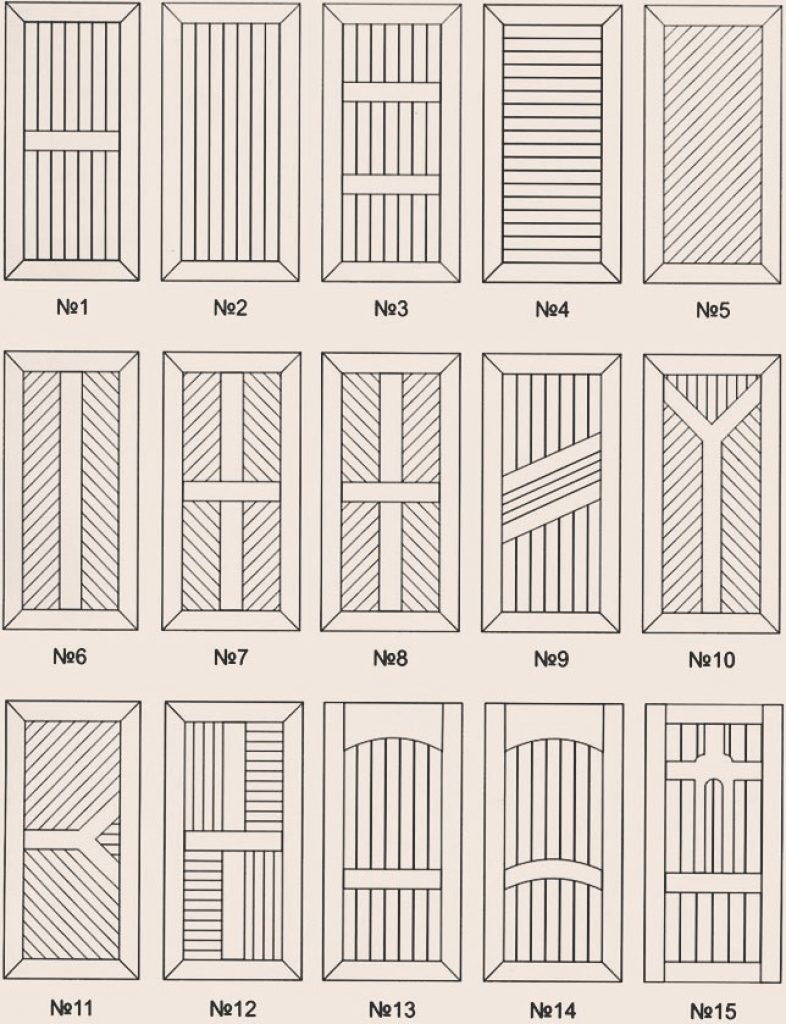
The design of a single-leaf metal door
 Read also: Do-it-yourself furniture and other wood products: drawings of benches, tables, swings, birdhouses and other household items (85+ Photos & Videos)
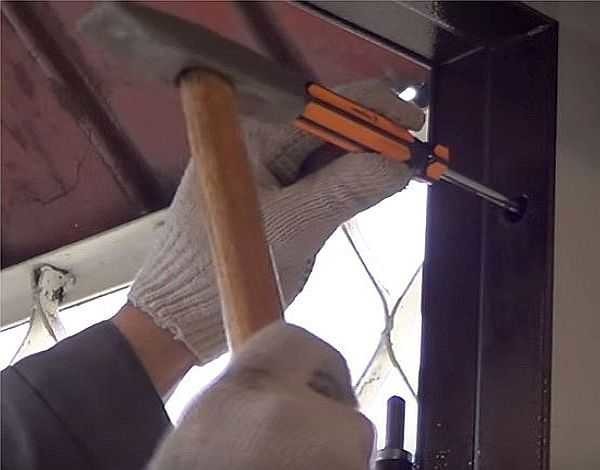
Connecting the door leaf to the frame
- Just as in the previous assembly, the seams should first be "grabbed" by welding. The final connection is carried out only after checking the correct installation.
- We drill holes for inserting a key and, if necessary, an eye.
- To attach the hinges, it is necessary to deviate from the bottom and top of the door by 20 cm.
- We raise the door (it is more convenient to do this together).We fasten the canopies in such a way that the lower elements (pins are attached to them) are attached to the box, and the upper ones, called reciprocal ones, to the door leaf.
- All hinges must be located strictly along one axis. This is not easy to do - you will have to repeatedly measure. Otherwise, in case of an error, the door will warp.
- It is better to hang a massive door not on 2, but on 3 hinges.
- Lubricate them immediately so that the door opens easily and does not creak.
Entrance metal structure
 Read also: Do-it-yourself construction and arrangement of a summer kitchen in the country: projects, design, device, with barbecue and barbecue (60+ Photos & Videos) + Reviews
 Warming
Insulate iron door welded from metal can be expanded polystyrene, polystyrene or mineral wool. When using polystyrene, 4 cm thick sheets are sufficient. Too much density of the material is not needed - because the load on it will be small. You will need to purchase 4 square sheets 1 m wide.
When buying polyurethane foam, choose a composition with minimal expansion, otherwise the foam will just squeeze out. We apply it around the perimeter of the frame, stepping back a little from the edges. Next, the foam is laid. All seams between the sheets, the gaps between the foam and the metal corner should also be sealed with foam. You can replace it with Moment glue or any other suitable adhesive composition.
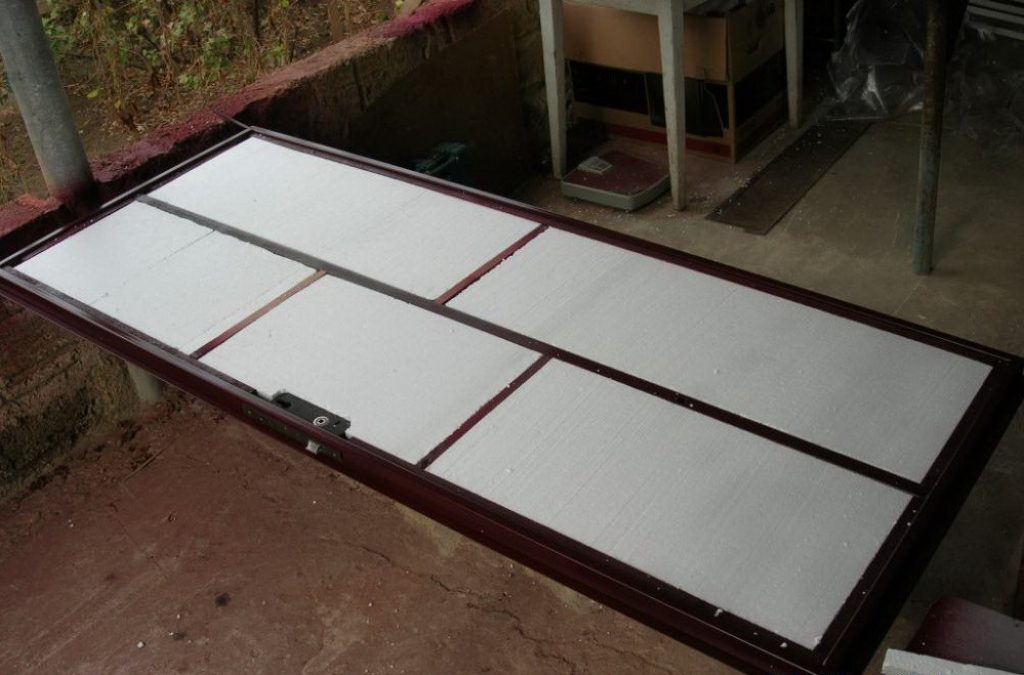
Insulation installation
Mineral wool or stone wool has a significant disadvantage These materials are capable of absorbing moisture. A metal door with a similar type of insulation will quickly rust. For apartment buildings, this is not critical - there is not so much moisture in the entrances. But it is highly not recommended to insulate the street door with mineral wool.
If in the future the door will be finished with a self-adhesive film, it is not worth covering the insulation with a chipboard. Any irregularities will be immediately visible. Replace chipboard with furniture moisture-resistant plywood. It is attached to the metal with self-tapping screws through pre-drilled holes.
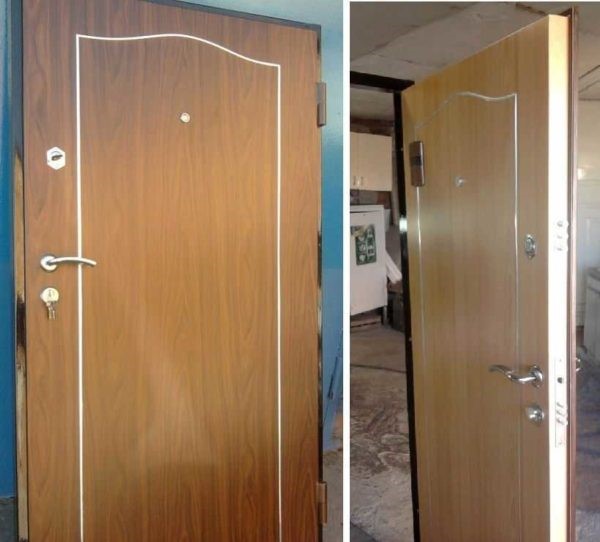
Metal door, pasted over with a film, with molding trim
 Read also: We build a house for a cat with our own hands. Interesting ideas and step-by-step instructions: from plywood, cardboard boxes, fabric. Dimensional Drawings (120+ Photos & Videos)
 Inserting a metal door into an opening
Installing a massive metal structure alone is unrealistic. You will need an assistant.
Dismantling the old door
- Before installing iron doors, remove the old door leaf from the hinges. To do this, put a crowbar under its bottom, lift the structure and remove it from the hinges. Some types of loops have to be unscrewed. This must be done starting from the bottom.
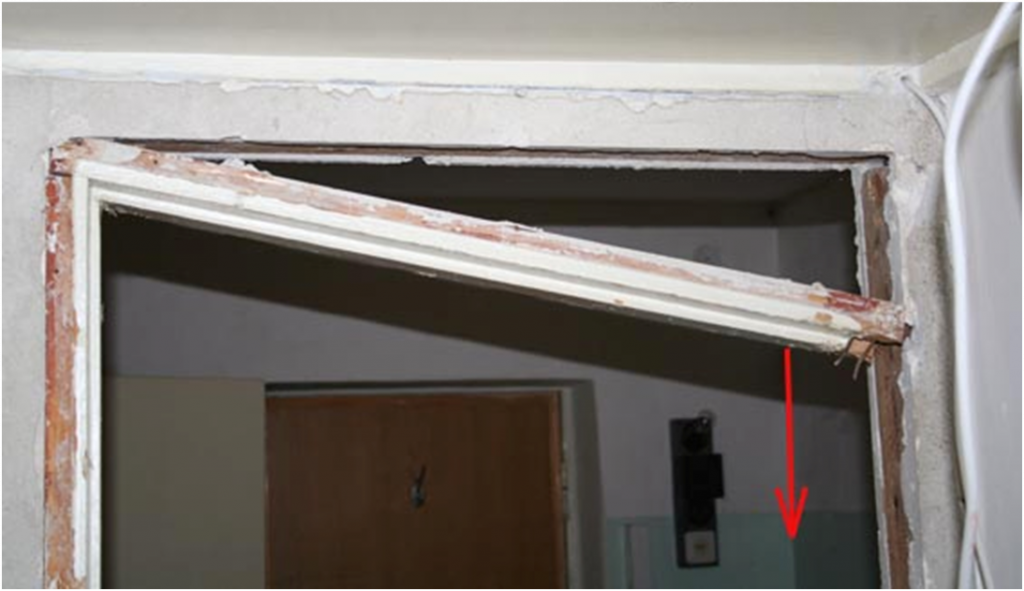
- At the old metal door, after dismantling the slopes, it is necessary to find the places of its fastening. For this, plaster is knocked down in the area of \u200b\u200bthe intended anchors or reinforcement. All metal parts are cut off with a grinder, and then the old box is pulled out.
- A regular wooden box is easier to remove. It is enough to cut the side racks in the center, and then, prying them with a crowbar, pull them out of the opening.
- All fallen off pieces of brick and putty should be knocked down. The resulting voids are sealed with new bricks, and then covered with cement mortar. Small potholes will later fill with foam, so you can leave them alone for now.
- Significant protrusions are knocked down with a hammer or cut off with a grinder.
- Pay attention to the condition of the threshold. In old houses, wooden beams are installed in these places. If it is damaged, the beam needs to be replaced. You can check its safety with an awl. Insert it into the wood and try to loosen it.If this can be done easily, the timber has fallen into disrepair.
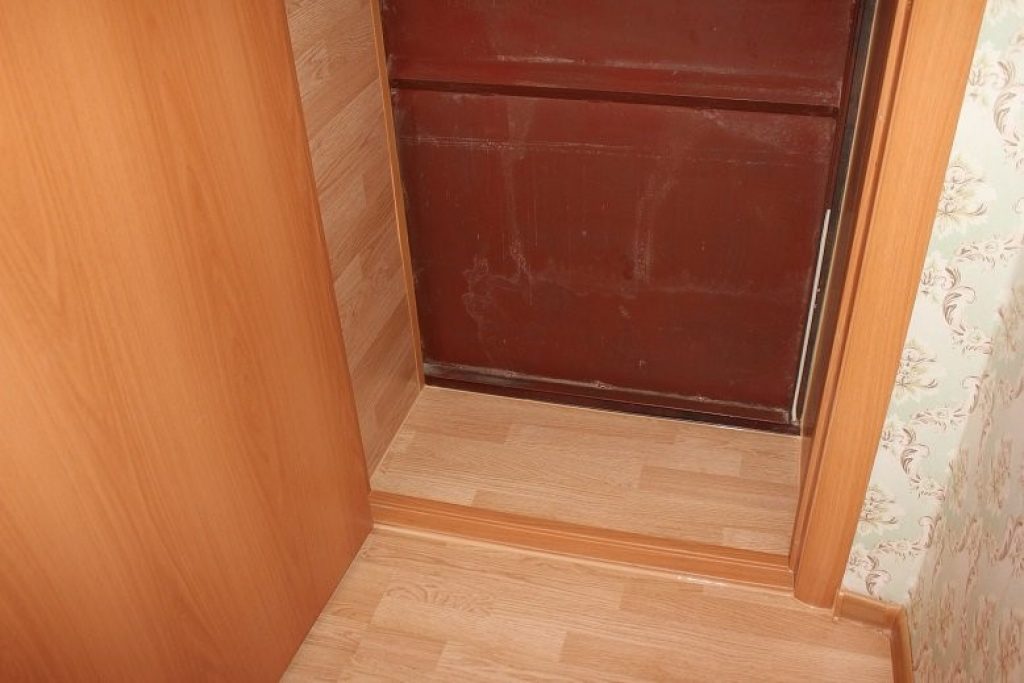
Removing the door frame
door insert

Door fixing methods
Installation of anchors
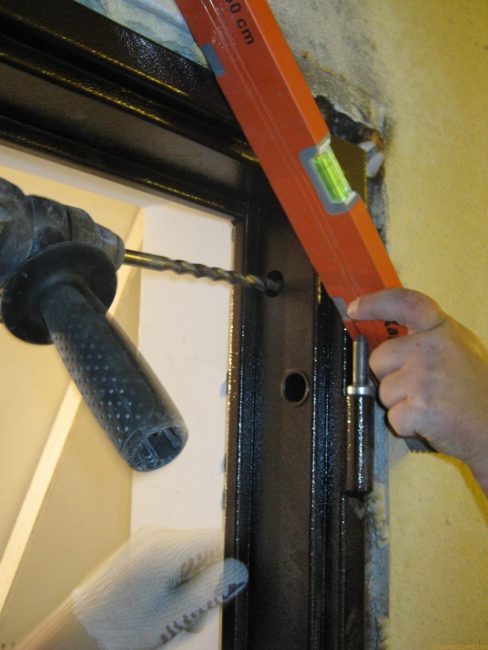
The frame must be clearly level
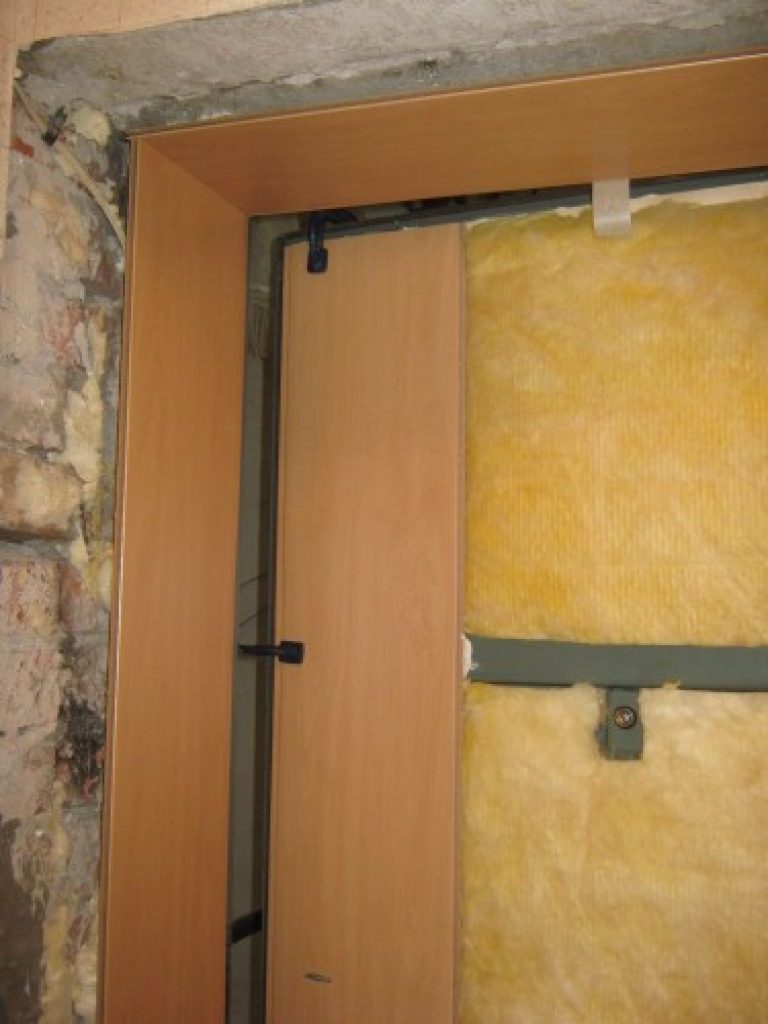
Due to strong shrinkage in wooden houses doors are not attached to the wall itself, but through a pigtail (beam) or casing (assembled box). But even in this case, it is possible to mount the front door to the house only a year after the construction of the log house.
To insert a structure into a wall of foam or aerated concrete, it is required additional installation of a metal frame according to the size of the doorway. She will stay in it due to emphasis. Mounting holes in this case will be located in the metal jumpers of the frame.
 Read also: We make vertical beds with our own hands: the best ideas of 2018. For vegetables, berries, herbs and flowers (65+ Photos & Videos) + Reviews
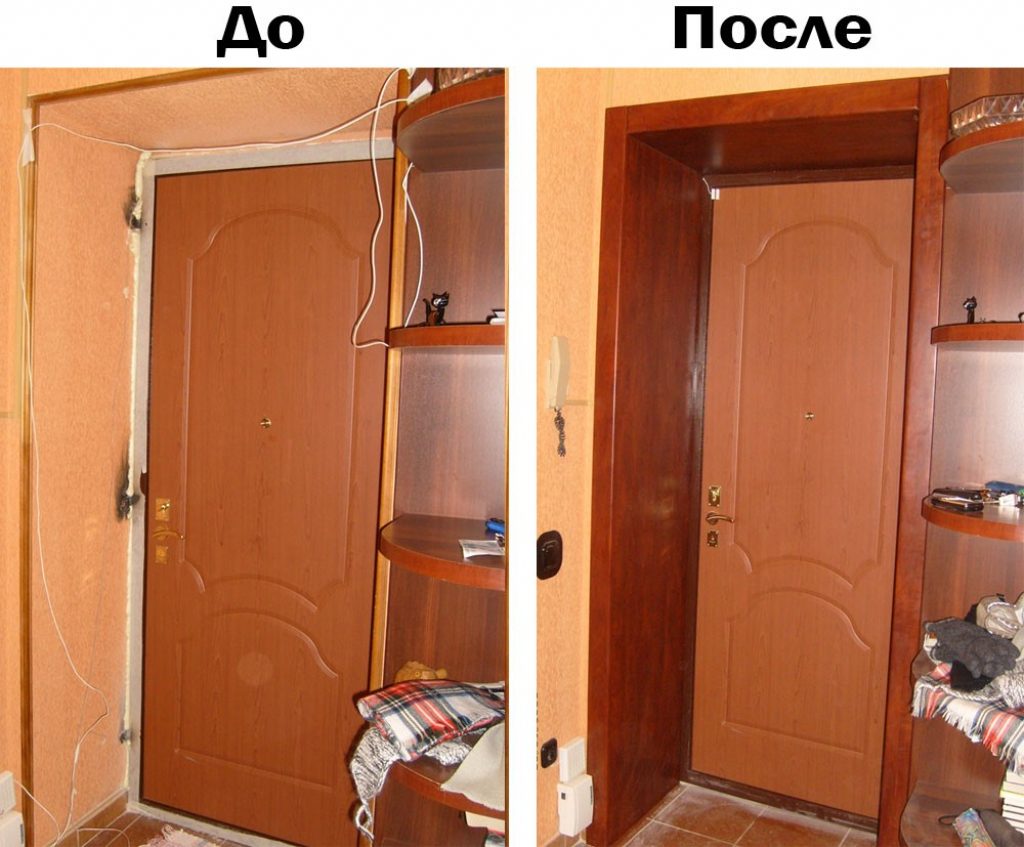
 Slope fixing
The appearance of our door is still far from ideal - Mounting foam sticks out of all the cracks, pieces of downed plaster. It is required to bring the input structure to mind by making slopes.
Certainly, doorway you can just plaster it. But it is quite difficult to perfectly align its corners. Much easier to install slopes - finish the part of the wall framing the door frame with panels, for example, from MDF, laminated or veneered chipboard.
To do this, it is enough to correctly mark, cut out the parts and attach them to the wall.
There are three ways to install slopes:
- with mounting foam
- on plaster mortar or a special adhesive called liquid nails
- on a pre-assembled frame
Slope fixing
After fixing the slopes with self-tapping screws or gluing with liquid platbands are fastened with nails. Self-tapping screws are sunk a couple of millimeters deep, and then sealed with putty, matched to the color of the platbands.
 Read also: Building a garage with your own hands: details about each of the stages. Description, step-by-step instructions, drawings of the roof, inspection pit, interior arrangement (75 Photos & Videos) + Reviews
 Entrance door sill
According to the standard, its height should be 30 mm. But in most cases, this parameter is not adhered to. The threshold can be made a little lower - about 20 mm. Too high will interfere with the entrance or dragging heavy bulky items into the house. Yes, and stepping over a high threshold is not very convenient.
You can make such a design not only from metal, but also from wood, stone or plastic.
- All debris and dust must be removed from the installation site.
- After taking measurements and cutting in the sills, grooves are prepared according to the size of the door frame.
- Holes are drilled in each of the parts for inserting screws.
- You should not immediately fasten the threshold - you just need to grab it with self-tapping screws and check if it interferes with opening / closing the door.
- If it moves freely, without effort, we finally attach the threshold, and close the locations of the screws with the help of special pads, which can be purchased at a furniture store.
Threshold for entrance door
 Read also: Dog bed: a description of the key points, step-by-step instructions for making your own hands (140+ Photos & Videos) + Reviews
 Finishing
The metal iron door looks too rough, therefore, it is better to finish it with veneer, MDF, laminate, self-adhesive film or staining with special paints. Chipboard is not suitable for these purposes - even with internal lining, after a year the sheets will begin to delaminate.
Special powder paints look very decorative, which are applied by spraying. However, their cost is quite high. Laminate finishing is allowed only in apartment buildings - this material is too afraid of moisture.
Laminate installation
Finishing the iron door can be done with MDF panels - they are produced according to the size of the door in the form of solid overlays, called cards, including natural wood veneer. You can also order panels in your own sizes.
For quite reasonable money, you will receive elite doors, outwardly indistinguishable from products, for example, from natural oak. Very good quality in MDF panels from Belarusian and domestic manufacturers.

Types of MDF overlays
- When finishing a metal door with clapboard, a special frame will be required. In principle, wooden planks can be attached to it with liquid nails or with the help of special fasteners - kleimers. But still, the wireframe method is considered more convenient. Thermal insulation material can be additionally laid under a wooden frame made of narrow timber.
- After cutting the wooden parts, the cuts are carefully sanded. To protect the wood from moisture penetration and premature destruction, it is treated with a special impregnation and dried well.
- The door leaf must be removed and all interfering elements must be unscrewed from it - a handle, locks, a peephole. The sealing tape must also be removed.
- After fastening to a metal door (for this, holes are prepared in it) of a wooden frame, they begin to install the lining. Planks must be as tightly joined to each other. The step between the fasteners is 15 cm.
- It will not be very convenient to work on the floor - it is better to lay the canvas on a table or workbench.
Clapboard door trim options
We described in detail the entire process of manufacturing such structures from start to finish. – from welding to installation and finishing. A detailed video of making iron doors with your own hands can be seen at the following link:

VIDEO: OWN HANDS IRON DOOR FROM PROF PIPE
Iron door: how to make, insulate and install with your own hands. Step-by-step instruction as well (Photos & Videos)


I made the doors myself, although I have a completely different profession. as it turned out, this is not difficult to do - the main thing is to cut it to size, and then weld it by welding. He blew out foam, then put the platbands - it does not blow.