
The fence of the garden plot does not apply to complex structures, so you can make the simplest fence in the country with your own hands. The choice of material for it depends only on the funds allocated for these purposes and personal preferences.
Content:
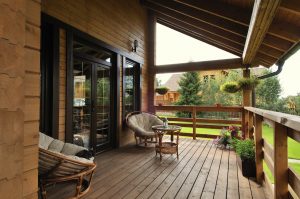 Read also: Terrace attached to the house: 150+ Best photo ideas | Do-it-yourself step-by-step arrangement
Basic requirements for fencing a garden plot
The fence in the country performs several functions at once. When separating a site from a street or road, it must provide reliable protection from prying eyes and intrusions from the outside. If the fence separates your territory from the neighboring one, then it is not necessary to make it capital - it is enough just to mark the border.
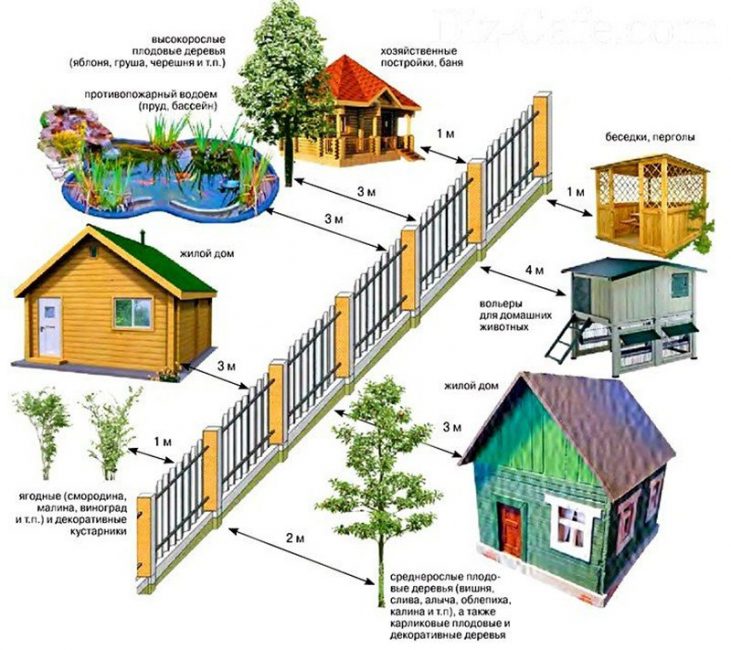
Rules for building a summer cottage
According to SNiP, the height of the fence delimiting the site and the street is up to 2 m. It can also be made solid, but only if this was allowed by the decision of the gardeners' meeting.
You do not have the right to shade the neighbors' plot - a high fence should only be transparent, mesh or lattice.
A continuous fence between sites is allowed to be erected only in the following cases:
- if its height does not exceed 0.75 m
- you have obtained the written consent of the neighbors
 Read also: Veranda attached to the house - expanding the living space: projects, tips on how to create your own hands (200 original photo ideas)
 How to choose a fence. Types of fences
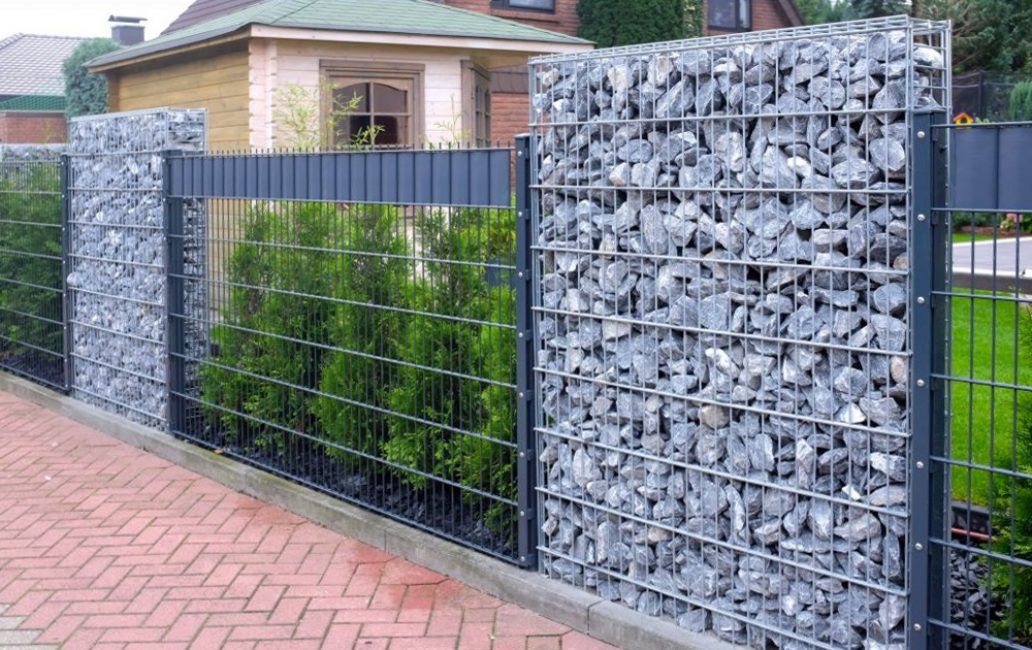
Combined decorative fence
There are many types of fencing. You can choose any of them:
- wooden fence: inexpensive fencing that can last 7-10 years; decorated with cuts along the entire length of the planks or only along the top, covered with paint or stain under precious woods, it looks quite solid and soundly
- fence - "braided" from the boards small thickness up to 20-25 mm
- metal fence: painted in different colors, from a distance it is little different from wood, but its service life is higher
- thick-walled polycarbonate: its translucent sheets transmit light well, such structures will be quite appropriate even next to the beds
- forged or welded metal: more expensive massive and very durable structure; high and its aesthetic properties; if you know how to work with welding, you can create a real work of art on your site
- brick or concrete on a strip foundation
- pole with spans from chain-link mesh
- braided from young flexible willow branches, hazel (considered the most suitable material for weaving), aspen, willow, etc .; you can also imitate wattle using plastic PVC rods
- green hedge: it looks very decorative, but it will take some time to grow it.
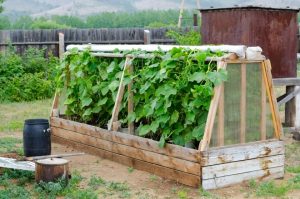
 Read also: Making a greenhouse with your own hands from a profile pipe and polycarbonate: a complete description of the process, drawings with dimensions, watering and heating (Photo & Video)
Support installation options

Mounting options for fence posts
Metal support posts are immersed in the ground in several ways:
- by driving into the ground
- screwing into the ground: for this, screw metal piles are used, one end of which looks like large screws
- by means of a backfill: with filling the gaps between the ground and the pillar with large rubble or stones
- concreting: it can be either full or partial, that is, part of the pile is driven into the ground, and its upper part is concreted.
Pits for backfilling or concreting are best prepared with a drill. In this case, the soil will crumble less, and the fence will be much stronger. It will be easier to drive piles into the ground if sharp metal stakes are first welded to their ends.
If the site is located in a swampy area, and moisture has appeared at the bottom of the pit, lower a thick polyethylene bag into it (such bags are used for large debris). Pour the solution into it.
 Read also: How to make flower pots with your own hands: outdoor, indoor, hanging | Step by Step Charts (120+ Original Photo Ideas & Videos)
 Does a fence need a foundation?
When building lightweight structures - fences made of picket fence, polycarbonate or chain-link mesh - it is enough to use strong metal or wooden supports of sufficient thickness. They can be further strengthened by pouring concrete.
Strip foundation with brick finishing of metal supports
But heavy brick, forged or concrete structures require the mandatory construction of a strip foundation. Otherwise, with temperature fluctuations or in the process of washing out with sewage, significant subsidence of a heavy fence is possible.
Foundation for the fence can be:
- tape shallow: metal supports are installed in it simultaneously with pouring
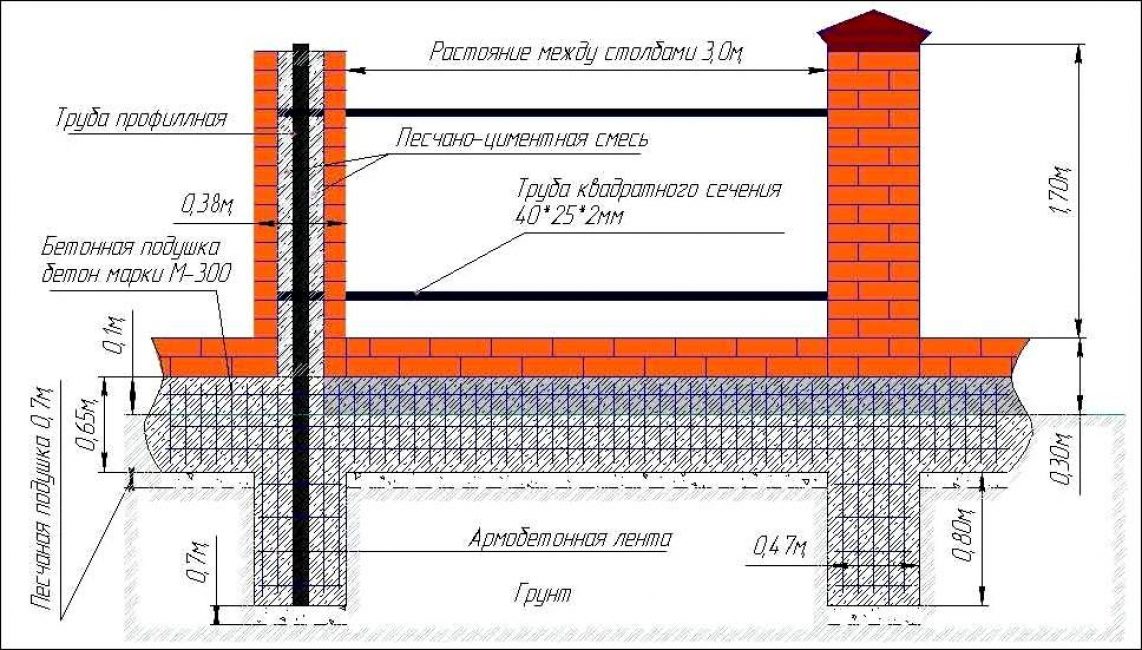
- strip-columnar: in this case, not only the foundation itself is concreted, but also the columnar supports; ideal for heavy structures, able to withstand even heavy loads
- columnar: only pits with supporting pillars installed in them are poured with concrete
A light, but “sailing” fence, for example, made of corrugated board, is best installed on a strip foundation of shallow depth to protect against wind.
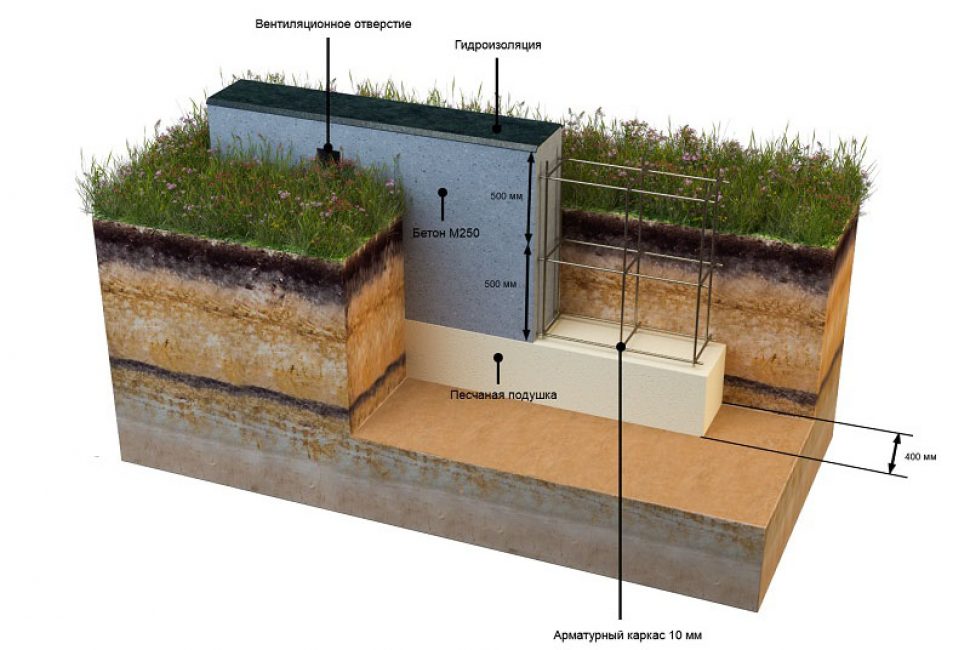
Tape shallow foundation
Its depth depends on the weight of the structure. For a fence made of welded metal, the depth of the foundation is 80-100 cm. Lighter fences can be equipped on a foundation with a depth of only 50-60 cm. It is also necessary to take into account the thickness of the sand and gravel cushion - it is 15-20 cm.
Strip foundation device
The proportions of the solution for the foundation depend on the brand of concrete. When using concrete M200 - 1: 2.5: 4.2. We give proportions by volume of materials cement / sand / crushed stone. Note that some sources may give proportions by weight. When using M300 concrete, the volume proportions will be different - 1.0: 1.7: 3.2.
Column Foundation
Such a base is able to withstand the weight of not too heavy structures. It takes much less cement mortar, and it takes a minimum of time to create it - it is enough to prepare the required number of pits, install supports in them and fill the holes with concrete.
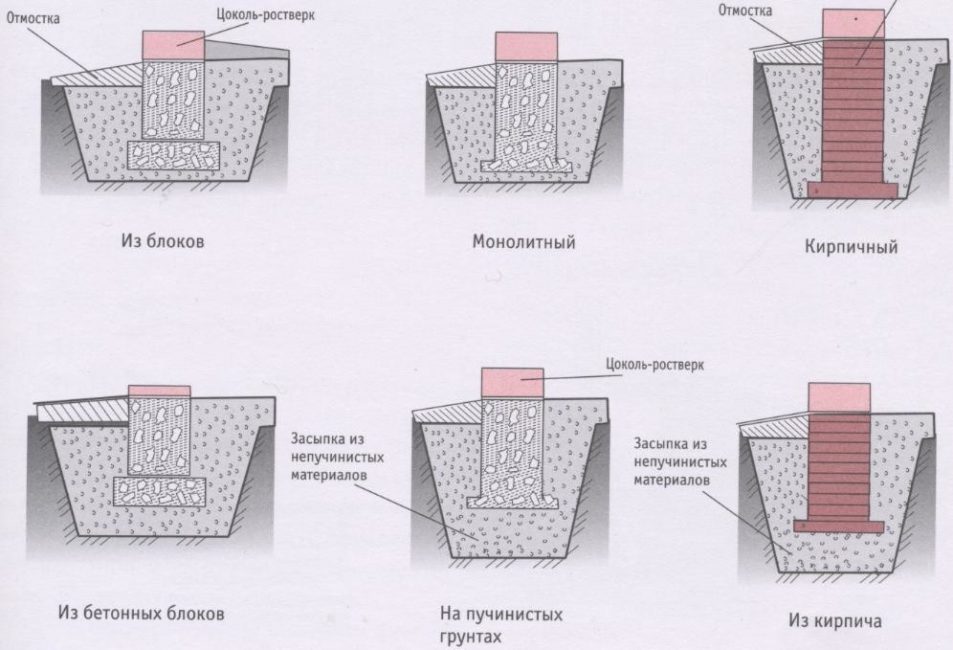
Types of columnar foundations
Heavy clay soil is difficult to drill. To facilitate the process, pour water into shallow pits for a couple of hours. Drilling will be much easier.
 Read also: How to make a patio in the country with your own hands: a variety of design options, decoration and arrangement (85+ Photo Ideas & Video)
Wooden picket fence
A picket fence is called strips of the same width, attached to transverse guides (lags or veins). In recent years, it has been made not only from wood, but also from metal. So, we will tell you how to make a fence in the country from a picket fence with your own hands.
Installation of supports
Before installation of any type of fencing, the site is completely cleared of sod and leveled. The roots of shrubs and trees are removed - sprouting, they can damage the structure.
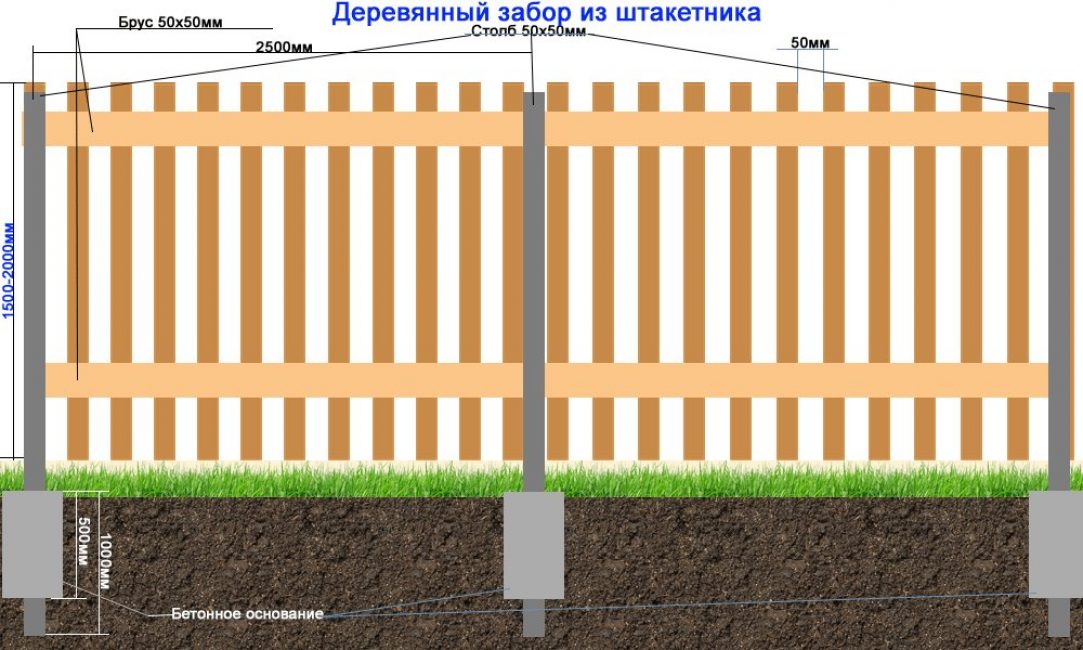
picket fence scheme
In the places where the supports are located, stakes are hammered. It is more convenient to make the distance between them equal to the length of the veins. It is not necessary to do it more than 3 m - with a large distance between the supports, the structure will turn out to be fragile.
Distance between pickets
It is not strictly regulated and can be anything. A solid (deaf) fence made of planks tightly adjacent to each other is a good protection against piercing wind and prying eyes. However, such a fence will not let in sunlight, which is bad for plants.
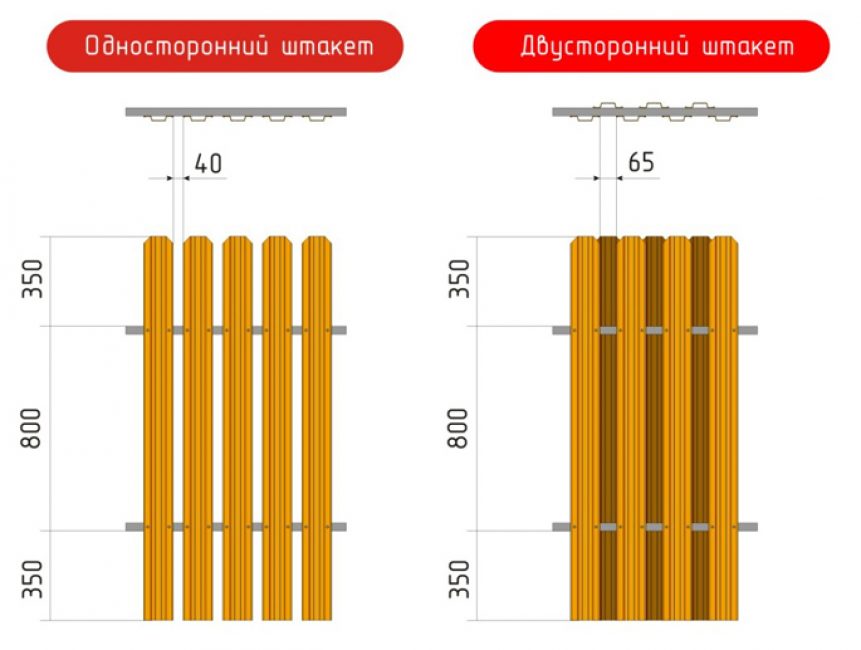
The scheme of the distance between the fences
With a sparse fence, the average distance between the fences is equal to half the width of the bar. A minimum gap of 20 mm can be left between the pickets.
Combined filling is also used - the spans of the fence that delimits the street and the plot are made solid. On the borders with neighboring areas, full shading is prohibited, so the fence here is made sparse.
Picket mount
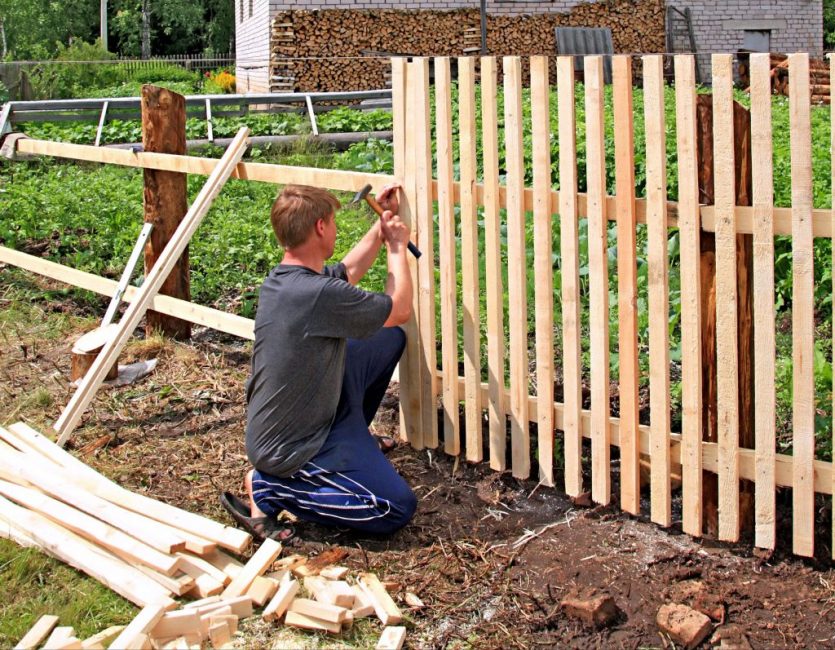
Installation of picket fence on wooden poles
Paint or stain the fence after the installation is completed.
Fence on uneven terrain
If the height differences on the site are significant, and it is unrealistic to level them, the ideal option in this case is a concrete base filled with ledges. "Steps" can be arranged and each of the spans, when each of them is attached to the supports just below the previous one.
In this way, even significant slopes of the site can be compensated.
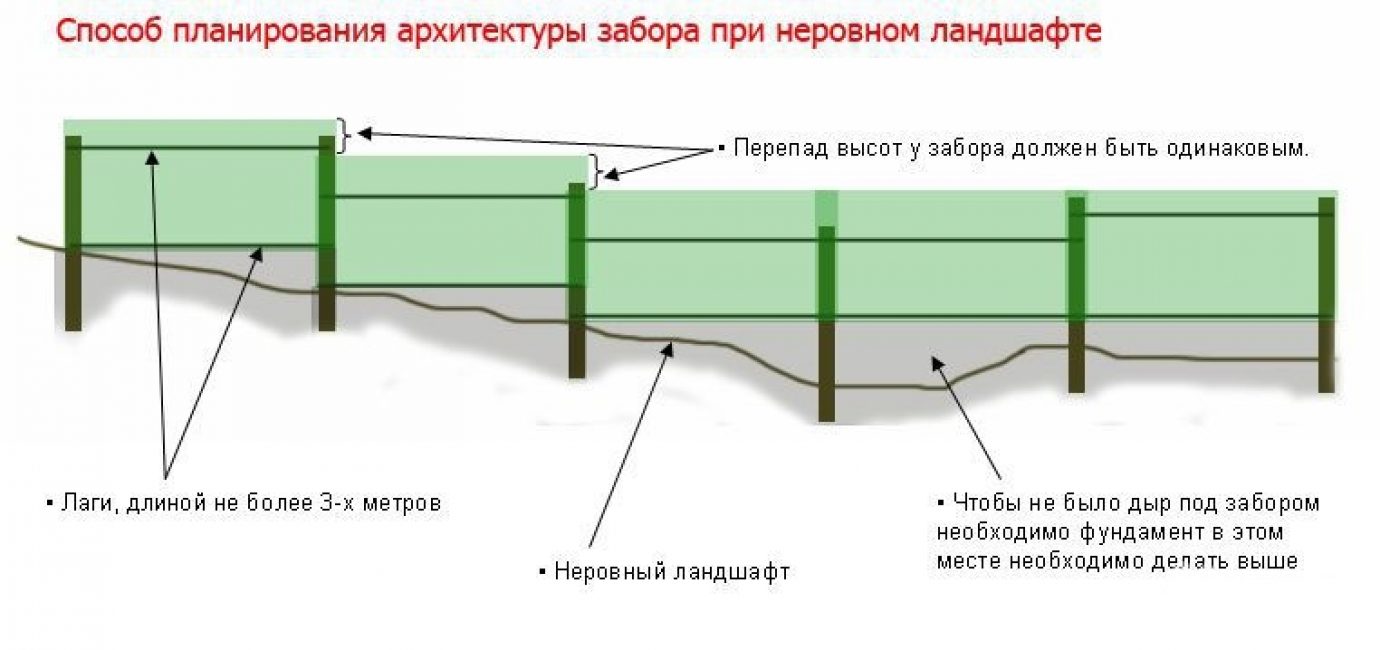
Fencing device for uneven terrain
Sometimes a method is used in which the top of the fence has a single level, and the bottom is mounted from pickets of various heights. But such fences look less aesthetically pleasing.
 Read also: How to make a children's house with your own hands: from wood and other materials. Dimensional drawings | (80 Photo Ideas & Videos)
 Metal picket fence
A more modern version of picket fences are designs in which wood is replaced with more durable and wear-resistant metal strips. Service life - up to 30 years.
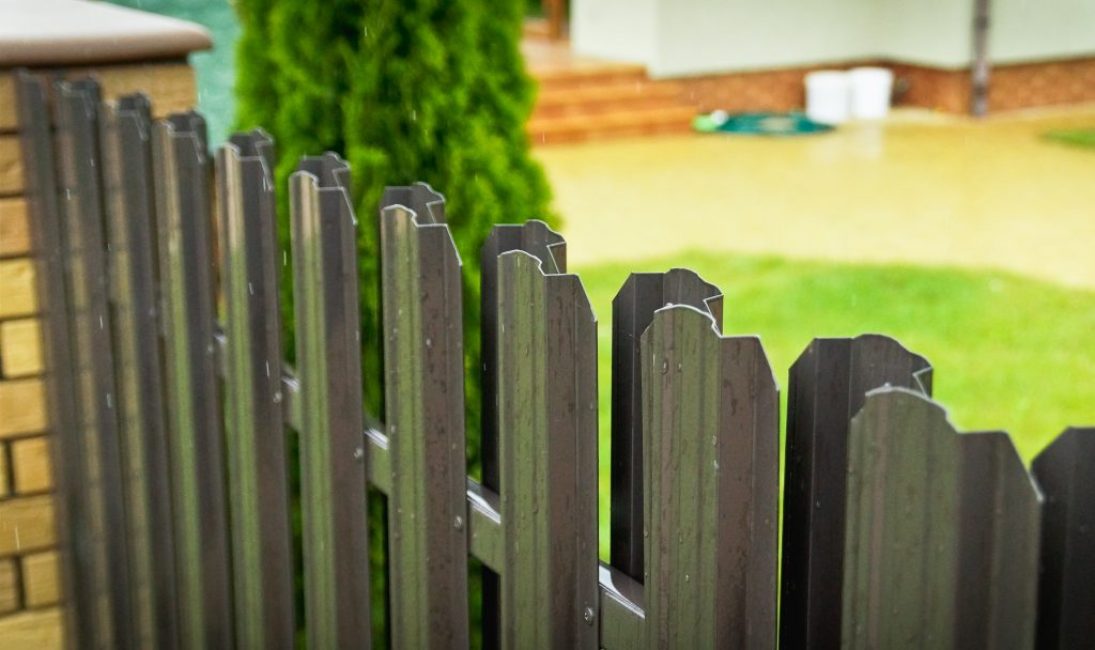
Metal slats for a fence are often called a euro picket fence.
Their installation is quite simple and in many ways similar to the installation of a classic wooden fence.
Consider step by step how to make a fence in the country from a metal picket fence:
 Read also: How to make a greenhouse with your own hands: for seedlings, cucumbers, tomatoes, peppers and other plants. From polycarbonate, window frames, plastic pipes (75 Photos & Videos) + Reviews
 Fencing made of corrugated board
Such a fence is solid, so it can only be used to protect the garden plot from the side of the road. It is inexpensive, but looks quite presentable.
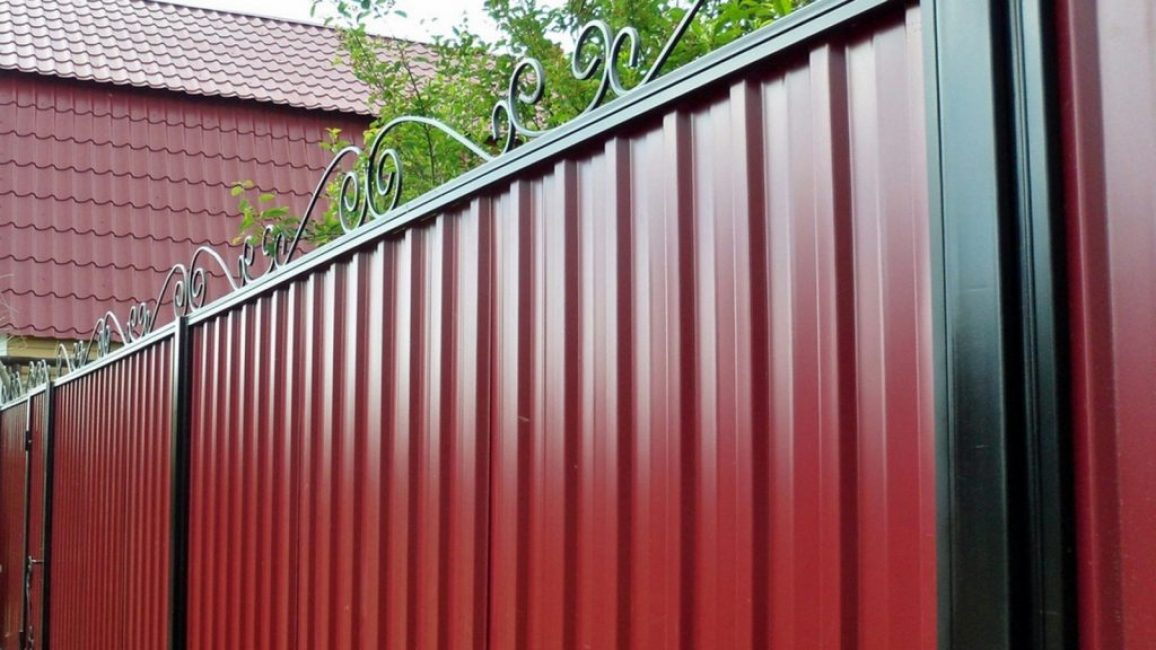
One of the options for fencing from corrugated board
Plus, corrugated board has a considerable service life - up to 20-30 years. Manufacturers claim that when coated with polyester, this period increases even more and amounts to 50 years.
We will describe how to make a fence in a summer cottage from corrugated board:
In places where the corrugated board comes into contact with the ground, corrosion will develop rapidly. Therefore, it is better to put such fences on the foundation. It is desirable to provide a concrete support even with uneven site landscape. In this case, the base can be arranged in the form of neat, even ledges.
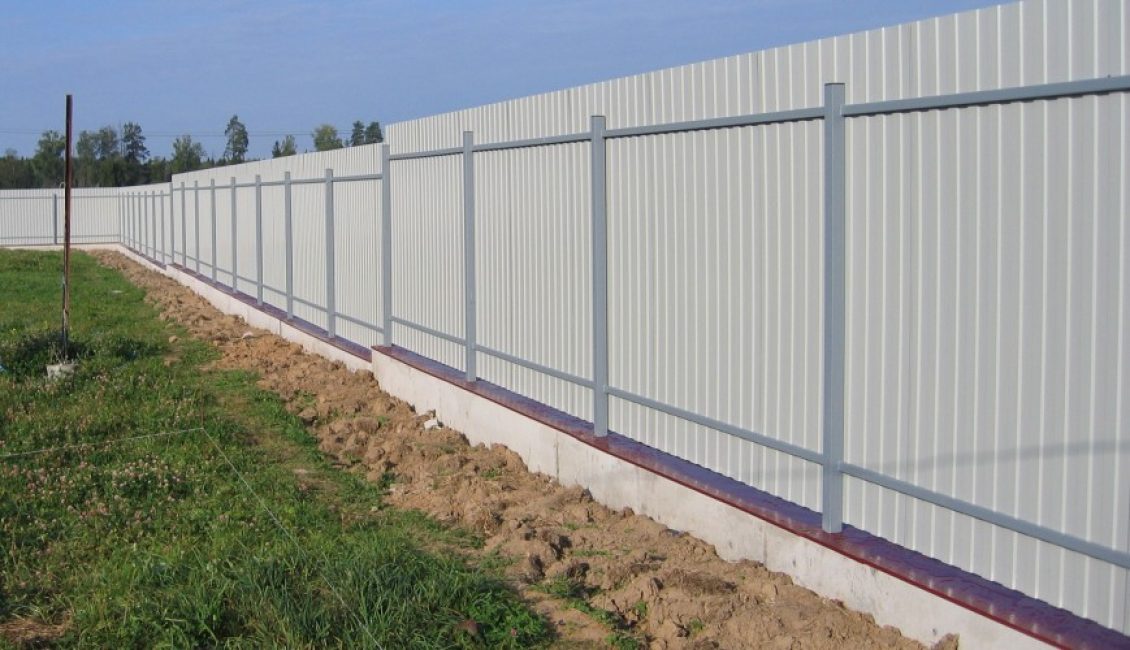
Fence from a profiled sheet on a strip foundation
It is not necessary to deepen the foundation for the fence - 30-40 cm is enough. Its width is selected depending on the size of the supporting pillars and the type of fence. When preparing the pit, it is necessary to make an allowance of 10-15 cm to the height of the sand and gravel cushion, which will help protect against moisture and freezing.
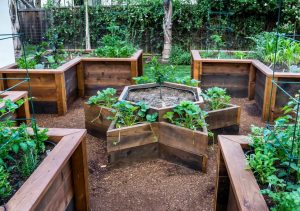 Read also: How to make and decorate beautiful beds in the country with your own hands: simple, tall, smart. For flowers and vegetables. Original Ideas (80+ Photos & Videos)
 Polycarbonate fence
Unlike corrugated board fences, cellular polycarbonate is able to absorb noise and dampen sounds. On a site with a fence made of this material, you will be guaranteed a quiet and peaceful environment.
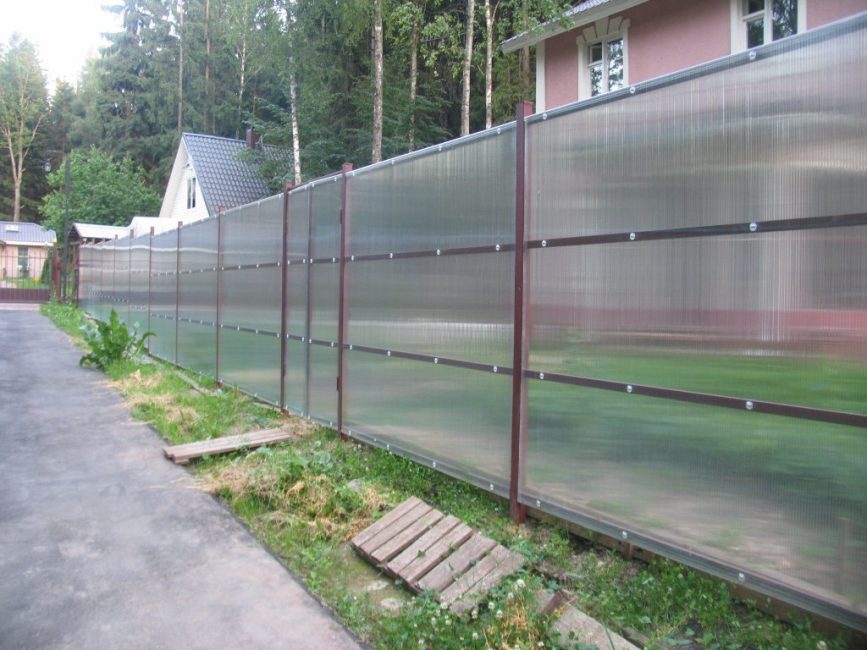
Translucent polycarbonate is also good because it is able to transmit light, and the fence from it will not obscure the plants.
With it, you can completely hide the territory of the garden plot from prying eyes - thanks to the honeycomb structure, it combines the advantages of translucent and deaf materials.
Polycarbonate is light enough, easy to cut, and with it you can build structures of the most unusual shape. It looks great in combination with metal forged elements.
Polycarbonate fence in stages
If thin-walled polycarbonate is used in the construction of greenhouses, then for the construction of a fence it is necessary to purchase sheets of maximum thickness - they are usually used in the construction of sheds or roofs of pavilions.
So, we tell how to build a polycarbonate fence:
Polycarbonate sheets are always covered with a protective film on top. In order not to damage or scratch the material, it is allowed to remove it after the installation is completed.
![[Instructions] How to make beautiful and unusual wall shelves with your own hands: for flowers, books, TV, kitchen or garage (100+ Photo Ideas & Videos) + Reviews](https://iherb.bedbugus.biz/wp-content/uploads/2018/05/19-6-300x213.jpg) Read also: [Instructions] How to make beautiful and unusual wall shelves with your own hands: for flowers, books, TV, kitchen or garage (100+ Photo Ideas & Videos) + Reviews
Read also: [Instructions] How to make beautiful and unusual wall shelves with your own hands: for flowers, books, TV, kitchen or garage (100+ Photo Ideas & Videos) + Reviews Wire mesh fencing
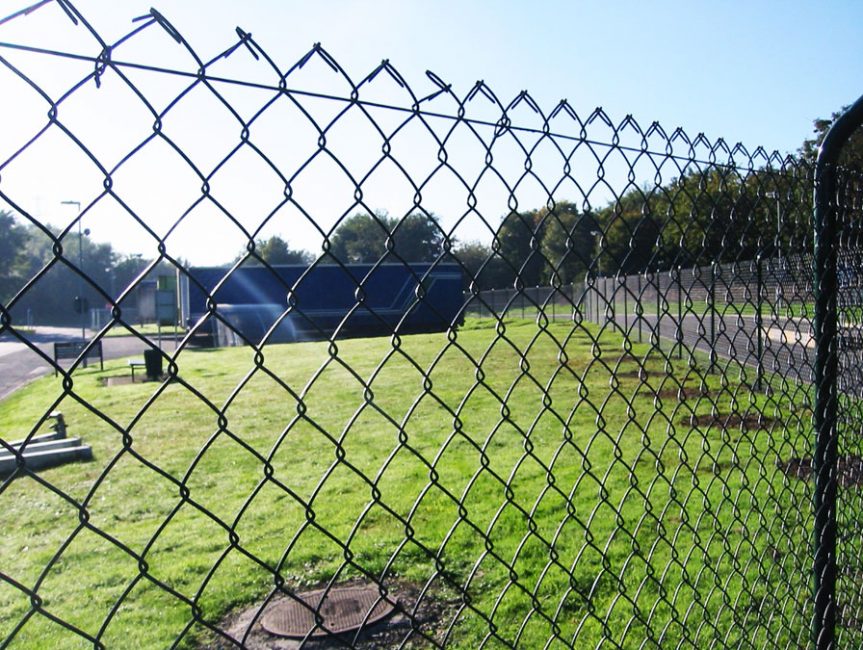
Such a fence can be used not only as a fence. They are often enclosed in aviaries, poultry houses or other animal pens. It is better to use a chain-link with a wire thickness of 1.8 mm. Such a fence will not sag, and it will not be easy to break it with ordinary wire cutters.

Chain-link mesh for fencing
The metal mesh will easily let the sun's rays into the area, and even right next to the fence it will be possible to plant any kind of plants. The service life of a thick wire fence mounted on metal supports is up to 30 years. In case of sagging, the mesh can be easily tightened, giving the structure its original appearance.
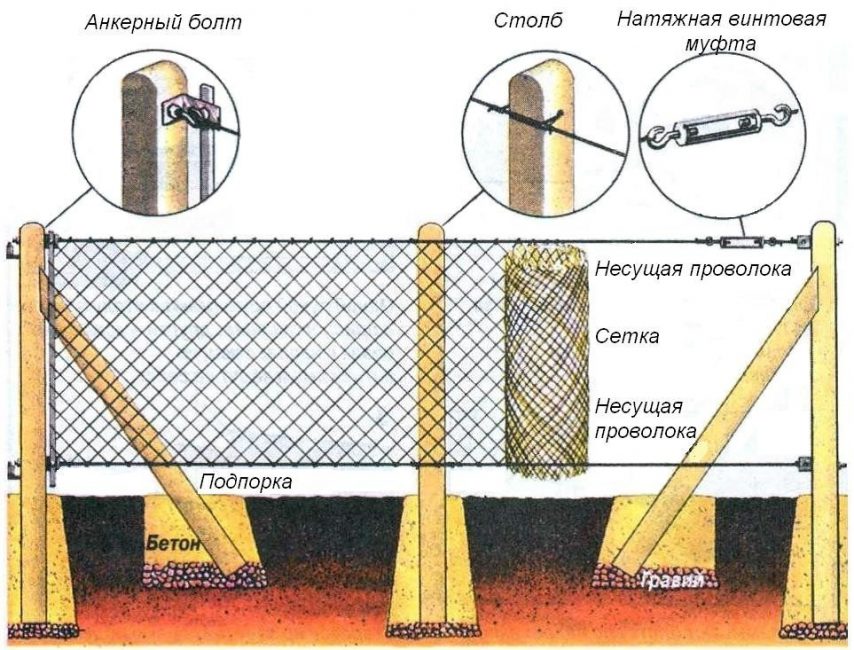
Chain link fence. Main stages of work
Using Wire to Tension Mesh
So that the chain-link mesh does not sag over time, a thick wire or cable can be run along the top and bottom of the fence. They will hold the structure in the desired position. They are fixed in advance, before the mesh is tensioned. The mesh can also be welded to a prefabricated metal frame.
How to stretch the chain-link mesh?
Mesh tension
 Read also: Do-it-yourself furniture and other wood products: drawings of benches, tables, swings, birdhouses and other household items (85+ Photos & Videos)
 Wicker fences
Finally, we will talk about another colorful type of decorative fences created by weaving young flexible shoots.. In principle, you can even make it from birch branches.
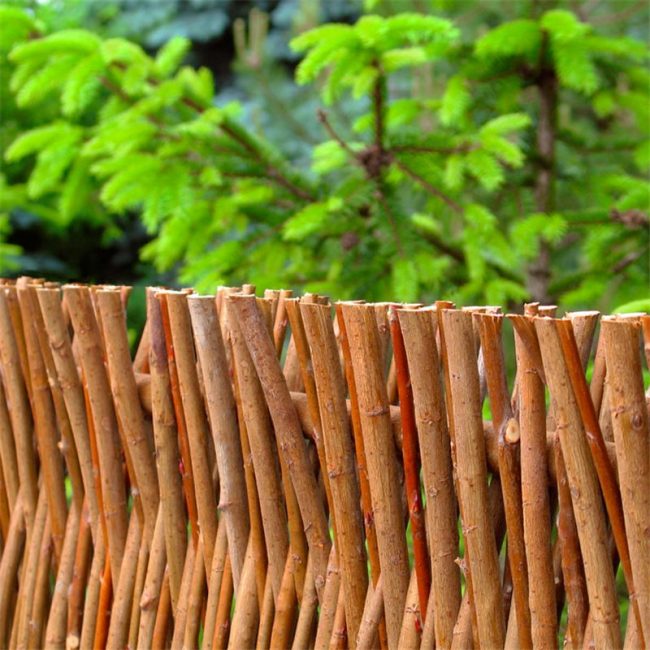
wicker fence
But still, willow, hazel, aspen, and also grapevine are considered the best material for weaving. A more modern option is weaving from peeled veneer or thin boards.
Harvesting branches
For weaving, it is desirable to use freshly cut branches of trees and shrubs with a diameter of 2-3 cm. It is desirable that they be more or less equal in size. If they were collected long before the start of work, the whips must be soaked for a couple of days in warm water. In this case, they will be more pliable and less fragile.
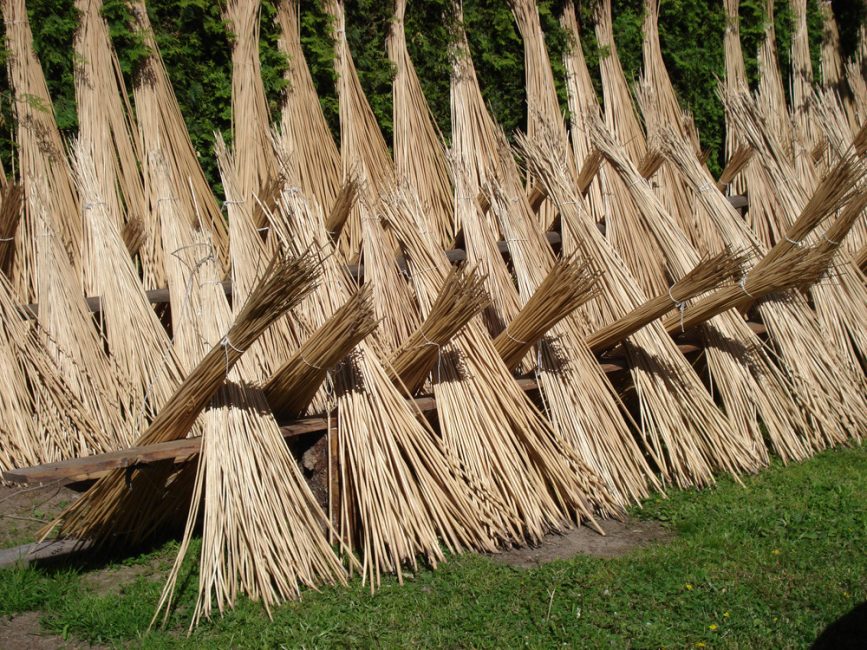
It is necessary to start harvesting raw materials in March or closer to autumn, in September
Branches must first be cleaned of bark. To do this, you need to acquire a special tool - a pinch. It can be made from a log with nails driven in and unbent at the ends. A classic pinch is a piece of solid wood with a hole in the center into which branches will be inserted.
Making a wicker fence in stages
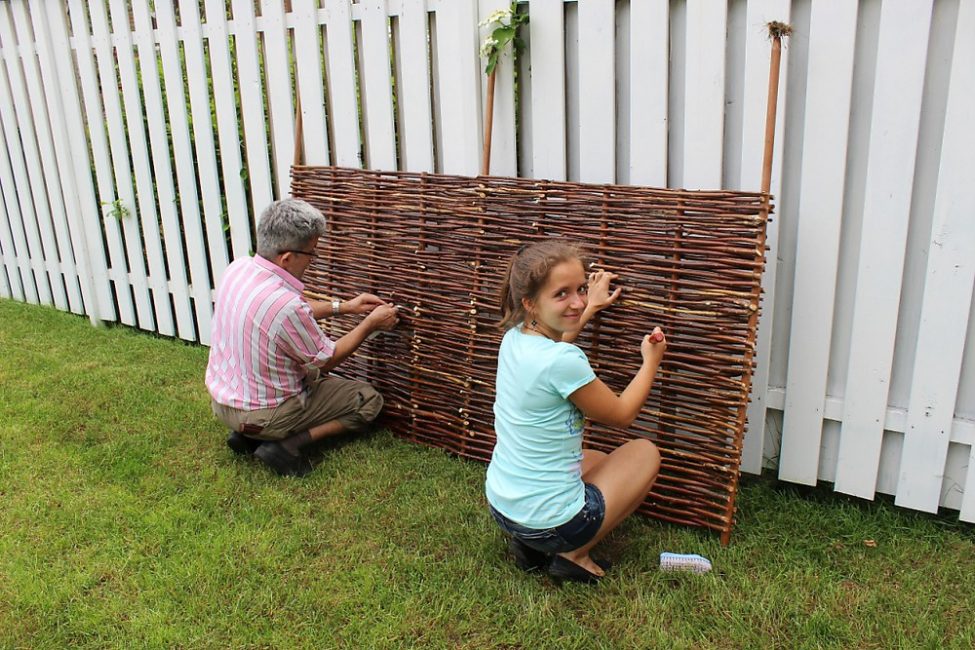
Even grandchildren can be involved in such an activity.
Each land owner has his own construction secrets, which they most often willingly share with others. We invite you to watch a video instruction for installing support pillars that, according to the author, can stand for centuries:

How to install a FENCE POST FOR AGES
How to make a beautiful and inexpensive fence in the country with your own hands: wood, metal and polycarbonate | (70+ Photos & Videos) + Reviews


