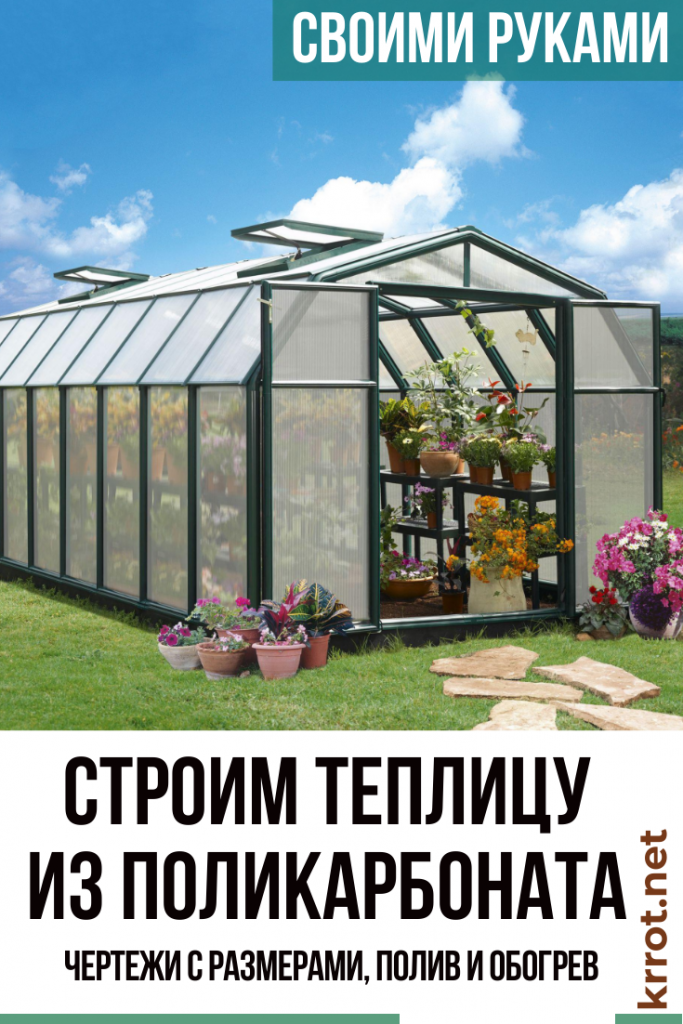
Making a greenhouse with your own hands from a profile pipe and polycarbonate: a complete description of the process, drawings with dimensions, watering and heating (Photo & Video)
To grow a quality crop, both professional farmers and amateur gardeners use closed greenhouses. A do-it-yourself greenhouse made of polycarbonate allows you to grow various crops at any time of the year and get a decent result.
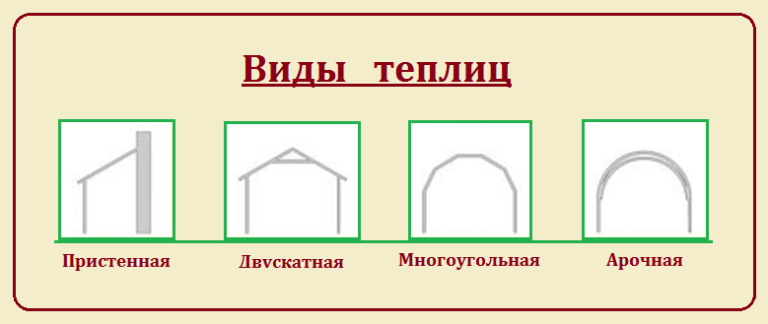
Based on the shape of the structure, polycarbonate greenhouses can be divided into 4 main types:
wall
gable
Polygonal
Arched
Greenhouse attached to the building
Wall greenhouses - a good option for building a greenhouse. The main advantage is the lower consumption of materials. One of the walls will serve as part of the house or another solid building.
In turn, wall structures can have a different location relative to the walls of the house.
Thus, three types can be distinguished:
Possible bay window option: in this case, the greenhouse will protrude from the general perimeter of the building. Occupies, as a rule, a small part of the wall;
Also, a greenhouse can fill the empty space between buildings.. With this option, the yard area is conveniently and functionally used;
A greenhouse that continues the main structure of the house, occupies the entire wall of the building and is the largest in terms of area among wall structures. Often, when drawing up a project before building a house, the location of a closed greenhouse or greenhouse is included in the drawing.
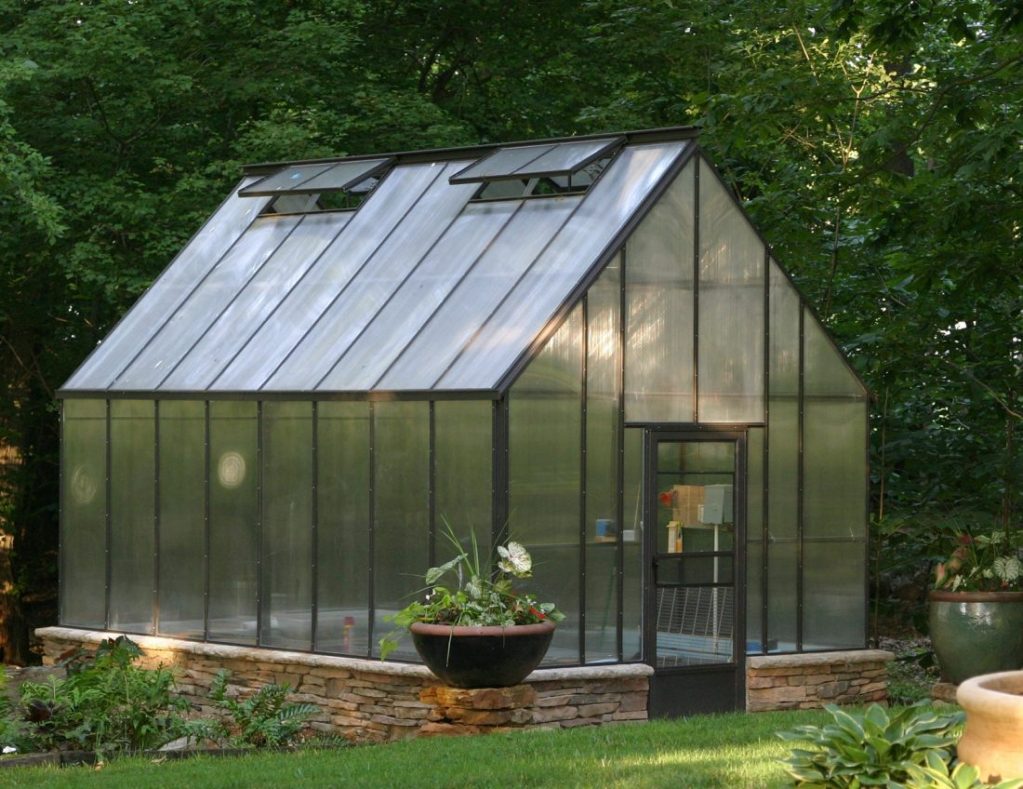
Gable roof - a classic option
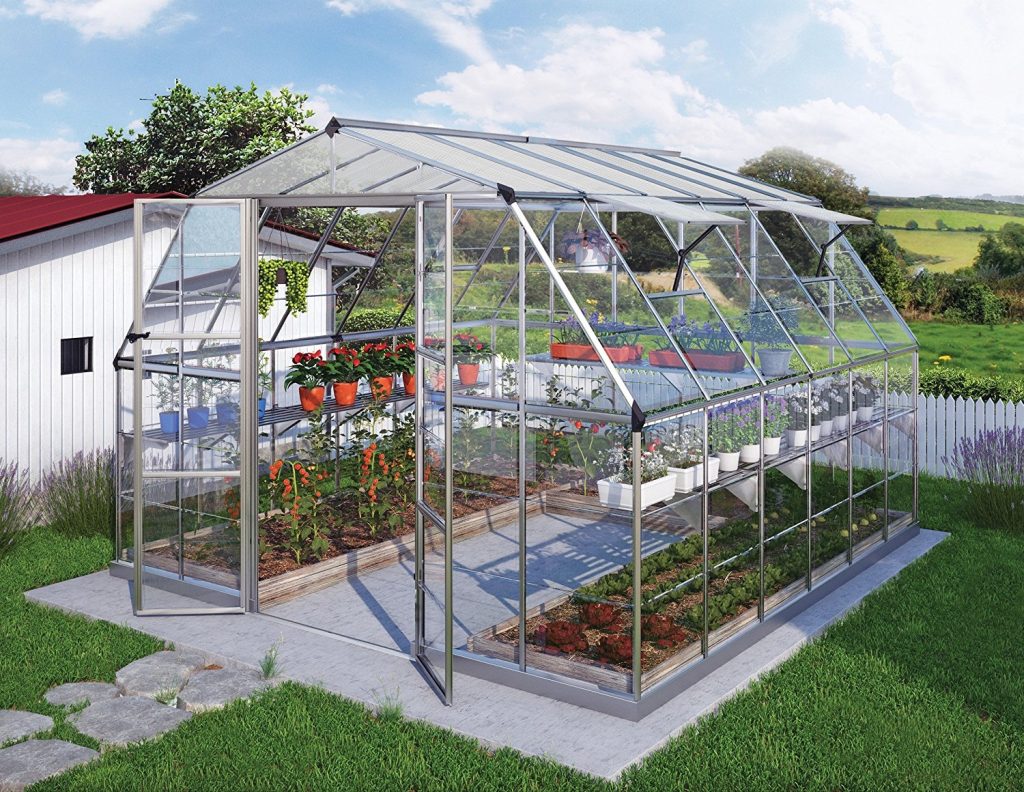
Gable greenhouses have vertical walls and a roof with two slopes. The advantage of the design is the ease of assembly and installation. The angular shape of the roof allows you to functionally use the ceiling space, for example, to install shelves for pots with seedlings.
Polygonal greenhouse
Polygonal greenhouses are strong enough to withstand heavy snowfalls and gusts of wind.. They have excellent light transmission. The unusual design of the greenhouse allows you to beautifully decorate garden plot.
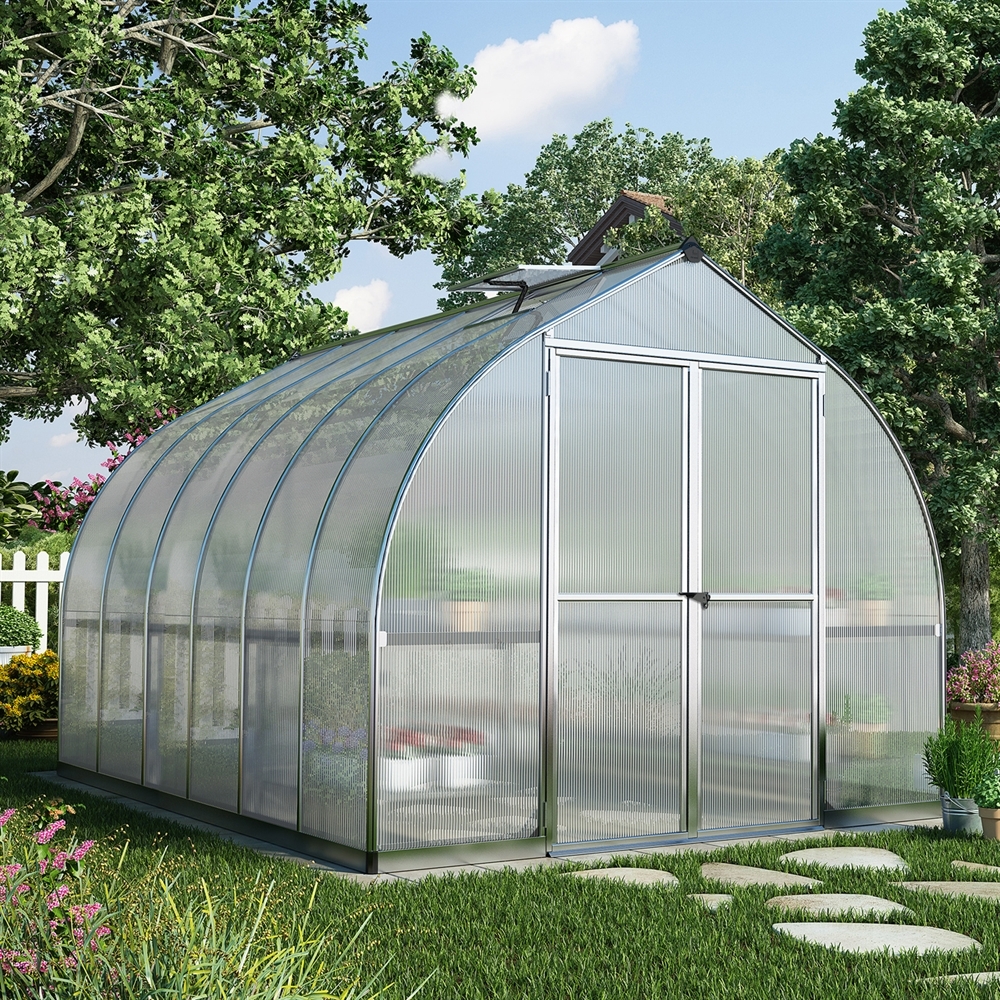
The arched type of greenhouses has gained considerable popularity due to the ability to better retain heat inside the greenhouse.
The design feature and the smooth slope of the roof allows it to withstand heavy loads from snow and does not prevent snow from rolling down to the ground.
Advantages
Polycarbonate greenhouse
The modern building material polycarbonate has replaced heavy glass and has dramatically simplified the work of building greenhouses.
Polycarbonate has a number of positive characteristics:
The light weight of the material simplifies the installation work and does not require a thorough foundation
The mobile version allows you to quickly disassemble and assemble the structure and move greenhouse
The price category of polycarbonate is lower than analogues (glass, fiberglass), which reduces the cost of the greenhouse
Sufficiently strong material is able to withstand mechanical damage, strong winds, hail
The polycarbonate greenhouse has excellent thermal insulation, exceeding triple double glazing
The light transmission of polycarbonate reaches 80%, which ensures good dispersion of sunlight. Ideal for plant growth and flowering
With proper care, a polycarbonate greenhouse has a fairly long service life of 10 to 15 years, without losing its functional duties.
The resistance of polycarbonate to ultraviolet rays allows you to save for a long time the original appearance of the material and the structure as a whole
Fire resistance and minimal toxicity make the greenhouse fireproof
As a material for the frame, metal profile pipes 20 by 20 are used, with a wall thickness of 1.5 - 2 mm. The length of this material reaches 6 meters. Profiles are used rectangular or square.
For reliable protection against corrosion, the material is galvanized or treated with powder paint.
If the frame is planned to be made of polypropylene pipes, then you will need:
To create a frame of the required strength, PVC pipes with a diameter of 25 to 32 mm are purchased. The length is usually from 1 to 6 meters. Polypropylene pipes are durable and not subject to corrosive destruction. The installation of the frame can be done by hand.
Greenhouse structures differ in the possibility of transportation. Thus, two types can be distinguished:
Stationary
This type provides for a thorough laying of the foundation as the basis for the greenhouse;
Mobile
A greenhouse of this type is not tied to the ground and involves moving the structure if necessary.
For a stationary greenhouse, there are 4 foundation options:
Tape
slab
Columnar
pile
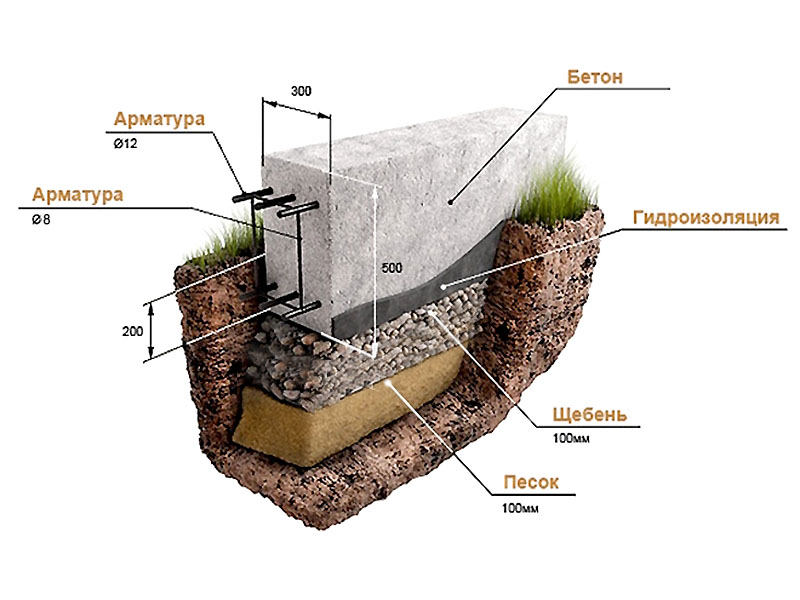
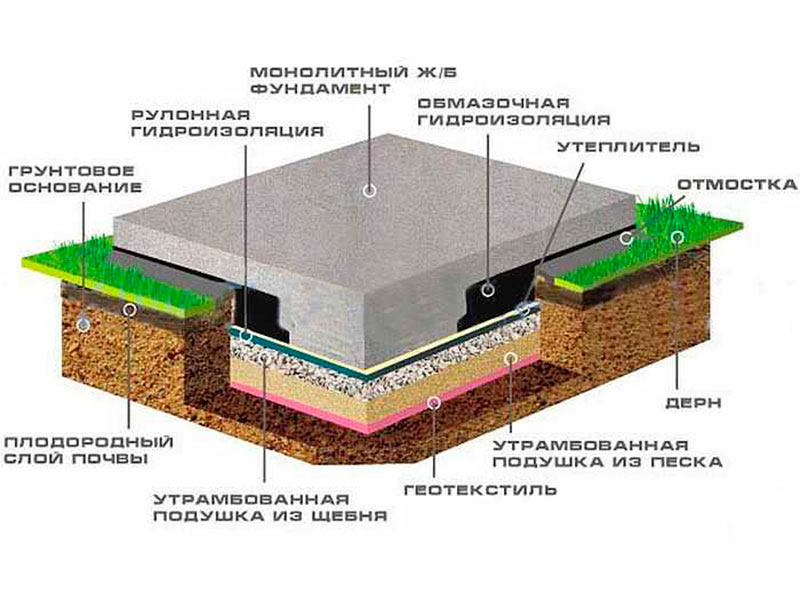
1Tape foundation divided into three types: not buried (only the top fertile layer of the earth is removed), shallow (assumes from 70 to 80 cm of foundation depth) and deepened (depth reaches 1.5 meters). The optimal ratio of the depth of the foundation and the surface masonry is 70% to 30%. If the foundation goes 70 cm deep, then the surface masonry reaches 30 cm.
Strip foundation device
As a material for the tape base, various materials can be used, such as concrete blocks interconnected by reinforcement. Ordinary brick or cinder block, or cement composition, including reinforcement.
2slab foundation implies the device of a completely flooded area on top of the primer layer. It is used in areas where groundwater or a large percentage of the sand component lies.
Slab foundation device
To organize this type of foundation, it is necessary to dig a pit, at least 10 cm deep, maximum 70 cm deep. The first layer is a pillow of crushed stone and sand. The next layer is laid geotextiles, such as roofing material, which serves as protection against an aggressive external environment. Next, the concrete is poured.
3Column Foundation, thanks to its technology, allows you to quickly organize the base for the greenhouse.Small columns are placed to a depth of up to 80 cm, at a distance of up to 1.5 meters from each other. As a material for columns, ordinary brick or cinder block is used. Rubble or natural stone, wooden stump or pipes filled with concrete with asbestos, or special T-shaped pillars made of concrete.
Column Foundation
The pile foundation is widely used in swampy areas or on uneven ground planes. The deepening of the base exceeds the lower mark of freezing of the earth by 30 cm.
There are two types of piles: screw (equipped with special blades that allow you to screw piles into the ground), driven (using special equipment, piles are driven into the ground). The distance between piles reaches 2 meters. In some cases, drilling equipment is required for screw-type installation.
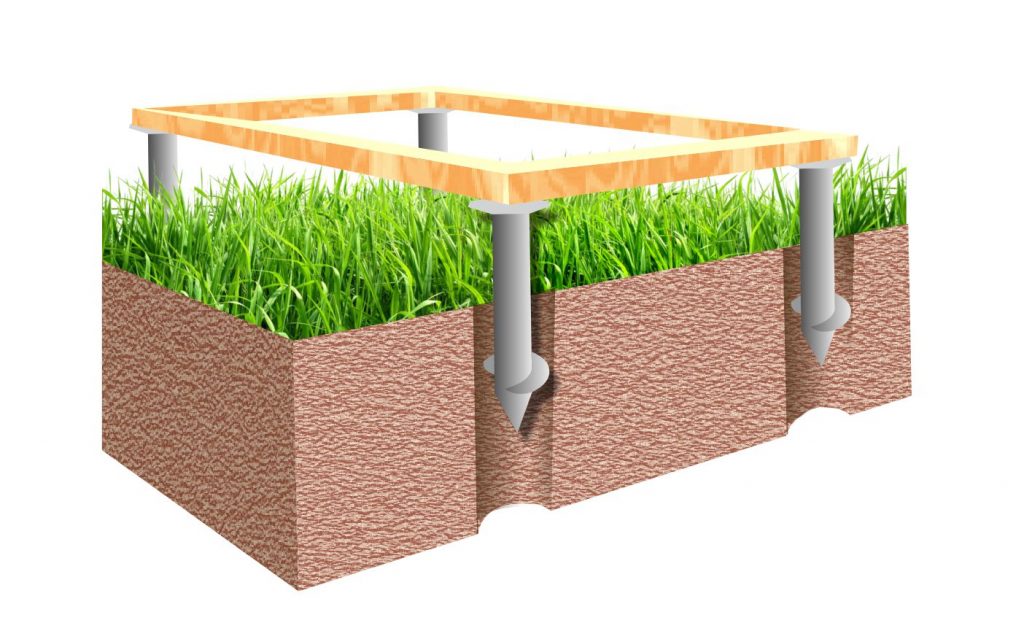
Lightweight wooden base for the greenhouse
If it is not planned to allocate a special place for the foundation for the greenhouse, you can use a lightweight type - a wooden base. Using a wooden beam makes it easier to build the base, and is also a less expensive option. An additional plus is the ability to move the finished greenhouse around the site.
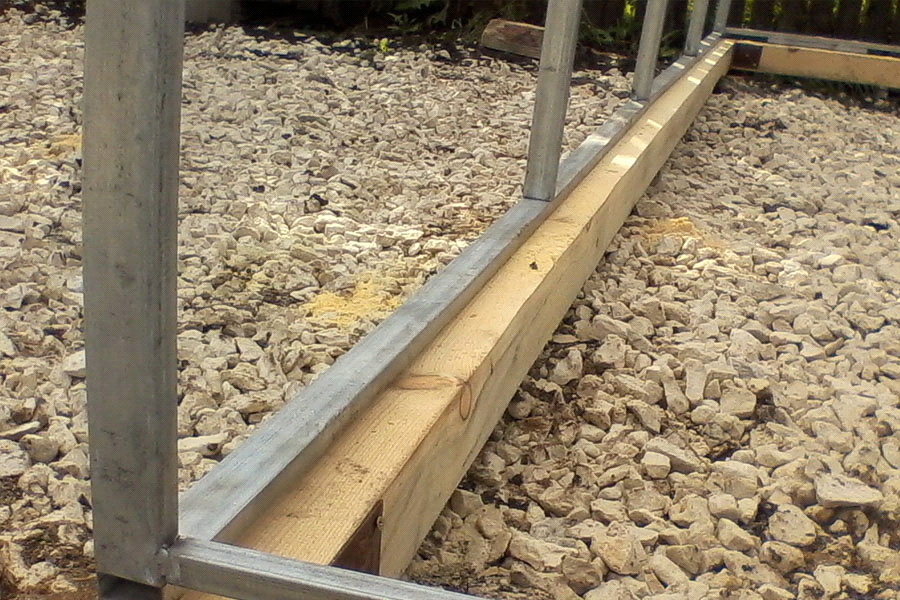
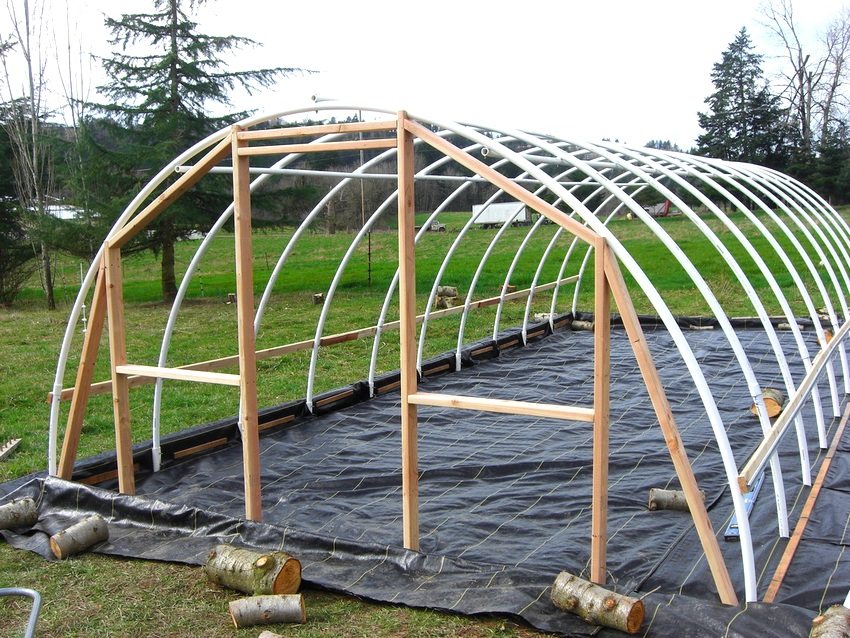
Phased installation of a metal frame of an arched structure on a wooden base
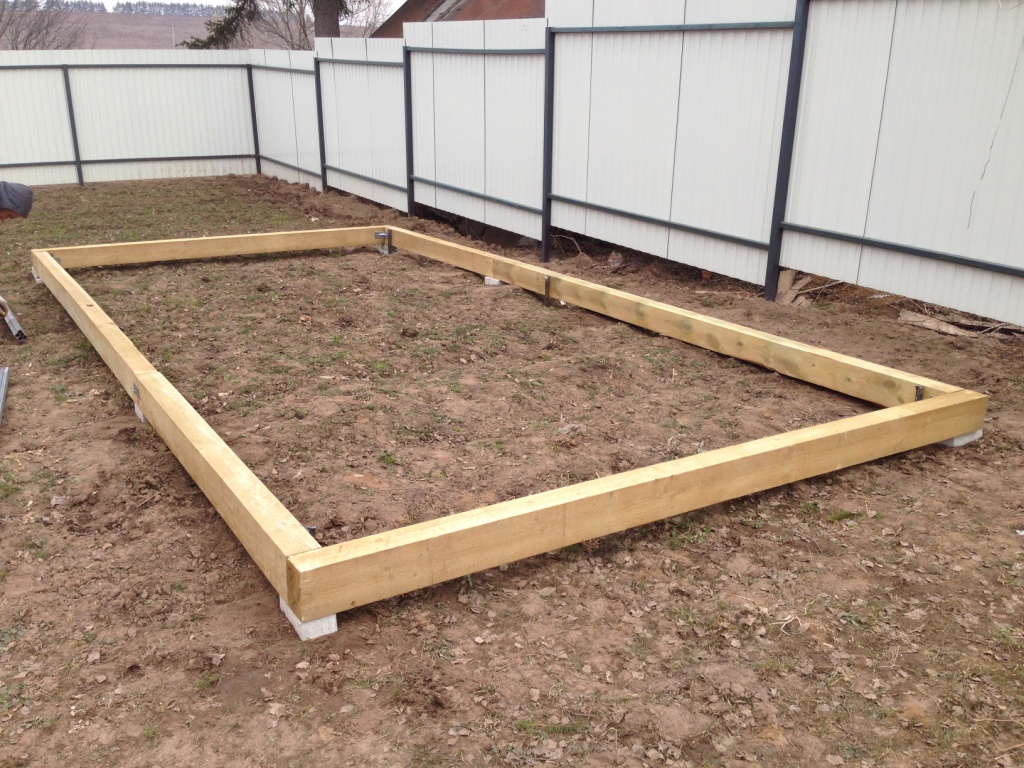
Installation of a wooden base 3 by 6 meters
1To begin with, the dimensions of the future greenhouse are determined. For a convenient location of the beds (two on the sides and one along the center line), the width of the greenhouse should be 3 meters. Length from 4 to 8 meters. A medium-sized greenhouse is 3 by 6 meters, height 2.1 meters.
2The base must be stable. In the classic version, you will need to purchase a wooden beam 150 by 150 mm. If it is not possible to deliver a long beam to the installation site, it should be cut into several parts. It is recommended that the timber laid on the side of the width of the greenhouse (3 meters) be installed in one piece, without sawing. The remaining length is dialed in accordance with the size of the greenhouse.
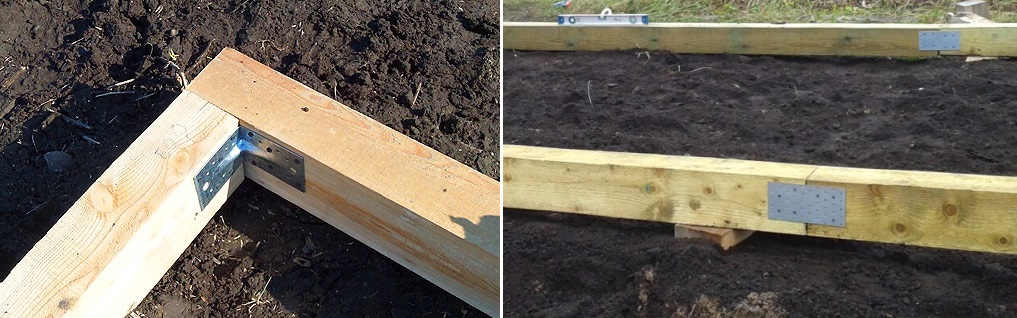
Methods for fastening a beam
3If it is planned to install a metal frame of a greenhouse 3 by 6 meters, then, accordingly, the length of the beam of the entire perimeter is acquired at least 18 meters.
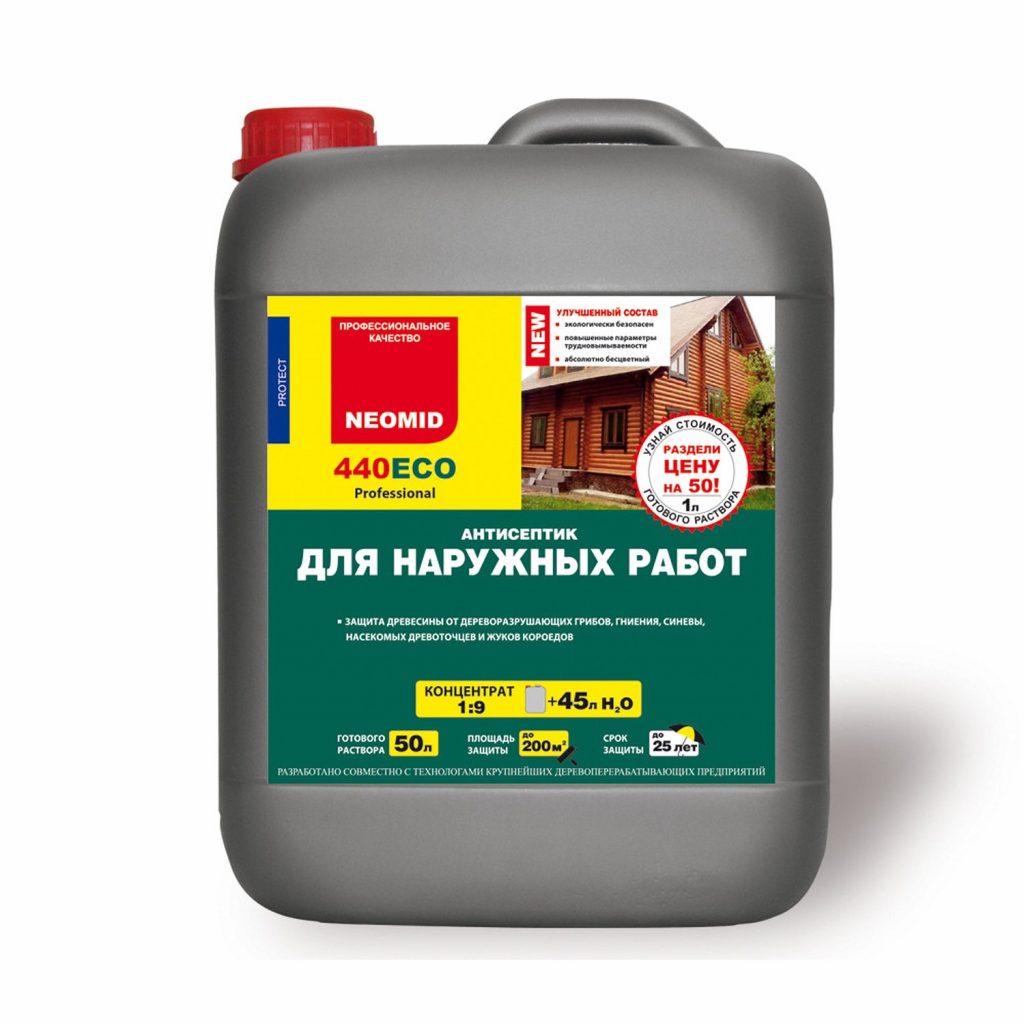
Additionally, it is worth taking care of purchasing liquid antiseptics for wood processing. Impregnation of the timber will allow you to save the base for a long time.
4Antiseptic groups of drugs contain special chemicals that inhibit the development of harmful bacteria. To maintain the protective effect after treatment, it is recommended to cover the surface with a waterproof material.
Wood preservative
5The frame of a wooden beam is installed in a regular geometric figure in compliance with a right angle and, as a result, should be a rectangle with 90 degree corners.
6Galvanized metal fixing angles and wood screws are used for the corner connection of the beam. Before laying the timber on the base, the surface must be properly planned.
7The ground plane should be flat and, if possible, avoid differences in height of more than 25 - 30 mm. If it is impossible to prepare the surface according to the specified dimensions, it is allowed to plan the surface for laying the timber using wet sand.
8For additional stability of the future greenhouse, holes with a diameter of 10 to 15 mm are drilled in a wooden beam. Subsequently, metal fragments of reinforcement or a thick-walled pipe will be driven into them. Trimmings of a profile pipe attached to the inside of the timber with self-tapping screws can be used.
9Binding to the base will significantly strengthen the greenhouse and eliminate its geometric displacement during strong winds.The axial distance from the mounting holes is 70 cm. The diameter of the hole must be selected according to the diameter of the metal rod.
10If for growing seedlings will use bulk soil, then geotextiles are laid at the base of the greenhouse before the delivery of black soil. Such a fabric will prevent the growth of unwanted weeds, the penetration of insects into the greenhouse that can harm the root system of plants.
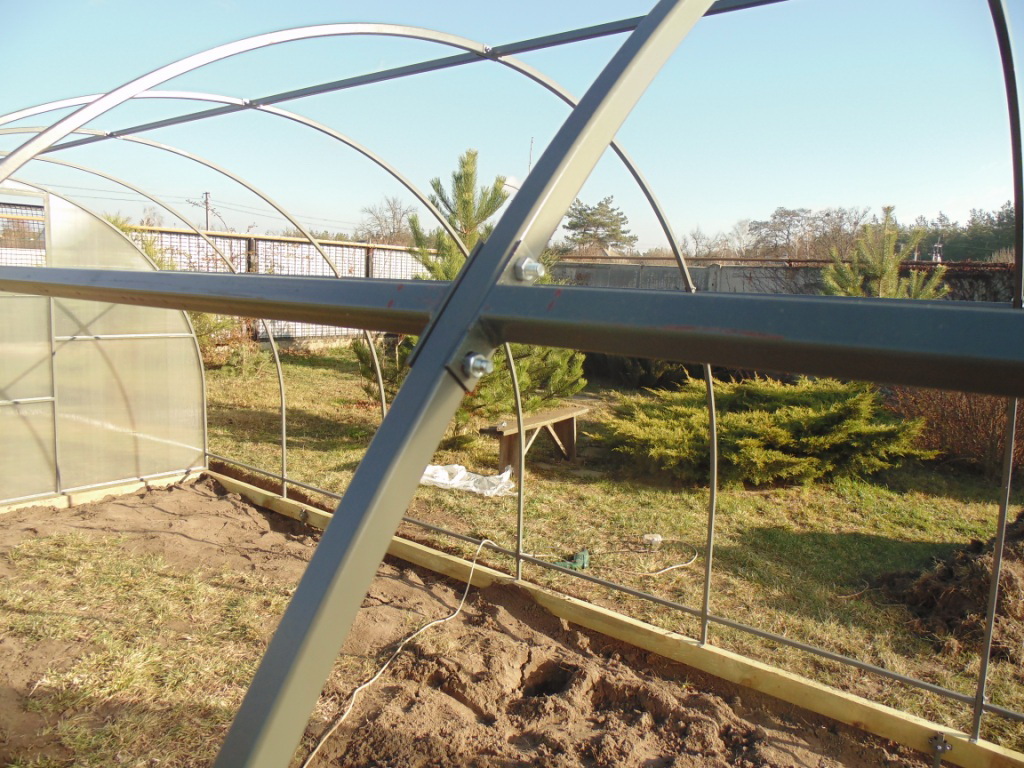
Preparation and installation of a metal frame
1The metal frame belongs to the most high-quality and strong construction. As a rule, aluminum or galvanized profile pipe is used for its manufacture. Working with such types of metals requires professional equipment (argon welding, special electrodes, etc.) and the involvement of specialists. Such a frame installation becomes quite expensive.
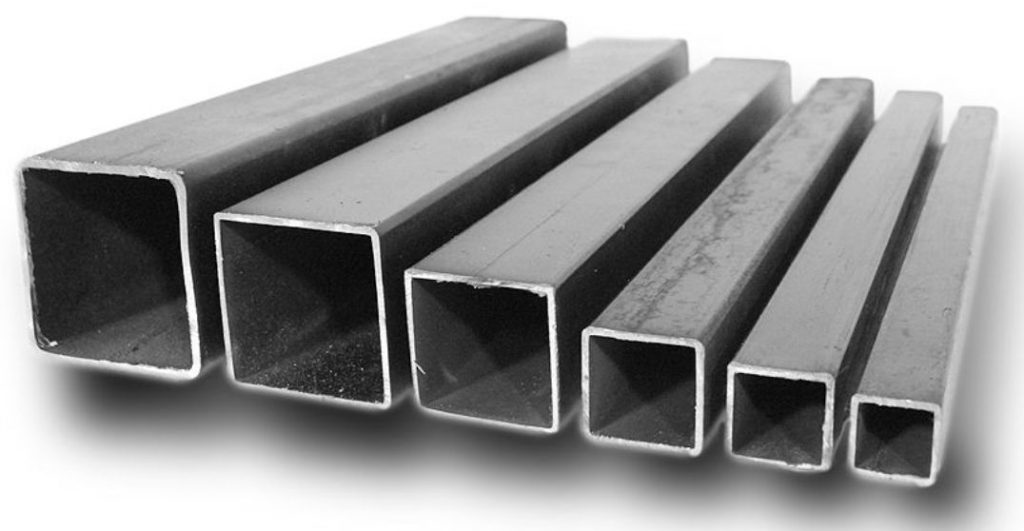
2For the manufacture of the frame of the greenhouse, a profile pipe made of ferrous metal measuring 20 by 20 mm or 25 by 25 mm with a wall thickness of 1.8 to 2 mm will be used. When using such a profile, the greenhouse frame is able to withstand quite serious loads.
Profile pipe samples
3For the manufacture of the frame arc and all the necessary accompanying reinforcing profiles, it is required to make a proper qualitative calculation of the required material. With a known width and length of the greenhouse, it is worth considering the presence in the design of the doorway and window compartments, zones with additional reinforcement of the frame.
4For a more accurate calculation of the purchased material, you will need to make a drawing of the frame. When making a drawing, special attention must be paid to the front and back sides of the greenhouse. These are areas for mounting doors with window elements.
Greenhouse frame drawing
5As a rule, when making a drawing, special attention is paid to the back sides of the greenhouse, where doors with window elements will be mounted. In these areas, it is necessary to install additional profiles to create increased strength.
Greenhouse with full-fledged windows and an entrance door made of metal-plastic
6For canopy the door will need to purchase metal hinges and locking elements to close the door itself and the window section. The distance between the arcs of the structure should not exceed 100 cm. This length between the elements takes into account the width of a standard 5 mm cellular polycarbonate - 210 cm.
7In the future, the remainder of the width of 10 cm will be used for 4 - 5 cm of overlap in the area of \u200b\u200bthe door, in the form of a small visor. The remaining 5 cm are intended for overlapping when installing subsequent polycarbonate sheets.
8For the geometric calculation of the greenhouse arc, a simple arithmetic formula for the circumference P=πd is used. The arc itself will consist of half the circumference and two straight lines at the edges.
9Based on the fact that the straight line will turn into a circle, the segment from the beginning of the straight line to the point of the beginning of the circle will be equal to 70 cm. There will be two such lines, that is, this distance is 140 cm.
10Next, the circumferential length of the profile is calculated. To do this, subtract the height of the straight segment 70 cm from the total height of the greenhouse 2.1 m. We get a point for calculating the radius of the arc 1.4 m. Knowing the radius of the circle (1.4 meters), we multiply it by 2 and get a diameter of 2.8 meters.
Now we apply the formula for the circumference of a circle:
P \u003d 3.14 * 2.8 \u003d 8.8 meters the length of the entire circumference, only half is needed, therefore, 8.8 / 2 \u003d 4.4 meters
4.4 + 1.4 = 5.8 meters - the resulting length is the required size for the manufacture of one arc.
Correction of the dimensions of straight segments and the arc itself can be carried out at will. The standard profile length is 6 meters 5 centimeters.
Given the length of the greenhouse of 6 meters, you will need:
for the manufacture of an arc of the front, subsequent and rear arches, 7 pieces of a six-meter profile are needed;
5 six-meter profiles will be used as longitudinal connecting elements reinforcing the entire structure;
for the manufacture of two doorways, doors and window compartments with an opening width of 95 cm and a height of 2 m, 26 meters must be used. This number may vary depending on the increase or decrease of additional stiffeners;
3 six-meter profiles will be used as the basis of the frame;
2 six-meter profiles will act as reinforcing bars in the door fastening areas.
Ultimately, to create a metal frame, you will need 126 meters of a profile pipe 20 by 20 mm or 25 by 25 mm.
Wall thickness from 1.8 to 2 mm.
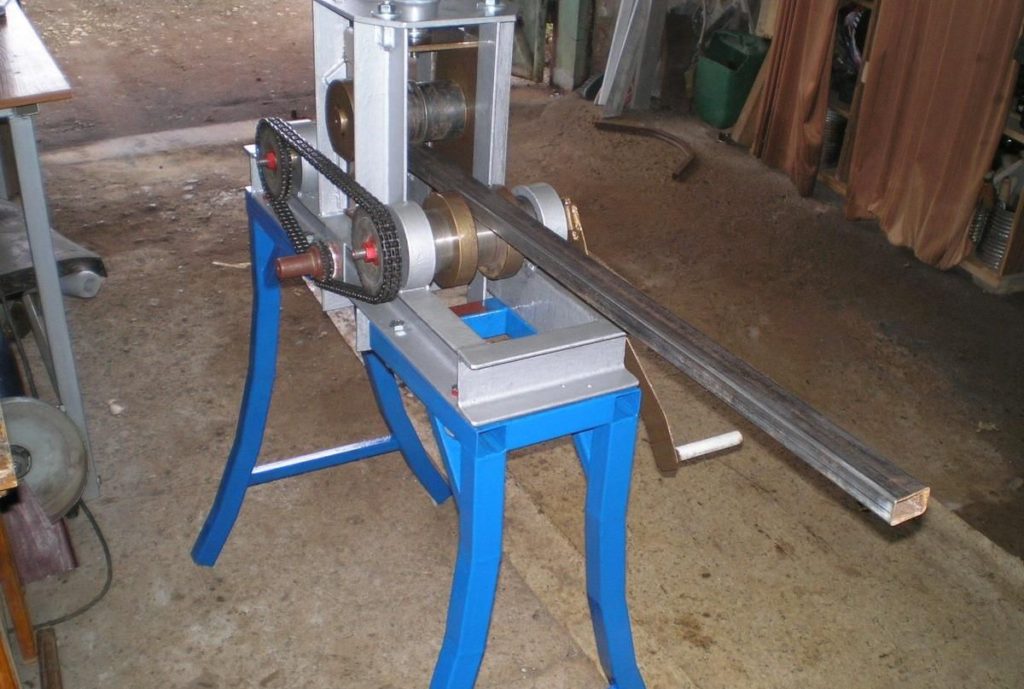
11To give the arched racks a curved line, special equipment is needed - a pipe bender. As a rule, at the points of sale of the profile pipe, there are profile bending machines with powerful rollers.
It is recommended to bend profiles on professional equipment. In this case, the high quality of the geometry of the entire structure is guaranteed, since when the profile is bent into the machine, all profiles are loaded simultaneously.
12For the best way, the profiles assembled to each other before laying are seized by electric welding at the ends. This eliminates the uncontrolled movement of the profile pipe during bending.
13It is not possible to achieve the ideal geometry of the structure, trying to give the profile a uniform bend on its own without professional equipment.
Pipe bending machine
14By purchasing such a quantity of a profile, the cost of bending work, taking into account discounts, is insignificant, which saves time and one's own strength.
15After making the arc, you should start making the front and back parts of the greenhouse. When assembling these arches, after welding into the base of the profile, the width on the outer sides must clearly correspond to the width of the wooden beam used as the base (300 cm). This will allow, when covering with polycarbonate, to make an overlap on a wooden base. Thus, drafts and the penetration of various kinds of insects into the inside of the greenhouse are excluded.
16Further, two parallel profiles are welded into the arc contour, which will serve as a doorway. In the upper part, respectively, a transverse is installed. Width between profiles 95 cm (or set according to personal requirements).
17The manufacture of the door is carried out in such a way that its external length and width along the external contours should be less than the internal dimensions of the doorway by 6 - 8 mm. After manufacturing the door contour, it is reinforced with transverse and diagonal profiles.
18To carry out the assembly work, the help of one, and preferably two, workers will be required. The first step is to mount the front and rear arches. Self-tapping wood screws through the lower profile into the prepared holes are screwed to a wooden beam. Additionally, side temporary holders are installed. Installation of arches is carried out in a clear vertical line under the control of the building level.
19Further, along the long sides of the greenhouse, a profile pipe is laid. This profile will simultaneously serve as a base and a guide line for mounting the arches of the structure.
Metal frame already fixed to the wooden base
20Fastening of this profile to the front and rear arches can be done using welding or using a metal corner with self-tapping screws for metal with a drill at the end. The use of corners as fasteners in the future will help to quickly dismantle the structure.
21The installation of the upper longitudinal bar is in progress, which will fix the front and rear arcs at the upper points. Temporary supports are used to prevent sagging of this pipe.
22The next step is to alternately install the remaining arcs of the structure, while it is necessary to control the distance, which should be no more than a meter. For high-quality installation of the arc on the profile used as a base, a five-centimeter segment of a smaller profile pipe is welded in the area of \u200b\u200bits installation.
23Thus, we get the opportunity, when mounting the arc, to put the profile on the holding ledge. At the same time, each subsequent arc is tied to the already installed upper crossbar.
24During the entire installation, all dimensions and distances are controlled. In a similar way, the installation of the remaining arches is carried out.
25The profile pipe of the arch and the guide profile are fastened with a galvanized bolt, nut and washer. The diameter of the galvanized bolt is recommended to use 4 mm. To install the fixing bolt, a hole of the required diameter is drilled in the arc profile and the guide profile, respectively.
26Further, the installation of the remaining six meter guides and profiles reinforcing the structure is carried out.
27Before covering the structure with polycarbonate, anti-corrosion protection of all metal parts of the greenhouse is carried out. The entire surface of the metal profile, if necessary, is cleaned using a metal brush or sandpaper. Degreased using a solvent, acetone or white spirit.
Carefully painted metal frame of the greenhouse
28The next step is a proper primer. After the primer has dried, the surface of the profile is painted using quick-drying paints.
3 in 1 enamel primers are presented on the modern market, which allow anti-corrosion treatment of metal on a rusty surface and perform the function of a primer and paint at the same time.
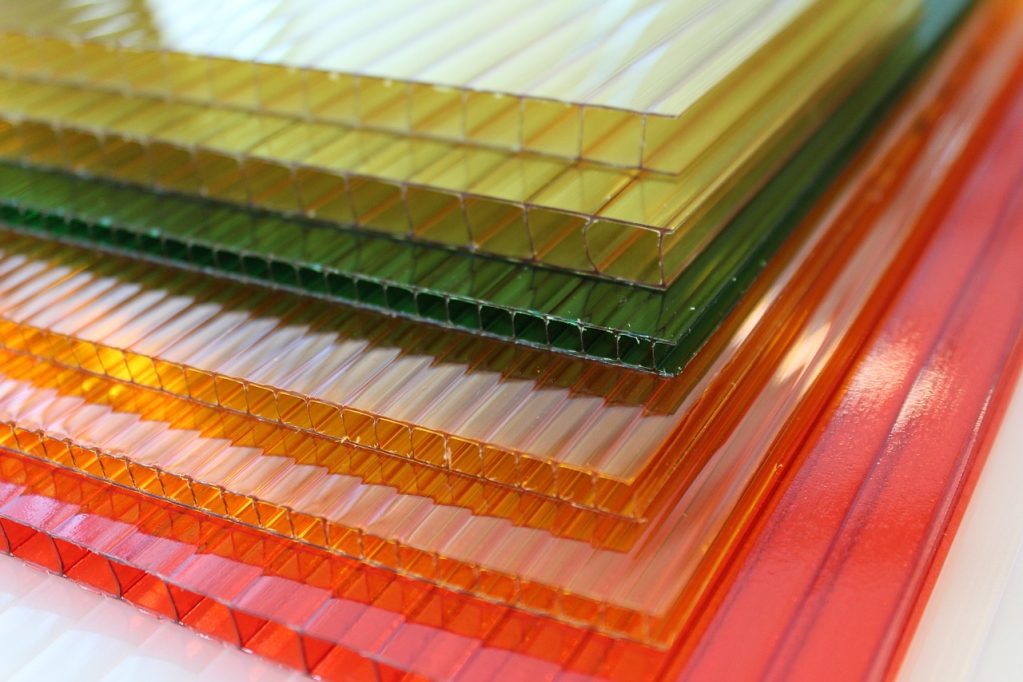
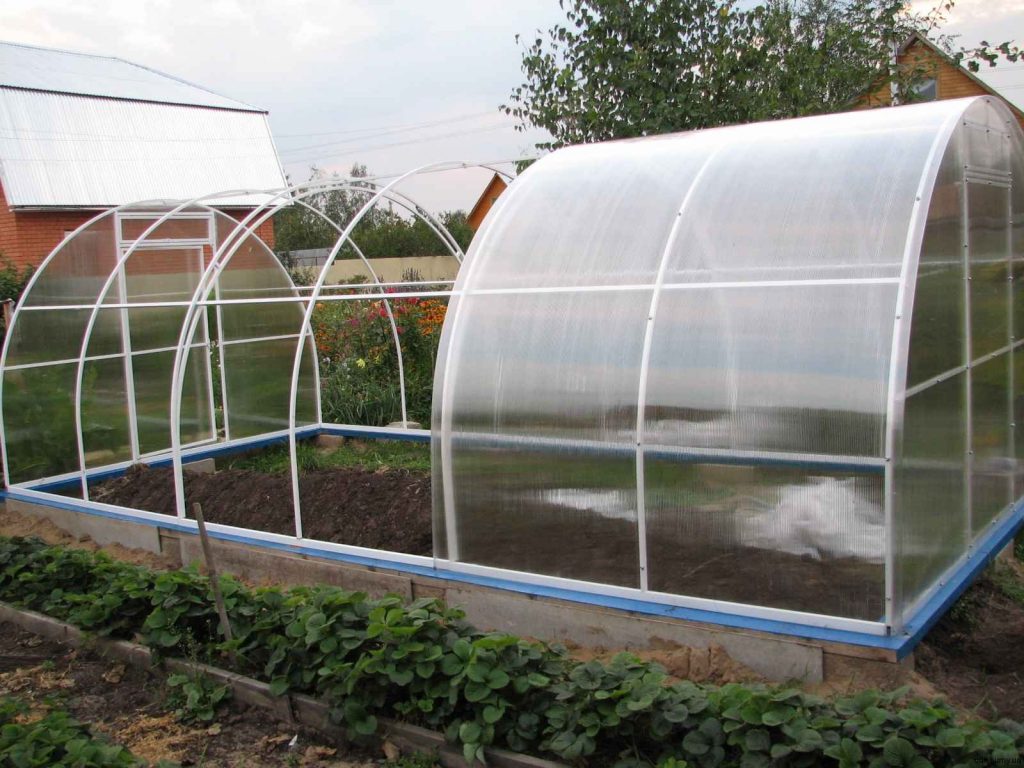
29After drying, the frame of the greenhouse can be covered with cellular polycarbonate.
Cellular polycarbonate is a transparent polymer consisting of two plates between which there is one or more rows of rectangular cells. This material has proven itself on the positive side. For a long time it has been used to create outbuildings.
Polycarbonate samples
The advantage of this material is high impact strength, lightness, high degree of light transmission.
Polycarbonate of transparent light shades should be used. Do not use dark material, this can disrupt the process of plant photosynthesis and cause negative consequences.
The most optimal thickness of polycarbonate for a greenhouse is 6 mm.
As a rule, such polycarbonate is produced in sizes:
width 210 cm
length 612 cm
For a greenhouse with dimensions of 3 by 6 meters, polycarbonate 4 standard sheets are required. Bolts with a drill are also purchased, equipped with thermal washers for screwing into a metal profile (as a rule, this kind of fastener is used for mounting corrugated board) and 43 meters of a galvanized metal strip for external fastening, which acts as a holding mechanism.
The installation of such a strip will ensure proper fastening of the polycarbonate sheets to the metal arc, while simultaneously acting as a pressure washer.
If you fasten polycarbonate without using galvanized tape, then in the process of thermal expansion of materials and during changes in temperature conditions, a breakthrough of polycarbonate at the attachment point may occur.
1Installation of polycarbonate honeycomb sheets must be carried out in such a way that the stiffening ribs are located along the length and the condensate formed inside the cell can freely drain inside the channel to the ground.
The correct location of the polycarbonate sheet during installation, the honeycombs are parallel to the supports of the structure
2Before starting work on the installation of honeycomb sheets, the protective UV film is removed. The first step, when installing polycarbonate, is the fastening of sheets to the front and rear arches.
3The size of the polycarbonate sheet without trimming along the length allows its installation. To do this, it is necessary with the help of an assistant to evenly place the material on the arched structure. The first sheet is located with an overlap in the form of a visor of 4 - 5 cm. A similar overlap should also be formed from the side of the second inner arc.
4Using galvanized tape, polycarbonate is fixed with galvanized bolts on the front and subsequent arcs, except for the last one, where overlap is expected during the installation of the next sheet.
5When attaching a galvanized tape, it is necessary to control the uniform pressing of the polycarbonate to the profile along the entire length of the arc. Mounting bolts are installed at a distance of 50 - 60 cm from each other. Polycarbonate overlap zones are pressed with a galvanized tape as a last resort.
6Similarly, honeycomb sheets are mounted on the entire arched structure.
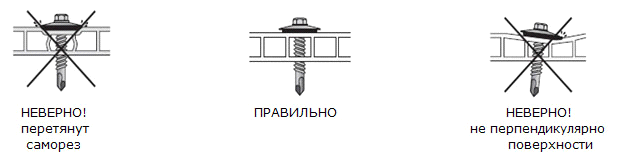
7You should not apply great efforts when tightening the self-tapping screw at the polycarbonate attachment points, this can lead to surface deformation.
Schematic representation of the correct fastener
8Cutting the sheet along the contour is carried out using a reinforced clerical knife. The surface of the metal arc will serve as a guide for the blade.
Installation of polycarbonate on the front and rear arches can be done both on the finished assembled frame of the structure before covering the total area, and separately on the arches not tied to the frame.
An alternative to a metal frame made of PVC pipes 25 diameter
The preparation of the base and the installation of polycarbonate are carried out in the same manner as in the production of a greenhouse using a metal profile pipe.
Almost finished greenhouse frame made of PVC pipes. Wooden beams can be used as reinforcement of the frame
By choosing a material as PVC plastic pipes to create a frame, we get the advantage associated with the characteristics of this material. Not significant weight, resistance to thermal and mechanical influences, not subject to corrosion, long service life, aesthetic appearance, not high price.
The pliability of the material and high flexibility allow you to give the arc a different circle. The most relevant and practical form of greenhouses is arched. In specialized stores, PVC pipes are presented up to 6 meters long. Such characteristics make it possible to avoid places with the additional use of docking fittings.
Due to the surface tension, the arch is created with a uniform bend, there is no need to use any equipment to give the bend. The creation of an arch is carried out using its own effort (bending).
Fastening a plastic arc to a wooden base can be done in various ways:
By fixing with self-tapping screws through pre-drilled holes
Using a metal clamp
By placing the edges of the arc in pre-drilled holes in the beam
As guides along the edges of the arc, pieces of reinforcement driven into the ground by half a meter or more are used, on which the opposite edges of the arch will be put on, thereby creating an arc
The attachment points of the arch on one side and on the other should be located at exactly the same distances. This will ensure the correct geometric shape, without distortions. The front and rear arches, where it is planned to install doorways and doors, are mounted using various fittings by soldering.
To do this, you will need to purchase:
Elbows 90 degrees
Tees
Couplings
Additional elements, given the design feature
Of the tools you will need a soldering iron for PVC pipes
Cutting doors into the doorway is carried out using ordinary metal hinges fixed to self-tapping screws (press washers).Longitudinal connecting strips reinforcing the frame are mounted in a manner similar to the construction of metal profiles.
This method allows you to create a mobile greenhouse frame and, if necessary, repeatedly assemble and dismantle.
Making a greenhouse from PVC pipes allows you to approach the creation of a design individually
Instead of polycarbonate, polyethylene film also acts as a material for covering greenhouses. For a long service life, the film is recommended to be selected from a reinforced multi-layer material with high strength and wear resistance.
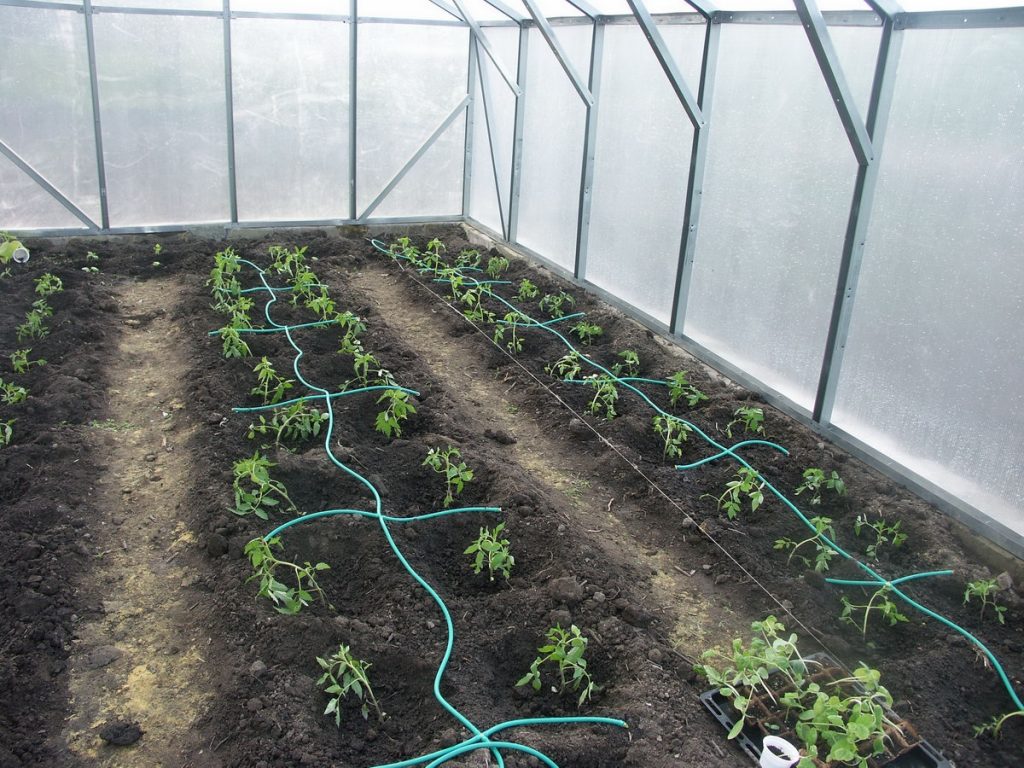
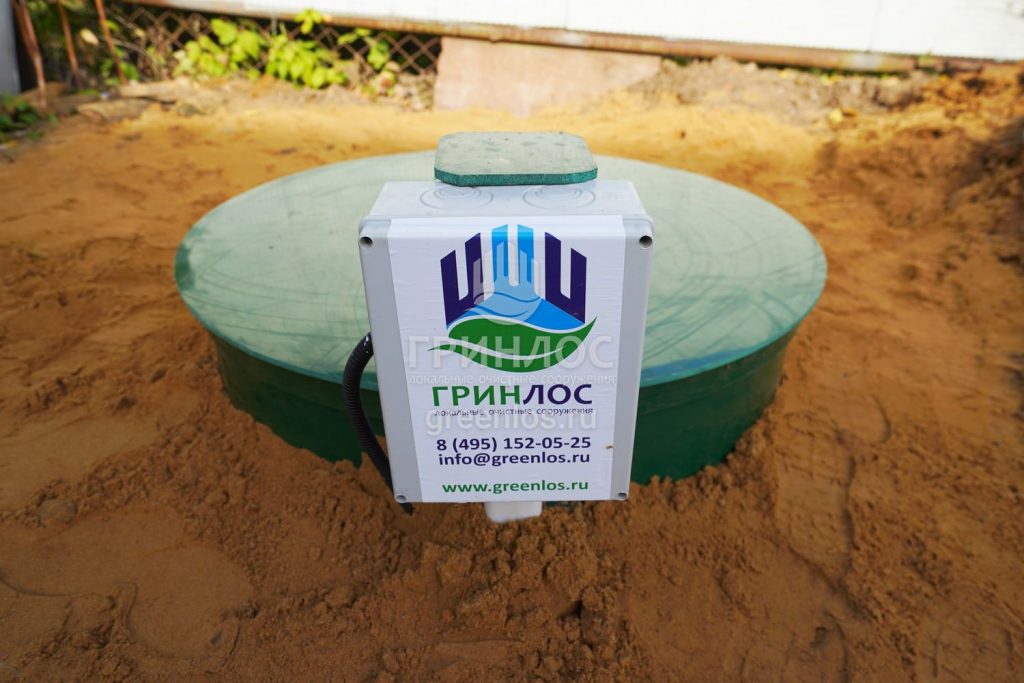
The use of drip irrigation not only provides an uninterrupted supply of water for plants, eliminating the need to water each bush independently, but also significantly saves water. Prevents erosion of surface soil. DIt provides an excellent opportunity to dilute plant nutrients for the entire volume of watering.
Drip irrigation eliminates the ingress of liquid on the surface of the leaf and, thereby, prevents the plant from burning. The water supply is gradual, which contributes to the saturation of the earth with moisture.
drip irrigation system
Having installed the system, it is possible to supply the required amount of moisture both to the roots of plants directly, by laying underground, and by placing a drip pipe superficially in the aisle.
To supply water, you will need to install the tank to a height of 1.7 meters or more. The higher the height of the water storage tank, the higher the pressure in the system.
For greenhouses 6 meters long using surface drip irrigation, it is enough to place a container with a volume of 250 - 300 liters at a height of 2 meters.
With a 20 mm diameter PVC pipe, a shut-off ball valve is required.For a winter greenhouse, during the calculation and installation of the greenhouse, it is necessary to determine the location for the location of the water tank inside the room in order to prevent water from freezing.
If you plan to use the greenhouse in the cold season, then it is necessary to foresee the heating system in advance. When choosing a heating system for a greenhouse, the dimensions and material used to make the greenhouse are taken into account.
Polycarbonate retains heat quite well inside the structure and does not require excessive heating, unlike polyethylene film, which has large heat losses.
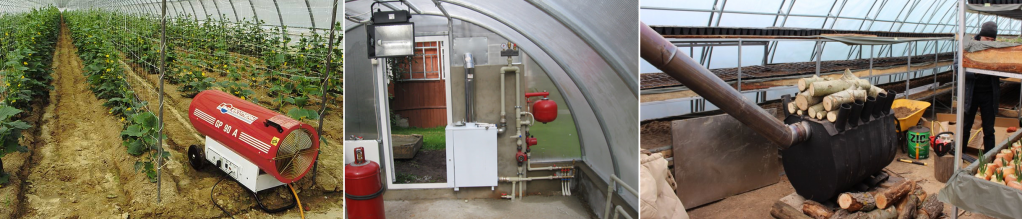
There are several types of heating options:
Types of possible greenhouse heating
Steam heating
This type involves connecting a greenhouse pipe line to a common home heating system. In this case, the pipes that are located along the path from the greenhouse to the house are required in reliable insulation. The boiler heating the entire system must have sufficient power to provide the desired temperature level. This type is used if the connection zone between the greenhouse and the house does not exceed 10 meters.
The presence of a boiler can be provided directly in the greenhouse itself. The device also requires the use of pumping equipment to create pressure in the water heating system.
air heating
For this type of system, an air-heating boiler is used. An efficient system is financially affordable and has good heat dissipation. In 30 minutes of operation, the air in the greenhouse warms up to 20 degrees.
gas heating
There are two options for gas heating: connection to stationary gas equipment and use gas cylinders. The air in the greenhouse is heated by the combustion of gas. Due to the rather high cost of the resource (gas), such heating is used, as a rule, in small greenhouses.
Electric heating
The advantage of this type of heating is that it does not heat the air, but only plants and soil. Infra-red lamps and heaters are considerably popular for electrical heating. Heaters with temperature sensors allow the greenhouse space to be divided into zones heated with different intensity.
Furnace heating
The simplest system that runs on wood or coals. Heating involves a solid fuel boiler and a pipe that takes smoke out of the greenhouse. The chimney structure needs constant cleaning from combustion products.
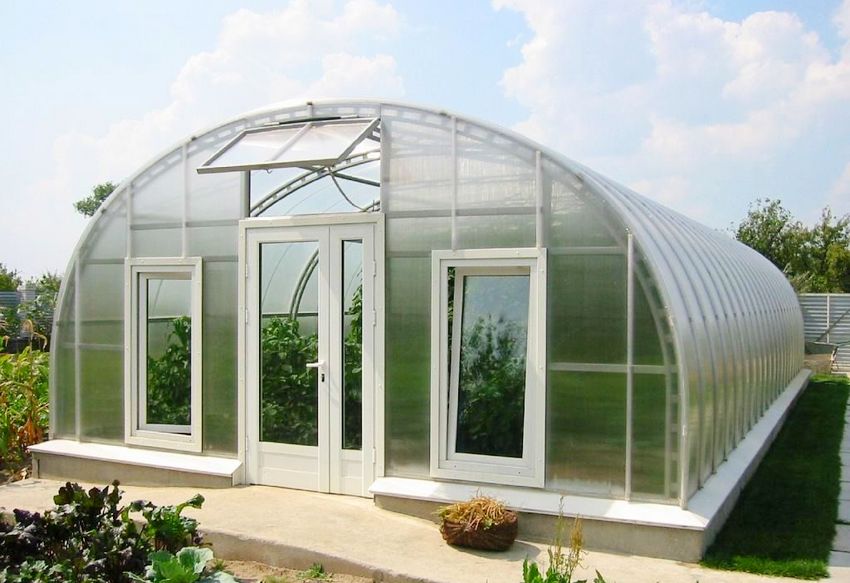
Proper installation of a greenhouse made of cellular polycarbonate
Making a greenhouse with your own hands from a profile pipe and polycarbonate: a complete description of the process, drawings with dimensions, watering and heating (Photo & Video)
8.8Total Score
Fine!
We have tried to collect useful information on this issue for you. If you do not agree with these ratings, leave your rating in the comments with the reasoning for your choice. Thank you for your participation. Your opinion will be useful to other users.
Relevance of information
9
Availability of application
8
Topic disclosure
8.5
Reliability of information
9.5
pros
Relatively easy assembly
Opportunity to grow your favorite crops all year round