If you have long dreamed of learning how to work with wood, do not waste time. Get started today. After all, simple furniture and wood crafts with your own hands (see drawings and photos) can be made without carpentry skills. There would be a desire.
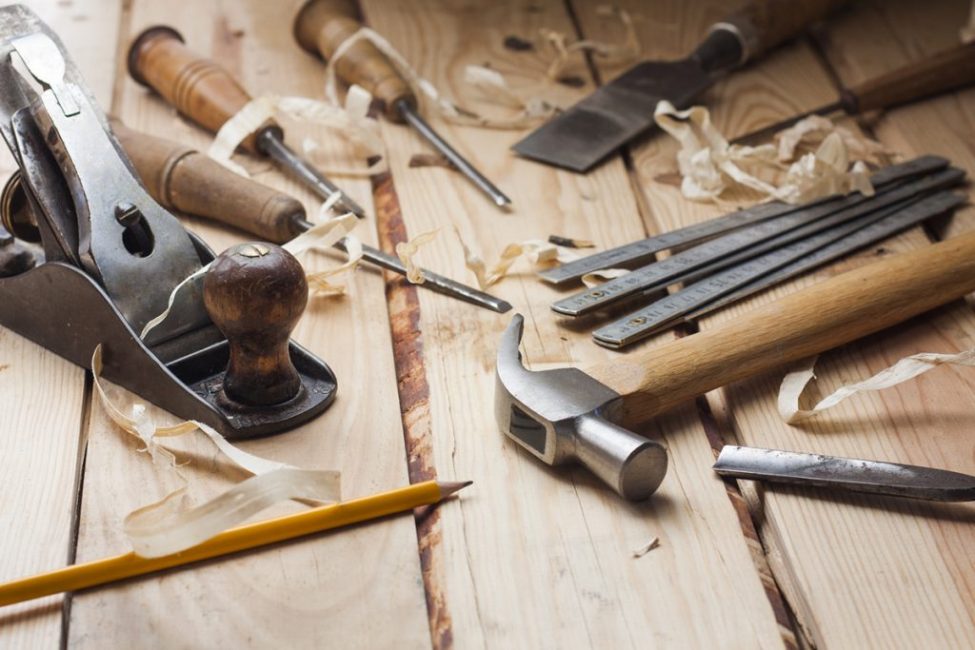
For the manufacture of most products, it is not at all necessary to purchase special equipment. In most cases, you can get by with a standard set of tools.
As a rule, for woodworking at home, you do not need to buy special equipment
drill or several types of drills for making holes for bolts, screws or wooden spikes; sandpaper.
To connect the parts, wood screws will be needed. To obtain a stronger connection, you will need screws or bolts with nuts. It's great if there is a circular saw in the garage.
In principle, for cutting a small number of parts, a bow saw is enough. If you wish, you can contact any carpentry workshop and order blanks of the required size there.
In the absence of a screwdriver, prepare small holes with a diameter half that of the screws themselves. Screwing them in by hand will be much easier.
In the future, if working with wood fascinates you, you can purchase an inexpensive lathe for the manufacture of complex parts and round blanks - it will cost 7-12 thousand rubles. If the house has an old electric motor, for example, from a washing machine, it will not be difficult to make such a machine yourself.
Do not work with a tree that has just been brought in from the cold. It should lie down for a day.
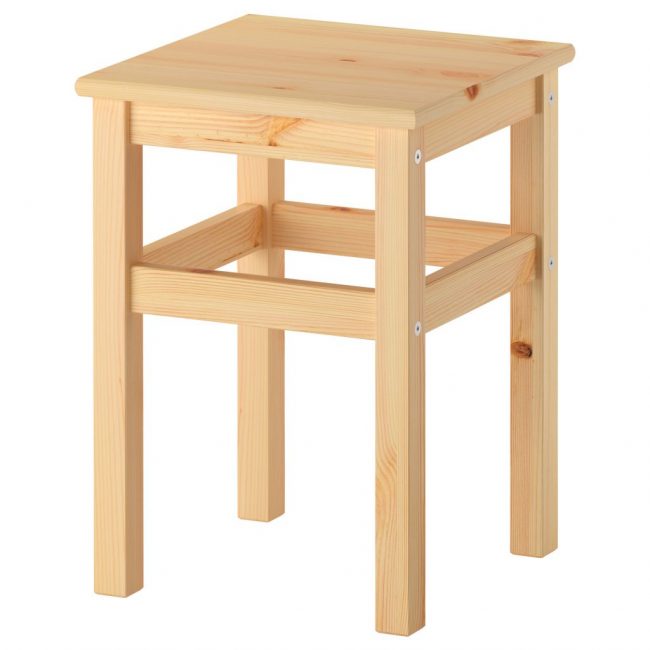
It is problematic to make complex types of furniture at home. But here is an ordinary stool, a bench, a shelf, a bed and even a wardrobe made of wood, using photos and drawings, even a novice carpenter is quite capable of making.
Stool
This type of furniture is always useful in the workshop, garage, on kitchen or cottage. The stool can be stationary, folding, have different leg lengths, seat shapes, etc.
The design of the stool can be complicated by making its upper part in the form of a box for storing small items. In the house, a folding stool-stepladder will definitely come in handy. By lengthening the legs of a regular stool, you get a bar stool.
There is always a use for a small stool
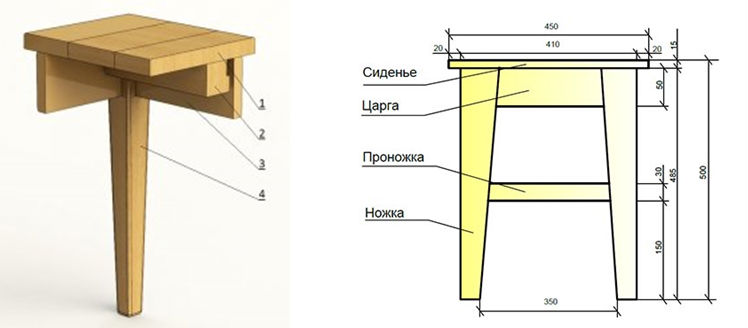
We will begin work with the manufacture of the simplest product.
For its manufacture we need:
bars for legs, tsarg (bars under the seat) and prolegs with a section of 35-50 mm
several boards for making seats or plywood; its standard size is 350-430mm
self-tapping screws
metal corners (crackers) to strengthen the structure, we will mount them under the seat
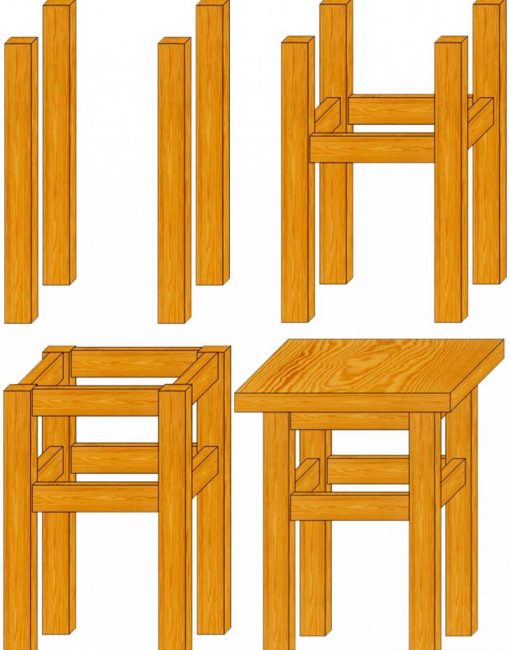
We describe the main stages of work:
Stool assembly
1Pay attention to the photo above. Assembling the stool is easy. The four legs of the stool are first connected with the help of prolegs and tsargs (bars located directly under the seat). Then the seat itself is attached.
2The standard length of the legs is 45-50 cm. For their manufacture, you can buy a bar or saw a 200 mm board. This size is most convenient - it will make 4 bars of 50 mm each.
3We are preparing some boards for sitting.
4To make the design stable, they are cut strictly at 90 degrees.
5When cutting the tsarg and prolegs, be sure to consider the length of the spikes.
6We process each detail first with sandpaper No. 40-60, and then go through them twice with finer sandpaper.
7Fastening the tsarg and prolegs on self-tapping screws will be unreliable - the product will loosen. For connection use rectangular spikes and grooves. To do this, mark their location. The width of the spike is 1/3 of the thickness of the tsarg or proleg. Length - 80% of the thickness.
8We begin the work with the preparation of the grooves - it will be easier to fit the spikes. To get a groove in the leg, it is first better to drill several holes in a row with a drill. The rest of the tree is selected manually with a chisel.
9In the absence of a milling machine, the spikes are made using a rasp and a jigsaw.
10We connect the legs of the stool in pairs (two each) with the tsargs and prolegs. If everything is correct, we drip glue into the grooves and insert blanks with spikes into them.
11To glue the seat boards together, we coat them on the sides and tighten the seat with a clamp.
12After the glue dries, we additionally strengthen the legs with the sides with the help of metal corners.
13We fasten the seat to the legs and tsargs with self-tapping screws. The stool is ready.
Stool details
Joiner's glue dries for at least a day. When working in a cold garage, this time increases.
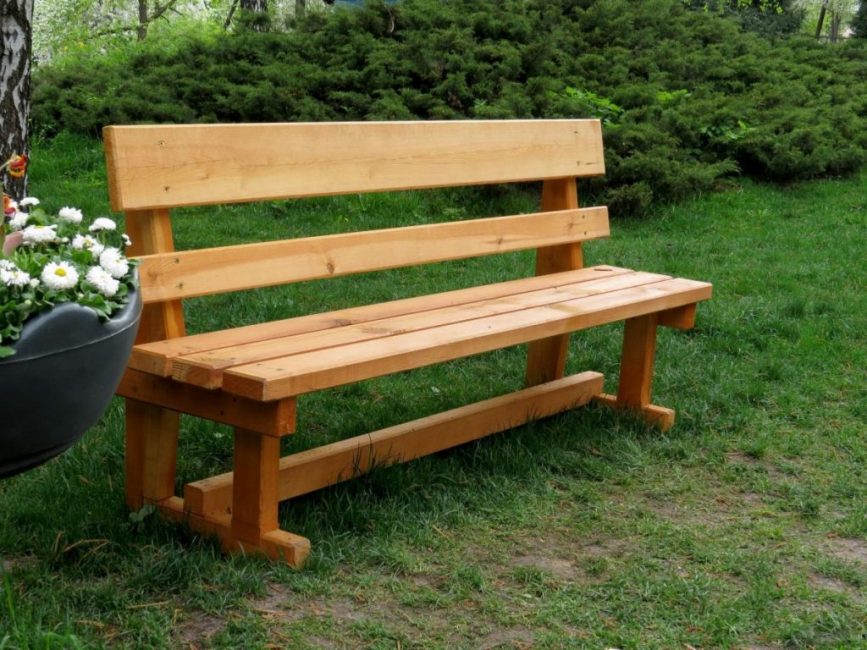
Bench
garden bench
Making a bench or bench out of wood is even easier. This design is in many ways reminiscent of a stool. The only new detail is the back. To mount it, a pair of bench legs will need to be lengthened.
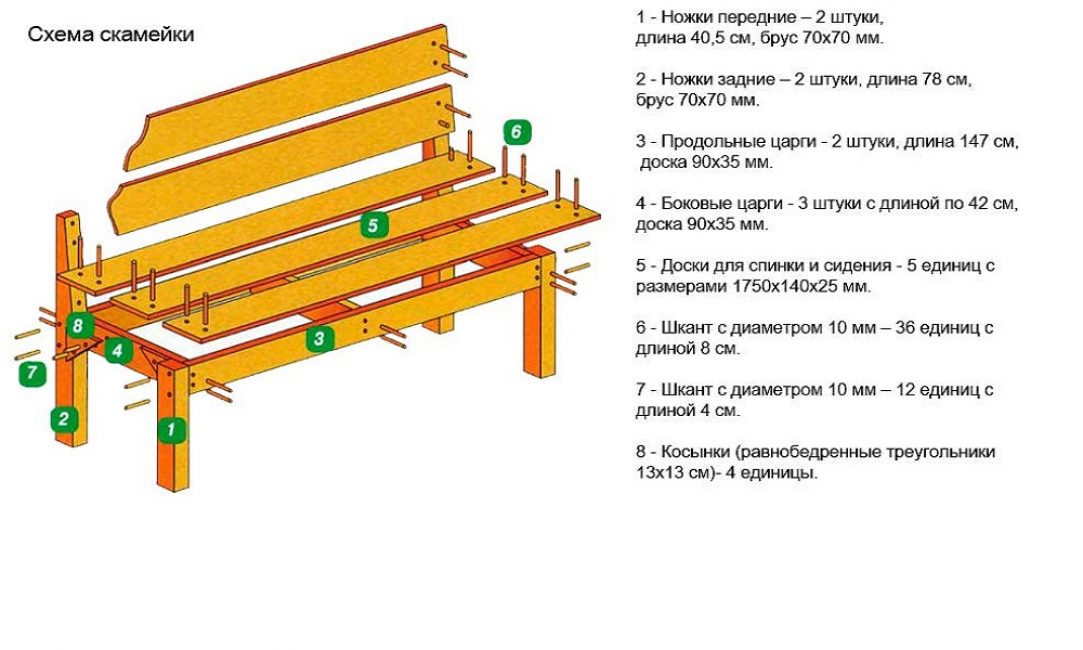
Scheme of the simplest bench
1The biggest difficulty is the manufacture of the rear legs. Their upper part is made with a slight slope for the convenience of attaching the back. But since there are only two such parts, they can be cut without the use of special equipment using a conventional bow saw.
2If there is no desire to mess around with cutting complex blanks, the rear legs can be made inclined. Just remember that to ensure stability, the bottom of the legs must be cut at the same angle.
3For greater stability, it is better to place the prolegs not in the center, but at the bottom.
4To strengthen the structure, they, as shown in the photo, can be interconnected by a transverse bar.
Chair
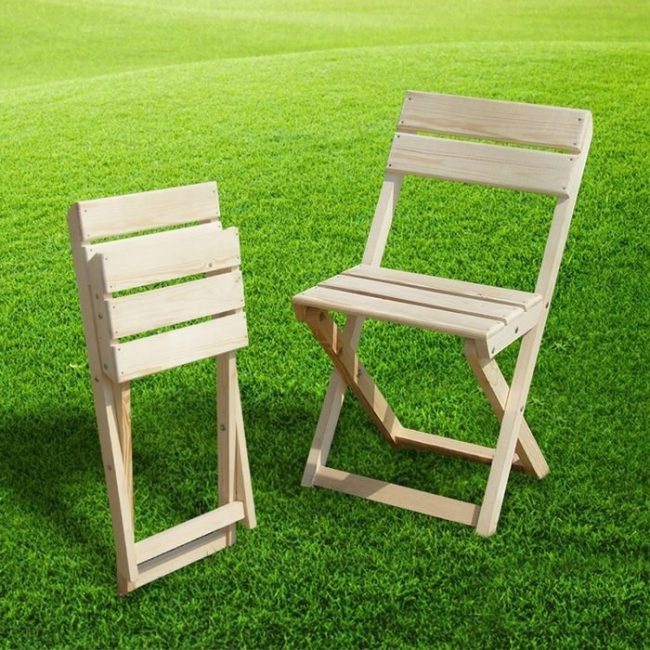
Since the manufacture of an ordinary chair with a back, in principle, differs little from the assembly of a stool and a bench, and you can already handle it on your own, we will complicate the task and make a folding chair made of wood.
Folding chair option
1It will not take up much space in the car, and you can always take it with you on a picnic or fishing trip.
2In order not to be mistaken in the calculations, make a sample of a smaller scale from cardboard. Measure each of the details. If the design turned out to be stable, you can begin to manufacture the product.
3First we prepare 2 wooden frames. In the upper part of one of them we fasten a pair of rails that will serve as a back. At the bottom of the frame, we fix the prong on the screws or with a tongue-and-groove connection (we described it a little higher).
4We make the second frame a little shorter. We also attach a proleg to the bottom. In the upper part we attach 3-4 seat rails.
5Since the legs of the chair will be inclined, their cut angle will not be 90, as usual, but 45 degrees.
6To obtain a strong connection, the seat and back are also fastened not with self-tapping screws, but with a tenon-groove connection.
7You can replace the back and seat with a durable canvas stretched over the frame.
8So that our chair does not move apart when unfolded, we install four restrictive paired bars under the seat. They won't let him fully develop.
9If the back and seat are covered with canvas, a narrow strip of fabric is pulled between the lower jumpers. It will serve as a limiter and will not allow the chair to develop.
10Cut the axle bolts to length with a hacksaw. We fix them on the legs of the chair closer to the seat. If you install them in the center of the legs, the design will be less stable. Screw cap nuts onto the ends.
11In order for the frame to close tightly, the nuts must be slightly sunk into the tree.
12You can replace wood with plywood. Cutting even curved parts out of it with an electric jigsaw will not be difficult. Straight cuts are made with a regular hacksaw. The design of such a chair will be slightly different. To assemble it, grooves are cut in plywood.
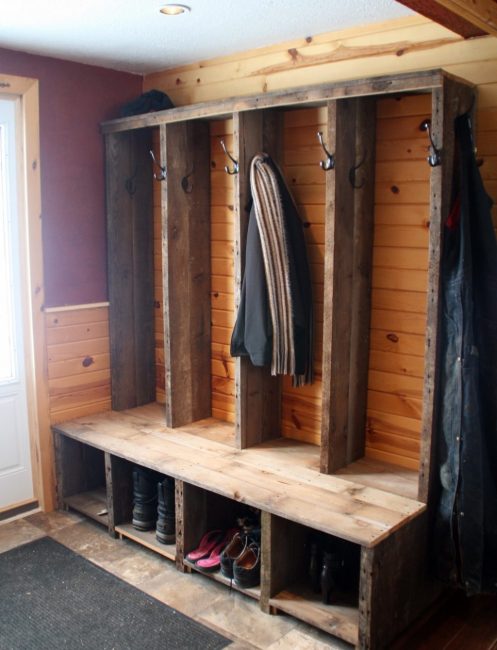
The simplest wooden shelf
The simplest shoe rack
Let's start making another product - shelves from wood. In the future, on their basis, you will be able to produce more complex products.
1After sawing the boards, their ends are sanded first with large and then fine sandpaper.
2It is necessary to grind and stain the product before the end of the assembly. After all, even small joints are always clearly visible.
3It is better to paint over a perfectly polished wood with a stain - on a dark surface, any scratches and chips will be evident.
4On sale there is a stain of different shades: under dark or light oak, nut, cherry, hazelnuts, etc. Learn that after drying, it brightens a little. When applying new layers, the wood becomes darker. More than two layers should not be applied, otherwise the surface will become spotty.
5The ends, due to the orientation of the fibers, always look darker after staining with stain. To reduce absorption, it is better to prime them first.
6Its drying time is about 12 hours. Then the product is varnished on top.
7After the blanks are completely dry, on the sides of the future shelf we make markings for attaching horizontally arranged planks.
8Without screwdriver drill small holes for fasteners. Their diameter should be half the diameter of the screws.
9Initially, it is not worth screwing them too tight. We do this only after checking the correctness of the assembly.
10We close the fastening points of the screws with plugs to match the color of our tree. They can be purchased at any furniture store.
11By the same principle, you can make a shoe rack out of wood (photos and drawings can be found on the net). Its back wall is covered with plywood, screwed to the ends of the shelf with self-tapping screws.
12If it is necessary to make jumpers in the product, they are fastened to horizontal shelves using round wooden spikes (dowels) inserted into pre-prepared holes, or self-tapping screws. To fix the board, 1-2 spikes are enough, which are pre-coated with glue.
13To hang a small shelf weighing 3-5 kg, purchase mounting loops and a 6x30 self-tapping dowel. Heavy structures are fixed with metal anchors in the shape of the letter "G".
14Learn that screwing shelves to a drywall wall in the usual way will not work. They are fixed only through the embedded bars, which are sewn into the wall in advance.
Do not overdo it with glue - it is applied in a thin layer in drops or a thin stream. When it dries a little, remove the excess. It is more convenient to do this with a clean paint scraper.
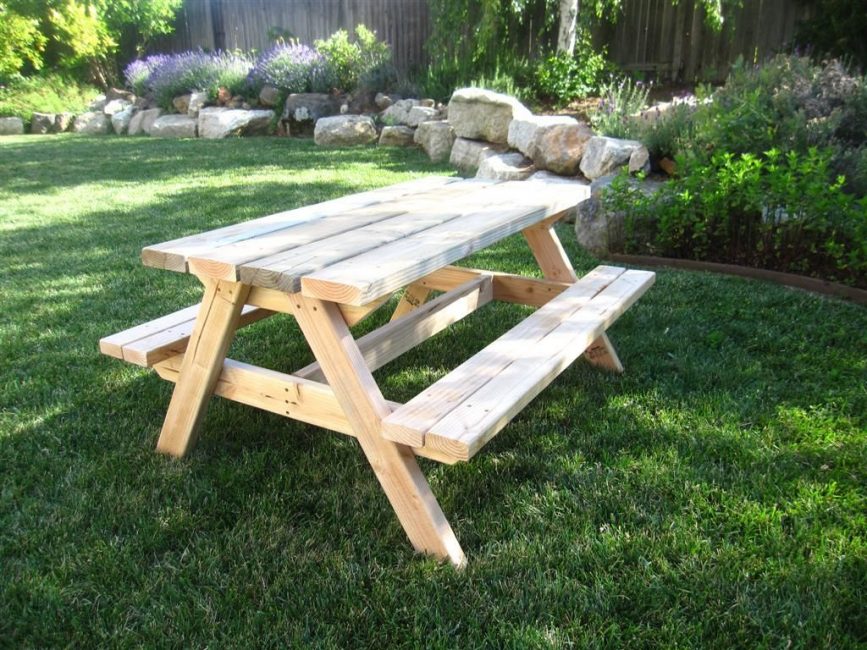
Table
garden table
Having built a table from wood, you can install it in the kitchen, in the bathhouse or in the garden house.
1The length of the tabletop depends on the number of seats. 50-60 cm is enough for one person.
2The standard table height is 165 cm.
3First, an underframe is made - a frame consisting of legs and drawers - connecting elements for fastening the tabletop and legs.
4According to the standards, only tenon joints are used to assemble the underframe. However, even furniture factories in recent years have been using less durable connections in the form of dowels (plug-in cylindrical rods, popularly called chopiks) and self-tapping screws.If you don’t want to mess around with cutting out the spikes, be sure to reinforce the corners of the underframe with “crackers” - metal or wooden fasteners.
5But nevertheless, spikes with semi-darkness are a more durable connection for the legs and the tsarg, when part of the spike in the upper part is cut out in half. They must be glued on.
6The tabletop is assembled from boards, paying attention to the direction of the fibers, so that when the wood dries, there are no problems with skew. Pay attention to the texture of the boards. With a successful combination of wood pattern, the product will turn out to be more original, and the joints will be less conspicuous.
7The boards of the tabletop are interconnected with dowels and dowels (wooden chopsticks). To do this, 8-12 mm holes are prepared at the ends. It is necessary to drop a little glue into them, carefully distribute it with a wooden torch and insert a dowel inside. The finished tabletop is tightly pulled together and left to dry completely.
The design of the garden table may be somewhat different. To strengthen its legs, it is pulled together with transverse bars, as shown in the diagram below.
It will be a big disappointment if, during assembly, the prepared parts do not fit perfectly with each other. Always check any connection at once.
Hallway
Cabinet furniture is more difficult to manufacture. Let's start learning how to assemble it from wood from the hallway. You can make it from furniture panels left over from old furniture, grooved boards, chipboard or plywood.
Hallway furniture option
It is necessary to stock up on accessories. Depending on the design, we may need door hinges, ties, metal bars for hanging hangers, etc.
1The design of the hallway can be any. Below we have provided only one of the possible drawings. If desired, a variety of its configurations can be found on the network.
2The simplest screed used to assemble the case are metal corners and self-tapping screws. On each side you will need 3-4 fasteners.
3More expensive, but also the most durable fasteners are special furniture ties, for example, extratrical. It is completely recessed into the tree and does not cling to stored things.
4When cutting out the body parts, do not forget to file the corners under the skirting boards at the bottom.
5The back wall of plywood, adjacent to the wall, is fixed with an overlay or a quarter with ordinary screws. The latter method gives a stronger connection.
6Shelf holders are used to install shelves. The simplest of these is a metal or plastic pin.
7Doors are hung on any kind of hinges. First, markings are made with a pencil through the holes. To prevent the door from loosening quickly, retreat at least 10 cm from the top and bottom. For heavy doors, it is better to use not 2, but 3-4 loops.
8To prevent pencil graphite from being erased, after checking the correct connection, mark the places of future holes with a nail or awl.
9Be sure to check that the hinges do not fall at the level of the shelves - they will not allow the door to close completely.
When drilling holes for fittings, keep drill strictly vertical. Otherwise, if there are bevels in the tree, chips will quickly appear.
10After hanging the sash, it will need to be adjusted.
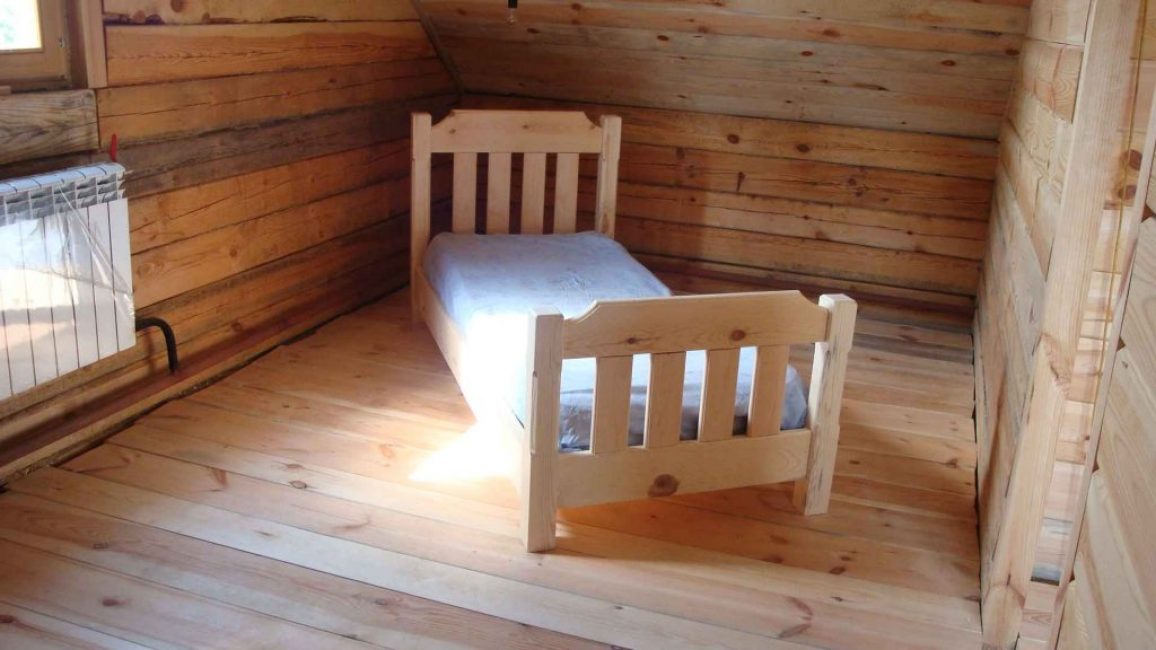
Bed
small wooden bed
Drawings of a wooden bed for assembly are not so difficult. We will describe only its principles.
1In order not to be mistaken with the size of the sleeping bed, before you start assembling the bed, purchase a mattress.
2It is not necessary to make a frame end-to-end. After all, the mattress over time slightly "spreads" on the sides. Therefore, add 1 cm to the frame on each side.
3To make the case, you will need old furniture panels or planed boards. It is better to use a more durable coniferous tree.
4First, the frame is assembled using metal corners or special furniture ties and self-tapping screws.
5To lay the mattress, it is necessary to install several jumpers made of durable boards across the frame. After assembling the frame, plywood 12 mm thick is laid on them.
6Another option for attaching the mattress is wooden lining at the bottom of the frame, on which the transverse slats are laid.
7If desired, at the head you can make a box for storing things in the shape of the letter "P" with a hinged top cover.
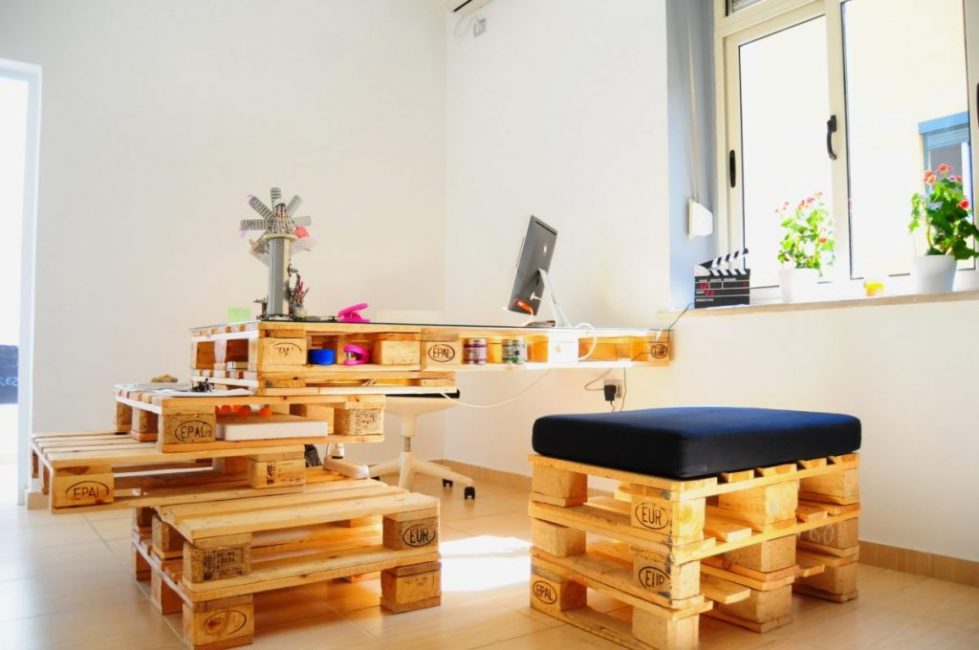
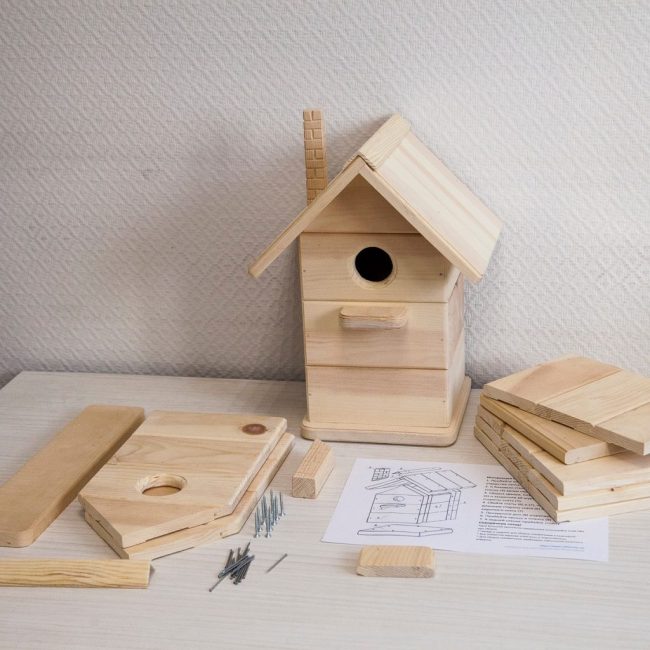
Buying expensive products for a summer cottage does not always make sense. It is much easier to assemble a table, chairs, benches and benches from old furniture or planed boards left after construction. From them you can also build a swing, a gazebo, and from waste wooden material - a birdhouse.
It turns out that a single bird is capable of destroying a thousand harmful insect larvae in a season. Therefore, a birdhouse in the country, made by hand, will be most welcome here.
1Its width is always standard - 10-12 cm. The height is selected depending on the type of birds that you want to attract to your site. So, for starlings, a house 60 cm high is required, but for tits, flycatchers, redstarts, it should be low - up to 26 cm.
2Woodpeckers will need a dwelling in the form of a triangle. A birdhouse for wagtails is always laid on its side and a trapik is attached to it. The flycatcher needs a birdhouse with a notch in the form of a gap, and the robins need a house with a slightly open front wall.
3For the manufacture of a bird house, only tes is used. After all, the inner sides of their dwellings and the facade should be rough. On a smooth surface, it will be difficult for the chicks to get out. For the same reason, the house is never painted or varnished. If there is no tesa at hand, you can use a planed board, on which notches are manually applied.
4Never use a coniferous tree to create a home for birds. Wings smeared in resin, for birds - certain death.
5Draft is dangerous for chicks, so saw the boards at 90 degrees so that no gaps form when they are connected. The birdhouse is never glued, but only knocked down with nails or twisted with screws. After all, the glue will scare away sensitive birds. For the same reason, you should not take chipboard or plywood for building a house.
6To make the bird house easy to clean, provide a removable cover. It is better to stuff a blank on it equal to the internal dimensions of the birdhouse. Such a dense cover will never be torn off by the wind.
7You can also hang the lid on ordinary hinges. In this case, be sure to provide a hook or latch.
8A 4 cm perch is attached with glue. Its diameter is 1 cm.
9A long pole is nailed to the back of the birdhouse.
10Lay moss, tow or sawdust at the bottom. To protect against drafts and bad weather, carefully coat all the cracks.
11A birdhouse is fixed at a height of 3 m with an entrance to the east or southeast. For starlings, an even greater height is required, up to 8 m. To prevent raindrops from falling inside, it is better to tilt it slightly forward. To prevent cats from reaching the dwelling, when hanging it on a tree, remove large neighboring branches.
The birdhouse is always placed in the shade - in the summer, in the open sun, the chicks will be uncomfortable.
Never make a birdhouse larger than the standard size. This will encourage the birds to lay more eggs than they can feed. As a result, some of the chicks will simply die.
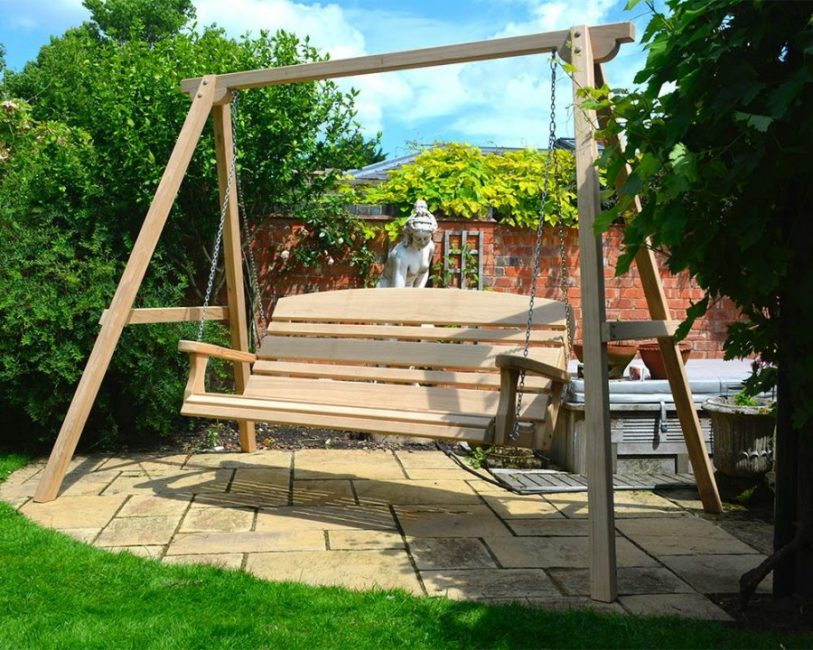
Swing
Plastic Chinese swings are not very durable, they are enough for one or two seasons. It makes no sense to spend extra money on expensive products if there is lumber on hand left after repair or construction. Solid wooden swing made of wood will delight both children and adults.
Swing with hanging bench
For racks and crossbar swings, use strong wooden bars with a cross section of 100 mm or more.
We will also need:
board for the manufacture of a seat with a thickness of 3 cm
metal chains or thick rope
several carabiners for hanging it; you can replace them with bolts and studs
sand and cement for pouring pillars into the ground
metal corners and screws
You should not install a swing on a concrete surface - after all, if you fall, the probability of injury will be very high. Choose a place for them on a lawn or soft sand.
Make sure that there are no protruding rebars, large stones and tree branches nearby.
1The height of the children's swing is from 2 m. If adults also use them, increase it to 3.5 m or a little higher.
2The swing support can be U- or A-shaped. In the latter case, the pillars can not be buried in the ground.
3When connecting the bars at an angle in the form of the letter "A", provide a crossbar between them. It is pulled together with metal corners and screws. For fasteners, cuts are made in the timber, into which the studs are installed.
4Do not tighten fasteners too tight. First, adjust the support with a building level, and only then screw in the screws to the end.
5According to GOST, the frame should be half a meter wider than the seat. Its size is chosen at its own discretion. The seat can be made with or without a back. With a length of 50 cm or more, adults can also use the swing.
6After cutting the parts, be sure to sand the planed boards with sandpaper.
7When installing supports for a U-shaped swing, treat the bottom of the pillars with bitumen and wrap with roofing material. This way you protect the tree from premature decay. Cover the remaining wooden parts of the swing with an antiseptic, drying oil, varnish or paint.
8The supports are buried in the ground by 1 m and must be poured with a cement-sand mortar. To protect against underground moisture and frost heaving, cover the bottom of the pit with crushed stone by 20-30 cm. It is necessary to hang the swing only after the cement has gained strength - not earlier than in a week.
9For attaching chains or ropes, it is better to use eyebolts. They are very durable and provide a large swing amplitude. To install them, the wooden crossbar is drilled through in 2 places.
10For a narrow seat, 2 fasteners on both sides are enough. For a wide seat, you will need 4 of them already.
11If it is small, you can do without carabiners, stepping back a few centimeters from the edges and making a couple of holes in the tree to insert a chain or rope.
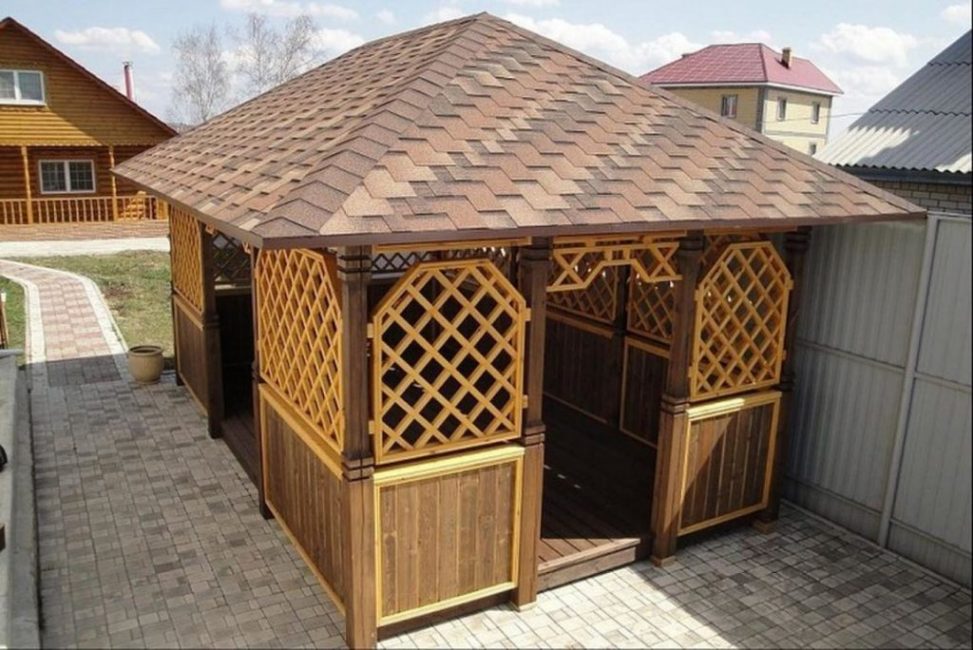
Alcove
Gazebo with 4-pitched roof
Planting and basic watering have come to an end? It's time to start landscaping gazebos made of wood with a pitched roof.
1It is better to choose a place to rest in the shade of trees, among greenery or surrounded by ornamental shrubs. They will be able to protect the gazebo from the piercing wind. It is great if there is a reservoir next to it. You should not just place the building in a lowland - sewage will heat it up.
2After clearing the site and leveling it, mark the location of the gazebo with twine and pegs. It should be 1.5 m larger than the size of the structure itself.
3A light structure does not require a powerful foundation. It is enough to erect columnar supports made of concrete or brick.
4For a 3x3 m gazebo, you will need 9 concrete or brick supports. They are buried in the ground by 30-40 cm. When using bricks, they are laid on a mortar in 5-6 rows so that the last row rises above the ground.
5When concreting or laying bricks, metal 10 mm rods 40 cm long are laid in the corner supports so that half of their length (20 cm) is recessed into the support.
6Now we are preparing the base of the gazebo from the bars. Their optimal section is 100x100 mm. The bars are interconnected with a half-tree fastener. To reinforce such a square or quadrangular base, provide 1-2 transverse beams in it.
7At the corners in both bars, drill holes for the bars (as you remember, we have already laid their metal rods in the extreme supports).Make the same holes in the bottom of the support pillars.
8At the top of the supports, immediately prepare rectangular cuts for attaching the roof rafters.
9After installing the posts and leveling them with a building level, reinforce them with struts located at an angle of 45 degrees.
10On 4 sides of the assembled frame, we install horizontally running bars - strapping. The harness, located in its lower third, at a height of about 1 m from the ground, will serve as the railing of the gazebo.
11To equip the roof, you need a horizontal cross. To do this, select rectangular recesses in the center of the bars for the “half-tree” bundle. To strengthen this fastening, screw wooden blocks in each of the cross corners of the cross.
12At the top of the support pillars, we have already prepared cuts. Now prepare cutouts at the ends of the cross so that their dimensions match the cuts of the supports.
13Attach the assembled crosspiece to 4 pillars.
14To create the rafters, we need a wooden octahedron, fixed in the center, which will rest on the cross. Its length is 80 cm.
15In the upper part of the octahedron, we prepare a rectangular cut, to which the first pair of rafters will be attached. This fastening is reinforced with self-tapping screws. The second pair of rafters will be attached overlay on top of the first pair. When trimming the rafters, be sure to leave a small 30 cm overhang above the roof.
16Four more rafters with their lower ends will lie on the supporting pillars. They are screwed to the octahedron with self-tapping screws.
17To prevent the roof from being squeezed by snow, you can install a few more support pillars that will rest on the rafter beam and strapping.
18To minimize the load on the roof, bring these supports under them very tightly, with a slight interference.
19At the entrance to the gazebo, we fasten 2 pillars to metal rods. We strengthen them with struts located crosswise.
20It remains to prepare the crate for the roof and sheathe it with plywood. You can cover the roof with any material of your choice.
21The lining is attached to the bars fixed between the railing and the bottom strapping.
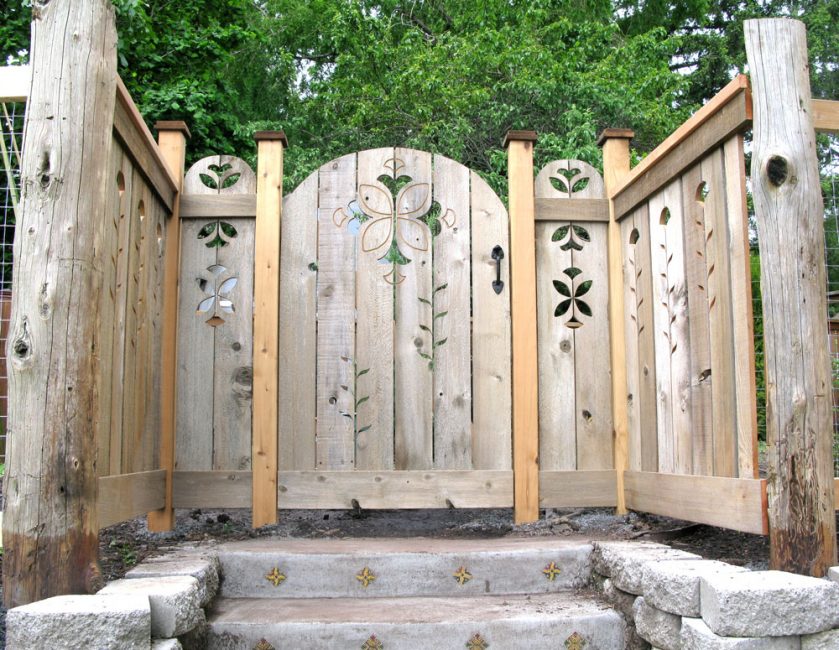
Gate
You can make a gate for the garden of any shape, from the simplest to the most elaborate and original. We will describe only the main stages of its installation.
Beautiful wooden gate, handmade with carvings
We will need:
support posts made of 10x10 mm timber or logs
wooden beam for frame 3x4 or 4x4 mm
picket fence, plywood or board (if you will make the gate leaf solid) for sheathing
galvanized screws and ties
loops for hanging the gate
metal or wooden handle
latch or overhead lock if you plan to close the gate with a key
Time to get to work:
1Choose the height of the gate at your own discretion. She can go with fence, be below or above it.
2The principle of its manufacture is simple. First, a frame is made, then a crate is stuffed onto it.
3The simplest frame for attaching a picket fence is in the form of the letter z or x. The frame has the shape of a rectangle with a board-crossbar (strut) and boards stuffed horizontally or diagonally on it.
4Old rotten supports are dismantled. If they are strong enough, you can hang a gate on them.
5Concreting will increase the service life of supports by 2-3 times. For them, pits 0.5-1 m deep are prepared, at the bottom of which crushed stone is poured. It will be able to protect the structure from frost heaving and excess moisture. On loamy soils, the pillars are buried by 1 m; on sandy soil, 0.5 m is enough.
6You can strengthen the concrete structure by laying reinforcement or rubble stones.
7The lower part of the supports is fired at the stake or impregnated with bitumen. Then it is wrapped with roofing material.
8The standard distance between the posts is 1-1.2 m.
9After installing the supports in the pit, they are leveled building level. Cement mortar is poured between them and the soil. Don't forget to pierce it with a shovel to remove voids.
10You can continue to work only after a week - the cement should be well strengthened.
11The gate begins to be made only after the installation of the supports - it is necessary to accurately measure the distance between them. The width of its frame is 1 cm less than the distance between the posts. It is collected on a flat area. This will avoid distortion.
12The frame skin is attached with self-tapping screws. It can be very different: solid, have windows or be sparse, arranged in the form of a Christmas tree or a semicircle. The design with carved slats looks very decorative.
13The bars of the frame are connected by metal corners. We strengthen it with a strut located at 45 degrees.
14It remains only to attach the hinges, the handle and hang the lock. The hinges are selected depending on the weight of the gate. To hang a heavy structure, they must be powerful enough and have long "arrows" to which the gate is screwed.
If you are fascinated by working with wood, in your free evenings you can make any products from it: from the simplest coffee table to cabinet furniture. The author of the following video picked up the best works made from this material. We hope you find some of these ideas helpful:
Wooden beds. Original wooden furniture. Ideas
Do-it-yourself furniture and other wood products: drawings of benches, tables, swings, birdhouses and other household items (85+ Photos & Videos)
8Total Score
Conclusion
Feedback from our readers is very important to us. Leave your rating in the comments with the reasoning behind your choice. Thank you for your participation. Your opinion will be useful to other users.
Good evening. Please tell me, after 9 classes, my son wants to make wood products and furniture with his own hands, who should he apply for, which educational institution should he choose, we are from Belarus. Help me please. I would appreciate any information and would be very grateful.


Thank you so much for sharing such inspiring ideas! Now my hands are itching to create something like this ourselves!
Good evening. Please tell me, after 9 classes, my son wants to make wood products and furniture with his own hands, who should he apply for, which educational institution should he choose, we are from Belarus. Help me please. I would appreciate any information and would be very grateful.