
 + Reviews")
Any man who knows how to hold a drill and a saw in his hands will cope with the manufacture of a locker on the balcony with his own hands. Handwork is good because it provides an immense field for the realization of your ideas. How many doors to make the cabinet - 2 or 3? Make a closet height to the ceiling or lower, or maybe multi-level? What to use for the frame - a wooden beam or a metal profile? Make the doors hinged, sliding or use roller shutters? Or maybe leave the shelves open, and then sew curtains for them?
Content:
 Read also: Projects of country houses for 6-10 acres: 120 photos, description and requirements | The most interesting ideas
What are the cabinets?
Embedded. Most often, you will receive just such a cabinet if you order it in specialized organizations. Of course, it will be delivered unassembled. Floor, walls, ceiling, shelves and cabinet doors are made of solid boards more often than chipboard, both cheaper material and MDF.
Right on the spot, the cabinet will be assembled from structural elements, fastening them with metal furniture corners, and installing plastic furniture corners inside. Actually, having ordered all these elements, it costs nothing for a craftsman to assemble a wardrobe, but all the same, its cost will be quite impressive.
balcony wardrobe
Frame. Only by going along this path, you can significantly save not only on materials, but also on work, but for this you will have to go through all the stages on your own. And it is about the installation of a frame cabinet that we will describe in more detail.
 Read also: Veranda attached to the house - expanding the living space: projects, tips on how to create your own hands (200 original photo ideas)
 What tools are required
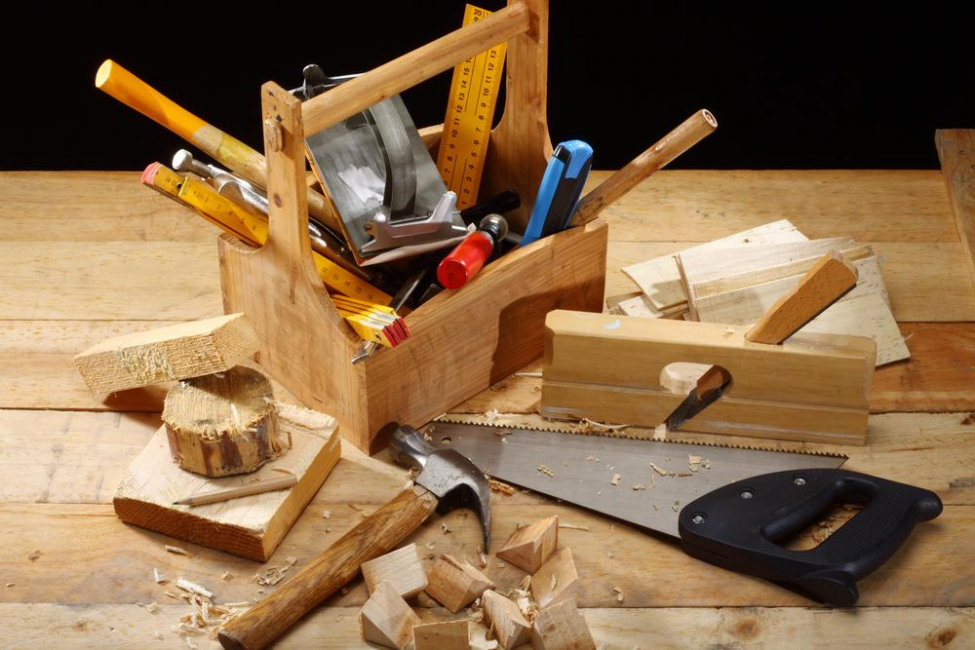
carpentry tool
- hammer drill or drill with a set of drill bits for concrete and wood
- saw or jigsaw
- hammer and chisel
- screwdriver set or screwdriver
A manual electric mill is very useful. This tool is used for processing the edges of wooden parts, they do not have to be given to a carpentry workshop, but to do this work yourself. With it, it is convenient to make recesses for loops. In a word, the thing is extremely useful.
You can cut the necessary grooves and recesses for the hinges, process the edges with a hand-held electric milling cutter and a grinder.
In today's world, there are many tools facilitating carpentry work, so all work should be done carefully and carefully so that the result pleases at any stage of their implementation.
In addition, you need:
- fittings
- metal and plastic furniture corners
- door or furniture hinges
- fasteners
- nails, screws, dowels or anchors
A carpenter cannot do without a metal ruler, a square and a pencil. You will need a building level and a plumb line.
 Read also: How to make a children's house with your own hands: from wood and other materials. Dimensional drawings | (80 Photo Ideas & Videos)
Material selection
Tree
Wooden cabinet
- Unsurpassed eco-friendly and breathable material. But it is expensive, so not always financial possibilities allow you to make a completely wooden cabinet on the balcony.
- In addition, on an open balcony, a tree tends not only to swell from moisture, but also to become covered with mold or fungus, and be affected by insects.
- Therefore, it is very important to treat wooden parts with varnish or special impregnation.Paint and varnish products and impregnations for balcony cabinets should be taken the same as for outdoor work.
- The least pungent smell has a water-based varnish. But it is not necessary to paint the tree, from this it will lose its natural beauty.
- Quite often, lining and plywood are used to make parts for a balcony cabinet.
Chipboard
Chipboard cabinet
- In most cases, shelves for cabinets are made from it.
- Possesses the increased resistance to differences of temperatures.
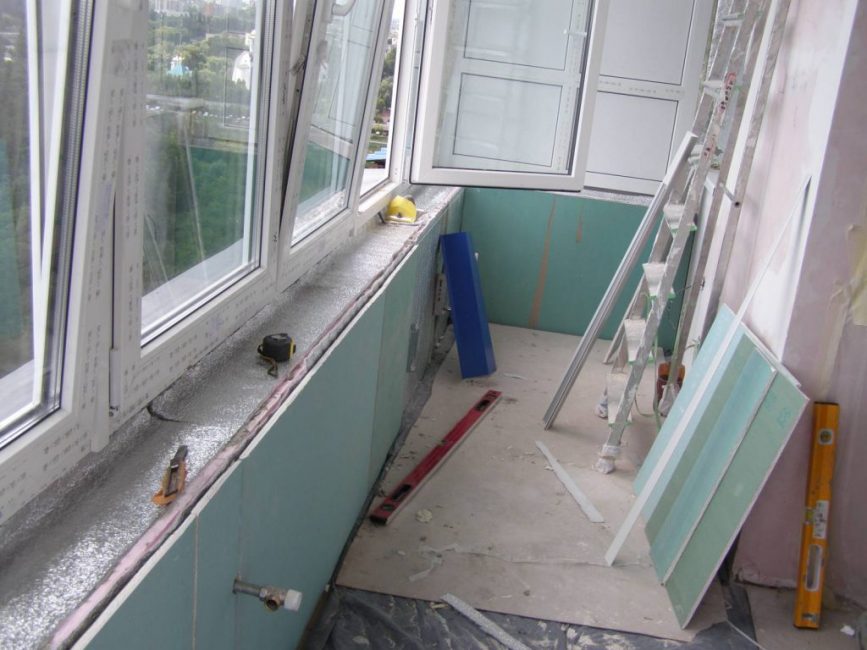
- On balconies, more moisture-resistant laminated chipboard is more often used. MDF, like OSB, has the best moisture resistant qualities, but due to the high cost they are used less often.
Drywall
Using drywall for a balcony
- Lightweight, easy-to-use material, and inexpensive. But the maximum that can be made from it for a balcony cabinet is the doors: sheathe the door frame with drywall sheets using self-tapping screws, glue the joints with reinforcing tape, putty and sand.
- Prime the dried surface, dry it again and paint with water-based paint or wallpaper.
- As a result, if you show a drop of imagination, you can get an unusually beautiful facade.
- Use drywall with caution for the side walls of the cabinet and it is better not to use it for shelves at all., it can turn out to be more expensive for yourself if one day the shelves cannot withstand the weight of the items and fall apart.
Plastic
Ceiling cabinets on the balcony
- Thick plastic is able to withstand temperature extremes and precipitation, so it is more expedient to mount the cabinet completely on open balconies, up to shelves made of thick plastic, of this material on a metal frame.
- It is flexible and bends easily, so the back and sides of the cabinet can be made from a single piece of plastic.
- Two-layer thick plastic for this, you just need to cut one layer at the fold.
- Plastic is very light, resistant to aggressive environments, it is very easy to take care of it, wash it. It is ideal for a closet if the balcony walls are made of plastic lining.
Rack
- Quite often, several types of material are used for balcony cabinets at the same time. Metal profile and plastic are recommended for open balconies, where the impact of temperature changes, rain and snow will be stronger. But chipboard and drywall are best used only for closed and preferably insulated balconies.
- The main goal is to make the cabinet not only functional, but also inexpensive. Therefore, the remnants of other works or parts of the old furniture. In skillful hands, all this will play in a new way and can turn out to be a masterpiece of its kind.
- For the frame, wooden bars are best suited. Masters recommend using pine bars with a section of 4x4 cm, 5x5 cm, 4x6 cm, etc.
- If the cabinet is located on an open balcony, then it is better to use a galvanized metal profile for the frame.
- For the back wall you will need a sheet of plywood or plastic or a chipboard sheet.
- For the manufacture of shelves reliable and durable materials should be used, primarily wood or chipboard. The edges of the cut shelves and door parts should be carefully processed with a manual electric milling cutter.
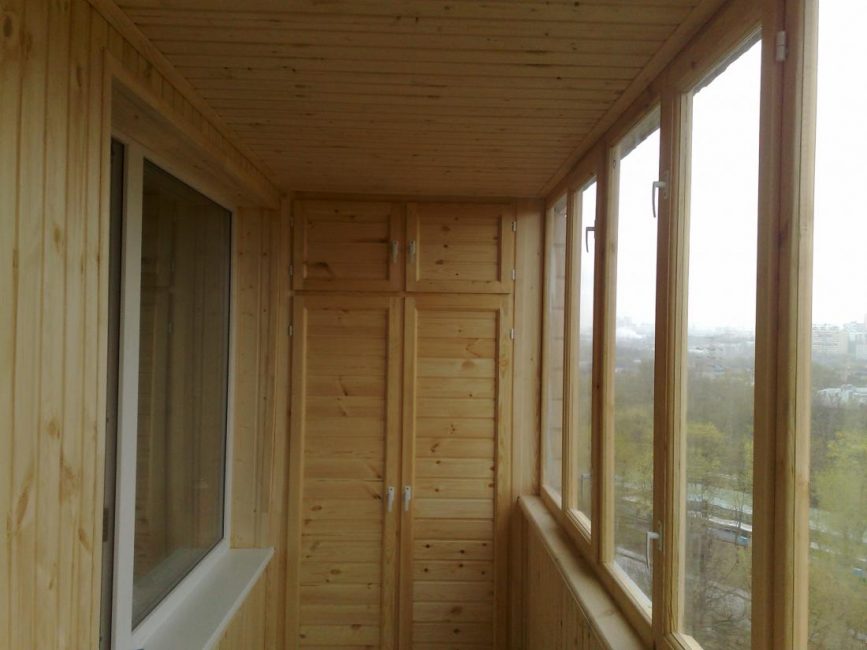
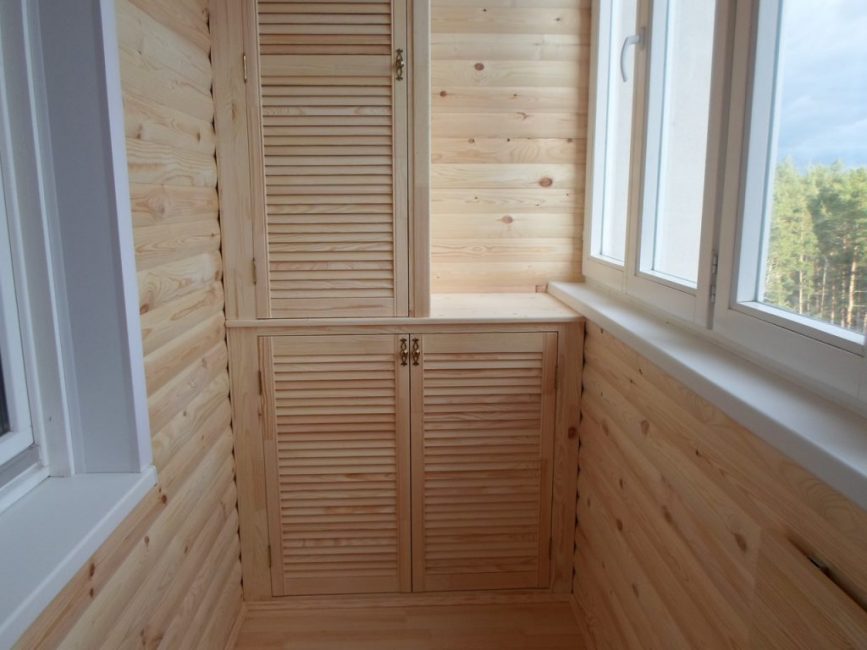
- Doors are a complex and variable design element that gives the appearance of the entire facade. They are made of wood, in particular, lining, laminated chipboard, drywall or plastic. They can be assembled from leftovers and as a result get a unique exquisite facade.
 Read also: How to make a booth for a dog with your own hands: building a home in the yard and in the apartment. Drawings, dimensions and original ideas (55+ Photos & Videos) + Reviews
 Cabinet configuration
Wardrobe under the window sill
Perhaps this is the most responsible decision. Since the cabinet will be fixed in the selected place, it will not be possible to move it in the future and subsequently it can only be dismantled.
- Option 1. The easiest way is if the balcony has 3 blank walls.Inside, you can fill the bars - guides under the shelves and hang the doors on vertical racks
- Option 2. A shallow closet framing the window. This is an exotic option, but it can come in handy for large balconies.
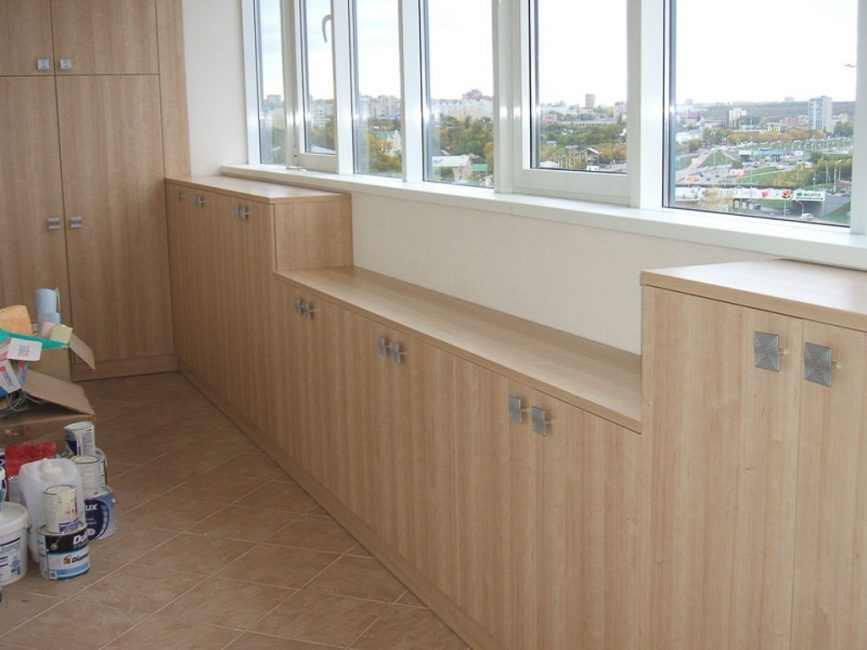
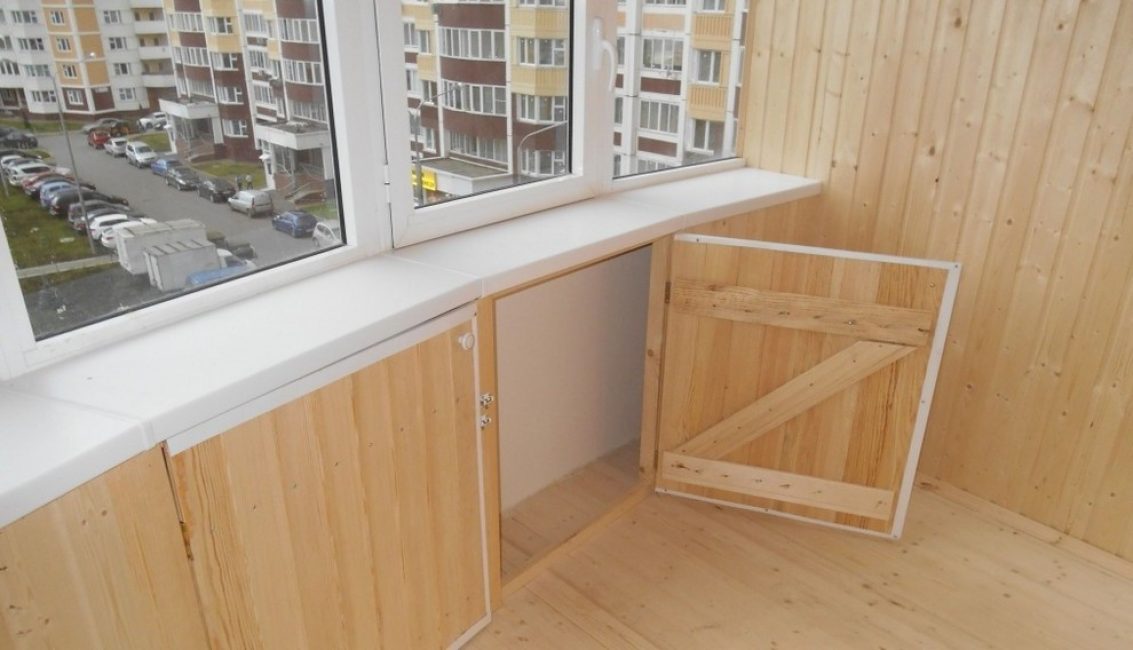
- Option 3. In the event that the balcony is glazed, under a wide window sill, you can construct a low and shallow (to the width of the window sill) cabinet. It looks good and has great functionality.
- Option 4. Most often, the wardrobe is built into one of the end sides of the balcony. Or they make 2 symmetrical ones, one opposite the other
- Option 5. Corner cabinets are different. You can simply make it triangular by using two adjacent walls to install the crossbars and placing triangular shelves inside. And you can fill two bars at the top and bottom at an angle to each other and nail the typed boards to them, which form 2 more walls. Inside, place shelves on the rails and hang the door in the resulting opening.
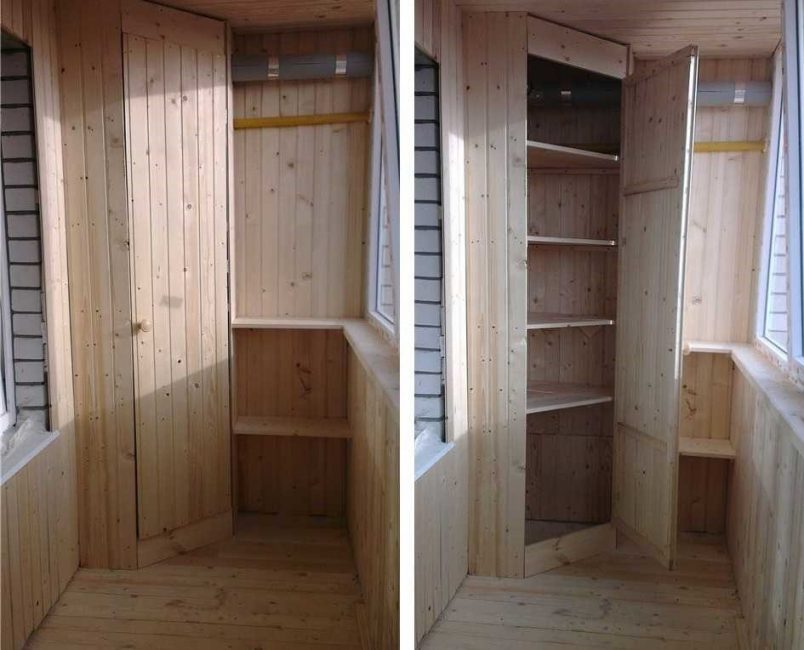
Corner cabinet example
![[Instructions] How to make beautiful and unusual wall shelves with your own hands: for flowers, books, TV, kitchen or garage (100+ Photo Ideas & Videos) + Reviews](https://iherb.bedbugus.biz/wp-content/uploads/2018/05/19-6-300x213.jpg) Read also: [Instructions] How to make beautiful and unusual wall shelves with your own hands: for flowers, books, TV, kitchen or garage (100+ Photo Ideas & Videos) + Reviews
Read also: [Instructions] How to make beautiful and unusual wall shelves with your own hands: for flowers, books, TV, kitchen or garage (100+ Photo Ideas & Videos) + Reviews
Dimensions and layout
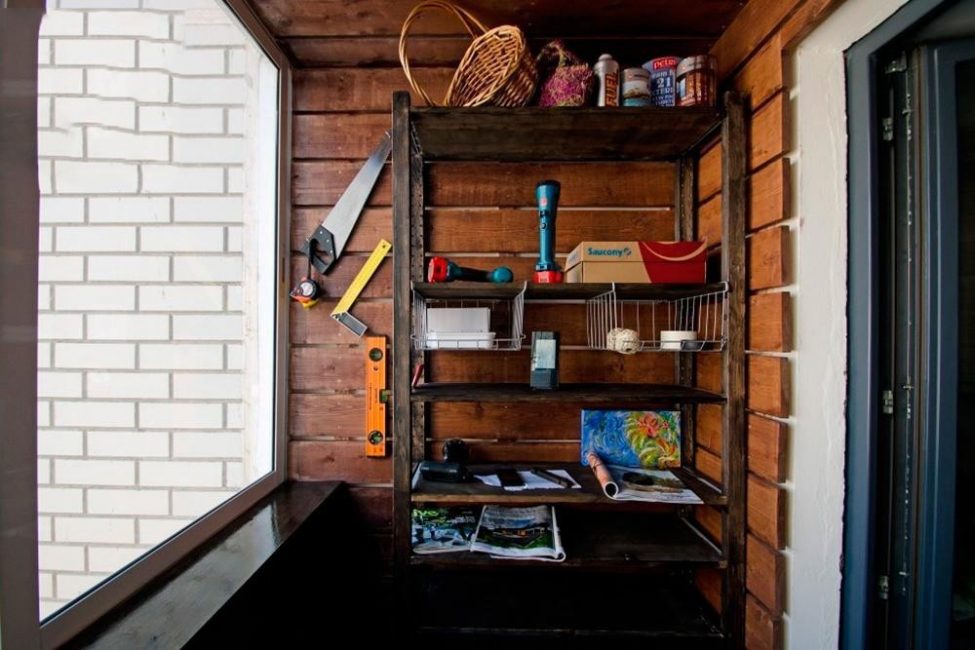
Rack with tools
- Using a tape measure, you need to measure the dimensions of the future cabinet - height, depth and width. The laser tape measure used by designers is very convenient in this regard, but the usual one is also quite suitable. If we have already remembered the designers, then the first rule for them is to take an extremely responsible approach to taking measurements, because the final result will largely depend on this.
- You need to be prepared in advance for the fact that the corners will not always have the prescribed 90 degrees and the distance from the floor to the ceiling in different places will have a different value. But knowing this in advance, you can level out some flaws.
- To maximize usable space, as well as increasing the rigidity and stability of the entire structure, most often they make a cabinet high to the ceiling, on which ceiling bars are fixed.
- Its depth is determined by the distance to the window, because the elements of the cabinet should in no case overlap the window space. It looks messy and interferes with the flow of sunlight into the room.
- The width of the cabinet is determined by the width of the end of the balcony.
- Based on the measurements, you need to make a drawing. Yes, you still need it, even if you don’t know how to draw at all, it will come in handy. Because the next step is markup.
- Marking starts from the ceiling. Having drawn a “beam” on it, using a plumb line, you need to transfer the drawing to the floor, and then draw vertical lines on the walls connecting the “beams” of the floor and ceiling into a closed rectangle - this is the place where the future frame frame is attached.
- In order not to be mistaken, the most meticulous ones make a full-size cardboard layout, and then cut out all the details of the future cabinet from it. This is a long and laborious process, but subsequently justifies itself by saving materials.
- And yet, you need to be prepared for fitting parts in the process.
![[Instruction] Do-it-yourself laminate on a wooden floor: a complete description of the process. Laying schemes, what materials should be used (Photo & Video) + Reviews](https://iherb.bedbugus.biz/wp-content/uploads/2018/05/laminat-300x200.jpg) Read also: [Instruction] Do-it-yourself laminate on a wooden floor: a complete description of the process. Laying schemes, what materials should be used (Photo & Video) + Reviews
Read also: [Instruction] Do-it-yourself laminate on a wooden floor: a complete description of the process. Laying schemes, what materials should be used (Photo & Video) + Reviews Step by step installation

Balcony improvement
If you understand the basic principle of operation, then installing the cabinet will not be difficult. It is necessary at each stage to take measures to strengthen the structure: use metal furniture corners, refuse flimsy materials. And constantly, before fixing work, check the level.
frame
- First of all, it is necessary to make the back wall of the cabinet out of plywood or not very thick chipboard.
- The basis of the cabinet is a frame, most often made of wooden bars. Everyone chooses the sequence of mounting the frame that is convenient for him.
- In one case, the back and front frames are first made, fastening the vertical and horizontal bars with self-tapping screws and strengthening with furniture corners.
- Start the installation from the rear frame, combining it with the markings, and drill through the fasteners. The frame is removed, inserted into the holes plastic dowel plugs, reattach the frame and screw in the screws, fixing the frame on the back wall.
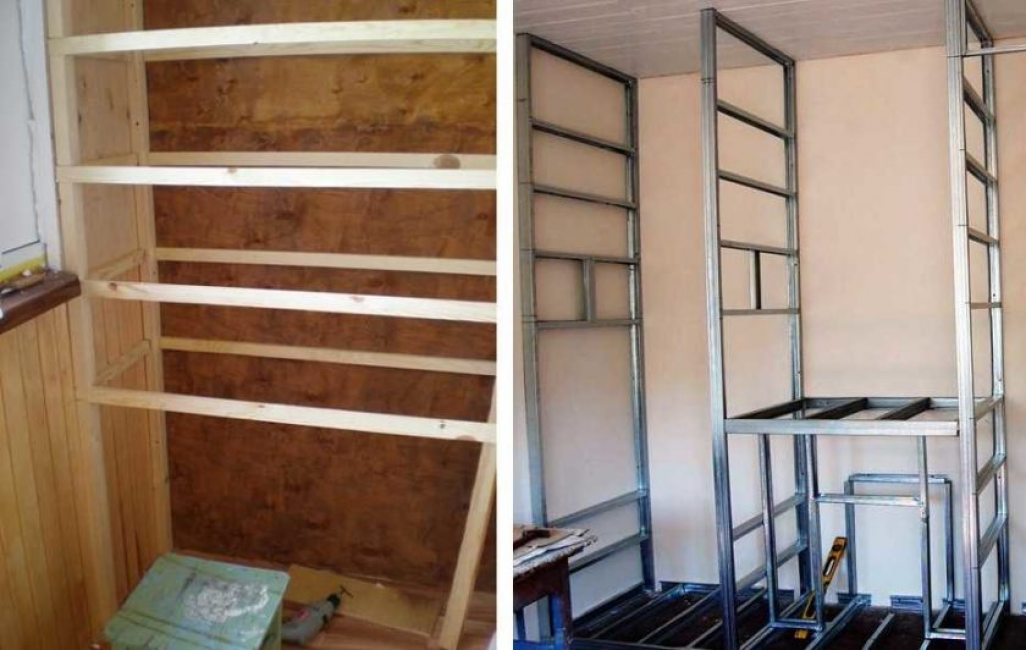
Frames made of wooden beams and galvanized metal
- The transverse bars are attached to the rear frame, and the front frame is attached to the ends of these bars, which is fixed with dowels or anchors on the ceiling, walls and floor.
- In another case, on the ceiling, according to a pre-made markup, with the help of dowels or anchors, bars are attached to form a rectangle. The same frame is made of bars on the floor. and then install the vertical guides, making sure that they are located strictly vertically.
- Masters do not advise cutting vertical guides of the same size, especially if the balcony is not finished - their height can vary significantly in different places.
- But if you missed somewhere, it doesn't matter. The guide, which will be fixed on the wall, can be assembled from separate bars and this will in no way affect the strength of the structure.
- In both cases, the vertical and horizontal parts of the frame should be reinforced with metal corners, in no case should you save on this important detail, the service life of the cabinet depends on them
- The step of self-tapping screws when mounting the frame is 35 - 40 cm.
- Having attached a bar to the wall, you should not be lazy and each time carefully measure the correctness of its location along the construction plumb line.
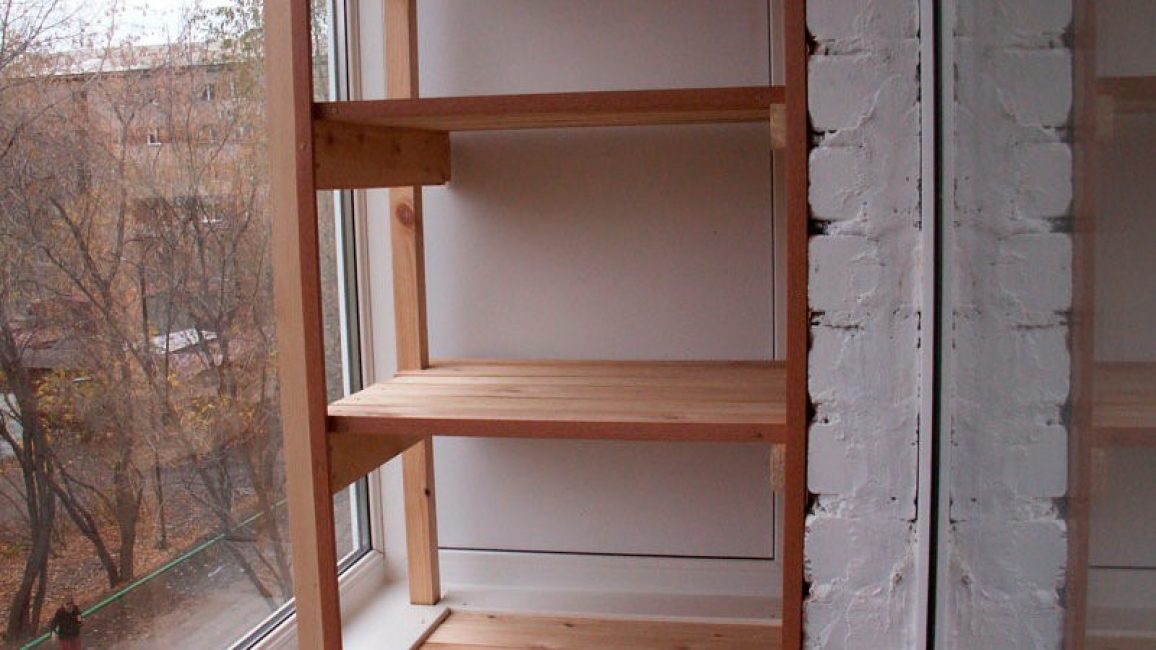
Shelves
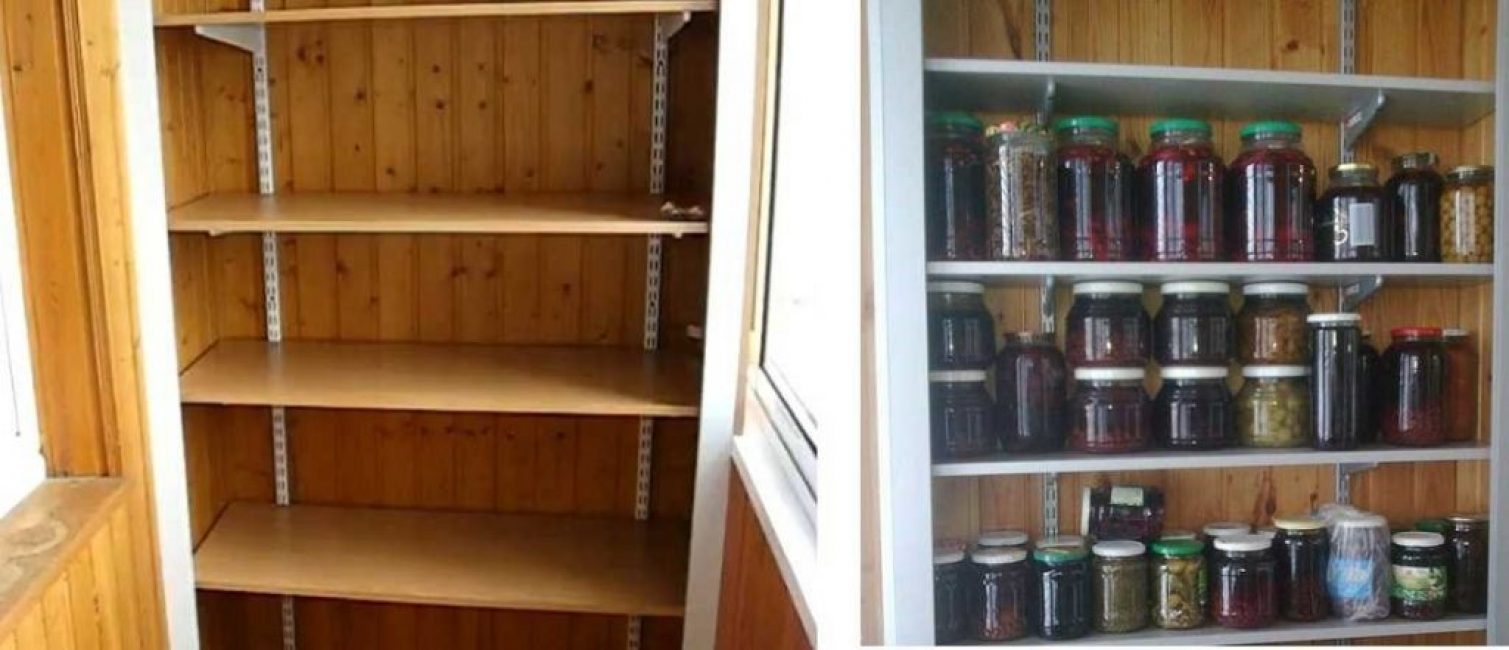
Shelves
- The standard distance between the shelves is 35 - 60 cm. First of all, it is worth considering what will be stored in the closet and, depending on the height of the items, make the distance between the shelves.
- By installing a partition inside, you can divide the cabinet into 2 compartments, install shelves in one, and leave the other hollow and store, say, a ladder or skis in it.
- For shelves on the walls, transverse guides are made of timber or galvanized profile, giving additional rigidity to the frame and the stability of the entire structure as a whole. The most important thing is to mount them strictly horizontally so that the shelves are parallel.
- Most often, shelves are cut out of wood or chipboard, carefully processing the edges of the cuts with a milling cutter. Shelves can be made by laying boards 1-1.5 cm thick next to each other and fixing them flush on the beams with self-tapping screws.
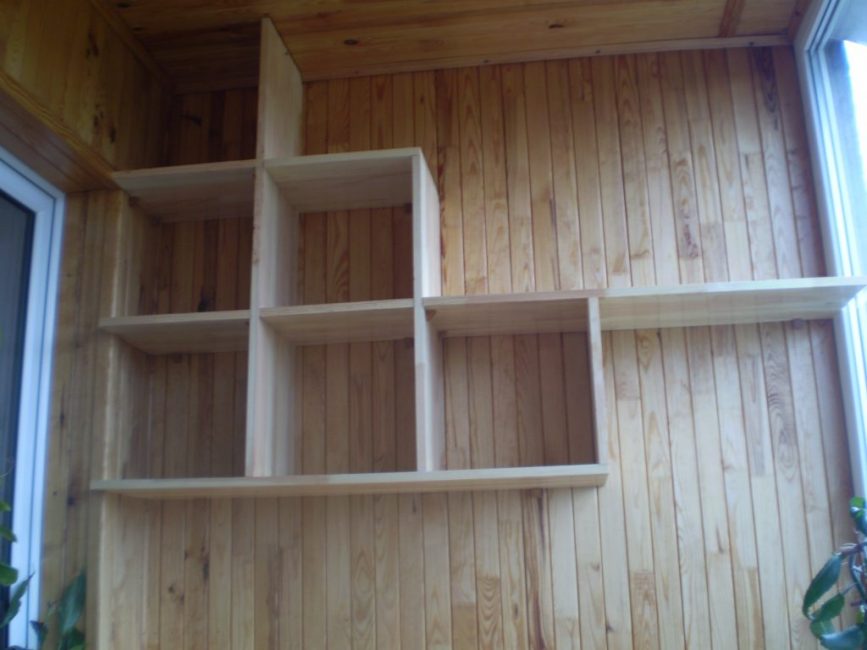
Shelves on the balcony
- You can cut shelves from plywood of the same thickness.
- The systems used in stores, consisting of metal rails to which brackets are attached, are very convenient for placing shelves. Such systems are reliable, and small-pitch holes in metal guides create special convenience. These holes make it easy to reposition the brackets by changing the distance between the shelves.
- However, something similar can be done by cutting grooves in vertical racks of timber with a chisel, making only the upper and lower shelves immovable.
- In fact, the simplest cabinet-rack with open shelves is ready. To drape the open sides, homemade Roman blinds or custom-made aluminum blinds are suitable.
- And you can continue to design and make doors.
doors
To avoid errors, the size of the doors is calculated after measuring the openings of the finished cabinet. Both doors are calculated simultaneously and adjusted to each other by fitting.
sliding doors
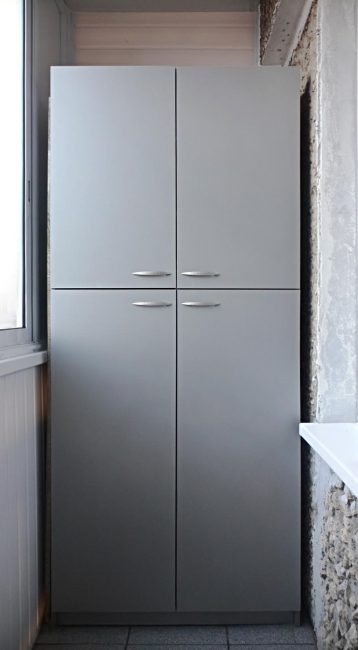
In some cases, it is more convenient to divide a tall cabinet into upper and lower parts, in which case each part will require its own pair of doors. If the width of the cabinet allows, then it can be three-leaf.
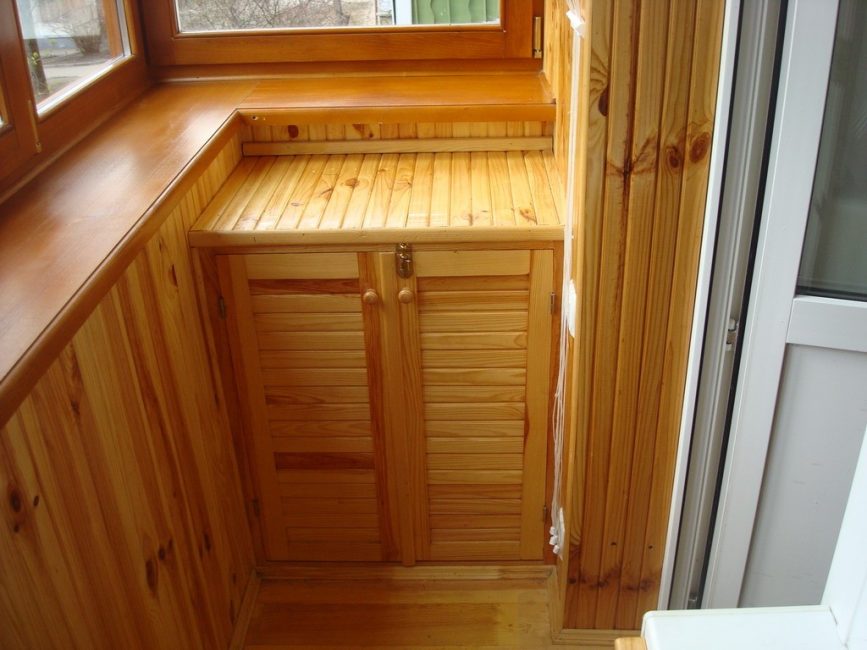
The basis for the manufacture of the door is the frame, which will require a thinner timber than for the cabinet frame, 1-1.5 cm thick. The frame is a rectangular frame made of wooden bars interconnected by self-tapping screws and reinforced with metal corners. Previously, it was fastened with spikes, according to the same principle, a spike-groove was inserted into the frame and door elements (a groove is selected in the frame with a milling cutter, and a spike is cut out in the inserts).
Today they do it easier, they lay the frame on the floor and, with the help of self-tapping screws, fix a solid piece of plastic or drywall, pieces of lining on it. With special care, glass can also be inserted inside the frame.
Doors from lining. They look especially good on balconies trimmed with the same material. If the lining is placed vertically, the door will become almost invisible, and if the pieces of the lining are placed horizontally, then visually the space will appear wider.
You can assemble the lining on the glue and let it dry by holding it in clamps. The resulting shield can be used without a frame. Details from the lining are recommended to be sanded and stained.
The finished door, assembled from scraps of boards or lining, must be reinforced on the back side with a crossbar (but make sure that it does not rest against the shelves, preventing the door from closing), and on the outside it can be decorated with platbands.
Wardrobe cabinet
Swing doors. They eat up space, since nothing can be put next to the cabinet, but some people like just such a traditional design. Three pairs of hinges are usually enough for a high door. Additionally, you can use closers and magnets.
For wooden doors, ordinary butterfly hinges are used. At the attachment point, a little wood is necessarily selected with a manual milling cutter in order to drown them flush with the surface of the workpiece. This will minimize the gap when mounting doors to the cabinet.
If the cabinet and doors are made of chipboard, special furniture hinges are used for them. With a milling cutter or drill with a crown drill, a round groove is selected for the cup of such a loop.
The sequence of work is as follows: first, the hinges are screwed to the doors, and only then to the cabinet. A very important point, it is necessary to ensure that the doors are located symmetrically relative to each other and form a small gap. All this is achieved by fitting, so it is not recommended to immediately put the door rigidly on all the screws, it is better to do this through one - it will be easier in the process of fitting.
After all, sometimes you have to remove them several times and hang them again in order to achieve the best result. Self-tapping screws are screwed into pre-drilled holes of a smaller diameter.
The handles are attached last. You can buy ready-made, installed with self-tapping screws on the back of the door, or instead of handles, you can cut small, literally for 1-2 fingers, round holes in the door leaf. Such handles-holes are most convenient for sliding doors.
Hinged cabinet doors
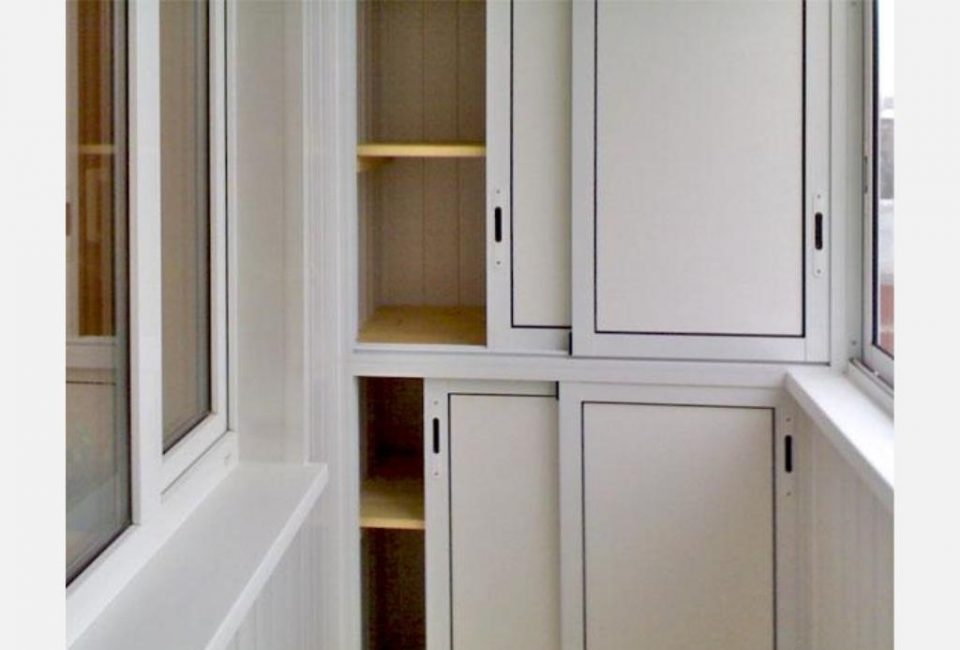
Sliding doors. They use a fairly complex system of rollers and guides. For their manufacture, you will have to contact specialized companies, and meanwhile their aluminum guides are rather flimsy, and indeed the entire design of sliding doors requires constant attention.
Craftsmen recommend the following option. In the carpentry workshop, you need to order to cut out the guides in wooden blocks. The lower guides should be planted on liquid nails, since the caps of the self-tapping screws will interfere with smooth running, and the upper ones can be easily installed with screws.
Doors for them need to be made from a single sheet of thin material (plywood, plastic, chipboard), then they will move freely along the grooves of the guides without any rollers. For easier movement, a plastic corner can be placed in the grooves (such are used as channels for external wiring).
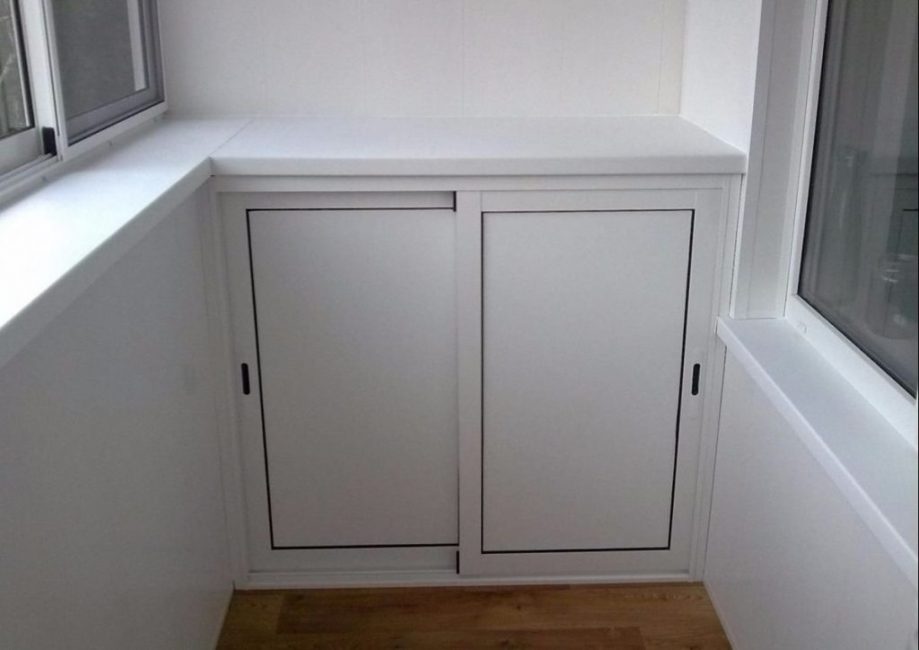
Sliding doors
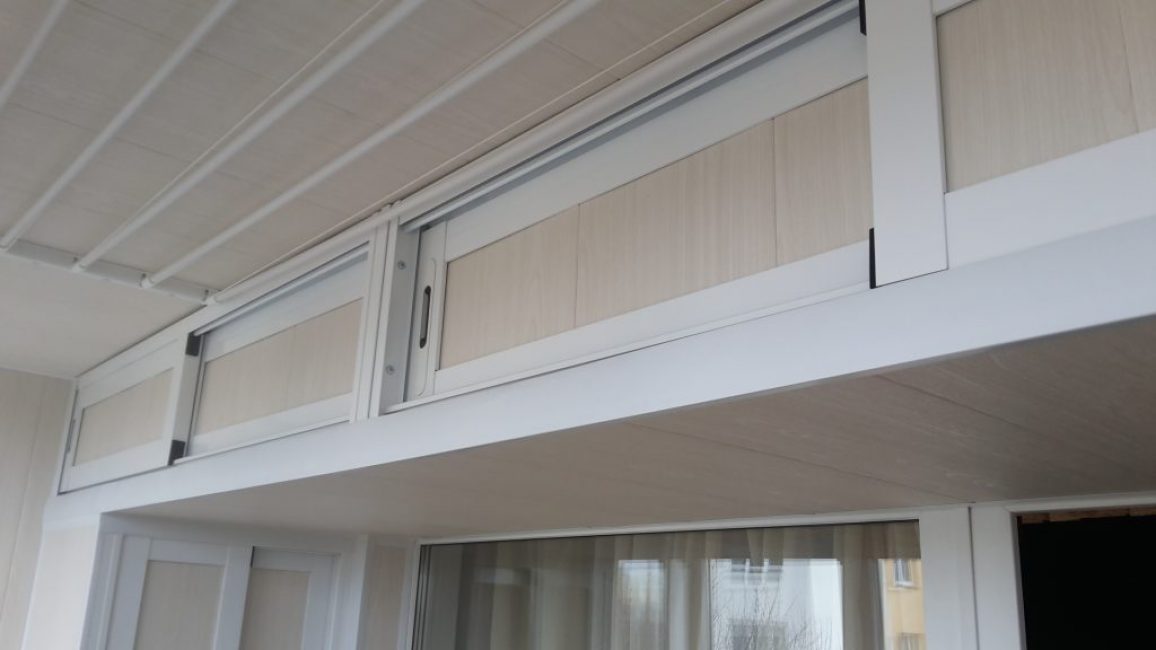
Roller shutters. If the closet door is not wide and the balcony is tiny, you can install a special roller shutter door that rises up to save space. She looks pretty stylish.
Its major drawback is its high cost. Roller shutters are made exclusively to order and are installed by the manufacturer.
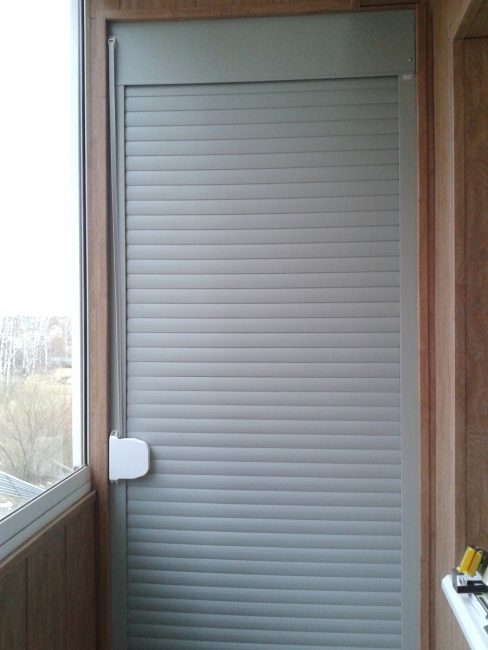
Use of roller shutters

VIDEO: Do-it-yourself wardrobe for a balcony made of PVC panels, inexpensive
Wardrobe on the balcony: what are the types, device, instructions on how to do it yourself (100+ Photos & Videos) + Reviews


When we moved to a larger apartment, it turned out that we still have a lot of necessary things, but we don’t use them every day - naturally, to avoid cluttering up the apartment, everything was taken out to the balcony. When they decided to use the balcony for its intended purpose, it was impossible to turn around on it (it is also small). Without hesitation, the husband bought sheets of chipboard, hinges, and in two days he made a spacious built-in wardrobe with many shelves and doors - everything fit there - from floor to ceiling - the balcony became empty, you can not only dry a lot of things, but a child in hot weather can play around.
I have already made such built-in cabinets in 3 apartments, at my place, at my wife's parents and at my own - on all balconies now there is many times more space for fat, the problem with unnecessary things that it is a pity to throw away has disappeared.
I make them from improvised means, take ordinary pallets, disassemble them and in this way racks are obtained, then I just buy hinges and chipboard, glue the whole thing with glue and it's ready.
So you can make a shelf for shoes in the apartment - but I will do this a little later.
A closet on the balcony is always convenient. On the shelves you can really place a lot of things that you do not often use, but in the house they are simply necessary. These can be tools: a drill, a vise, baskets for going to the forest for mushrooms, flower pots - if the flower has grown and it has been transplanted into a larger diameter. I can also share one more idea. After we insulated the loggia and sheathed it with plastic, we made a frame of bars under one of the side walls. They made a lid on top, sheathed the entire box with the same plastic as the loggia, it turned out something like a chest. Inside, along each wall, a 10 cm foam was cut out and inserted, the bottom was cut out last. It turned out to be an excellent bin for potatoes for the winter, the products do not freeze even at a frost of -25.
In the article I saw an interesting example of a locker. I'm sure this option will look great on my balcony ...