
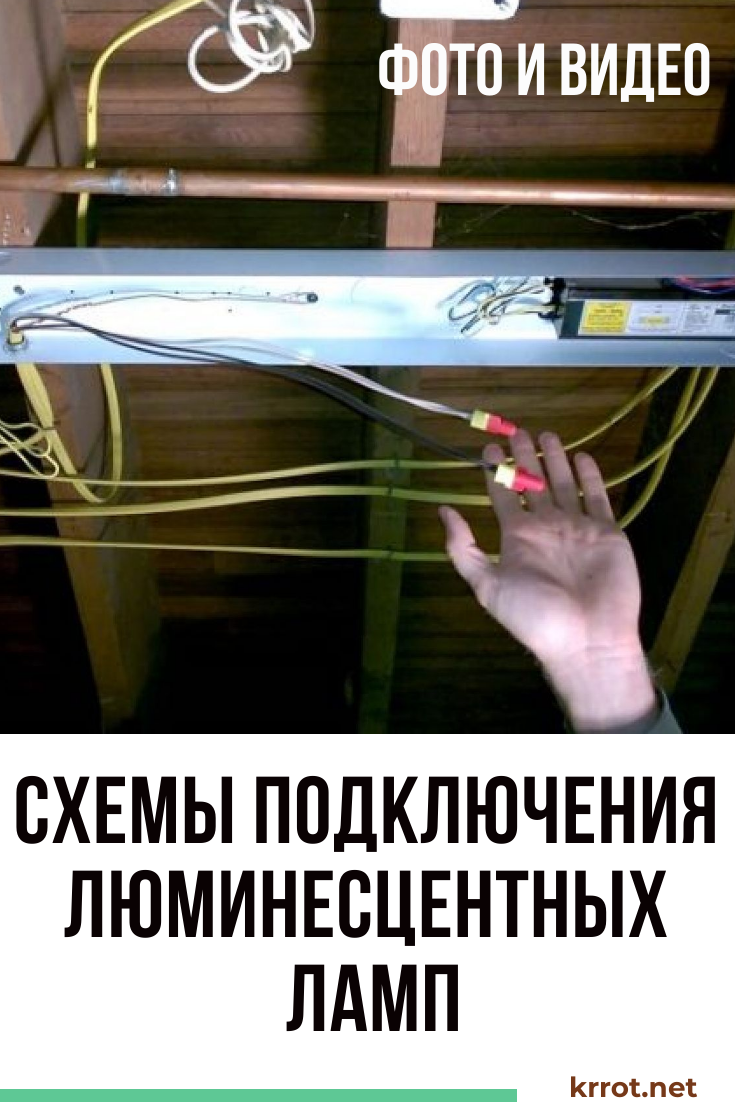
Conventional incandescent lamps are inefficient - they emit more heat than light. Yes, they have a short lifespan. Connecting fluorescent lamps allows you to save almost 3 times on electricity bills. Plus, such light sources have a greater range of colors and are less harmful to the eyes. However, their installation requires the purchase of special devices: chokes or electronic ballast boards.
Content:
 Read also: Interesting ideas for decorating your favorite dacha with your own hands | 150+ original photo tips for craftsmen
Features of fluorescent lamps
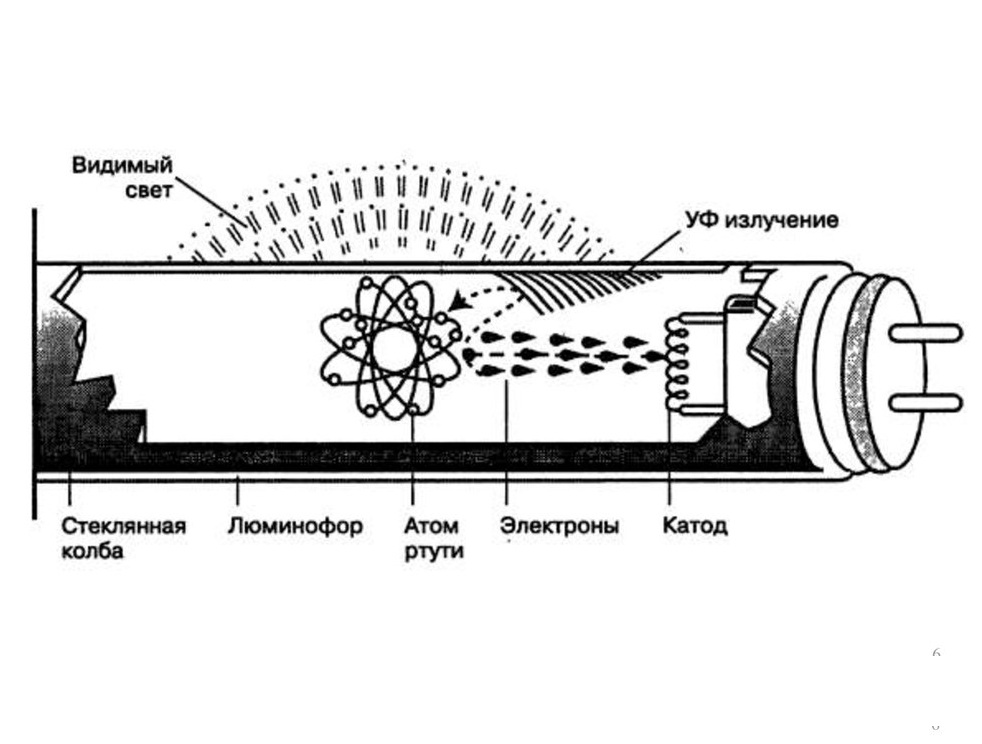
Fluorescent lamp device
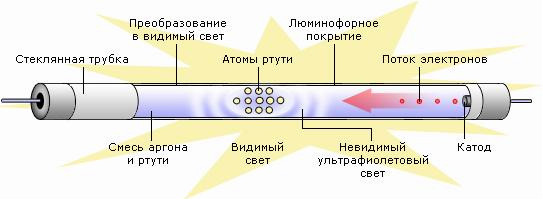
To understand how fluorescent lamps are connected, you need to understand the principle of their operation. Outwardly, they look like glass cylinders, the air in which is completely replaced by an inert gas under slight pressure. There is also a small amount of mercury vapor that can accelerate ionization - the movement of electrons.
Electrodes are located on both sides of the cylinder. Between them is a tungsten spiral coated with oxides of substances that, when passing current and heating, can easily move over fairly long distances, creating ultraviolet radiation (UV).
[Instruction] Connection of wires in a junction box: types of connections and their application
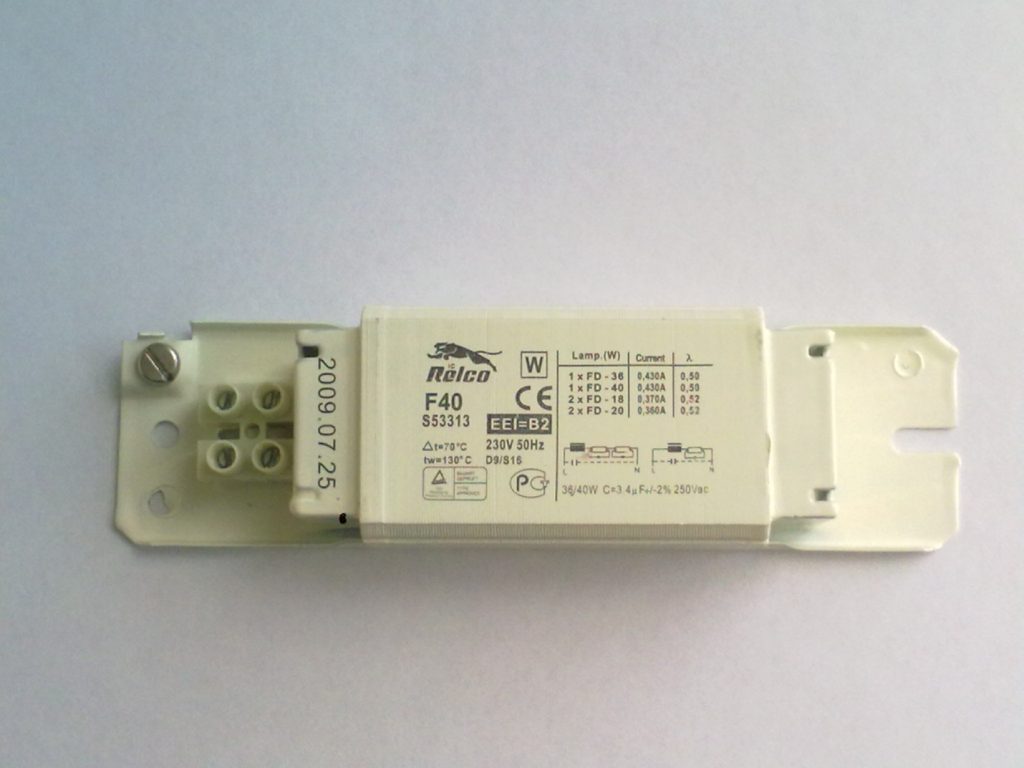
Electromagnetic gear
But, since this type of radiation is invisible, it is converted using a phosphor (a special composition based on calcium halophosphate, which coats the walls of the cylinder), capable of absorbing UV, instead emitting visible rays of light. The color of illumination depends on the type of phosphor.
After turning on the device and switching to the operating state, the current strength in it may increase due to the drop in gas resistance. If you do not limit this process, it can quickly burn out.
To reduce the current strength, chokes (limiters) are used - helical inductors that give an additional load and are able to shift the phase of the alternating current and maintain the desired power for the entire period of switching on. Restrictive devices have another name: ballasts or ballasts (ballasts).
Electronic ballast
More advanced types of ballast are electronic mechanisms (electronic ballasts), the principle of operation of which will be described in the next chapter. To start the discharge, a starting device called a starter is used..
 Read also: Landscaping your site with your own hands - (130+ Photo Ideas & Videos) + Reviews
 Operating principle
The principle of operation of fluorescent lamps
Let us briefly describe the interaction scheme of the starter, ballast and lamp:
- When power is applied, the current passing through the control gear passes through the starter contacts along the tungsten spirals, heating them up and then goes towards zero
- The starter is equipped with a pair of contacts: movable and fixed. When current is applied, the movable contact (bimetallic), heating up, changes its shape and connects to the first
- In this case, the current strength immediately increases significantly to the limit limited by the inductor. The electrodes heat up
- The starter plate, on the contrary, begins to cool and disconnects the contacts. At this moment, there is a sharp jump in voltage and a breakdown of the gas by electrons. When mercury turns into vapor, the light source switches to operating mode
- The starter is no longer involved in the process - its contacts are open.
 Read also: Perennial flowers (TOP 50 species): garden catalog for giving with photos and names | Video + Reviews
Basic connection steps

Scheme of connecting one light source to one choke
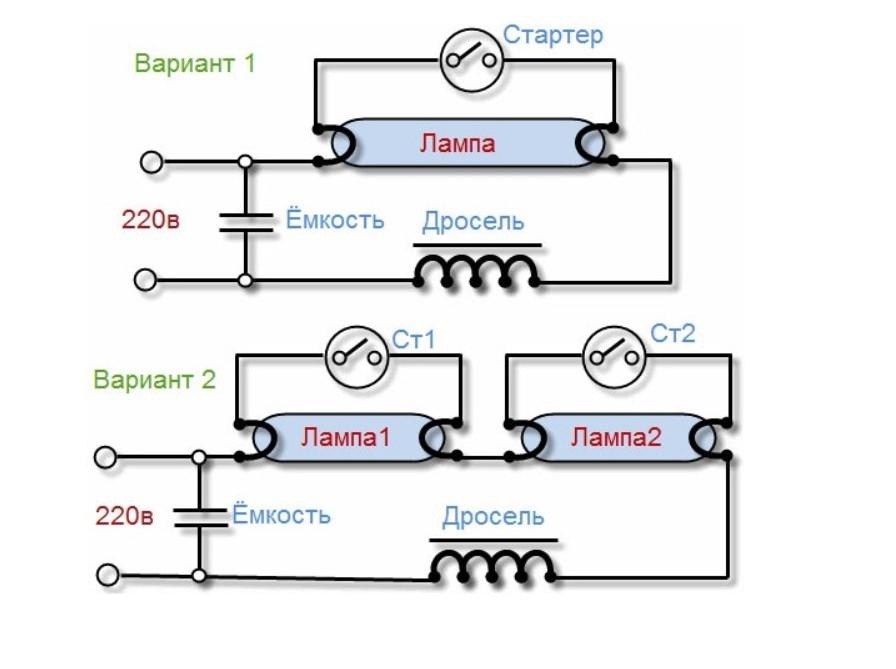
The wiring diagram for a fluorescent lamp with a choke is quite simple:
- The inclusion of a compensating capacitor in the circuit allows you to reduce energy losses and save its consumption. In principle, the system will work without it, but with high energy costs.
- The voltage must pass sequentially through all points, starting with the capacitor
- Next, the PRA is included in the system. To obtain an even glow, its parameters must ideally match the lamp power
- The choke is connected to the light source in series
- After it leaves the coil, connect the starter terminals
- We mount a second network contact to it
Unfortunately, the starter is not a very reliable device. Plus, during operation, the lamp may flicker, negatively affecting vision. In principle, it is possible to connect without it. You can replace this part with a spring-loaded button-switch.
 Read also: Making a greenhouse with your own hands from a profile pipe and polycarbonate: a complete description of the process, drawings with dimensions, watering and heating (Photo & Video)
 Installation of two lamps
Connection options
No matter how many light sources are required to be included in the lighting system, they are all connected in series. Two starters are required to start two lamps, respectively. They are connected in parallel.
So, let's describe the process of connecting 2 fluorescent lamps at once:
- The phase must first approach the inductor input
- From him it should go to the first lamp
- Then head to the first starter
- Then go to the second contact pair of the same light source
- The output contact is connected to zero
- The second pipe is connected in exactly the same sequence. The first is PRA. Then the contact of the second light source, and so on.
If you understand the principle of this circuit, you can easily connect 3 or 4 fluorescent lamps in the same way.
 Read also: 56 The best productive varieties of cucumbers for greenhouses: description and photo | +Reviews
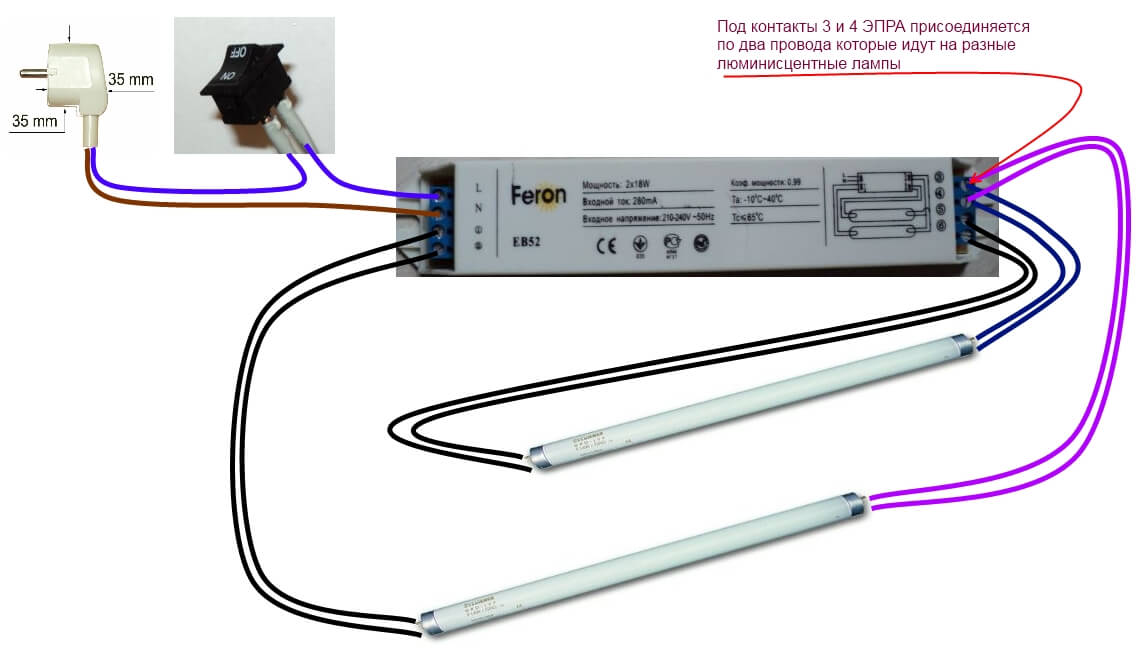
Pair of lamps and one choke
Scheme with one choke
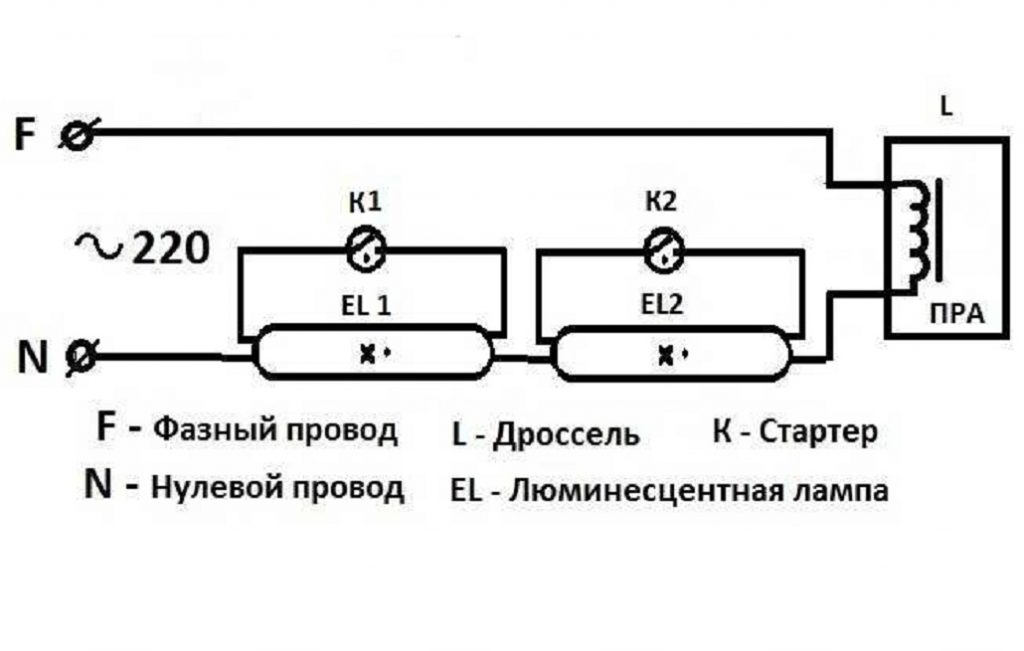
Two starters are needed here, but an expensive ballast can be used alone. The connection diagram in this case will be a little more complicated:
- We connect the wire from the starter holder to one of the light source connectors
- The second wire (it will be longer) should run from the second starter holder to the other end of the light source (bulb). Please note that it has two nests on both sides. Both wires must go into parallel (identical) sockets located on the same side.
- We take the wire and insert it first into the free socket of the first and then the second lamp
- In the second socket of the first we connect the wire with the socket connected to it
- We connect the bifurcated second end of this wire to the choke
- It remains to connect a second light source to the next starter. We connect the wire to the free hole in the socket of the second lamp
- With the last wire we connect the opposite side of the second light source to the throttle
 Read also: Eggplant: description and characteristics of 53 popular and unusual varieties for open ground and greenhouses (Photo & Video) + Reviews
 Connection without choke
Infrared ceiling heater with thermostat — modern technologies in your home (Prices) + Reviews
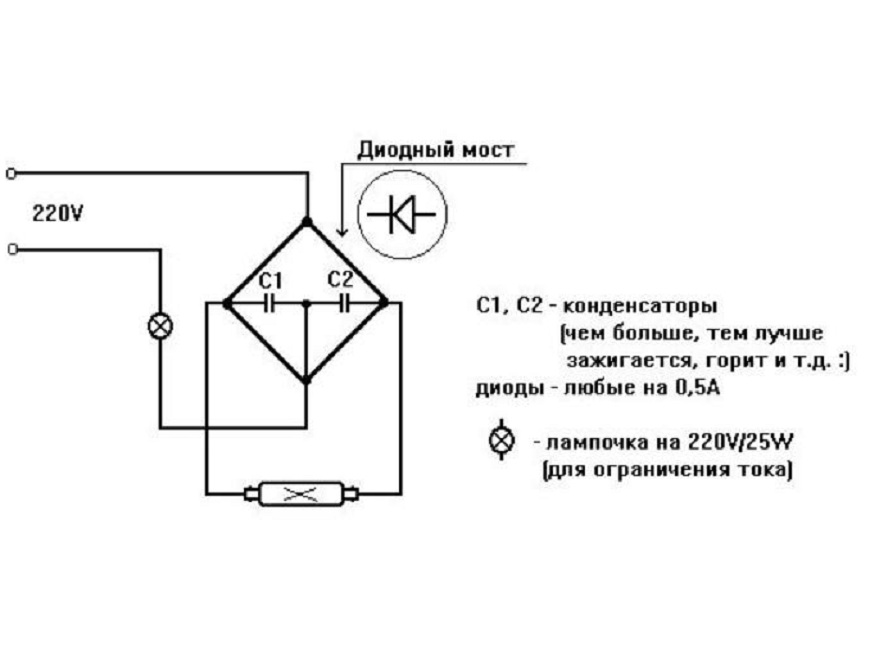
This connection does not use a choke.
This method is mainly used in older lamps when the ballast fails. This can be done by using direct current, the value of which is higher than usual. That is, the voltage at the time of start-up should be increased. The strength of this voltage is selected based on the characteristics of both the network and the light source itself.
To connect a fluorescent lamp without a choke, you need to connect a diode bridge (or a pair of diodes). Contacts are closed on both sides in pairs. On one side of the light source should be plus, on the other minus.
A similar scheme can be used even with a burnt filament. After all, a cylinder with gas with this method will be fed by a constant voltage. Just keep in mind that this method can be used for a short period - over time, the pipe will quickly darken, and then, due to the burnout of the phosphor, it will completely stop emitting light.
 Read also: Peas: description of the 43 most popular varieties, undersized, medium-sized and varieties of grain forage purposes (Photo & Video) + Reviews
 ECG connection
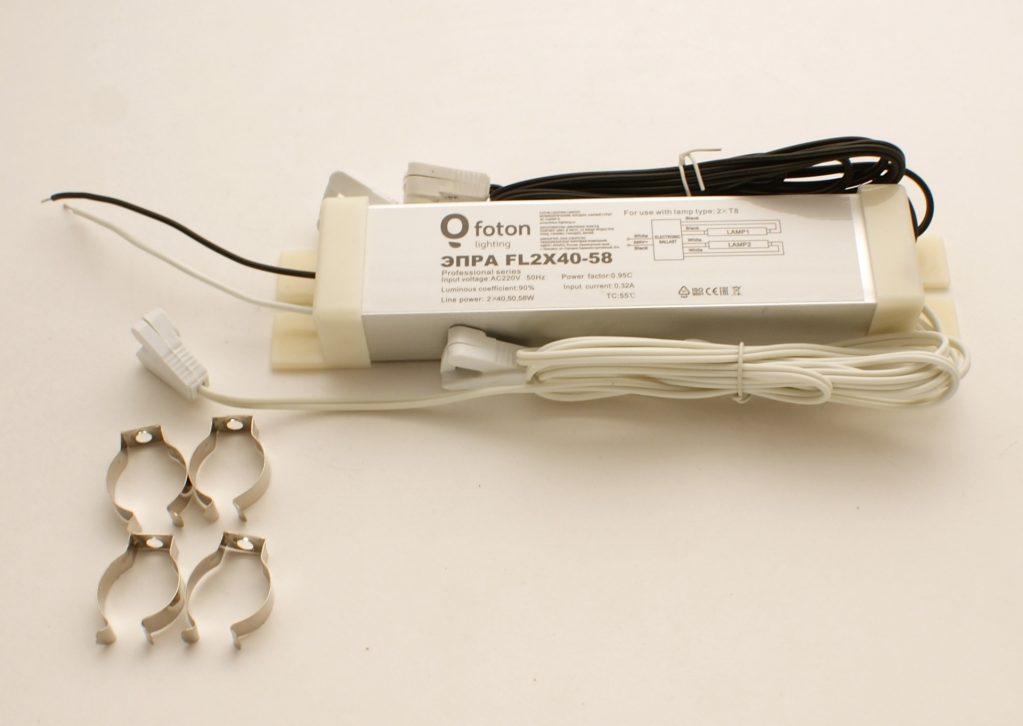
Connecting the electronic ballast (electronic trigger)
Chokes are quite noisy devices. Therefore, in recent years, they have been connected to the fluorescent lighting system infrequently, replacing them with electronic ballasts, digital or analog.
Such devices no longer need a starter. Essentially, electronic triggers are small electronic boards. They themselves are able to regulate the voltage level and provide an even light, without flicker. Plus, they are safer and less flammable in operation and have a longer service life.
There can be many options for implementing electronic ballasts, but there are two main ways to start:
- sources are preheated; this helps to increase the efficiency of the device and reduce its flicker
- using an oscillatory circuit; the filament in this case is part of it; when the discharge passes, the circuit parameters change, as a result, the voltage drops to the required level
You can get rid of annoying buzzing and blinking by replacing the old choke with a modern electronic ballast. For this you should:
- Disassemble the old circuit by removing the throttle, starter, and condensate from it. Only a light source and wires should remain inside
- We attach the electronic ballast selected for power to the body with self-tapping screws. If there are two lamps, then the power of the electronic mechanism should be 2 times higher
- We connect it with wires to the sockets of the lamps
- If the assembly is done correctly, both light sources should light up at the same time, with an even bright light. Buzz, of course, should no longer be.
Advantages and disadvantages of fluorescent light sources
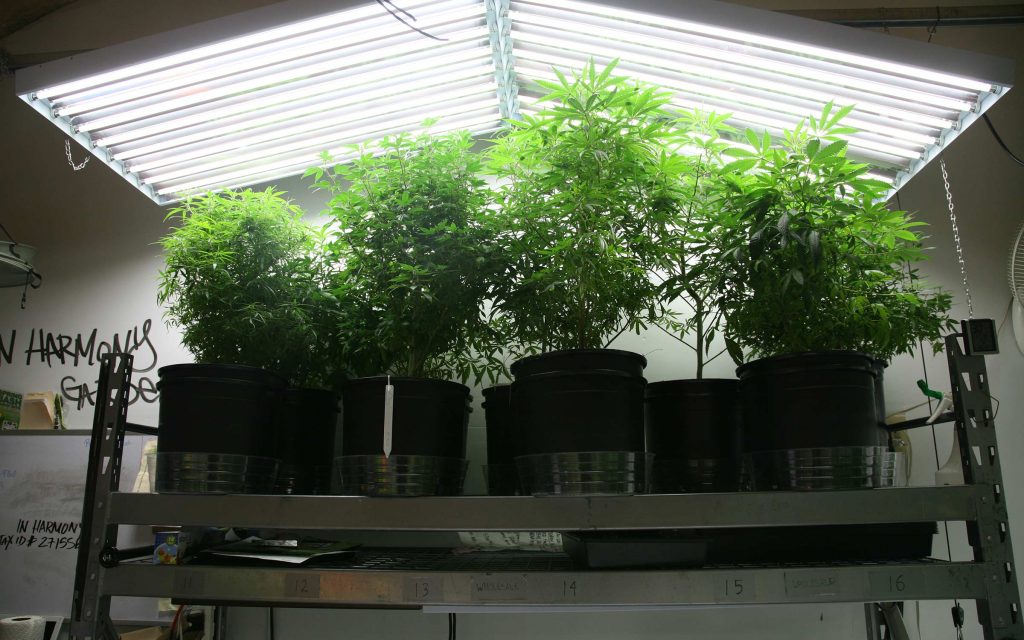
Use of lamps for greenhouse cultivation of plants
- The first significant advantage of such devices is significant energy savings. Light sources of the latest generation, working on this principle, spend it 4-5 times less than conventional incandescent lamps.
- In addition to high light output, a long service life is a positive point. It can be 12-25 thousand hours. Such devices are often used for contrast lighting of large areas (offices, shopping centers, schools) or street lighting. They are used in transport, in street lamps, tunnels.
- The need to connect additional devices (starters and chokes)
- Dominance in the spectrum of yellow light and distortion of the color rendering of illuminated objects
- Significant dimensions of the bulb, which makes it difficult to evenly redistribute the flow of light
- The intensity of light in such sources can be influenced by the ambient temperature.
- The heating of the lamp does not occur immediately; it gains full brightness after a while, sometimes it can last 10-15 minutes
- significant pulsation of light, which can adversely affect vision
- The presence, albeit in minimal amounts of mercury, dangerous to human health, plants and animals
The latest developments of scientists have become compact fluorescent light sources, outwardly similar to conventional incandescent lamps. They come with a standard socket and can be easily screwed into any chandelier or floor lamp. No upgrade is required.
All ballasts (ballasts) in them are located in the cartridge itself or are taken out separately in small blocks. Such devices are often called energy-saving.
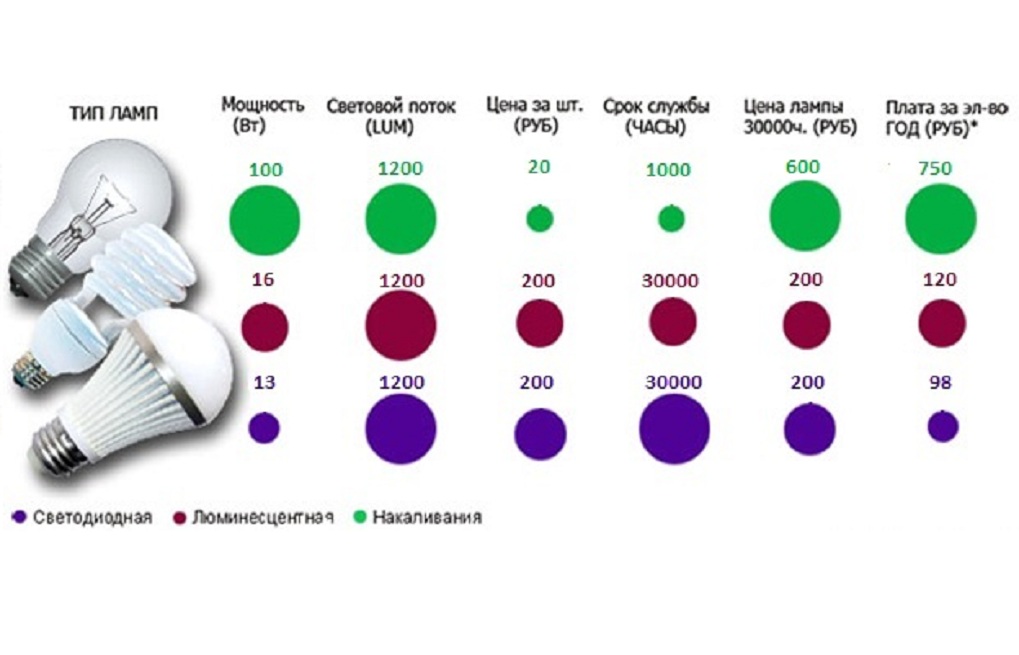
Comparison of parameters of different light sources
But still, in recent years, users prefer to connect modern LED lamps instead of fluorescent lamps. The principle of operation of these devices is significantly different. Fluorescent flasks are filled with gas and mercury vapor, and light radiation is generated by heating the tungsten coil. In LED devices, the light emitter is a group of diodes or a single LED. It is he who converts the current into light rays when it flows through a semiconductor.
Such devices are not only more durable and less dangerous. (Damage of fluorescent lamps threatens to ingest mercury into the human body). The efficiency of LED lighting sources is much higher, so they are more economical. The connection diagram for a fluorescent or LED lamp in both cases is as simple as possible - just screw its cartridge into the base.
For details on how to connect fluorescent lamps, see the following video:

VIDEO: How to connect a fluorescent lamp
Connection diagrams for fluorescent lamps: with and without a choke, 2 or more lamps (Photo & Video)


Pretty interesting and informative site. I was interested in how to connect two lamps to the choke.