
Any, even the most durable boards, eventually become covered with fungus and rot. The floors in the house on the ground, that is, in the form of a monolithic concrete base, are devoid of such a disadvantage.
Content:
 Read also: Projects of country houses for 6-10 acres: 120 photos, description and requirements | The most interesting ideas
Design features
Layer order
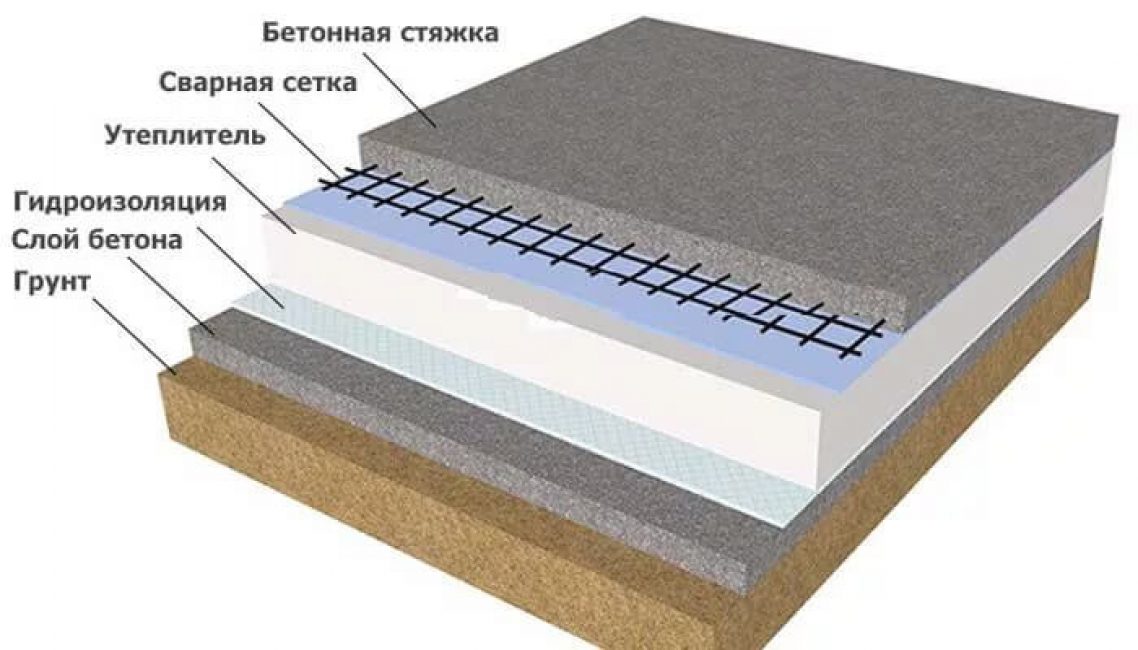
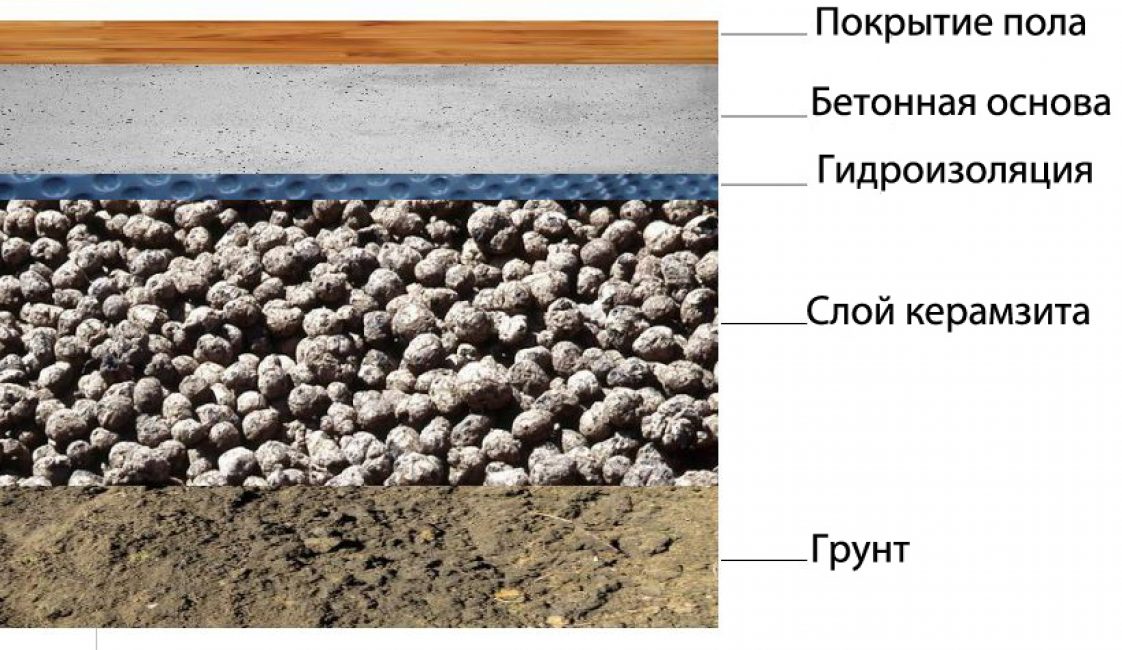
When erecting a tape foundation or a foundation with a grillage of small height, it is possible to use floors on the ground - a structure consisting of the following layers:
- sand and gravel cushion designed to stabilize the concrete layer and protect it from underground moisture
- screeds (concrete preparation, footings): according to the recommendations of SNiP, in central Russia it is enough to equip a layer 5 cm thick
- roll waterproofing
- insulation layer
- concrete underlayment 1 cm thick
- clean floors: they can be used, for example, tile, linoleum or laminate; the use of a classic base in the form of wooden floors along the logs is also allowed
Unlike a slab foundation, the screed in the floors on the ground in a private house is not made too thick. After all, it must withstand the load of only the weight of furniture, household appliances and other things in the house. 2 layers of screed: rough, laid immediately after the pillow, and finishing, top, will be enough. A similar foundation is made only after the construction of the structure itself.
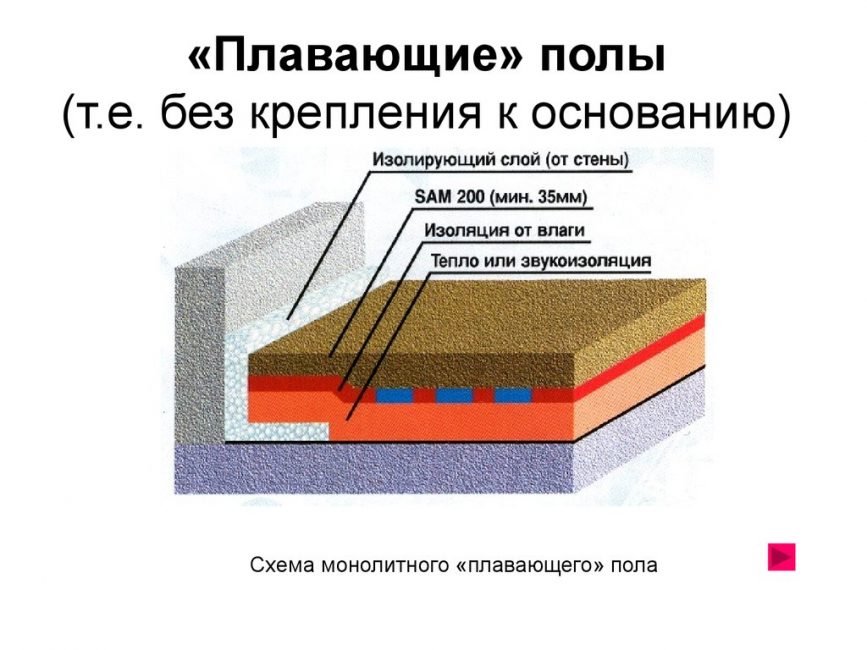
floating screed
There are two types of floors on the ground. They can:
- tie to the tape base;
- be made in the form of a floating screed, not connected to the foundation
Each of these designs has both advantages and disadvantages. With a rigid bond with the foundation, the screed lying directly on the foundation shrinks less, so it does not crack. But when the foundation subsides, it can simply “hang” in the air. Although with high-quality reinforcement of the base, this is not such a big problem. Backfilling will help to avoid lowering the slab with soil removed from the pit, but with specially imported non-metallic materials, sand and gravel.
When using a floating screed, when the base shrinks or the ground moves, stress will not be transmitted to the concrete slab, and cracks in the floors will not occur. However, it can "play" on its own, which often leads to defects - cracking or the appearance of gaps between them and the wall. Therefore, when pouring the floor over the foundation, the strength of the concrete solution and the use of high-quality reinforcement are essential.
Advantages and disadvantages
There are many advantages to concrete floors on the ground in a private house. We list the main ones:
- Can be used on most types of soil
- minimum consumption of concrete and, as a result, low cost
- sufficient resistance to the forces of frost heaving
- thanks to careful insulation in a house with a similar base in winter, it is easier to maintain a positive temperature, since a screed with a heat insulator laid inside is able to accumulate heat well, as a result, heating costs for the building are reduced; it is enough just to insulate the basement well and blind area
- such floors do not need ventilation and annual drying
- unlike wooden floors, they do not require periodic replacement of rotten beams
- The disadvantages include the complexity of repairing communications. Therefore, it is imperative to lay duplicate sleeves in concrete, in which additional sewerage and water supply systems are located. They can be connected quickly and without problems in case of clogging of the main communication systems.
- Another disadvantage of such grounds is the lack of a basement. However, the underground in a private house can be quite organized in another utility room.
Some developers advertising their own services claim that under such floors it will be constantly wet. But in the case of arranging a quality drainage, stormwater drainage and drainage of flood and groundwater, accumulation of moisture can be completely avoided.
Ground floor
 Read also: Veranda attached to the house - expanding the living space: projects, tips on how to create your own hands (200 original photo ideas)
 Ground Requirements
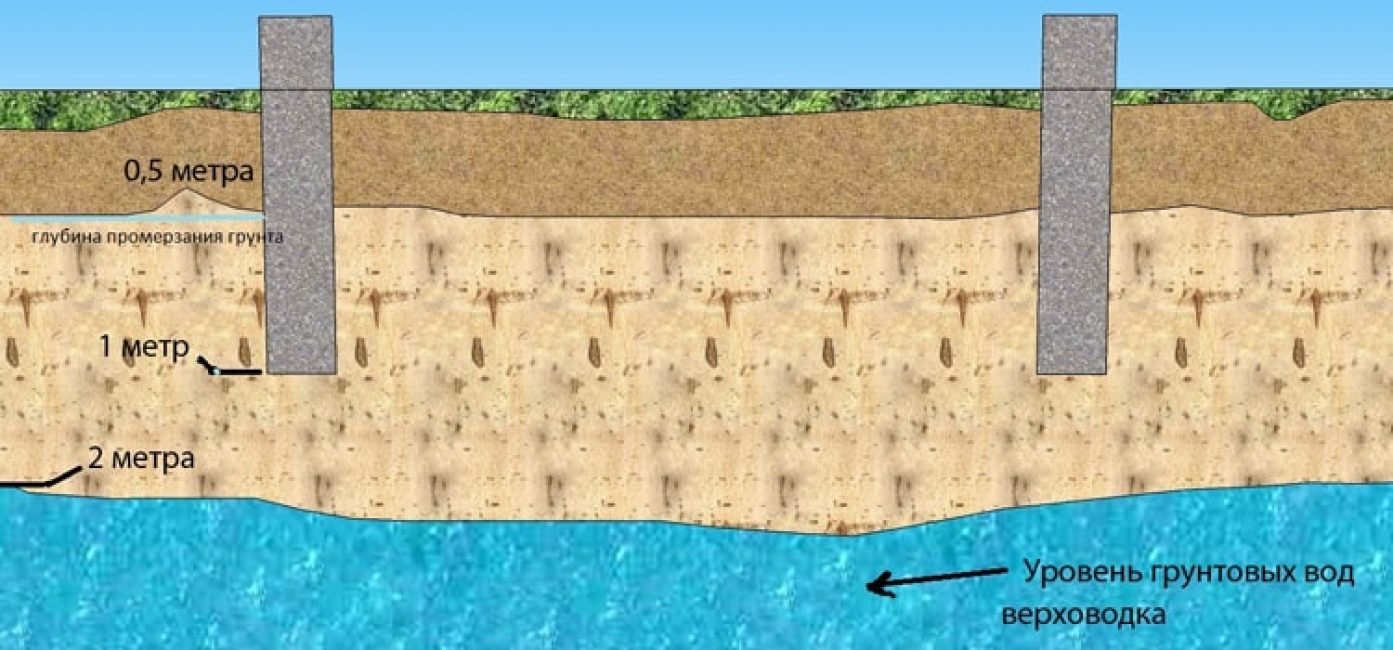
Groundwater layout
Unfortunately, such a base may not be used on all types of soil. After all, with movements and heaving of the soil under the floor of the house, concrete damage is possible. The laying of such a foundation is permissible only if the groundwater is located below the level of 0.5-0.6 m from the surface.
The arrangement of floors on the ground and on too loose, mobile soils is not recommended. On heaving soils and soils with a high degree of freezing, the thickness of the footing should be increased to 15-20 cm.
 Read also: How to make a cellar in a private house or in the country with your own hands: diagrams, step by step guide, proper ventilation (55+ Photos & Videos) + Reviews
The main stages of construction
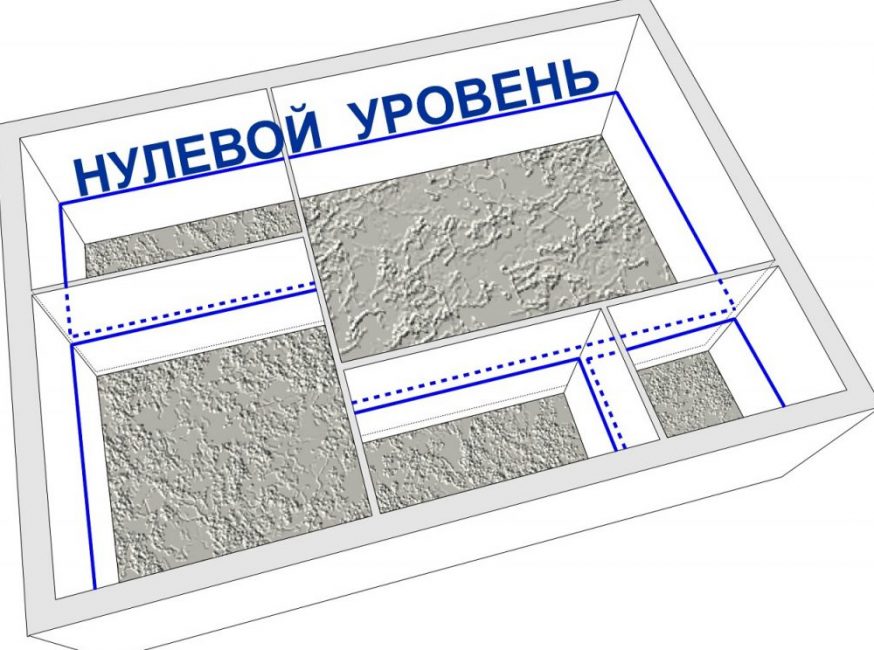
Zero markup
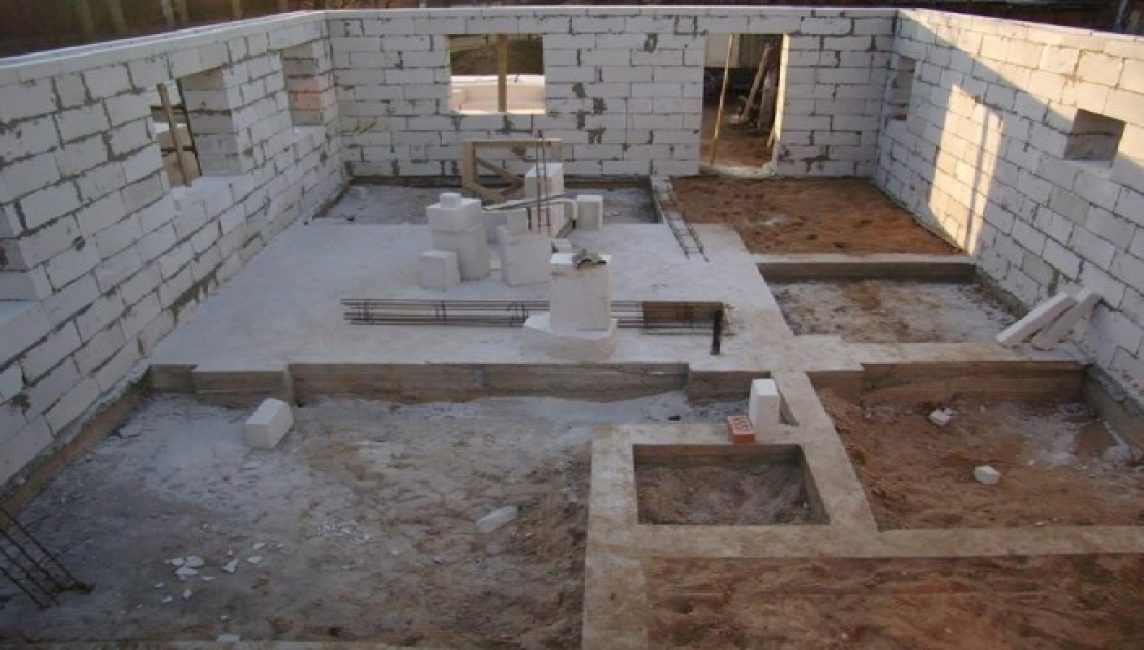
It is better to start work on laying the floors of the house on the ground in the summer, after the construction of the building, the erection of walls, and the roof. Since when digging a foundation pit for a strip foundation, the depth of the pit turns out to be significant, it is covered with the same soil with layer-by-layer compaction.
To determine the lower point of the mark, a point called the zero mark should be noted at the bottom of the door threshold. It is from her that the countdown of the deepening into the ground begins. On average, it is 30-35 cm
You can outline the highest (zero) point of the floors with the help of nails and a cord driven around the perimeter of the structure
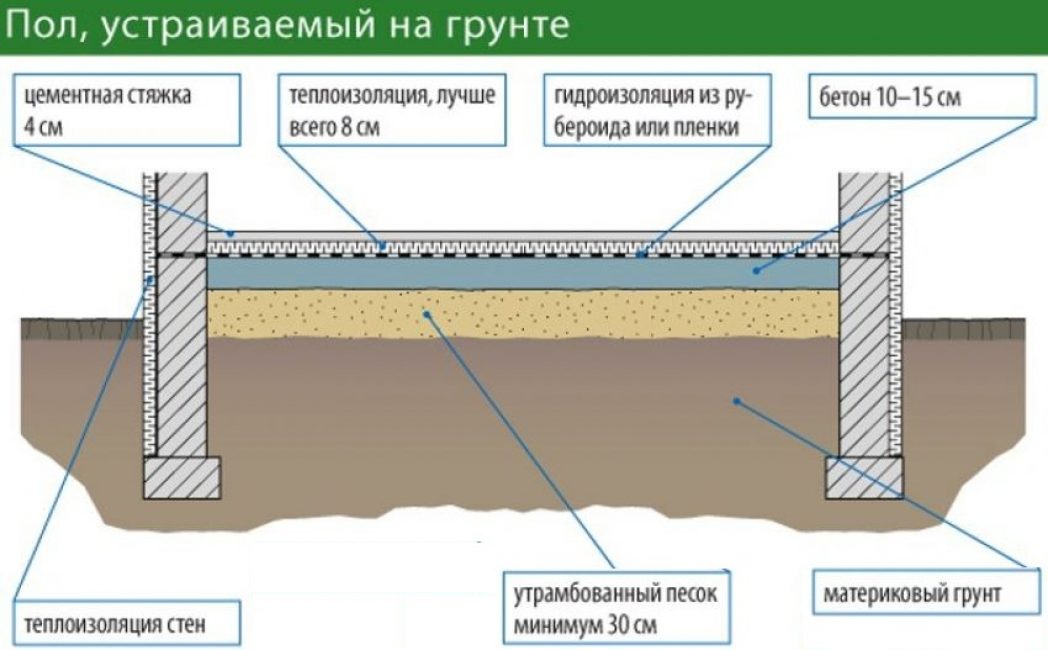
In floors on the ground, be sure to carefully prepare the base. The ideal backfill for them is sand. It is rammed in small layers with a height of no more than 15 (or even better 10) cm. According to SNiP, the total height of the layers is 60 cm
Each of them is first compacted dry, and then spilled with water and pressed again. A jet of water can erode the layers, so such work should be carried out through a spray nozzle. Excessive oversaturation of sand with water is useless - it should be sufficiently moist, but not wet. They spill it with a hose and pass through it with a vibrating plate twice with a change in direction of movement
It is more convenient to control the height of the sand filling with the help of wooden pegs with a mark. They are located in the corners. After backfilling the next layer, the stakes are removed and new ones are placed.
To compact the layers, gravel of a large fraction is poured on top. When it is rammed, due to the strong pressure of the stones, even the lowest, deepest layers of sand are well compressed.
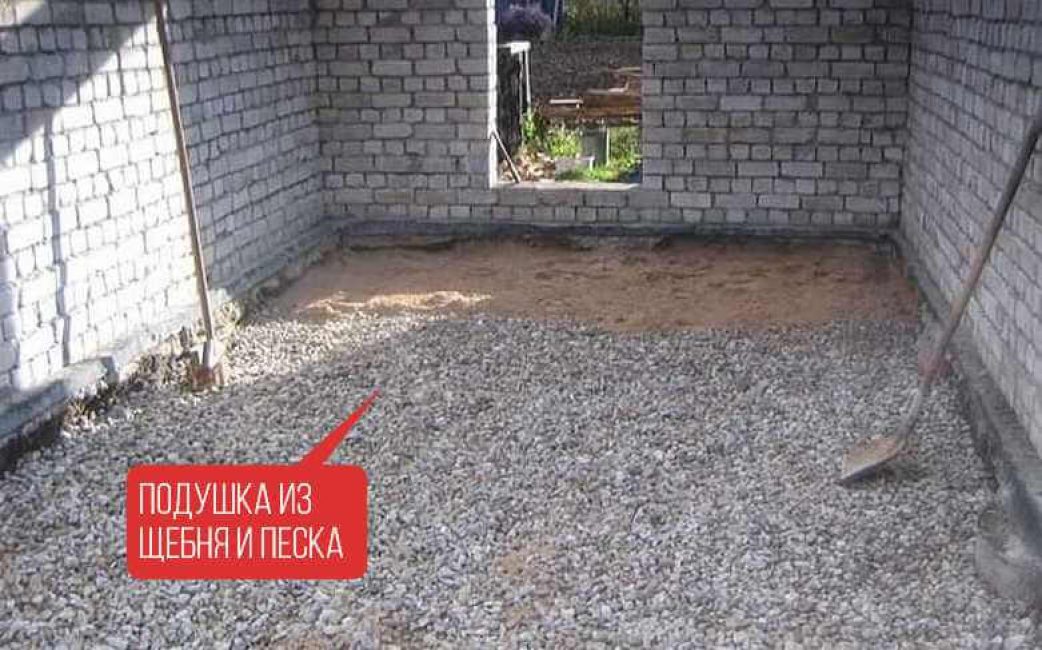
Sand and gravel pillow
The next layer is a screed. As we have already pointed out, its large thickness is useless. Enough 5 cm
In the rough screed (concrete), the heaving load on which is small, the use of reinforcement is not necessary - it is required only for arranging the last concrete layer - the finishing screed.Reinforcing the footing is advisable only in the presence of soils with increased frost heaving or with a significant mass of structures in the house
To fill this layer of screed, it is allowed to use lean concrete mortars with a minimum percentage of cement. With high loads on the floors, its amount in the solution can be increased. In these cases, it is also recommended to use cement with improved strength characteristics.
The third layer is waterproofing. To create it, you can use a fairly thick plastic film. The recommended thickness is 150 microns. It is required to lay the film on the base with an overlap on the walls and overlapping layers of 15-20 cm. Each of the seams is carefully glued or fastened with a construction stapler. It is desirable to lay waterproofing not in one, but in two layers.
You can replace the film with bituminous roll materials. They are welded onto the concrete layer with an overlap of 2 layers.
As a heat insulator, it is better to use not a roll, but a plate material that has a high compressive strength
An ideal insulation for the floors of a house on the ground is a layer of extruded polystyrene foam. You can also use regular foam (although working with this fragile material is a little more difficult). Both expanded polystyrene and polystyrene completely retain their heat-shielding properties even when wet.
When using materials that absorb moisture well (for example, mineral wool or expanded clay), they must be additionally waterproofed. Otherwise, their thermal insulation properties will decrease.
Insulation plates are laid only apart (in a checkerboard pattern). All joints should be filled with mounting foam. The thickness of the layer depends on the area of \u200b\u200bresidence. It can be 5-20 cm
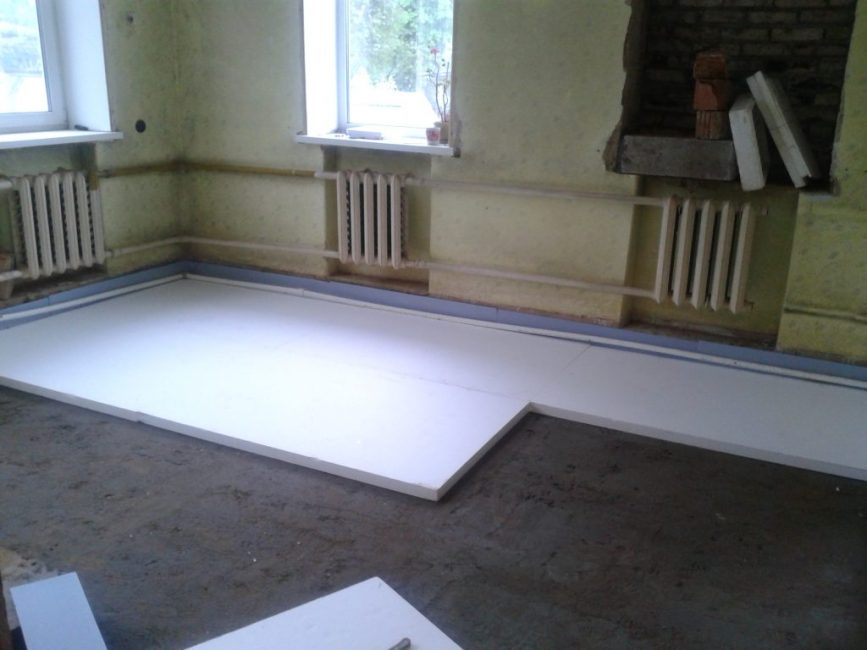
Floor insulation with polystyrene foam
When laying expanded polystyrene in 2 layers, the slabs are positioned so that the seams of the second layer pass through the center of the slab of the lower layer
It is desirable to protect the porous heat insulator with a film. Otherwise, moisture from the concrete will go into its smallest holes, and the strength of the concrete will decrease.
When pouring the top, finishing screed, cement M400-500 is used with the addition of sand without clay impurities (preferably quarry or river) and crushed stone of a fraction of 5-10 mm. The strength of concrete must be at least M150
Reinforcement of the finishing screed is carried out using a 100x100 metal mesh or a 3-4 mm bar. The compressive strength of fiberglass wire is much worse, so it is used for reinforcement only in soils that are not prone to movement
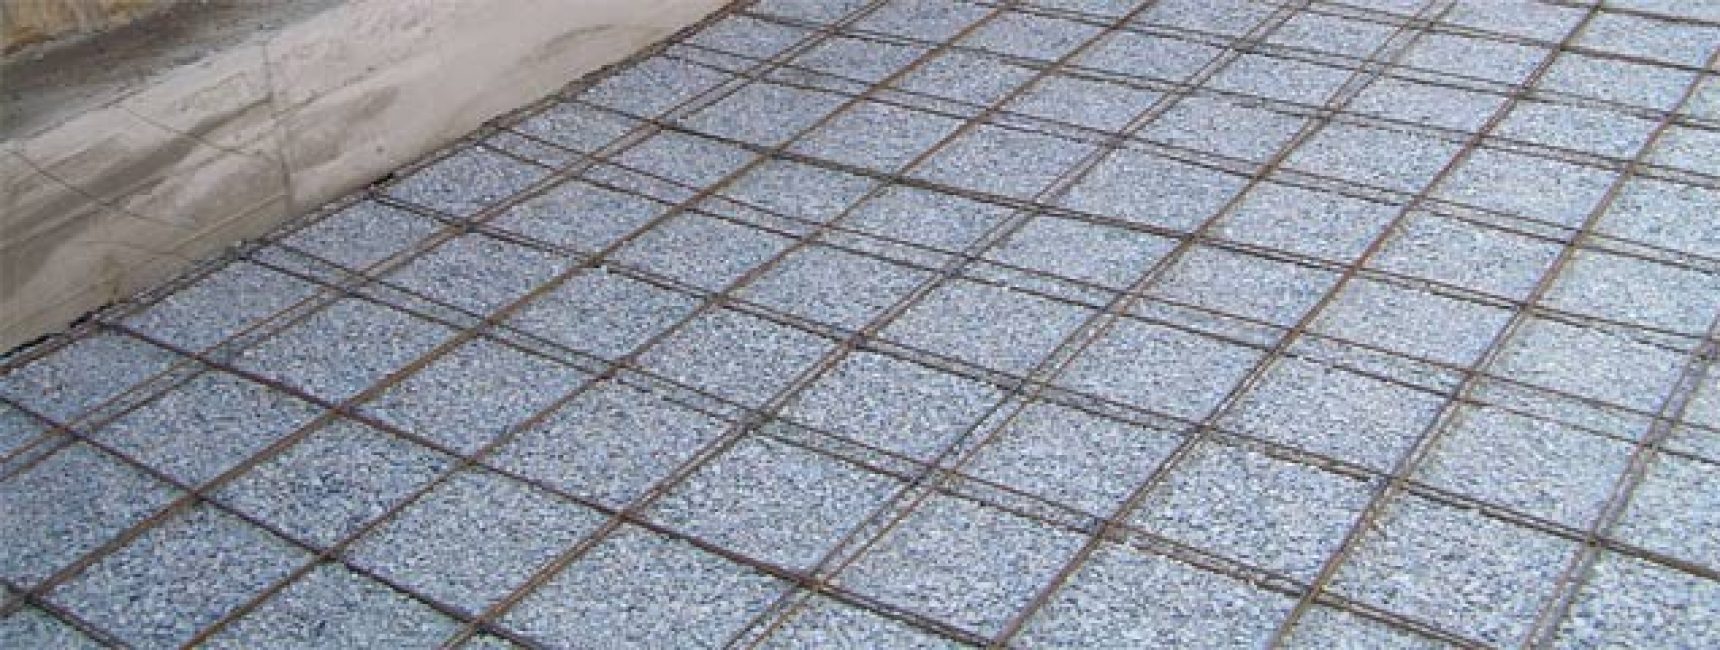
Reinforcement of concrete screed
To avoid rust, the reinforcement should be in the center of the concrete screed, so it is laid out on plastic stands 20-30 mm high
When using a net, it is stretched between hammered metal pegs. Wood subject to decay is undesirable for these purposes.
 Read also: How to make flower pots with your own hands: outdoor, indoor, hanging | Step by Step Charts (120+ Original Photo Ideas & Videos)
 Concreting Recommendations
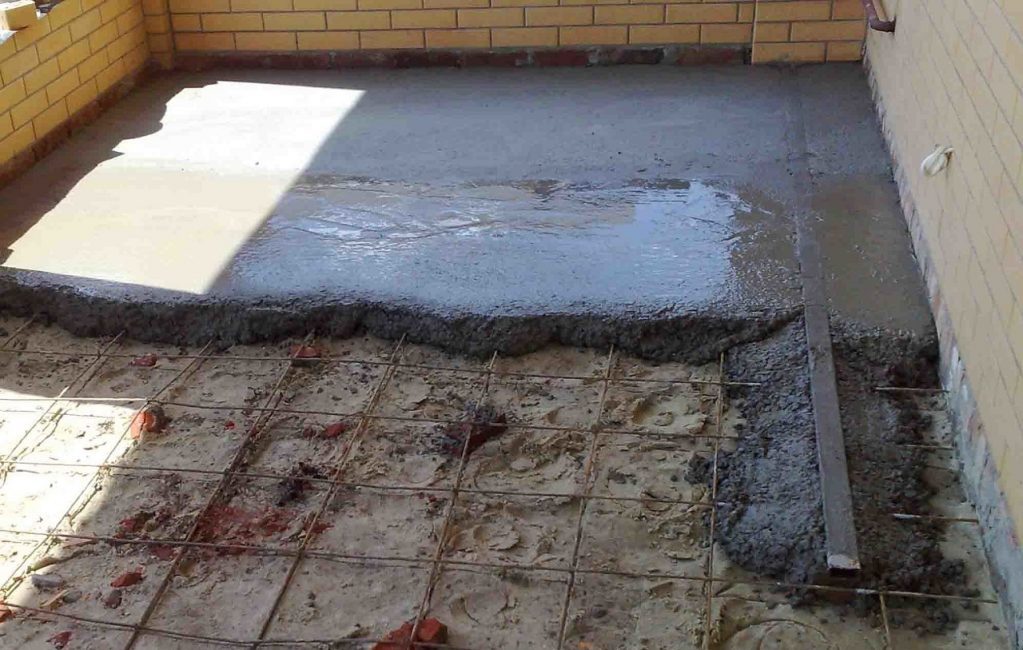
Finished layer of concrete screed
Formwork is being prepared for pouring the screed. In order for the floating screed to be located at a certain distance from the walls, it must be leveled with a building level. For ease of formwork removal, the tree can be pre-treated with oil.
In order to avoid the appearance of cold bridges, the solution is poured in one stage, so that a monolithic screed without seams is obtained. You should work as quickly as possible so that the concrete does not have time to grab.
Its proportions during mixing directly depend on the brand of cement (see table). In order for the cement and sand to be evenly distributed in the solution, the dry components should first be thoroughly mixed, and only then the liquid should be added.
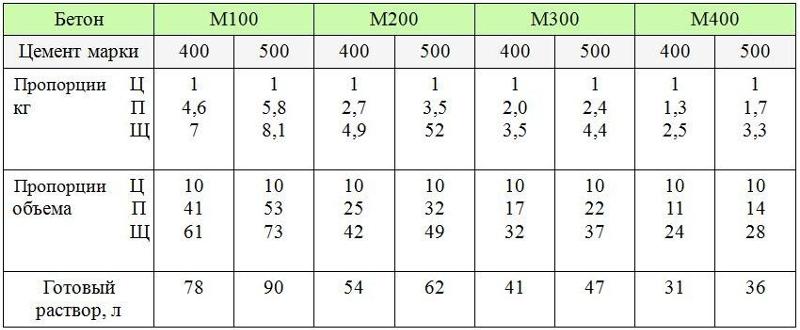
Table of the ratio of cement, sand and crushed stone
Mixing mortar in large quantities without using a concrete mixer in this case is simply unrealistic. In its absence, it is better to purchase a ready-made solution, mixed in a mechanized way, from a trusted manufacturer. For pouring the footing, it is desirable to use cement of a grade not lower than M200-300, which does not crack when solidified.
Work starts from the far corner. A vibrator is used to remove voids. The concrete is leveled with a special construction tool in the form of a long metal rail - the rules. After filling all the sections between the beacons, they are carefully removed and concrete is poured into the holes formed. In order for the solution to dry evenly, the surface is covered with a film and left to dry. In the first week, concrete should be periodically moistened with water. It finally gains strength for at least a month. Any work started before this time may weaken the strength of the concrete.
 Read also: How to make a children's house with your own hands: from wood and other materials. Dimensional drawings | (80 Photo Ideas & Videos)
Features of the arrangement of floating floors
floating floor
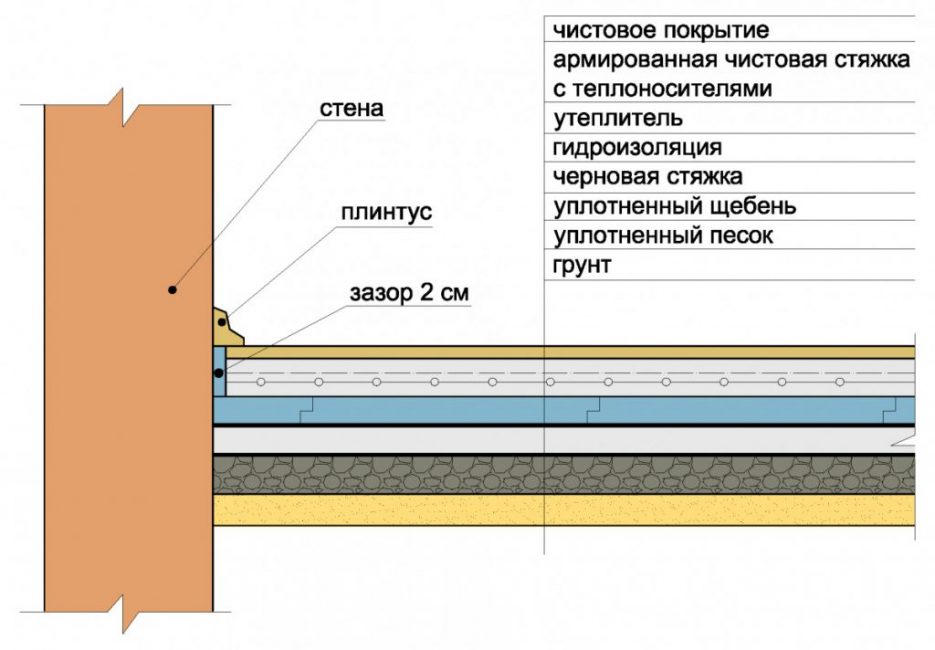
How to make floating floors on the ground in a private house? The principle of creating both structures - floating and rigidly fixed floors - is similar. To ensure the mobility of the base, a damper gap is provided between it and the foundation, with the help of which linear expansions of concrete are compensated.
A special tape is used as a damping layer. It is laid around the entire perimeter of the foundation. Insulation (polystyrene foam) is laid on the edge along the entire height of the screed.
 Read also: How to make a greenhouse with your own hands: for seedlings, cucumbers, tomatoes, peppers and other plants. From polycarbonate, window frames, plastic pipes (75 Photos & Videos) + Reviews
 What are load-bearing walls based on?
Strip foundation
Since this type of base is not load-bearing, leaning heavy stoves, brick partitions and massive stairs on it is highly discouraged. In these cases, tape is used as a base for internal walls. foundation.
When erecting partitions, the following method can also be used to avoid breaking concrete:
- stiffening ribs are mounted under them - reinforced concrete girders, which rest on the foundation; when the foundation moves, they will act as elastic inserts, damping such deformations
- a gap is made in the thermal insulation layer with the installation of a reinforcing cage in it, which is connected to the main floor frame; if the thickness of the insulation layer is insufficient to prevent the appearance of cold bridges, you should go down 20-40 cm
 Read also: How to make a booth for a dog with your own hands: building a home in the yard and in the apartment. Drawings, dimensions and original ideas (55+ Photos & Videos) + Reviews
 Dry screed technology
“Pie” couplers
The Knauf company offers to replace the concrete in the floors of the house on the ground with a dry expanded clay screed. The first three layers in them are similar to the previous version - pillow + concrete screed + waterproofing.
- Next, beacons are placed in the form of a metal profile, which are fixed motionless with a solution
- A layer of expanded clay is scattered between the beacons and carefully leveled
- Two-layer GVL slabs are laid on top. Fastening is carried out using adhesive and self-tapping screws
A company engaged in the production of soundproof panel systems called ZIPS offers its own version of arranging a dry screed. In this case, expanded clay is proposed to be replaced with mineral wool, which is glued to gypsum fiber sheets.
![[Instructions] How to make beautiful and unusual wall shelves with your own hands: for flowers, books, TV, kitchen or garage (100+ Photo Ideas & Videos) + Reviews](https://iherb.bedbugus.biz/wp-content/uploads/2018/05/19-6-300x213.jpg) Read also: [Instructions] How to make beautiful and unusual wall shelves with your own hands: for flowers, books, TV, kitchen or garage (100+ Photo Ideas & Videos) + Reviews
Read also: [Instructions] How to make beautiful and unusual wall shelves with your own hands: for flowers, books, TV, kitchen or garage (100+ Photo Ideas & Videos) + Reviews Basic Mistakes
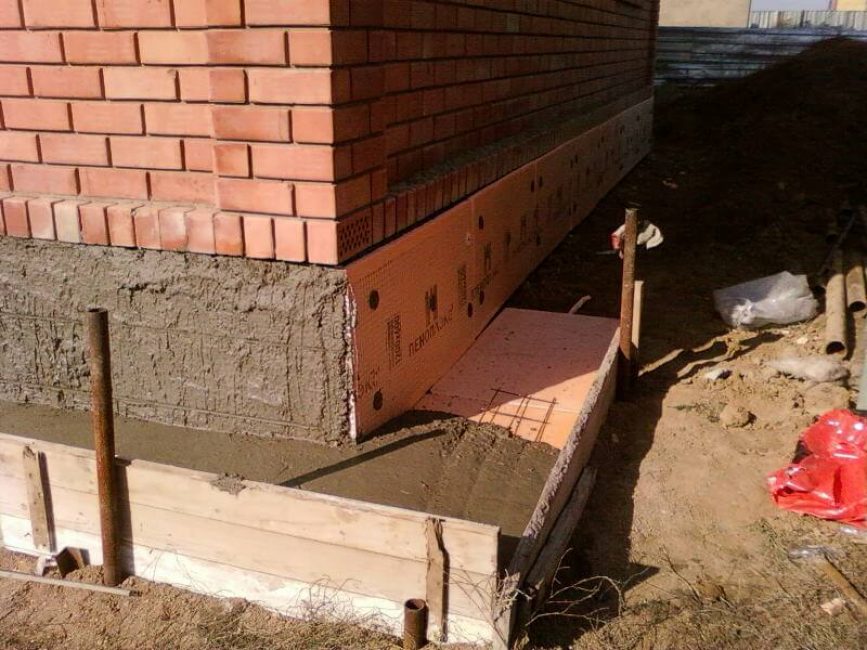
Basement insulation with polystyrene foam
- Laying floors at high levels of groundwater or soils with a high level of freezing. In this case, you should choose a different type of base
- Use as leveling beacons wooden blocks that are prone to rotting and leaving them in the screed. In case of damage and deformation of the tree, subsidence of concrete is possible
- A small layer of footing and the absence of reinforcement with increased load on the floors over 200 kg / sq. m
- The absence of a damper tape around the perimeter of the foundation, which can lead to cracking of concrete during temperature changes
- Laying insulation below zero, which is fraught with freezing floors
- Lack of thermal insulation of the plinth and blind areas
![[Instruction] Do-it-yourself laminate on a wooden floor: a complete description of the process. Laying schemes, what materials should be used (Photo & Video) + Reviews](https://iherb.bedbugus.biz/wp-content/uploads/2018/05/laminat-300x200.jpg) Read also: [Instruction] Do-it-yourself laminate on a wooden floor: a complete description of the process. Laying schemes, what materials should be used (Photo & Video) + Reviews
Read also: [Instruction] Do-it-yourself laminate on a wooden floor: a complete description of the process. Laying schemes, what materials should be used (Photo & Video) + Reviews Laying underfloor heating
If desired, warm floors can be provided in the floors of the house on the ground. To do this, it is enough to lay polyethylene, metal-plastic pipes in the upper (finishing) screed or install electric heating elements in a similar base. Because any pipe connections in the screed are not allowed, the contours of underfloor heating provide inextricable.
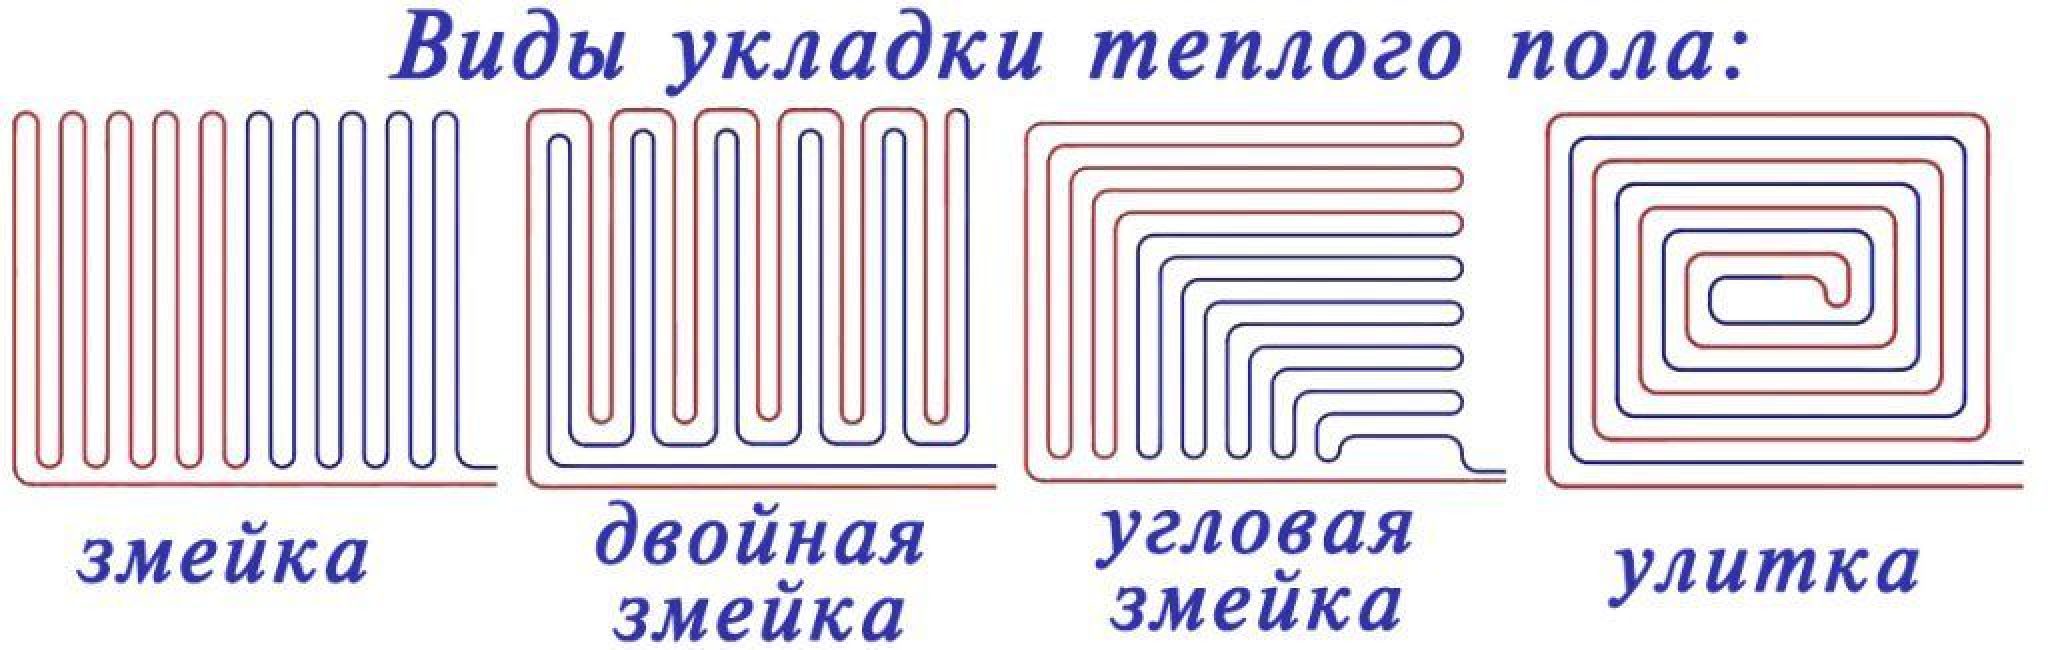
Types of underfloor heating
Pipes are laid on top of the wire mesh reinforcement just before the fill layer. Naturally, the thickness of the screed will automatically increase. Before starting work, a detailed diagram should be drawn up indicating the locations of the control and monitoring of the underfloor heating system, as well as the method of laying out pipes and the distance between them.
The thickness of the filling of the top layer should be 50 mm. Checking the performance of underfloor heating on the ground in a private house and their connection is carried out only when the concrete strength is at least 70%, that is, 3 weeks after pouring.
As you can see, arranging floors on the ground in a private house is not so difficult. Most importantly, strictly adhere to the recommended technology.
The author of the following video talks in great detail about each of the stages of their creation:

Do-it-yourself floors on the ground in a private house
Floors in a private house on the ground: device, features, step-by-step guide, as well as (Photo & Video) + Reviews


