

The basement under the house is not the best place for long-term storage of blanks. The temperature there is elevated, and closer to spring, the vegetables in it will flake. Therefore, sooner or later, novice homeowners have a reasonable question: “How to make a freestanding cellar with your own hands?”
Content:
 Read also: Bath stoves with a water tank (120+ Photos): device and principles of operation, types, model selection, self-production (Video) + Reviews
Types of cellars
In fact, the cellar is a fairly deep hole in the ground with a reinforced ceiling and walls.
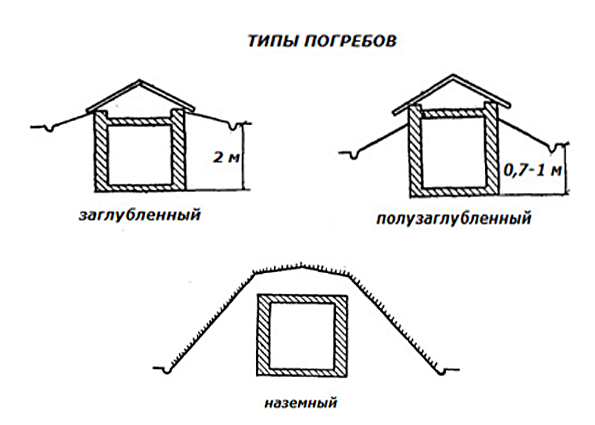
The degree of deepening of such a storage can be different:
- deep buried: are completely underground to the entire height of the cellar; it is not difficult to maintain a comfortable temperature for vegetables and preservation at any time in such rooms - a layer of soil reliably protects them from heat and cold;
- riding (ground) cellars: they can be erected on any type of site, but most often such structures are used when groundwater is located close to each other, when it is not possible to deepen the cellar too much; to protect such structures from heat and cold, they are thermally insulated by backfilling with soil (bunding);
- semi-embedded: something between a top and deep storage; its lower part is buried in the soil, and the upper one is located above the ground.
When choosing the type of cellar, it is necessary to focus on the depth of groundwater. They should not rise higher than 50-60 cm from the bottom of the cellar.
According to the location, all underground storage facilities can be divided into 2 types:
 Read also: Water pump for a private house or cottage: types, principle of operation and selection criteria (Photo & Video) + Reviews
 Location selection
The safety of products and the durability of the building itself largely depend on the place chosen for construction.
- in an open area lit by the sun - it is better to choose a place in the shade
- near large trees that can damage the structure with their roots
For the building, the most elevated place is selected. In this case, the probability of flooding with groundwater during their rise in the spring is reduced. Plus, sewage rain or melt water will not accumulate on such a site.

The vegetable store is located on an elevated site.
To avoid the collapse of buildings, the cellar pit should be located no closer than 0.5 m from the foundation of buildings.
When building a vegetable store under an unheated room, you will not only save space on the site, but also ensure ease of use - you no longer have to clear the snow every time you go for food supplies.
The walls and roof of the building will create additional protection from cold winds and scorching heat.
 Read also: Gas cylinder in the country - for a stove, heater and other needs: terms of use (Photo & Video) + Reviews
Construction of a deep cellar
The construction of any kind of underground storage should be carried out not in the spring, when groundwater rises too close to the surface, but towards the end of summer, in August. All work must be carried out in dry weather. When it rains, the pit must be covered with a film.
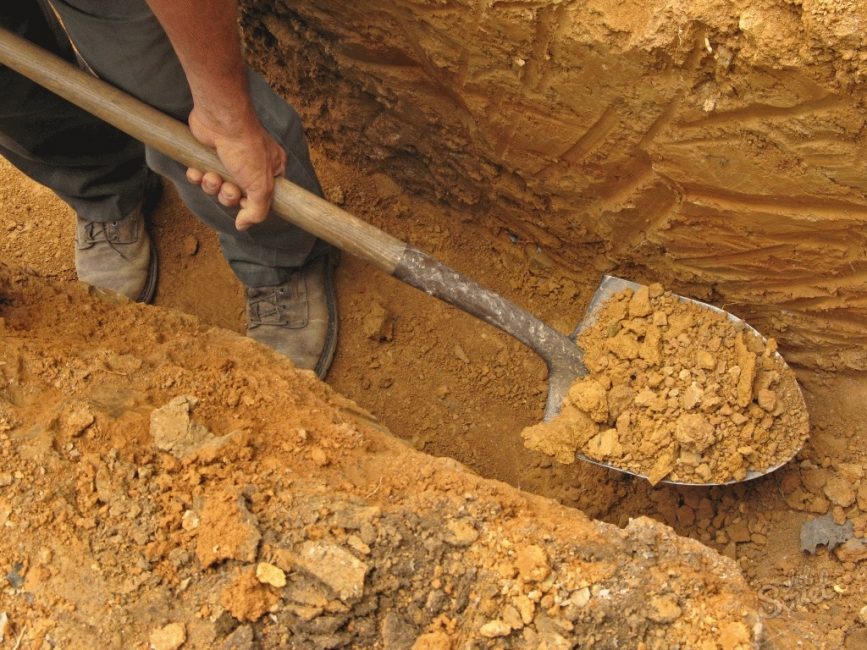
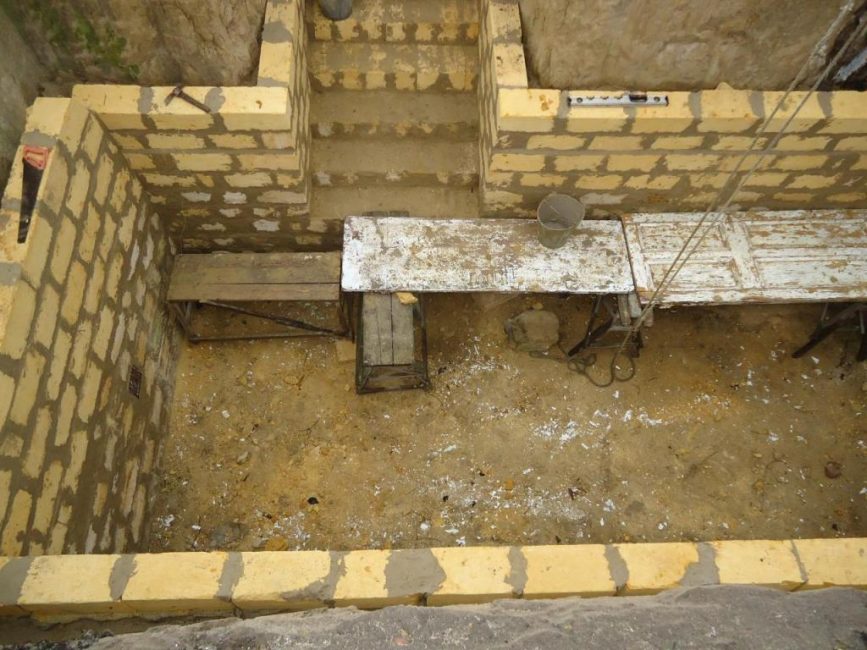
Pit preparation
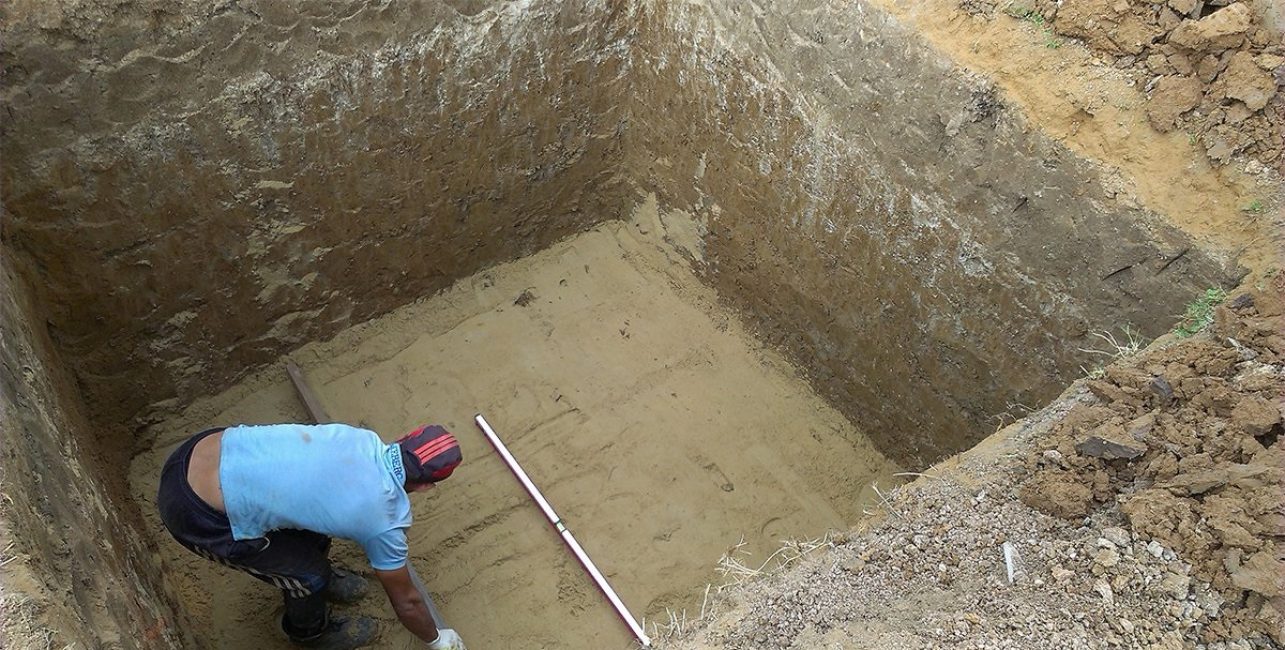
Pit preparation
Preparing a clay castle
The best floors in the cellar are adobe. Our ancestors also knew about the peculiarity of clay to retain moisture and not let it into the room.
To this day, a clay castle is one of the best options for protection. foundationeven in the construction of residential buildings. By the way, leaks in the basements of buildings erected back in the 18th-19th centuries appear only after the laying of new modern communications and the destruction of adobe surfaces.
Clay preparation
A clay castle is called a layer of clay 20-25 cm thick, laid along the contour of the building with the capture of the perimeter of the walls. The ideal option would be a combination of modern and traditional methods of protection.
First, rolled bituminous material (for example, roofing material), glued with heated bitumen, is laid on the floors, they are poured with cement, and a clay castle is built on top.
Sufficient clay must first be soaked with water for several days. With an excess of sand, 10-20% lime is added to it. It is better to ram the clay in the formwork, filling it in small layers. To compact it, they trample it with their feet, turning it over with a shovel from time to time.
If a natural layer of clay is found at the bottom of the pit prepared for the cellar, it must be dug up with a shovel, capturing a section slightly wider than the intended walls.Then the floors are well washed with their feet, dug up again with a shovel and trampled down.
The walls are also insulated with a clay castle. To do this, the space between a brick or concrete wall is filled with carefully compacted clay. The thickness of such a lock is from 25 cm. It is more convenient to fill the space with clay as the walls are erected.
It is rammed with a piece of log or a special rammer in the form of a flat heavy base and a handle attached to it.
Ventilation
Regardless of the type of cellar, it must be provided with ventilation. After all, in addition to moisture coming through the capillaries from the soil, vegetables and fruits stored indoors will also release water during breathing.
There are two ventilation ducts in the cellar. The first exhaust is located above the ceiling itself with an output to the outside to a height of 10-15 cm (see photo). The end of the pipe, located outdoors, should rise above the ground by 0.5 m.
When located above the cellar of an outbuilding (garage, barn, etc.), the exhaust duct is displayed on the roof of the building above the ridge. The pipe should rise above it by 0.5 m.
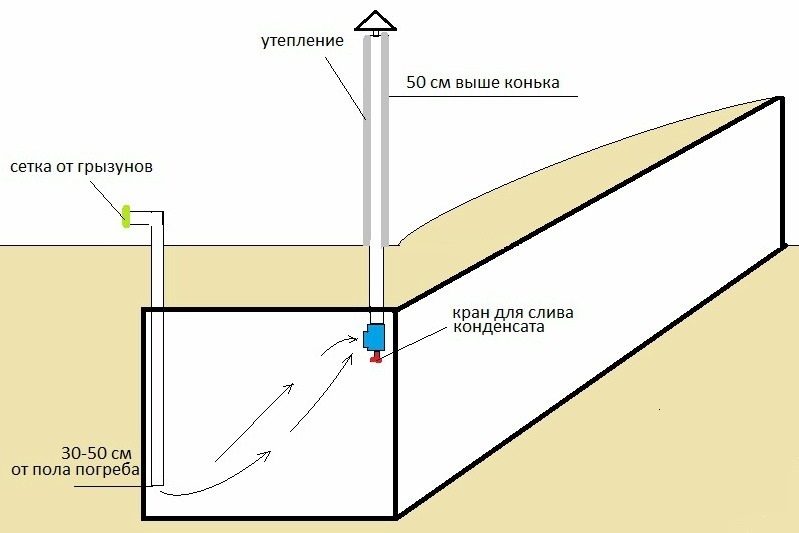
Cellar ventilation scheme
The second supply channel, which serves to supply fresh air, is equipped at a distance of 20-25 cm from the floor. Supply and exhaust pipes are mounted only on opposite walls. Their minimum length is 2.5-3 m. In order for the circulation of air masses to be uniform, the diameter of the channels must be the same.
They are laid already in the process of building walls. To do this, special holes are provided in masonry or concrete, into which pipes are inserted. From above, the channels are equipped with visors that protect against precipitation and penetration of rodents.
Too large as well as a small diameter is undesirable. In the first case, it will be too cold in the room, in the second case, the small size of the channel will not provide sufficient air exchange. Ideally, pipes should not have any bends. Any extensions and contractions are not allowed.
The size of the pipes is calculated depending on the dimensions of the room. For every 1 m2 of a cellar with a standard 2-meter depth, 26 cm2 of the channel section should be provided. If the storage depth is large, the diameter of the pipes is increased proportionally.
So that the water vapor coming out does not freeze, the channels are insulated at the exit points with soil. You can put on a casing from the outside, lined with heat-insulating material.
Forced ventilation is installed in large vegetable stores. In the simplest systems, an electric fan of low power is installed in the hood for this. In more complex versions, it is installed both in the supply and exhaust channels.
wall decoration
The most popular materials for their finishing are concrete, brick or concrete blocks. A formwork is prepared for pouring concrete, into which a reinforcing cage is built. All concrete work must be carried out within one day.
Otherwise, cold bridges will form at the joints, through which heat will escape. Such joints are also dangerous due to an excess of surface stress - the wall will turn out to be fragile.
Brick wall decoration
When erecting brick walls, laying is carried out in one brick. As a solution, a clay-sand or cement mixture is used. Outside, the walls are waterproofed with a double layer of bitumen and roofing material. The remaining space between the soil and the wall is covered with earth and compacted.
You can finish the walls with asbestos-cement slabs. Wood is undesirable. Its service life in a wet room will be short. If this is necessary, you can use the method that our ancestors used.Stakes are hammered into the corners of the walls, into which boards or slabs cut to length and dried for 1-2 years are laid.
Cellar ceiling
For the manufacture of floors, you can use concrete, wood, or a combination of both. Fixing a plank ceiling and laying insulation between the wooden beams is much more convenient and easier.
In this case:
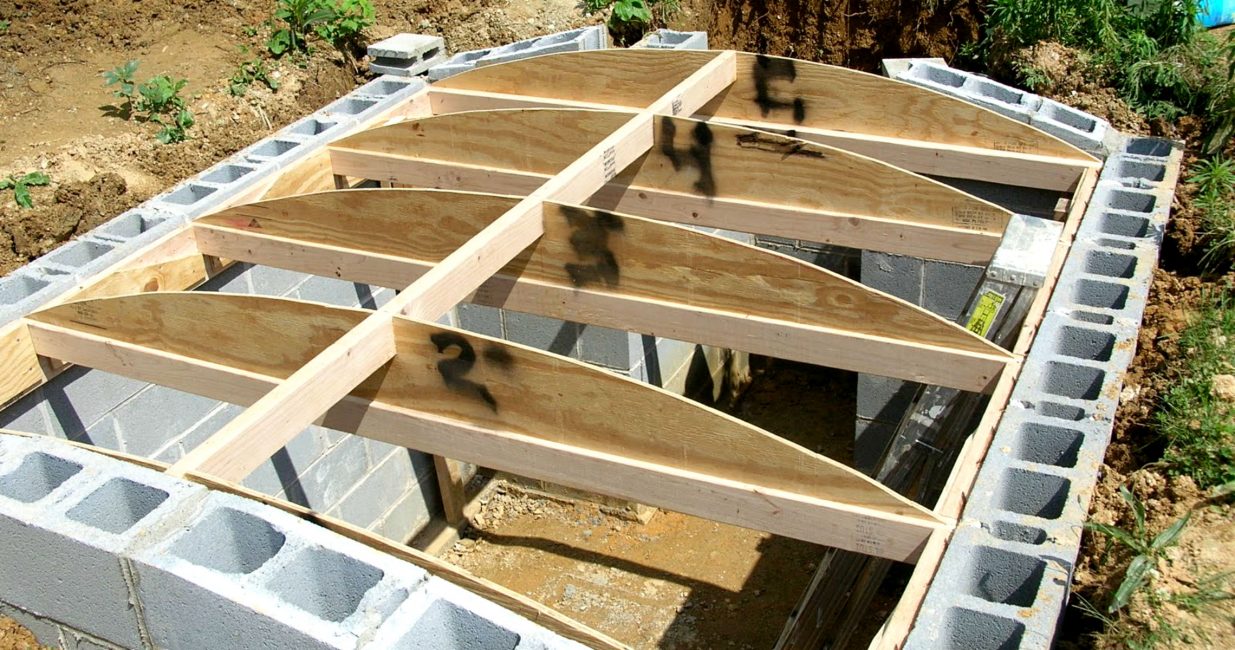
wooden floor
Ceiling insulation
To ensure the optimum temperature in the room, the ceiling must be thermally insulated.
To do this, a lattice structure (crate) of timber is attached to the beams, between which foam plastic or any other heat-insulating material that does not absorb moisture is laid.
To secure it, it is sheathed with boards or fiberboard, which are screwed to the bars.
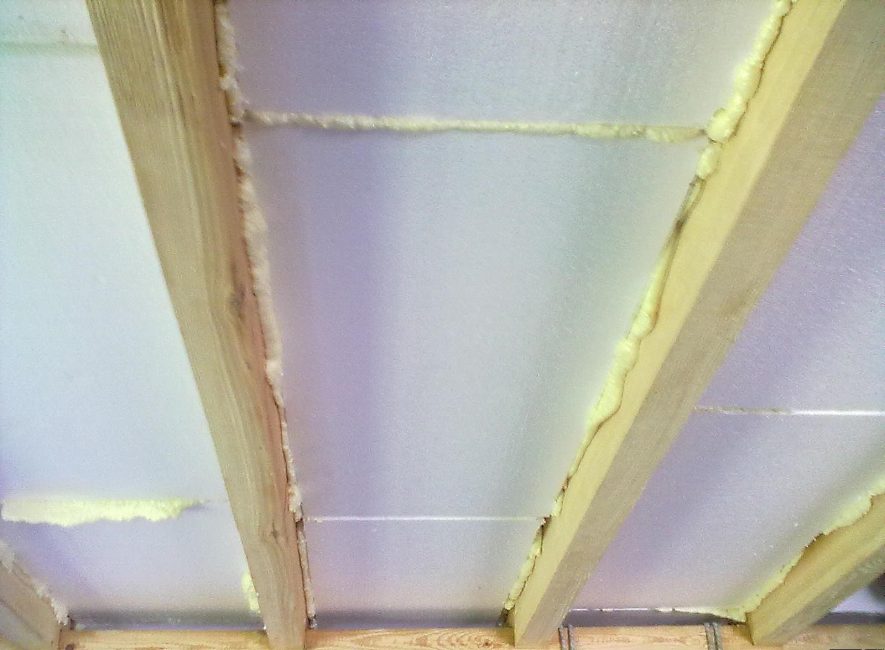
Before installing the insulation on the ceiling, a plastic film is overlapped. This can be done with simple double sided tape. All joints in the insulation are carefully sealed. Then it is again covered with a film. As a finishing coating, plaster or boards can be used.
 Read also: What should be the wiring in a private house, do-it-yourself installation, instructions for beginners
 Construction of the upper cellar
The cost of such a design compared to the underground option is quite low. Yes, and it is more convenient to use such a storage - it is equipped with an ordinary door, and you no longer have to climb the stairs down. However, it is not easy to maintain the optimum temperature without deepening into the ground. For this, a special design of the building is provided.
Types of riding cellars
- storage sheds with bunding: the simplest structures made of boards or logs, resembling a hut; to maintain a comfortable temperature, such buildings are covered with a sufficiently large layer of earth from above
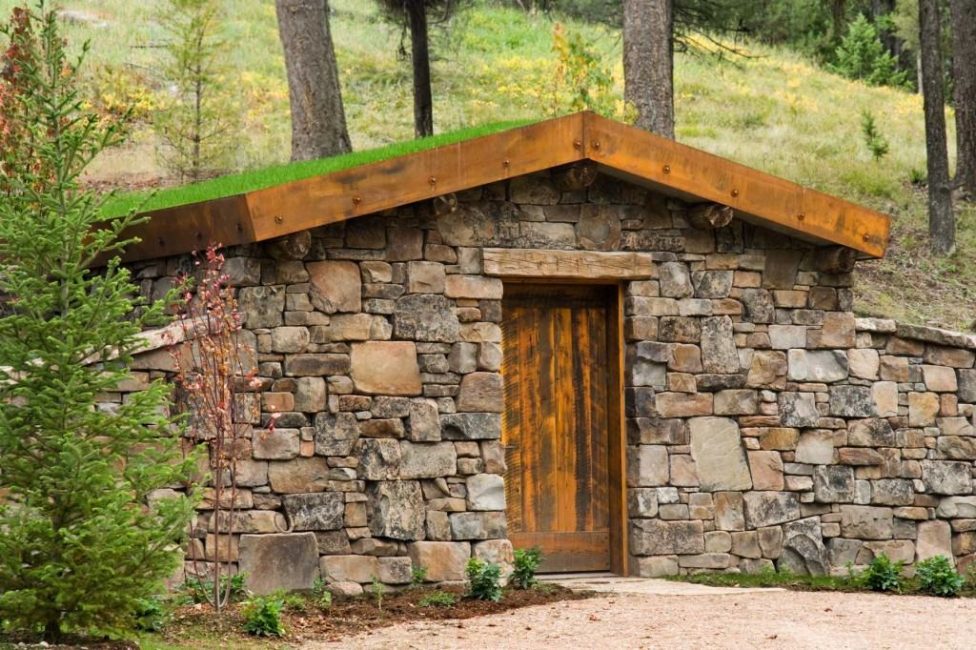
- upper cellar without embankment: its design is similar to the design of a conventional outbuilding; to maintain a comfortable temperature, the walls of such a building are made double with a layer of thermal insulation between them
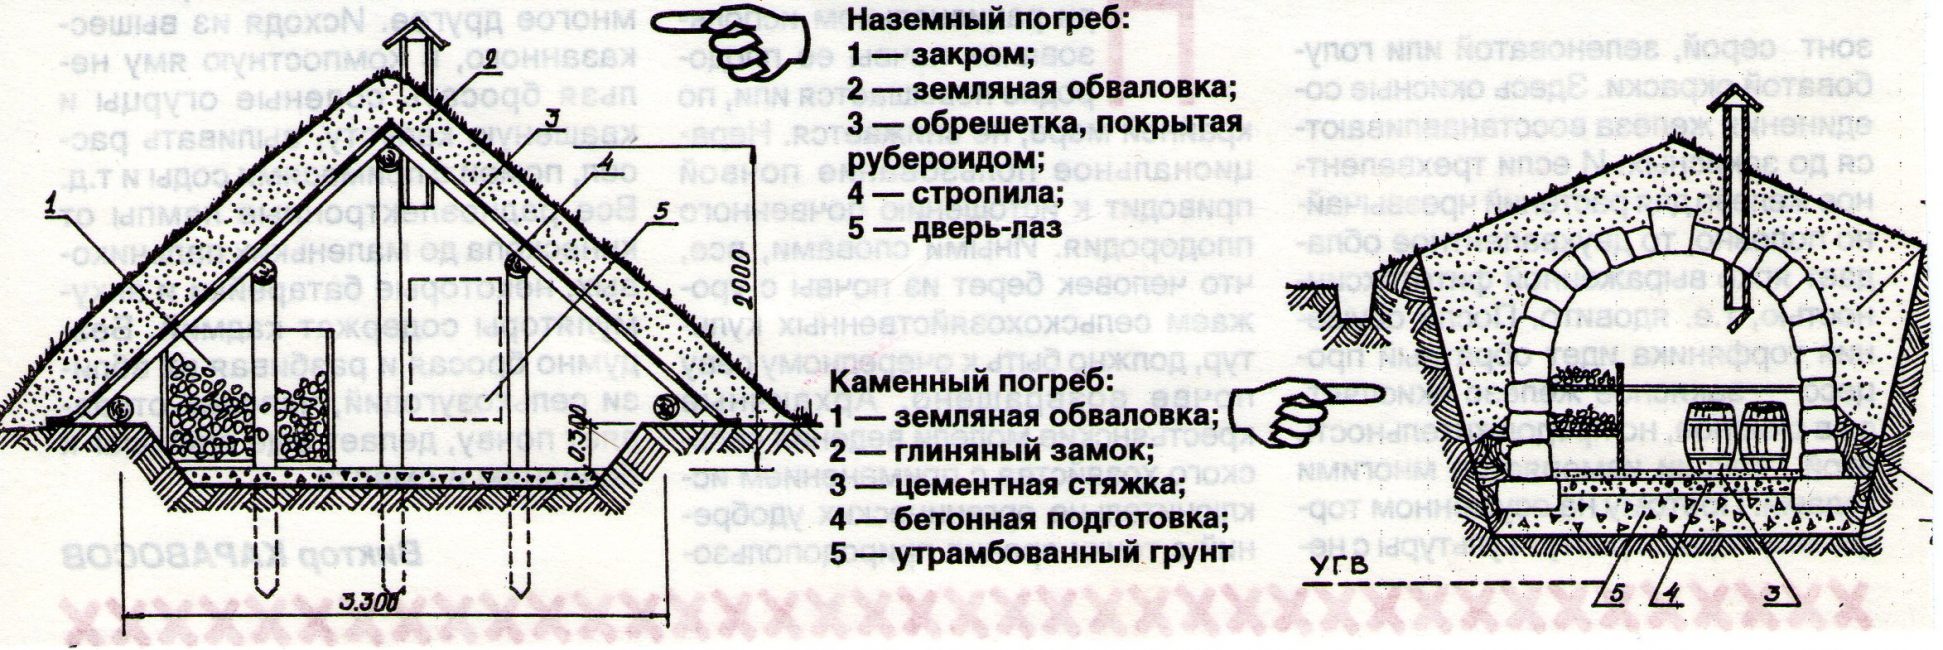
Types of cellars with bunding
Construction of a cellar with an embankment
Unlike the deep-seated cellar, most of the upper cellar rises above the surface. To maintain the required temperature in the room, it will require additional thermal insulation.
embankment
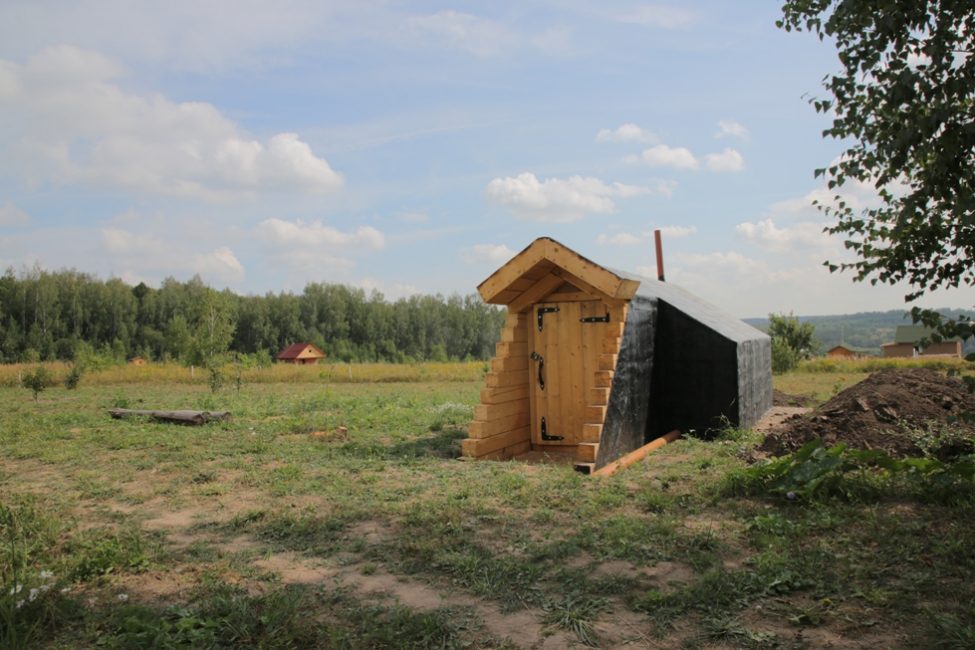
Preparatory process before bunding
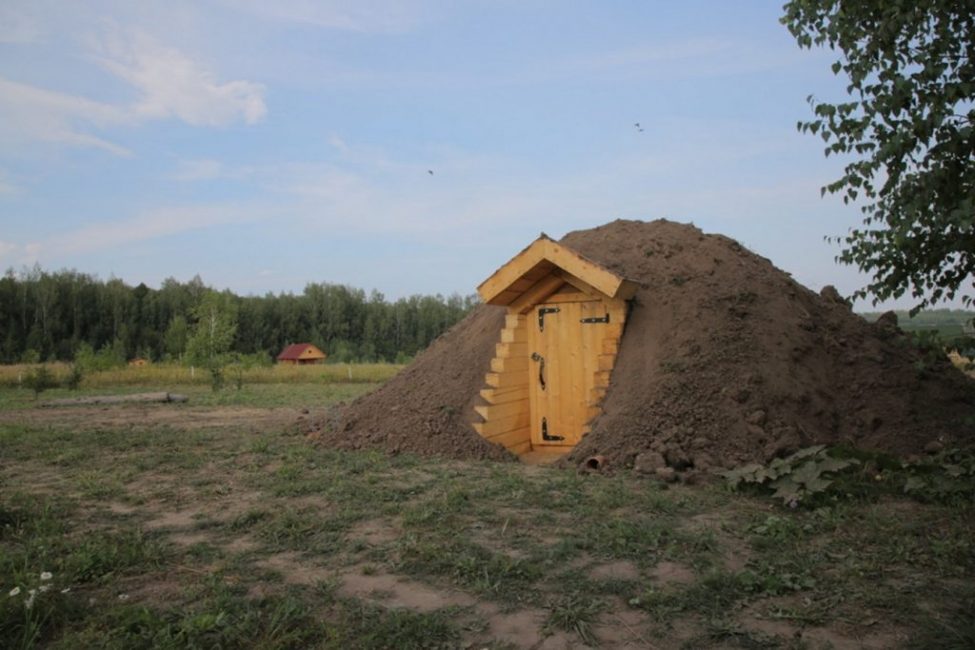
Ready storage
The main stages of the construction of a cellar without wall embankment
Riding cellars with full bunding take up too much space on site. In recent years, site owners have found a different solution. Instead of embankment, they began to build cellars with double walls.
Outwardly, they look like ordinary buildings. However, due to the massive walls laid with insulation, a comfortable temperature for vegetables is maintained in such a storehouse.
In the literature, it is recommended to insulate the space between the walls with foam, sawdust or expanded clay.
Building without embankment
With earth, with the help of a bunding, only a one- or two-pitched roof of such a vegetable store is insulated. The thickness of the layer of soil to be filled up is up to half a meter. Just as in the previous case, a vestibule is provided in such a storehouse.
The door leading to the vault is carefully insulated.
During the construction of such a vegetable store:
Semi-buried cellar
Such a structure goes into the ground to a depth of about a meter with a wall height of about 2 m. The entrance is through the vestibule, and the door is flush with the ground. Second, insulated the door provides access directly to the cellar, where they go down the stairs.
Such structures are erected on sites with a groundwater level of no more than 1.5-2 m.
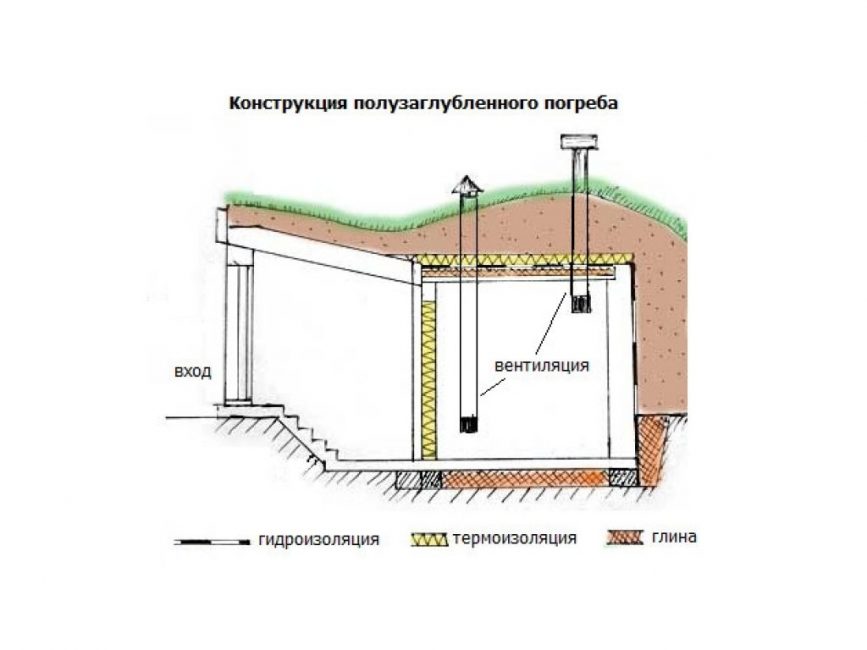
Semi-buried cellar
The procedure for performing work is in many ways similar to the stages of building a ground cellar:
Cellar of reinforced concrete rings
The maximum diameter of reinforced concrete rings is 2-2.5 m, so they can only be used to build a small vegetable store. But for a small family, such a room will be quite enough.
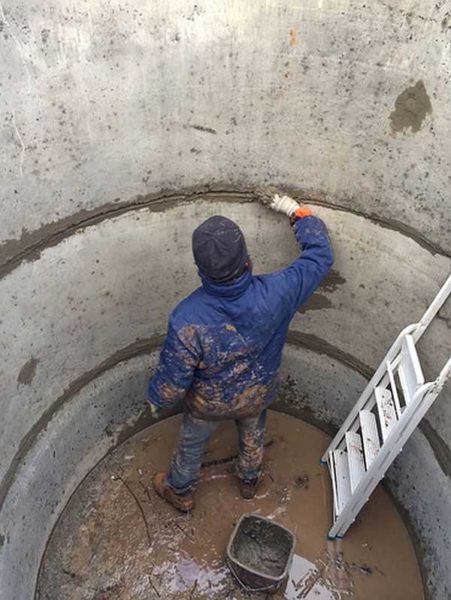
Sealing joints in a concrete cellar

Cellar in the garage. Built with Conscience!
How to make a cellar in a private house or in the country with your own hands: diagrams, step by step guide, proper ventilation (55+ Photos & Videos) + Reviews
 Read also: Projects of country houses for 6-10 acres: 120 photos, description and requirements | The most interesting ideas
Ready-made structures for cellars
The industry produces ready-made hermetic structures for cellars from a variety of materials: from plastic to metal. It is undesirable to use metal containers - they do not store heat well.
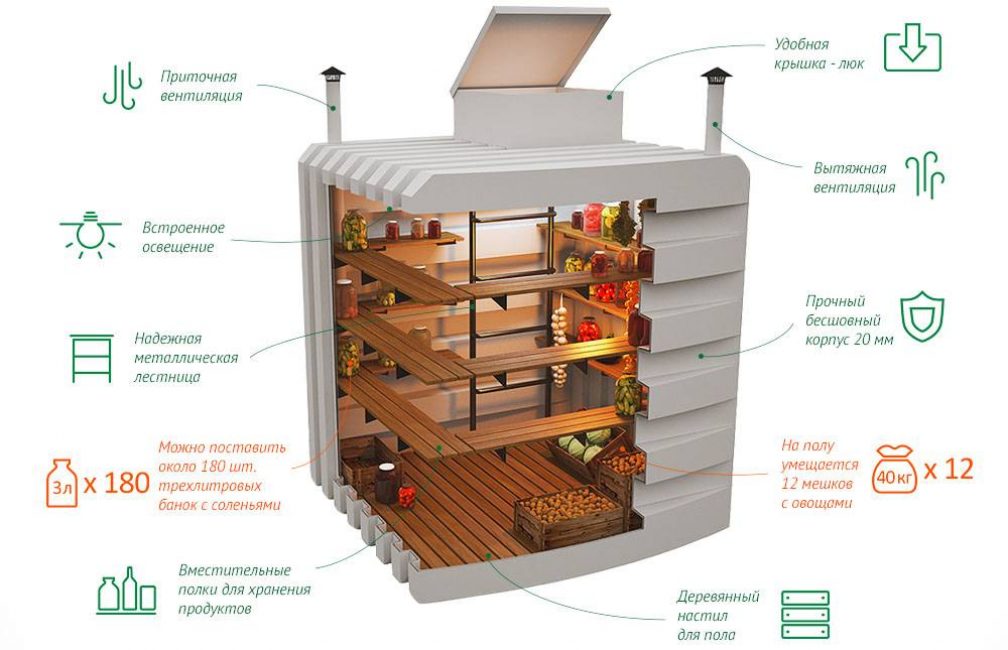
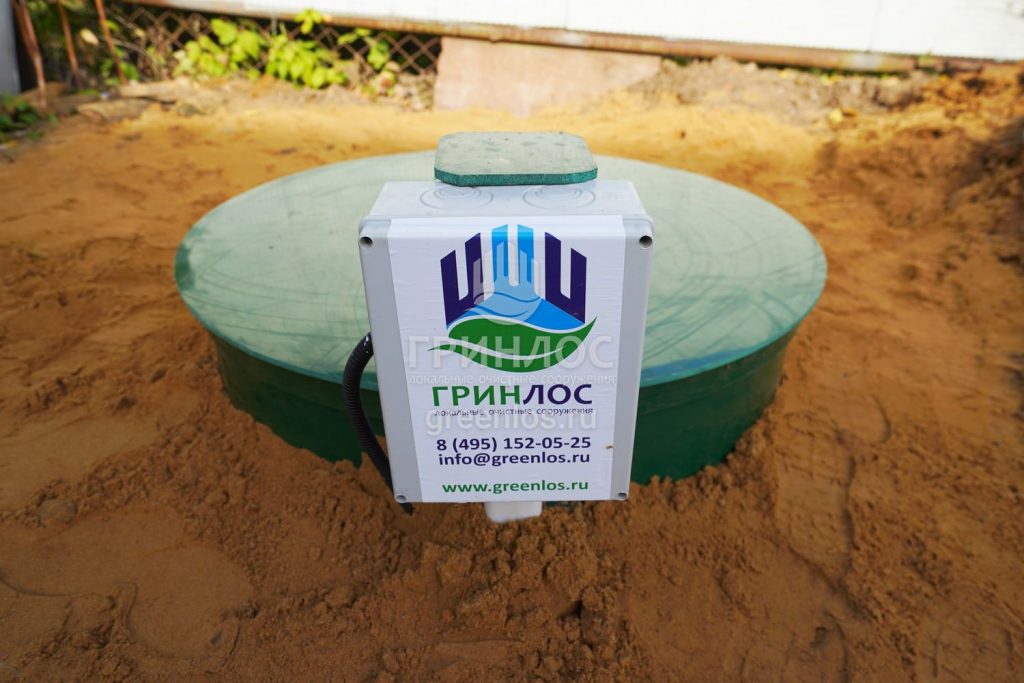
Plastic Cellar
Installing this design is easy. Under it, a pit of the required size is being prepared, into which a sealed container is lowered. The space between it and the ground is covered with earth and compacted tightly.
If desired, a complete installation of such a cellar can be carried out by the manufacturer.
You can see with your own eyes the process of laying a plastic cellar in the following video:
Plastic cellar with side vertical entrance
How to make a cellar in a private house or in the country with your own hands: diagrams, step by step guide, proper ventilation (55+ Photos & Videos) + Reviews


Described in detail, thank you for practicing everything, because it is described by a practitioner. Found everything you need in one place. I will be building this summer. Too bad you don't have to think!