
When choosing a gate for arranging the entrance to the courtyard of a private house, sliding (retractable) structures are increasingly preferred. They are practical, durable and easy to automate to open and close without leaving your car. Using the drawings of sliding gates and instructions for their arrangement, you can make and install the structure with your own hands.
Content:
 Read also: Water pump for a private house or cottage: types, principle of operation and selection criteria (Photo & Video) + Reviews
Varieties sliding gate
Sliding gates
There are three types of sliding gates depending on the location of the guide:
Suspended. The door leaf, equipped with rollers, is hung on a beam. This option is reliable and durable - suspended gates of industrial facilities, installed more than 50 years ago, are successfully functioning to this day. A serious drawback is the need to install the beam at a high height so that any equipment can pass through the gate, since the design turns out to be metal-intensive and, accordingly, very expensive.
Hanging gate
Rail. Rollers for movement are attached to the bottom of the canvas, they move along a rail mounted on the surface of the earth. The upper roller on one of the consoles (from the side where the gate leaves) additionally holds the canvas. The advantage of the design is its compactness - the canvas moves beyond the opening only by its width. The disadvantages include the need to constantly maintain cleanliness around the rail, since snow, fallen leaves, random debris can block the movement of the web.

rail gate
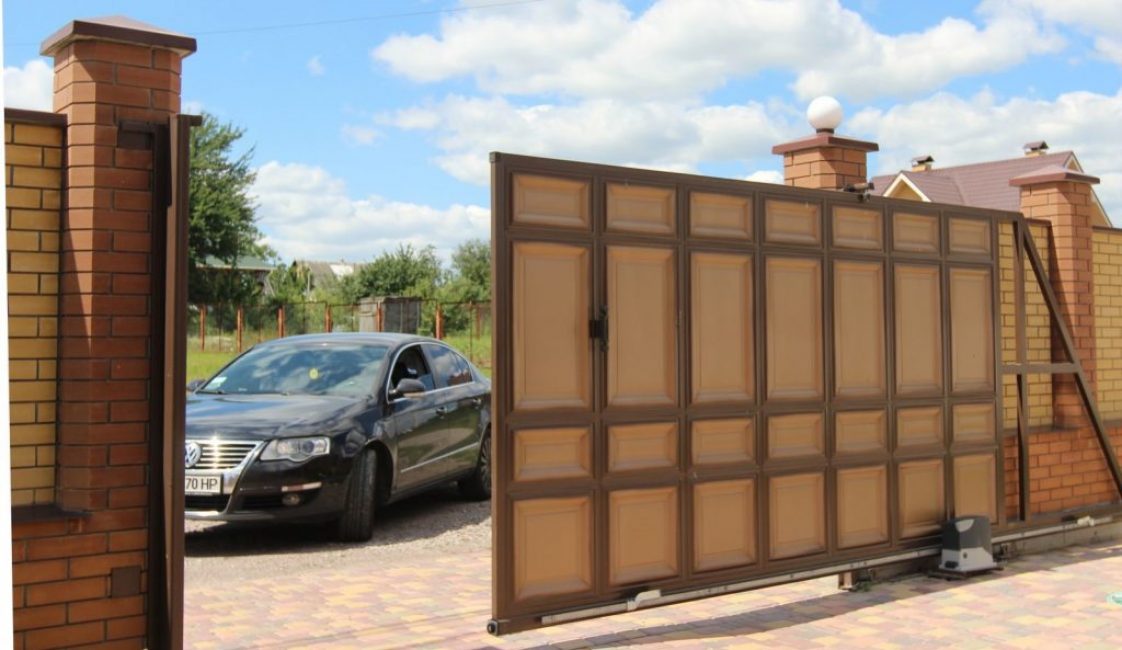
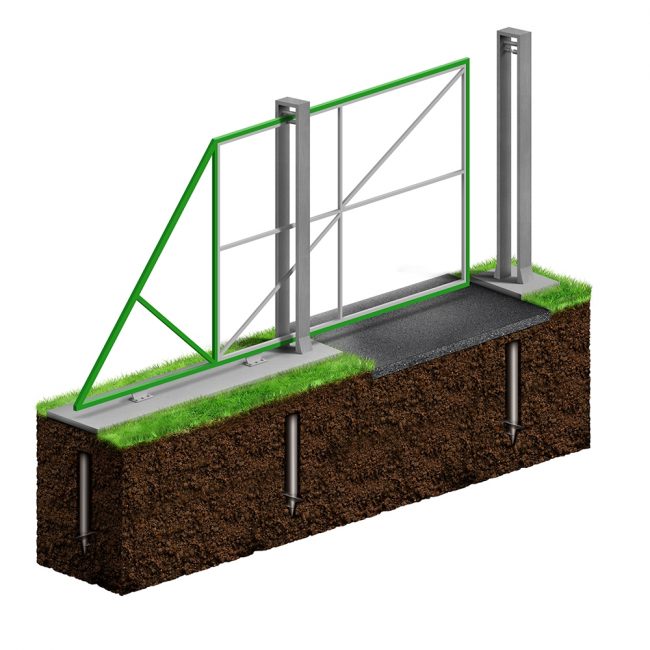
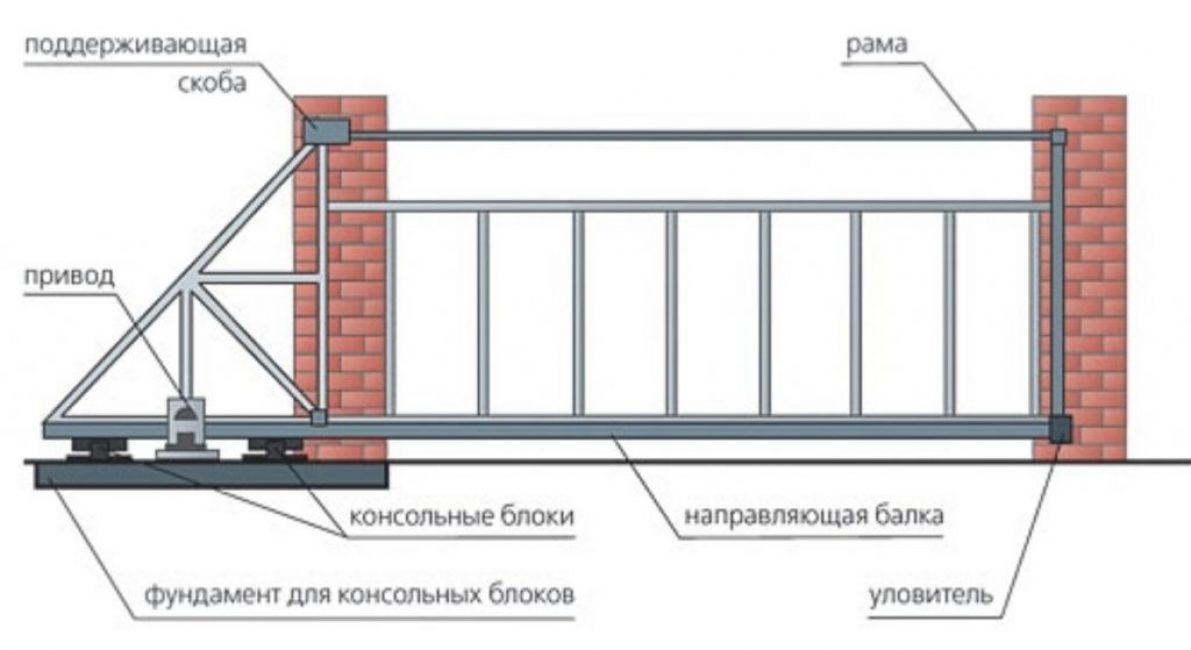
Console. The canvas is equipped with a guide beam and suspended on cantilever roller blocks. As a result, the lower edge of the sliding sash does not touch the ground. The guide beam is usually mounted at the bottom of the blade, but may be located in the middle or at the top, depending on specific conditions.
Fully extended design
Advantages and disadvantages of cantilever sliding gates
- no upper and lower limits on dimensions
- a gap of 10 cm between the leaf and the ground - snowfall, random debris will not interfere with the operation of the gate
- easy, effortless web movement, the rolling elements are located inside the beam - they are protected from atmospheric influences
- the ability of the canvas to withstand high wind loads due to the system of its fixation in a vertical position
- the ability to equip the gate with security elements and an electric drive with remote control
- They are quite difficult to install, demanding on the length of the fence
 Read also: Gas cylinder in the country - for a stove, heater and other needs: terms of use (Photo & Video) + Reviews
 Installation restrictions
Sliding gate scheme
Installation of sliding gates of the cantilever type is impossible or very difficult if:
- Along the fence on the side where the sash will roll back, there is no free space equal to one and a half width of the opening.The sliding sash takes up a lot of space due to its technological part, which helps to evenly distribute the load on the console unit
- The fence is located at an angle relative to the opening line or is not built in a straight line. The section under the shifted sash must be straight and be in the same plane with the opening
- The relief of the soil in the area under the sash has noticeable irregularities, height differences. Leveling will require a lot of excavation
 Read also: What should be the wiring in a private house, do-it-yourself installation, instructions for beginners
Gate device: preparatory stage

Metal sliding gates
First of all, you need to inspect the site. If space and relief allow the installation of a retractable structure, a project is being developed. It is best to combine the arrangement of the gate with the construction of the fence. In this case, the characteristics of the pillars and their location will fully meet the task.
The optimal distance between the gate posts is 4 meters. This passage width is standard in European countries, so imported fittings and accessories for sliding gates are manufactured to meet these requirements. In addition, a four-meter passage makes it easier to enter from a narrow street.
The posts must be firmly fixed in the ground, located strictly vertically, in the same plane with the fence.
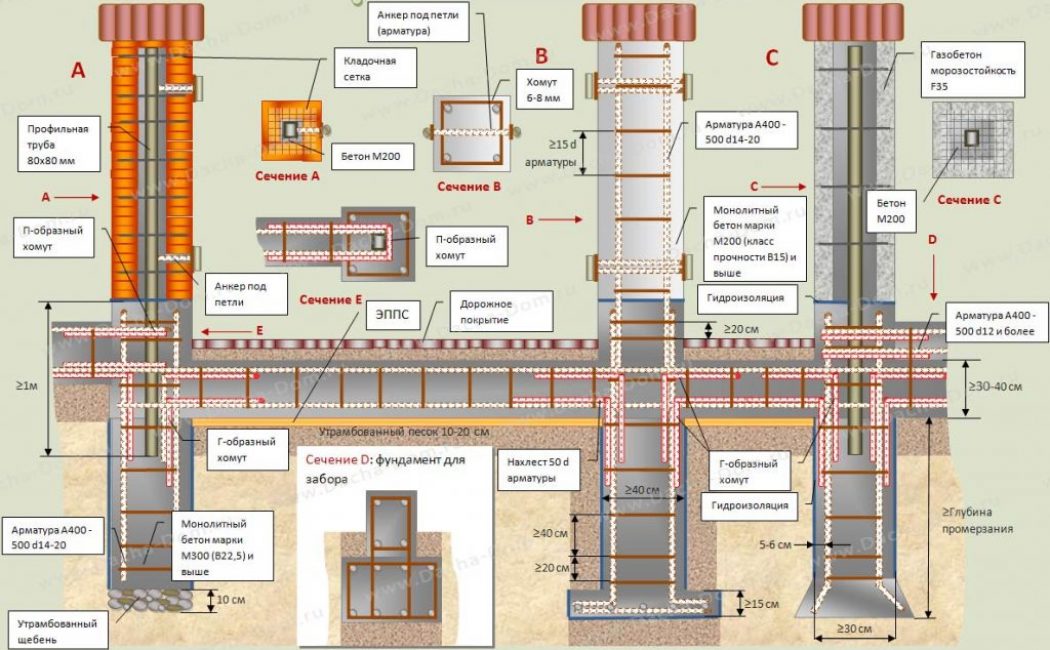
The poles can withstand the load from the sliding gate:
- from reinforced concrete or brickif the cross section is at least 200x200 mm (brickwork is mounted around a pole from a square or round pipe)
- from steel profile pipe section not less than 600х400 mm
Opening scheme for sliding gates
Brick and reinforced concrete pillars must be equipped with steel embedded plates 100x100x5 mm for fastening the gate elements. The plates are installed flush, 3 pieces per post from the side of the yard, with an indent of 10 cm from the edge of the opening. The lower plate is mounted 20 cm above the zero mark (the level of the entrance to the gate), the upper one is 20 cm below the top edge of the post, the central one is in the middle between them.
 Read also: Projects of country houses for 6-10 acres: 120 photos, description and requirements | The most interesting ideas
 Design and stages of work
If there are no skills in designing such systems, it is recommended to contact specialists, since errors will result in improper distribution of loads and rapid wear of mechanisms.
Door manufacturers offer designs of standard sizes, so the easiest way is to use the ready-made solution and copy the drawing with the specification. Also, options for drawings can be found on the Internet on the forums of private developers.
Project example
Detailed drawing with specification will simplify the work, will allow you to purchase materials and components in the required quantities.
At the design stage, it is necessary to choose the option of filling the door leaf. The most commonly used profiled sheet, wood paneling or metal grating.
The list of works includes:
- installation (or preparation of existing ones) support pillars)
- arrangement foundation under the working part of the gate mechanism
- installation of electrical wiring for the installation of automation
- gate manufacturing
- construction installation
- connection and adjustment of the drive for automatic sliding gates
Tools and materials
Sliding gate accessories
For work on the manufacture of structures and installation of the system, you will need:
- welding machine (welding current - from 130 A) with universal electrodes 3 mm, sleeves, mask
- grinder + cutting wheels, cleaning
- building or laser level
- hammer
- screwdriver + metal screws (200 pcs) or riveter + rivets (200 pcs) for fastening the profiled sheet as filling the door leaf
- profiled sheet - 10 sq. m
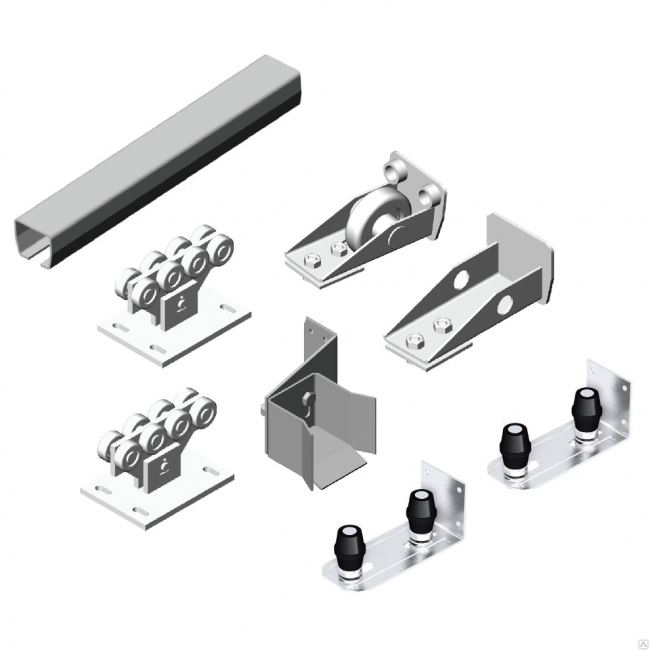
- sliding gate hardware kit
- profile pipe 60x40 - 20 m, 40x20 - 20 m, 60x60 - 7 m
- channel 16 to 20 cm - the length should correspond to half the width of the opening
- reinforcement with a section of 10-14 mm
- materials for protective and decorative coating of metal structures (anti-corrosion primer, primer for metal, paint for metal, solvent)
- sealant
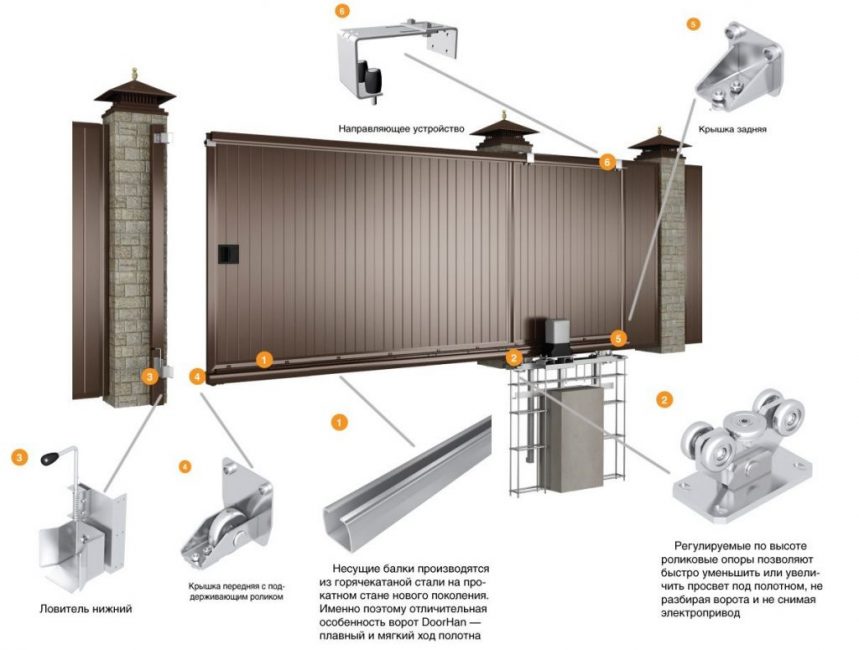
Sliding gates
A set for sliding gates is selected taking into account the width of the opening and the weight of the structure.
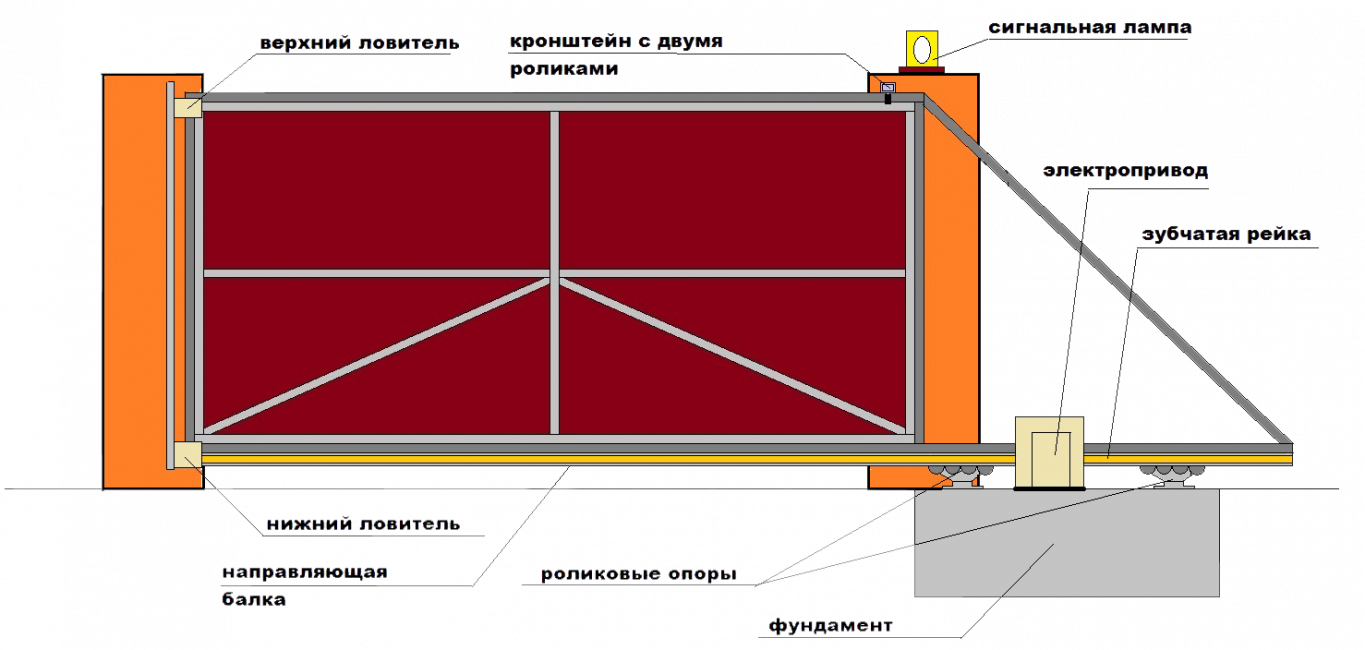
Standard kit includes:
- console (guide, beam) - a rail with rollers inside, due to which the sash moves
- roller carriages (2 pcs) - mounted on the foundation, the rollers are located inside the console
- upper roller plate - mounted on a support post, holds the canvas in a vertical position
- end roller - helps to fix the sash so that it does not sag in the closed position
- catchers (lower and upper) - mounted on the counter post, fix the edge of the sash when closing, preventing the canvas from warping
- plugs for the console - are installed on the ends, protect against the penetration of moisture, dirt
Installation of support poles
gate foundation
Under the pillars, pits are prepared with a depth below the level of soil freezing. At the bottom, a layer of sand and a layer of crushed stone (10 cm each) are compacted. The pillars are installed vertically in level and the pit is poured with concrete. Mortgages in concrete and brick pillars were described above.
From the side of the yard, false pillars from a profile pipe 60x60 mm are attached to the pillars: a U-shaped frame is welded to the support post, and a receiving (unloading) post is welded to the counter post.
markup
Foundation made according to the markup
After installing the pillars, markup is required. First of all, the zero level of the site is determined. It is the level of entry into the gate opening, regardless of whether the road surface is laid on it or not. Surface foundation should be flush with the driving surface, which should be taken into account when marking, as well as the subsequent laying of the road surface.
The zero mark is first drawn on one of the supporting pillars, and then transferred to another using a laser level or a building level and a cord. Close to the surfaces of the pillars, a cord is pulled along the marks (attached to pegs), and its horizontalness is checked. The cord must extend beyond the support post by at least 2 meters.
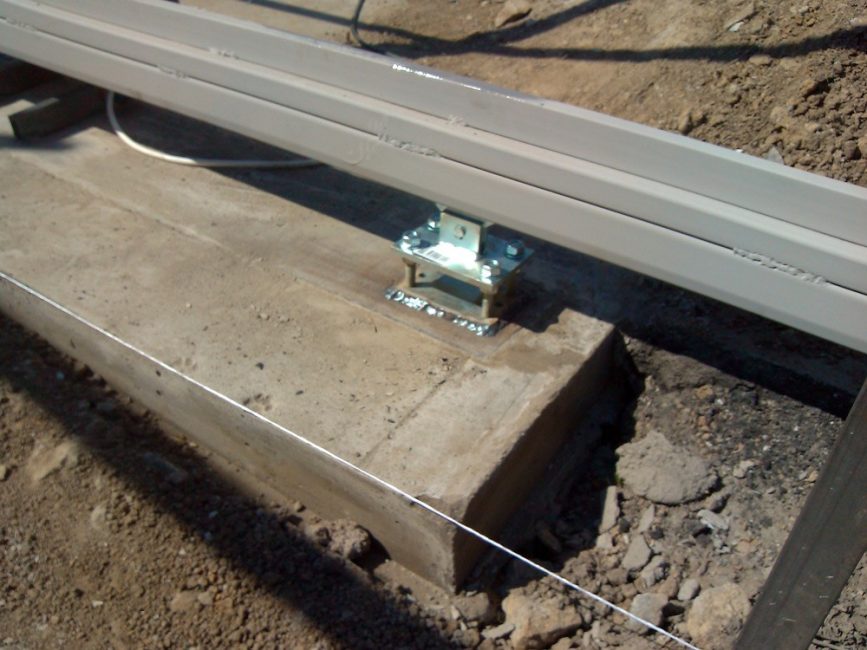
Foundation for the gate mechanism
Mortgage for foundation
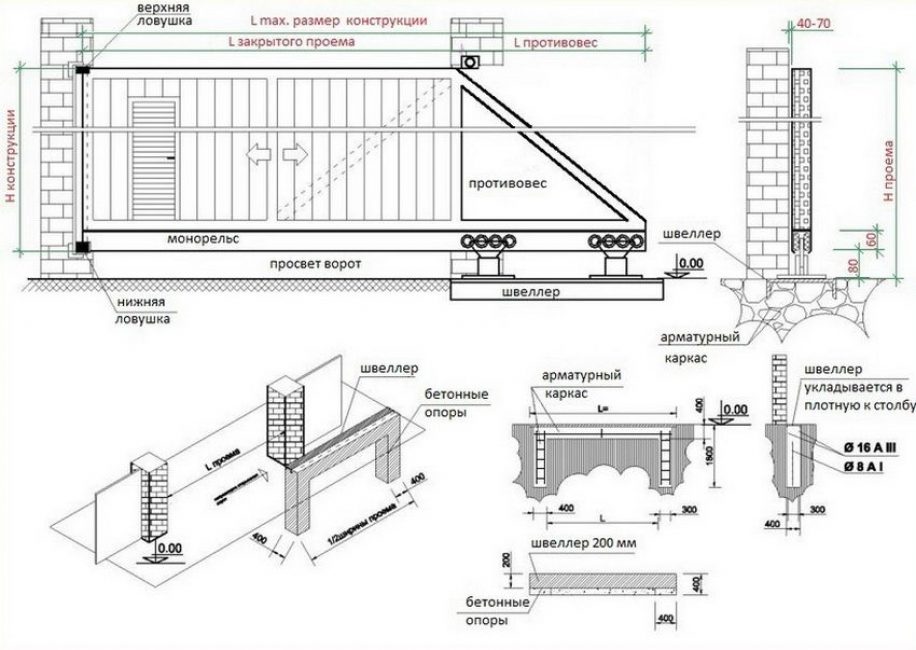
From the side where the sash will roll back, it is required to dig a pit, the length of which is equal to half the width of the opening plus 10 cm. The pit should start directly from the support post and be parallel to the fence. Its width is 40-50 cm, and the depth depends on the depth of soil freezing with the addition of 20 cm per sand and gravel cushion (in most regions of the country, a depth of 1.5 meters is sufficient). Layers of sand and gravel are carefully rammed.
For the manufacture of an embedded structure in the foundation, a channel 16-20 cm, reinforcement with a cross section of 10-12 cm is required. On a flat area, the channel is laid on the edge. Then, with a grinder, the reinforcement bars are cut into segments of 1.5 m.
The resulting "legs" are welded to the inside of the channel shelves. It is recommended to scald the fixed legs with vertical rods. Additionally, from the section of the channel, it is possible to weld a platform for installing an electric drive for the gate with a cut out hole for the output of the power cable.
concreting
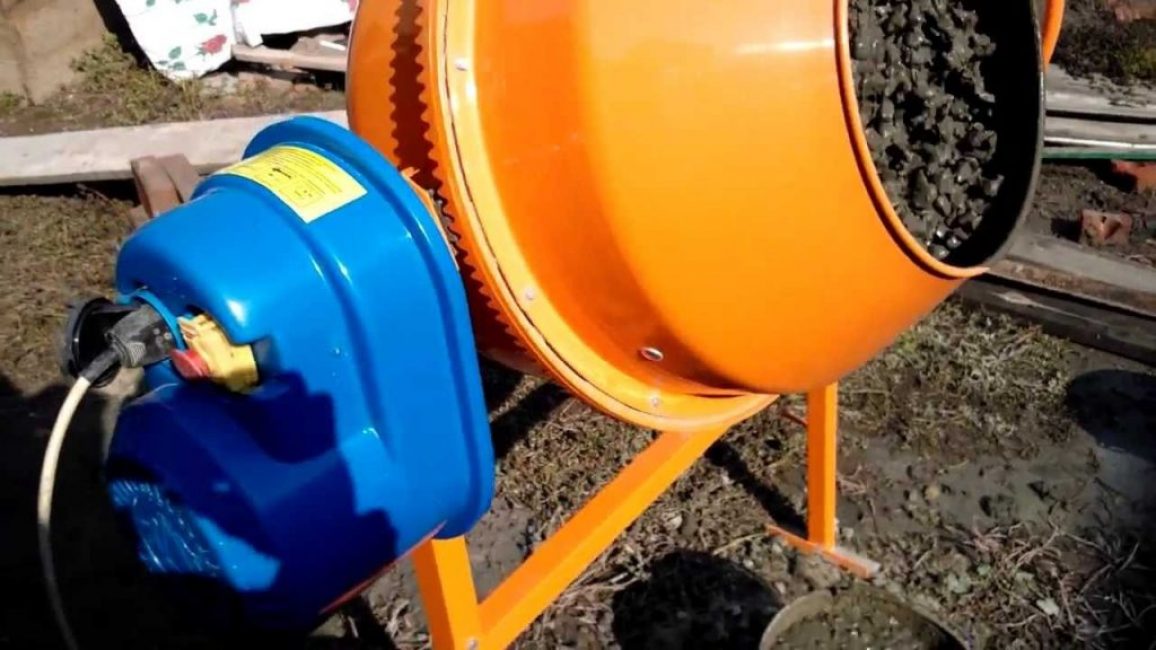
Application of concrete mixer
The resulting embedded structure is installed in the pit in such a way that the channel surface is located at the zero level of the site (check-in level), strictly horizontally. It is recommended to use pieces of rebar for spacers so that the embed does not move during the pouring of concrete.If the zero level is above the ground surface, the formwork from boards is additionally installed to the required height.
For concreting use a mixture of brand M250-M300, no less. For the preparation of the working composition components are mixed in the following proportions:
- cement M400 - one bucket
- washed sand – 2 buckets
- rubble or gravel – 4 buckets
- water - 0.7-1 bucket depending on the moisture content of the filler and the presence of a plasticizer
To get high-quality concrete, it is kneaded with a compact concrete mixer. The laid mixture is repeatedly pierced with reinforcement to remove air bubbles and seal. Immediately after concreting, gently wipe the surface of the channel with a wet cloth, removing dirt.
The concrete foundation must stand for at least a week (according to SNiP - 28 days).
Installation electrical wiring for automatic gates
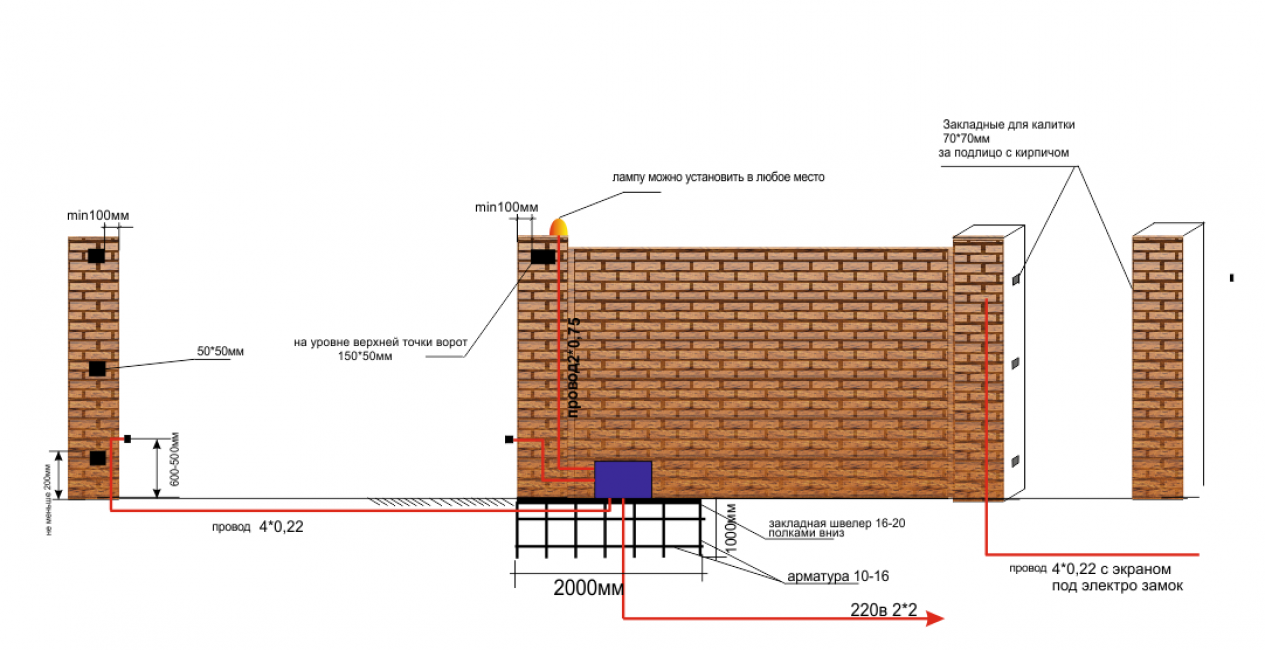
Wiring diagram for automatic gates
To equip the gate with automation, it is necessary to mount wiring, which will require:
- outdoor power cable PVS 3x1.5, for drive power supply (the length depends on the distance from the drive mounting point to the electrical panel)
- signal cable with reinforced insulation 4x0.5 for connecting the receiver of photocells and signals (the length is determined on site)
- SHVVP 2x0.75 for power supply of the signal lamp and power supply of the photocell emitter
- 75 ohm television cable for connecting the receiving device to an external antenna, if it is supposed to be mounted (the length is determined on site)
- HDPE corrugated pipe with a diameter of 20-23 mm for the protective casing of cables laid underground
- The free ends of the cables must have a margin of 1.5 meters in relation to the connection point.
Gate manufacturing

Sliding gates on rail
While the foundation is gaining strength, the door leaf is being assembled. For work, you should choose a flat ground area.
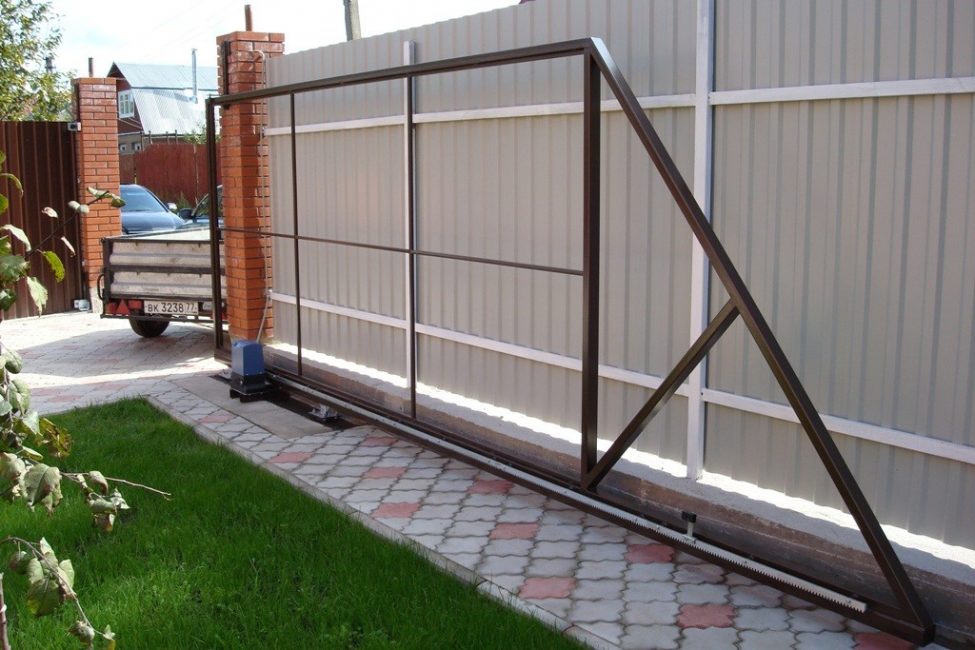
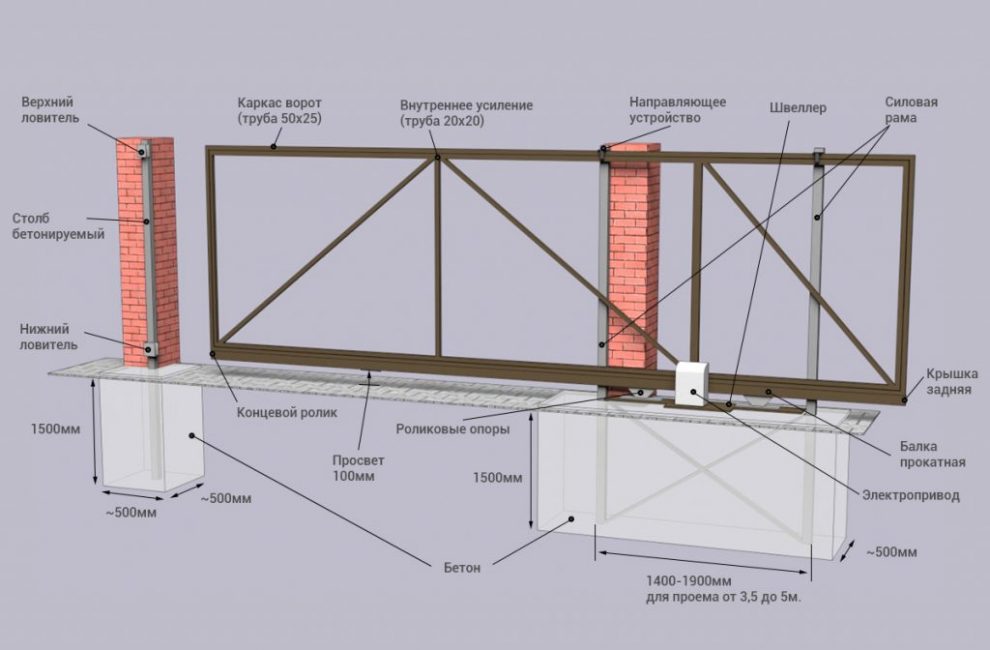
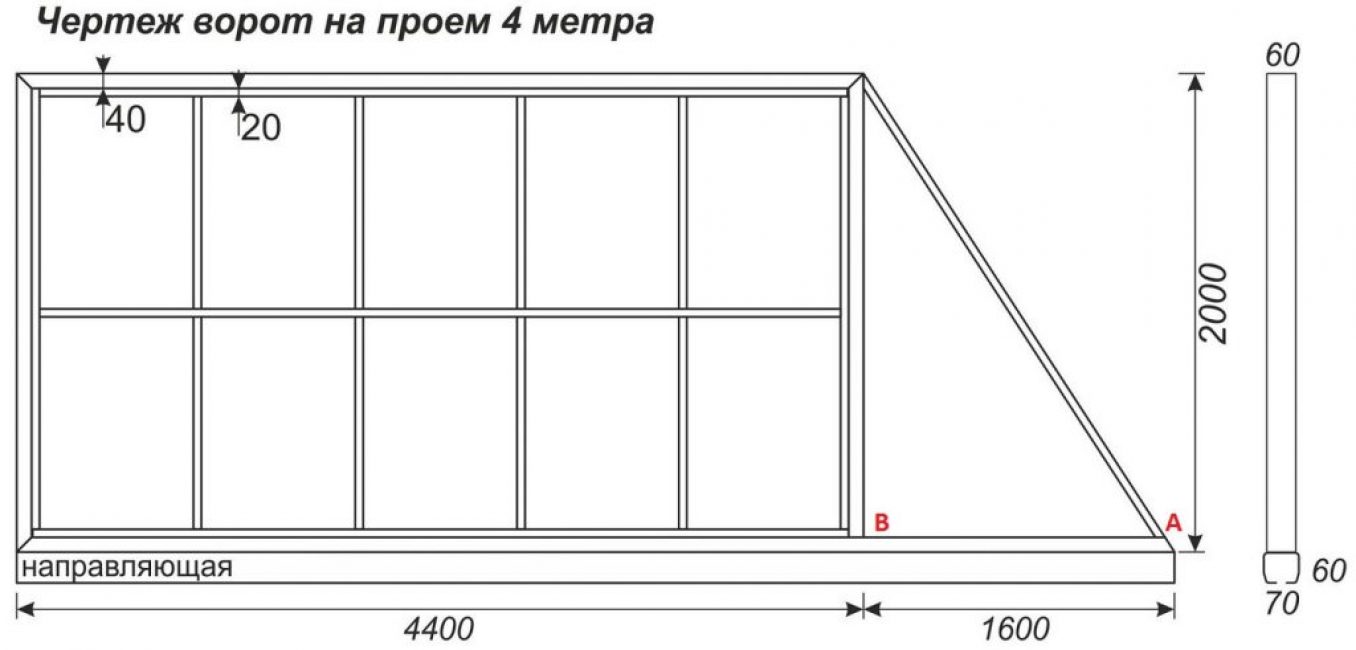
With the help of pegs and a cord, mark the contour of the future gate. In the classical version, such gates visually consist of two parts - a rectangular leaf along the width of the entrance and a counterweight in the form of a right-angled triangle, the lower side of which is equal to half the length of the main leaf.
In this way, with a standard opening of 4 meters wide, the lower part of the gate will have a length of 6 meters. On the site, with the help of wooden stops and a cord, a 6x2 meter rectangle is marked, additional stops are installed to visually divide it into two rectangles 4x4 and 2x2 meters.
The stops should be located in the same horizontal plane - this is checked by a level. Then the logs are fixed from rigid wooden slats or metal profiles, fixing them with self-tapping screws on the stops. The resulting design will serve as a welding table.
Welding
Arrangement of stiffeners
A grinder or a cutting machine cuts a profile pipe 60x40x2 mm to the required dimensions. You should get two horizontal, two vertical and one diagonal profiles. Spot welding grabs the elements at the joints.
Using a tape measure or cord, you need to check the diagonals of the base 4x4 rectangle - they must be the same. With a square, check the angles of the counterweight, which should be 90 ° and 45 °. In the absence of deviations, all joints are welded with a continuous sealed seam.
At the next stage, the door leaf is reinforced with an internal frame frame, stiffeners - they will also serve as a support for fixing the filling from the profiled sheet. For the manufacture of these elements, a profile pipe 40x20x2 mm is used. It is important to strictly adhere to the dimensions and cut in such a way that the welded joints are airtight.
The reinforcement elements are first tacked by spot welding, after which diagonals and angles are measured. If everything is in order, the points of contact between the power frame and the stiffeners are welded with seams 15 mm long in increments of not more than 500 mm. All welds should be smoothed out with a grinder.
A supporting beam (console) is welded to the bottom of the frame from the kit for sliding gates - it will allow you to move the leaf using roller carriages.
Painting and installation of filling
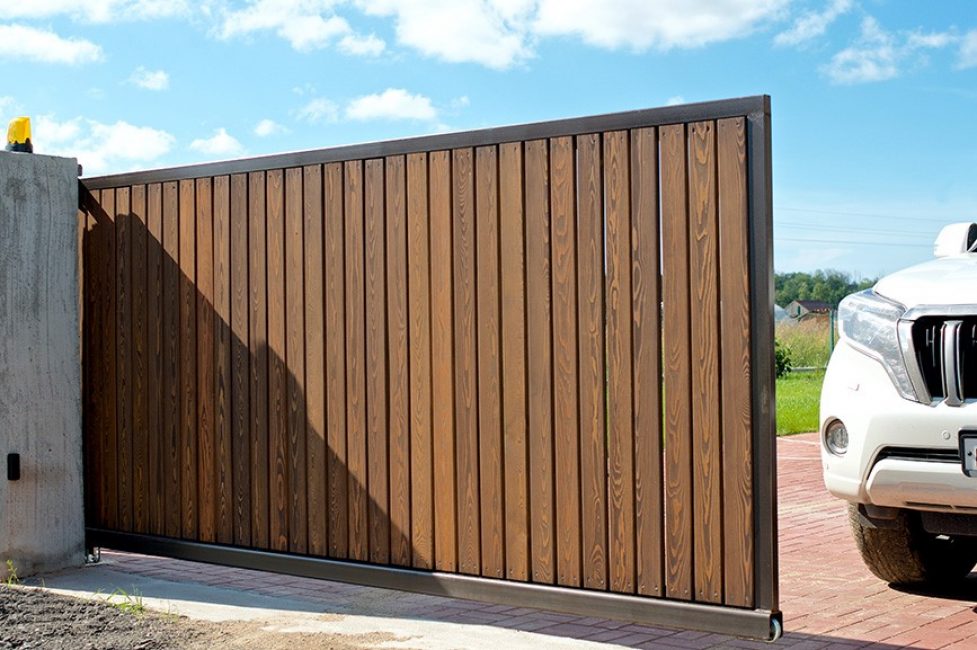
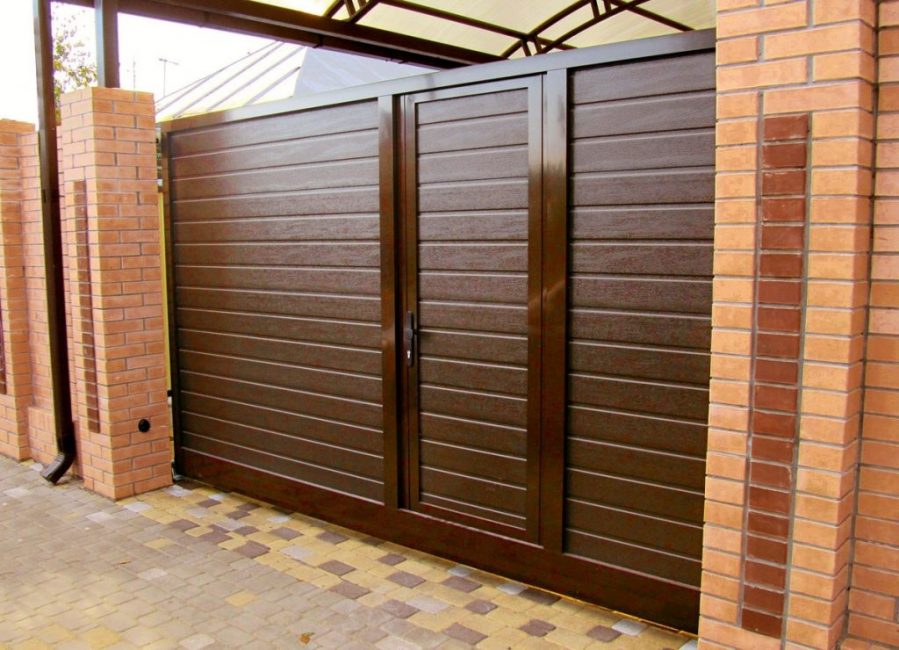
wooden infill
To waterproof the structure, the gaps between the inner frame and the outer contour are filled with silicone sealant. At the final stage, the fabric frame is treated with an anti-corrosion compound, primed and painted. It is recommended to use alkyd enamel and apply a paint and varnish coating in at least 2 layers with intermediate drying until completely dry.
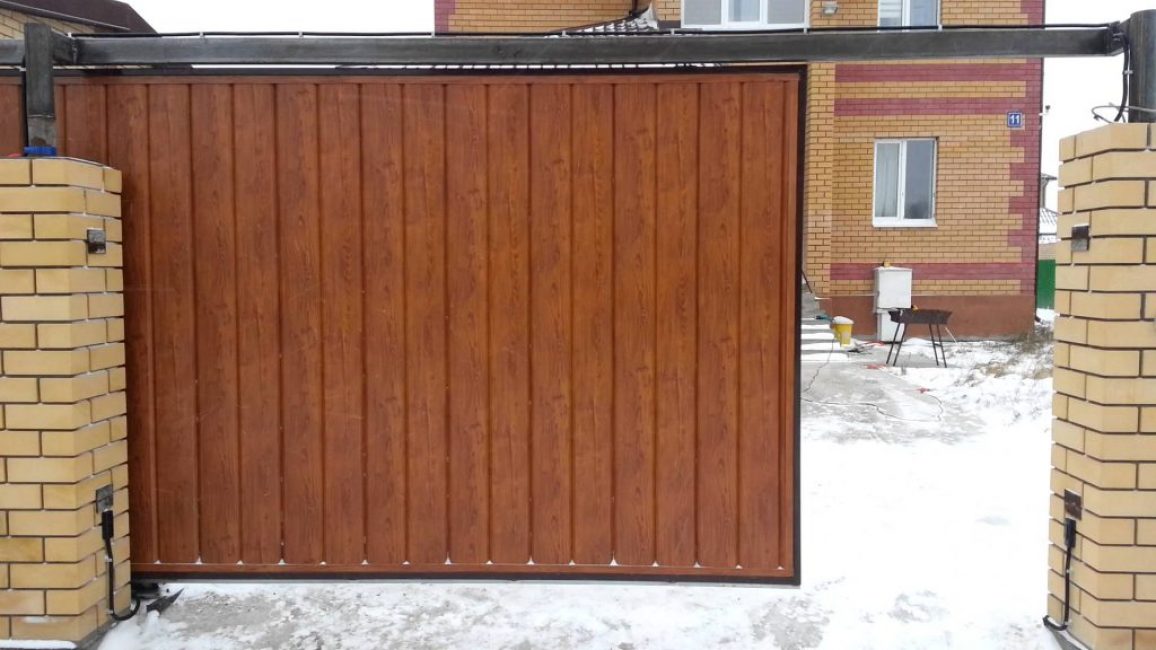
The dried frame is sewn up with a suitable material. Profiled sheeting with a protective and decorative polymer coating is mainly used - it is affordable and easy to install. For fastening, use self-tapping screws for metal or rivets. It is also practiced to install wooden filling so that the gate is in harmony with the fence and buildings.
Sliding gate installation
sliding gate
On the channel used as a mortgage for the foundation, it is necessary to install the roller carriages at the maximum allowable distance from each other. Wherein:
- the carriage closest to the opening must not rest against the knurling roller at the end of the frame with the door fully open (roller length 150 mm);
- the rear carriage must not knock out the plug at the end of the guide rail when the door is fully closed.
Carriage platforms are pointwise welded to the foundation embedment. The sliding gate frame is put on roller carriages, after which the gate must be set vertically in level. A roller plate is attached to the top of the support post by spot welding, which helps to keep the canvas vertical.
Next, you should roll the canvas to check if there are any difficulties with opening and closing. If necessary, the carriages are cut off with a grinder and grabbed in a new place. Having achieved the optimal location and checking the canvas for the absence of distortions, the carriages are attached to the foundation, scalding around the perimeter.
A more convenient option is to use mounting pads with studs for carriages. Installation is carried out in the same way, but at the same time, if necessary, the carriages are easy to dismantle and replace.
Final stage
Sliding gate with wicket
At the last stage of work:
- securely weld the top plate with supporting rollers and adjust them - on each side there should be a gap of 2-3 mm between the roller and the sash
- insert and fix the knurled (end) roller at the front end of the console
- the lower catcher is welded onto the counter post (its lower edge should be located 3-4 mm above the lower edge of the end roller so that it rolls and lifts the sash, unloading the roller carriages)
- the upper catcher is welded on the counter post at a height of 1.6-1.8 m, it will prevent the web from skewing under external influences
- put a plug on the second end of the console to prevent moisture and dirt from getting inside
After the installation is completed, the sliding gates are ready for operation. If the design is automated, you should install an electric motor and other equipment, connect the system to the electrical panel.

VIDEO: Master Class - DIY Sliding Gates
Sliding gates: making a practical design with your own hands. Schemes, drawings and sketches (100+ Photos & Videos) + Reviews


The title doesn't match. Where are the drawings, where are the specifics? The article is filled with general information. Educational nonsense walking on net!
Good day! If you expected to see your personal project in the article, yes, of course, you will be disappointed in our material. In this case, you should still contact the specialized organization for the production and installation of these gates. We have described the general points, provided several visual drawings, and listed common mistakes. It is simply impossible to take into account all the existing nuances and issue a universal solution. Thanks for your comment 🙂
Good afternoon, I partially took advantage of your article, but only my gate opening is much more than 5.5 meters, the foundation had to be poured in one block, and then everything is according to the scheme, I ordered sliding rollers from the turner, I bought all the material cheaper in winter, spring came and installed everything for one day, working well