
No ready-made toys and fairy lights can't compare to the ones you make yourself.
Of course, it is easier to buy everything you need for Christmas tree decorations, but the creation of New Year's toys with your own hands, from paper and other materials, like nothing else, can create a festive mood and bring joy in the process of their manufacture.
And the master classes proposed in the article will help you in this simple matter.
Content:
 Read also: Veranda attached to the house - expanding the living space: projects, tips on how to create your own hands (200 original photo ideas)
Materials used
Christmas decorations made of paper
There are many variations of homemade Christmas toys for decorating the Christmas tree and the interior, but the simplest ones are made of paper. To make them will not require large financial costs, since you can use any improvised materials available to any housewife.
So let's prepare the following:
- plain office paper (required to create a pattern)
- colored pencils, markers
- cardboard (white and color)
- scissors and utility knife
- PVA glue and glue gun
- skein of thread with a needle
- yarn of various colors
- small decor from ribbons, beads, beads, sequins, sequins, confetti, foil, shreds and other
This is a basic set for creativity, but something else may be needed in the course of work. So, let's get creative.
 Read also: How to make flower pots with your own hands: outdoor, indoor, hanging | Step by Step Charts (120+ Original Photo Ideas & Videos)
 Spectacular flower
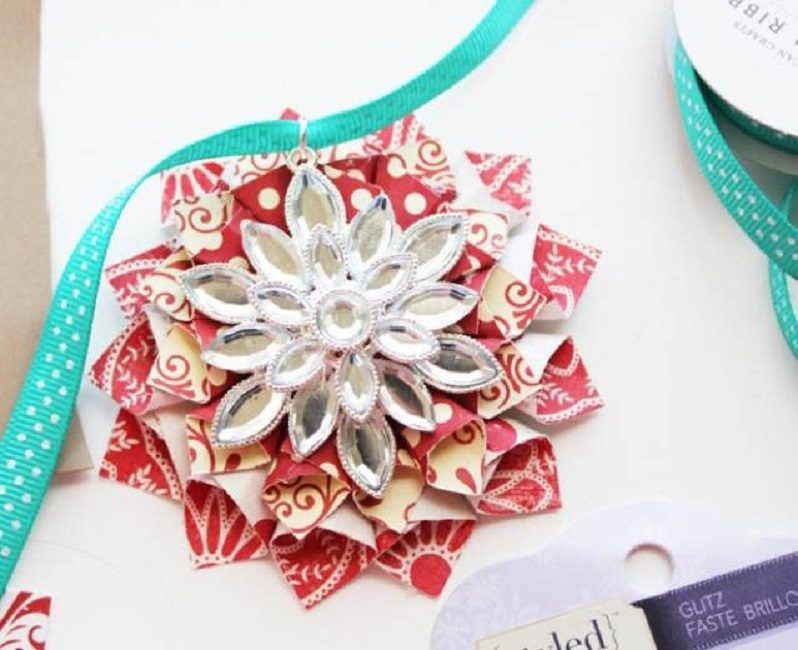
Unusual flower on the Christmas tree
To make a spectacular flower on a beauty Christmas tree, it is necessary to prepare such consumables and tools:
- colored paper
- scissors
- ruler
- black and white pencil
- cardboard
- Scotch
- glue
- decor details: braid, rhinestones, pebbles, beads
Step by step master class:
- Cut paper into 14 squares measuring 2.5x2.5 cm and the same number - 3x3 cm. Fold each square into a bag. And so that it does not open, fix the touching ends of the paper with glue
- Now cut out a circle from cardboard and mark the center on it with a pencil.
- Alternately glue the larger bundles onto the round blank, and those that are smaller on top
- Decorate the released flower in your own way
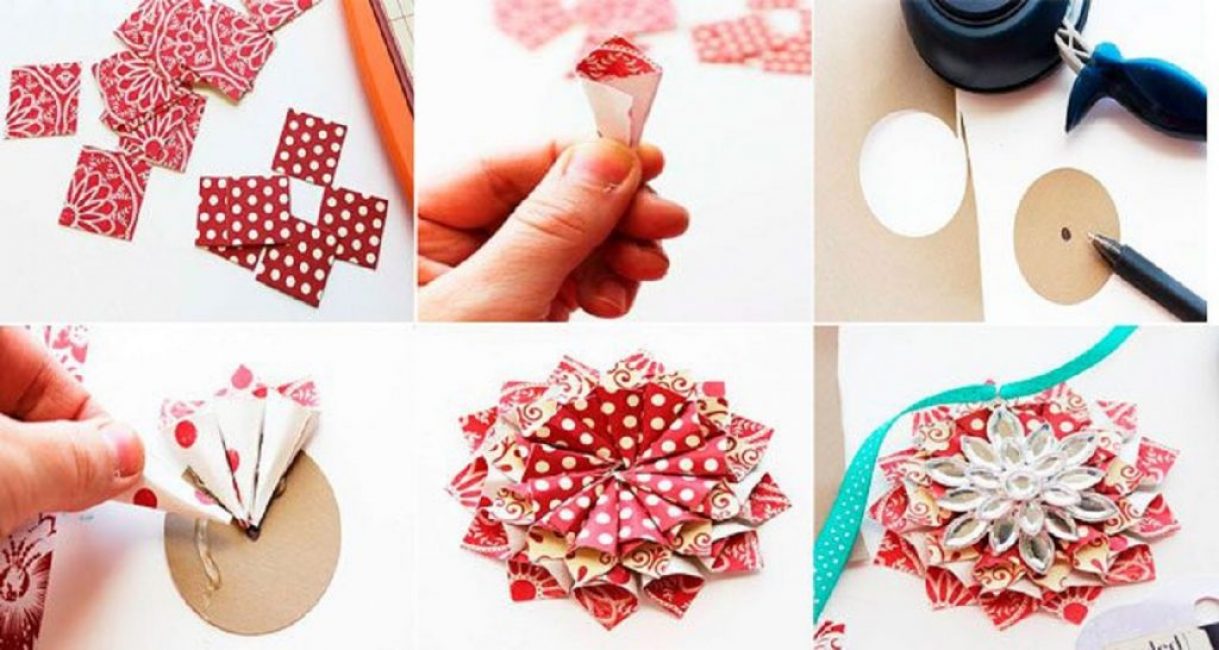
Execution technique
This is how you get a beautiful flower that will surely attract the attention of guests with its originality. And beginners are advised to follow the photo instructions for making crafts.
 Read also: How to make a patio in the country with your own hands: a variety of design options, decoration and arrangement (85+ Photo Ideas & Video)
paper cones
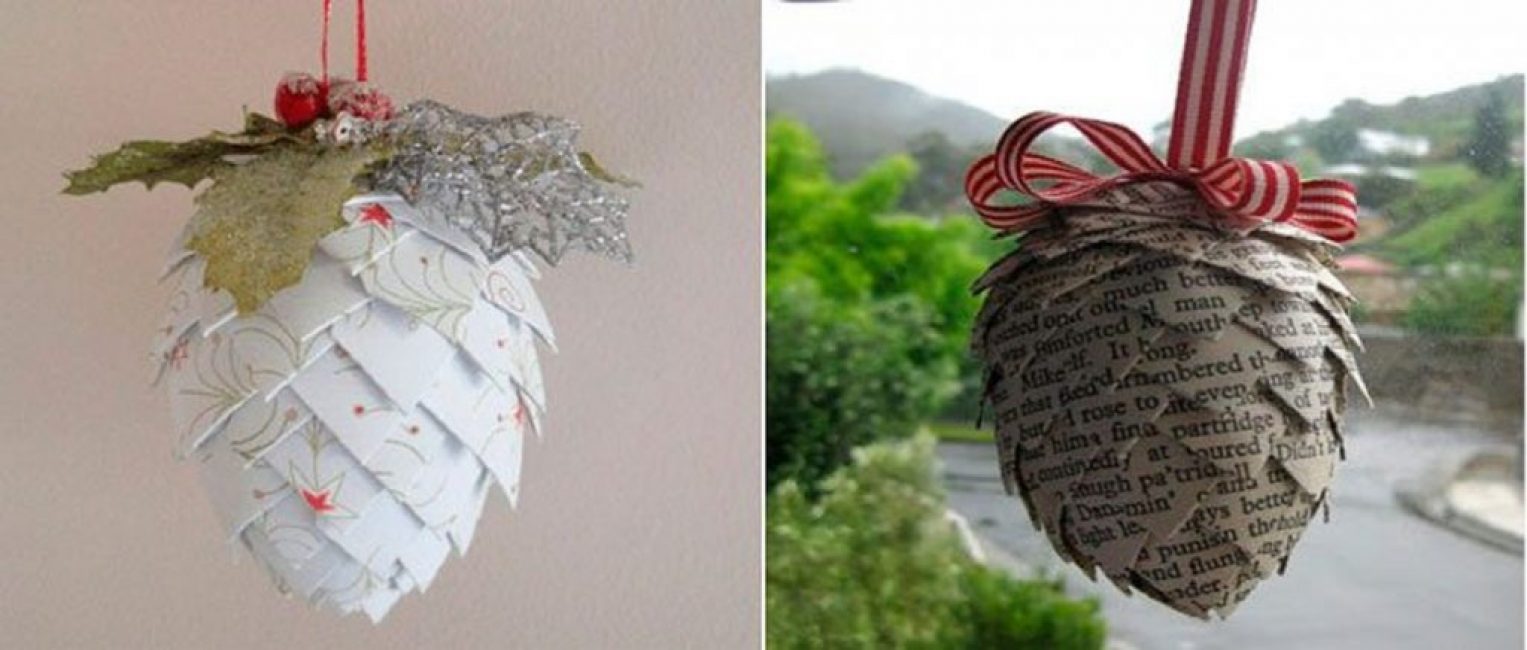
paper cone
In the process of making cones for the Christmas tree, you will need cardboard, foam or newspapers, decorative elements and a standard set of tools. You can make cones from felt.
They operate as follows:
We cut thick or thin paper into many strips. Take their width approximately, but in our example it is 2.5 cm
We cut squares from the strips, making a cut across the blanks
We bend the right and left upper tip so that it looks like an arrow
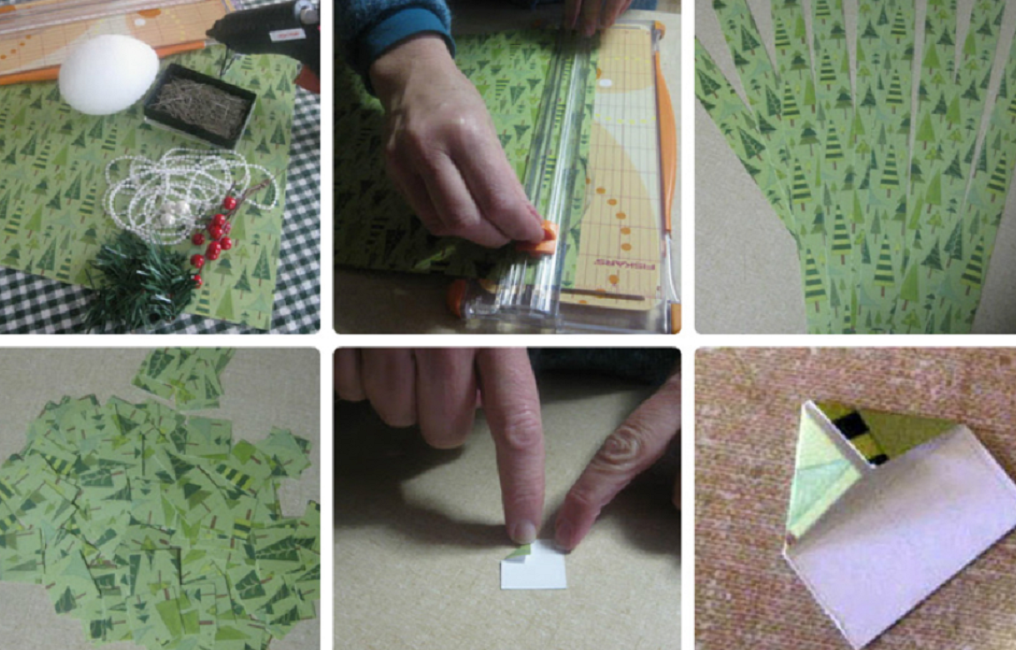
paper arrow
We make a rounded foam blank or crumple the newspapers and glue them in pieces by laying them on top of each other. Move from bottom to top
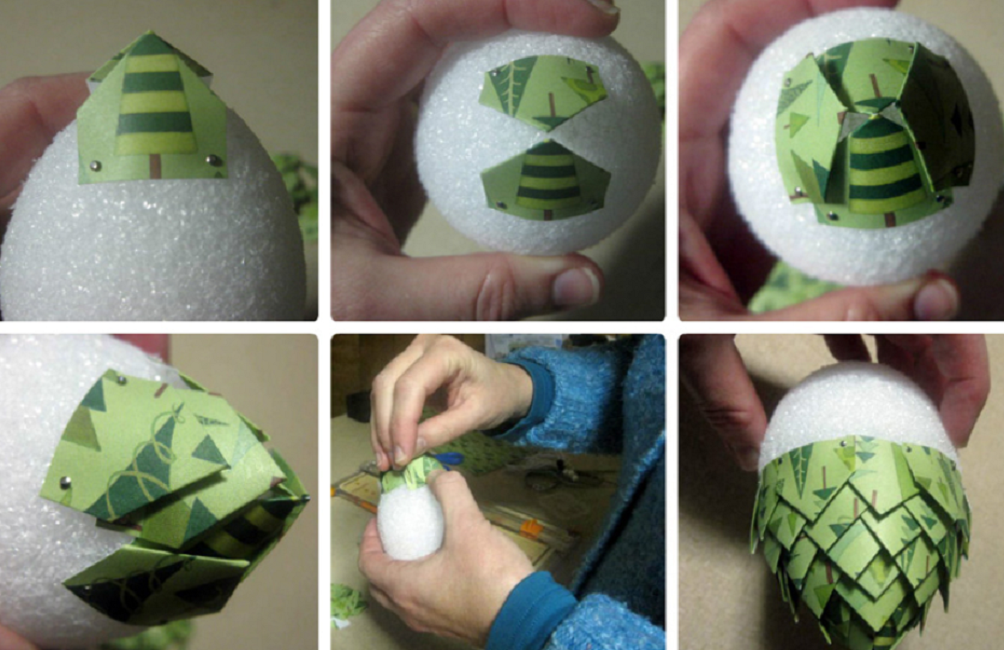
Styrofoam blank
After that, it remains to decorate these wonderful cones, fasten a loop from a beautiful ribbon from below and you can hang it on the Christmas tree
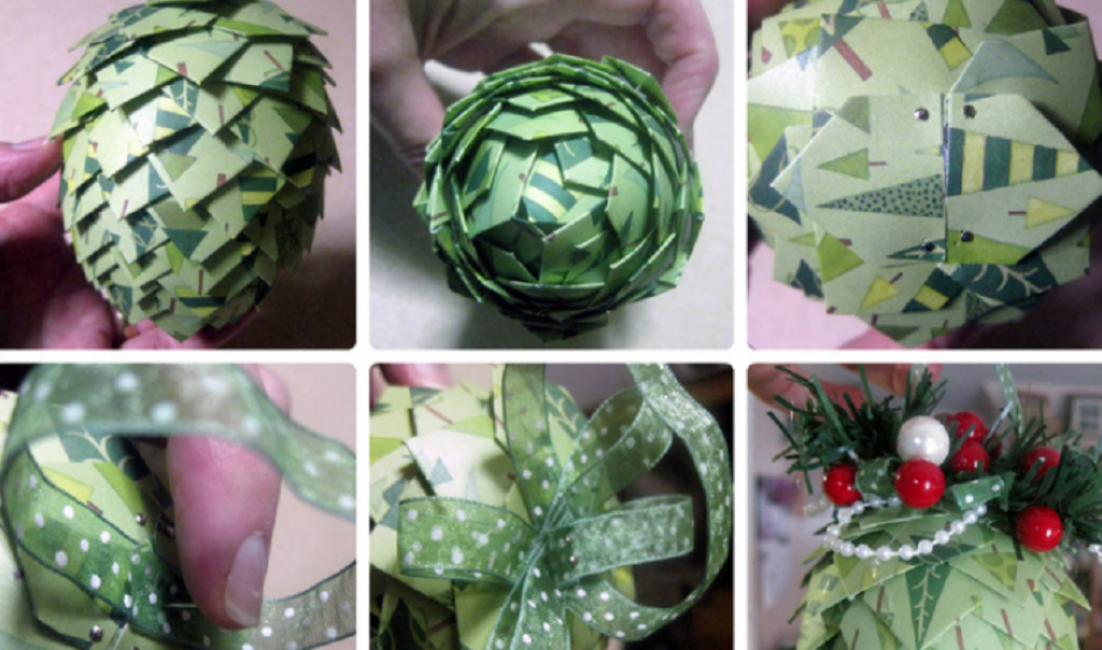
Tapes on the bump
 Read also: How to make a children's house with your own hands: from wood and other materials. Dimensional drawings | (80 Photo Ideas & Videos)
 graceful snowflakes
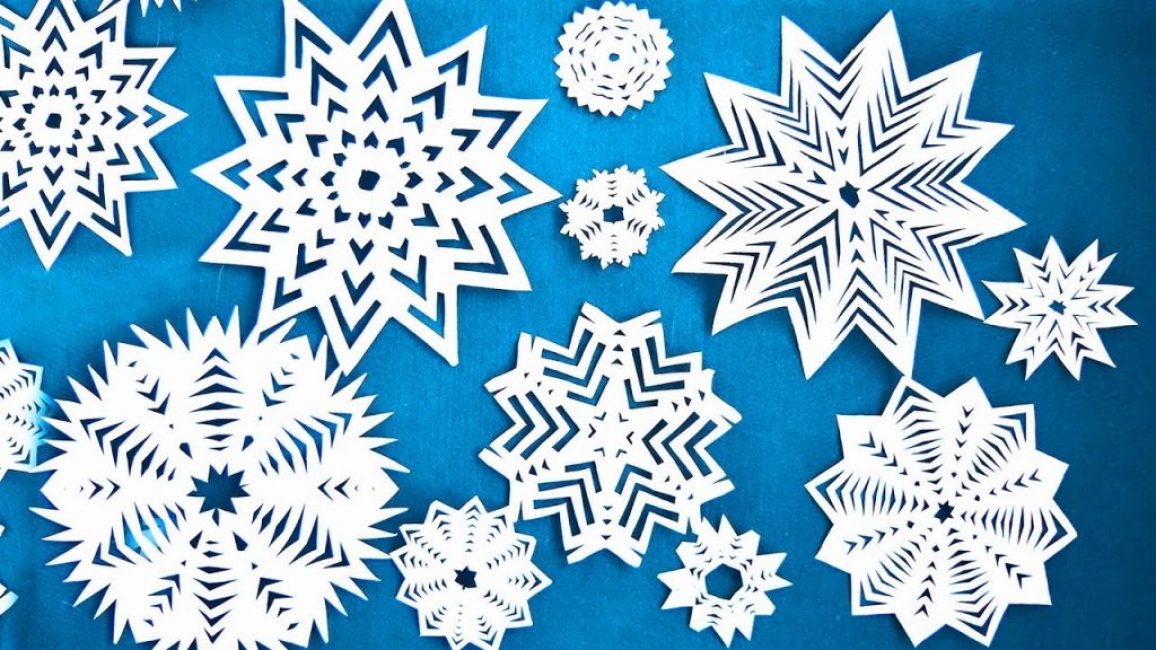
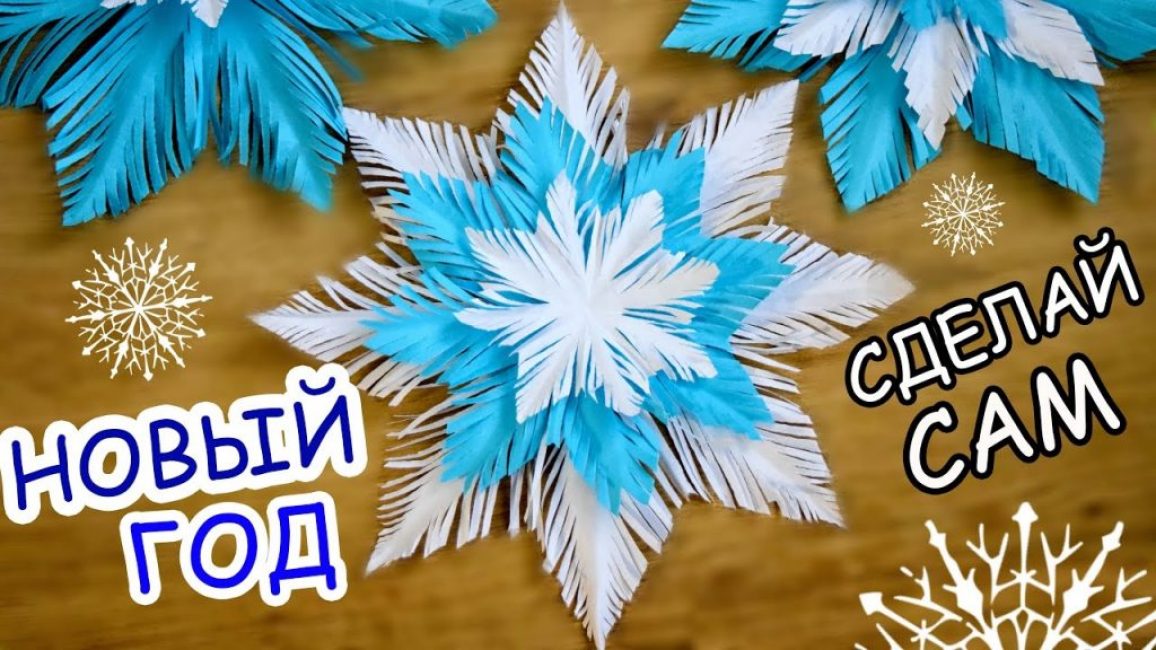
Graceful paper snowflakes
How to manage for the New Year without snow, albeit artificial in the form of snowflakes. Classic flat snowflakes made of white thin paper will help not only transform the Christmas tree. They will look spectacular on windows, walls and furnishings. You can make them in different sizes and with a variety of patterns.
Instructions for work:
Take a white sheet of A4 paper. Fold it in half diagonally
Cut off the rest of the bottom to leave a triangle
Bend the triangular blank again across and do the same again
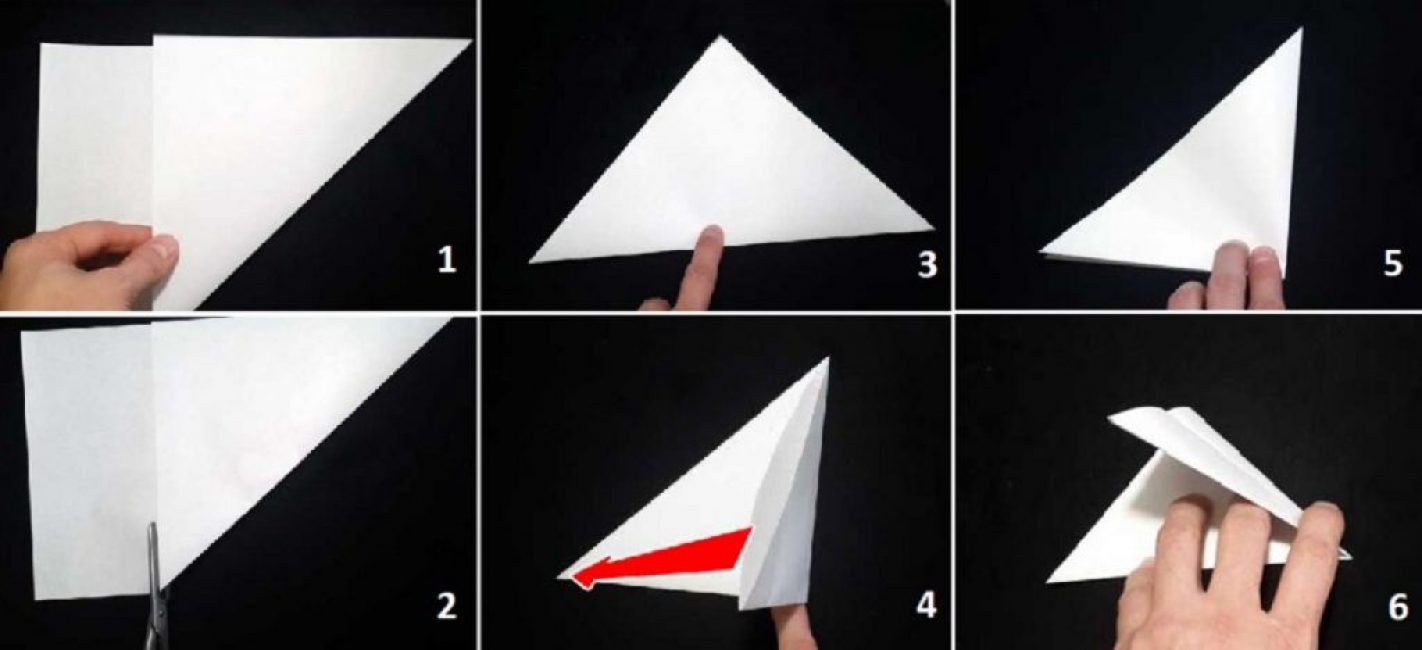
triangular blank
Trim off excess paper from the bottom.
On the triangle, apply a pattern according to a pre-prepared stencil. Cut out the pattern on it and straighten the snowflake
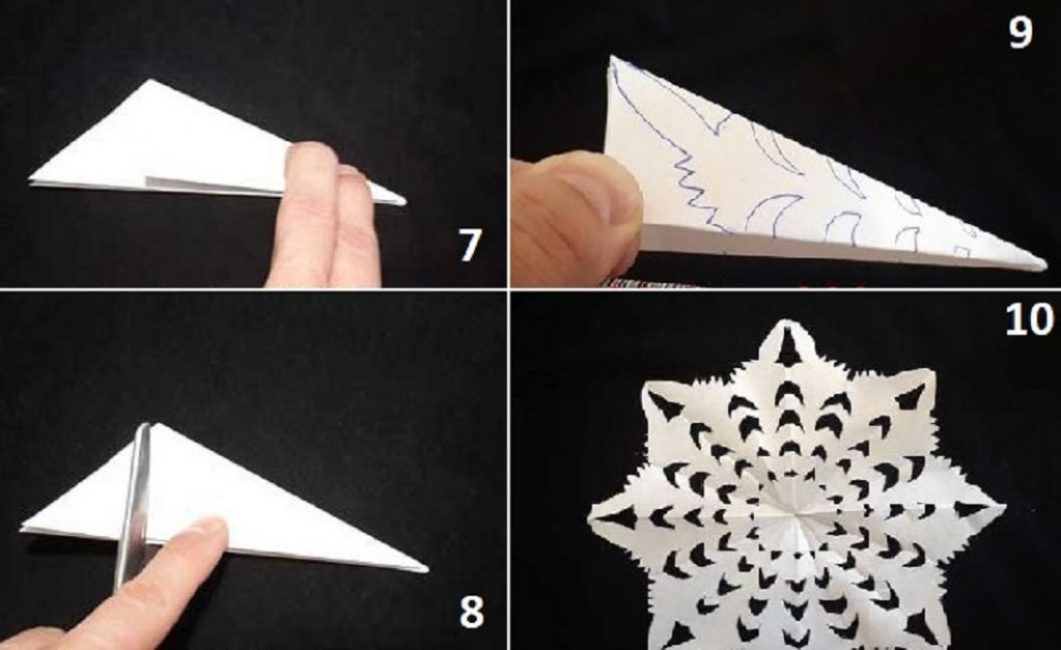
Snowflake
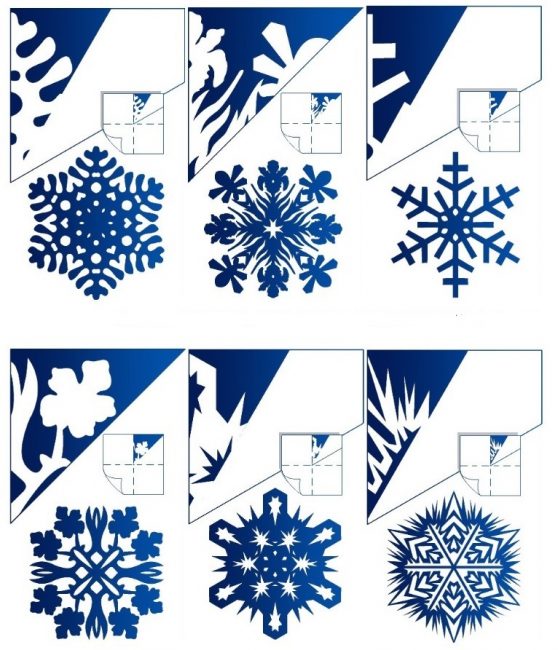
What can be patterns of homemade snowflakes
![[Instructions] How to make beautiful and unusual wall shelves with your own hands: for flowers, books, TV, kitchen or garage (100+ Photo Ideas & Videos) + Reviews](https://iherb.bedbugus.biz/wp-content/uploads/2018/05/19-6-300x213.jpg) Read also: [Instructions] How to make beautiful and unusual wall shelves with your own hands: for flowers, books, TV, kitchen or garage (100+ Photo Ideas & Videos) + Reviews
Read also: [Instructions] How to make beautiful and unusual wall shelves with your own hands: for flowers, books, TV, kitchen or garage (100+ Photo Ideas & Videos) + Reviews
Father Frost
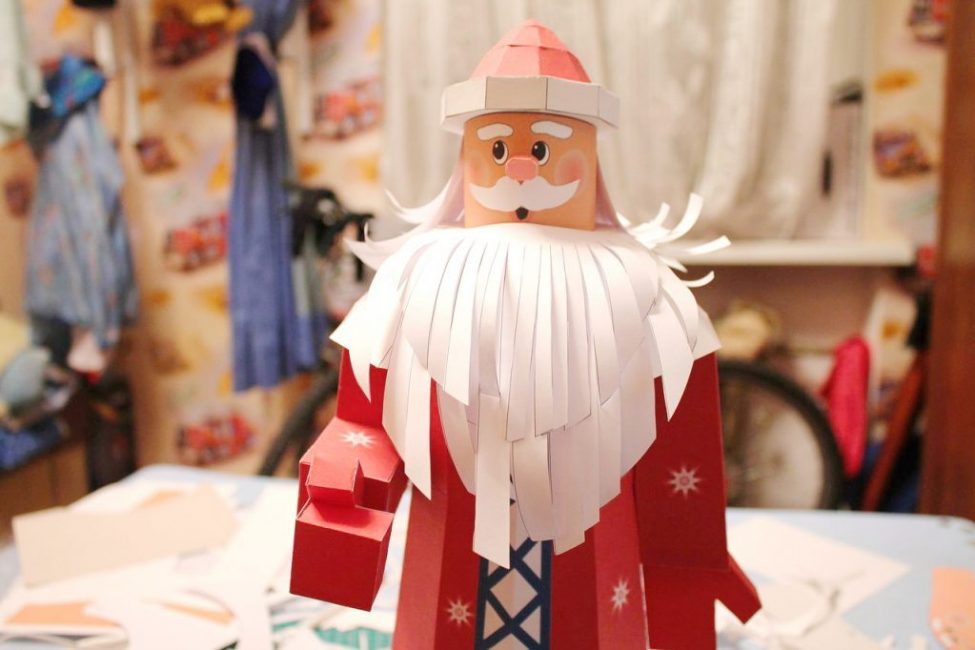
Santa Claus from paper
In order to make a miniature Santa Claus, you do not need to spend a lot of time. Children can be involved in its production, because this is such an exciting activity. To make such funny pendants, prepare colorful sheets of paper and proceed as follows:
Cut out the details of the future grandfather. They can be seen in the photo below.
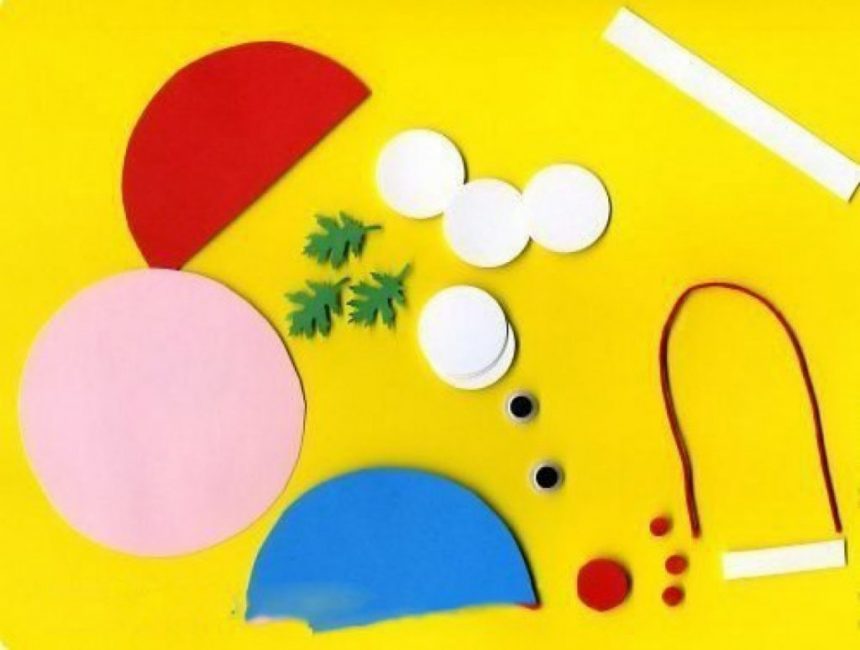
Details of the future grandfather
Glue the thread in the form of a loop to the large circle.
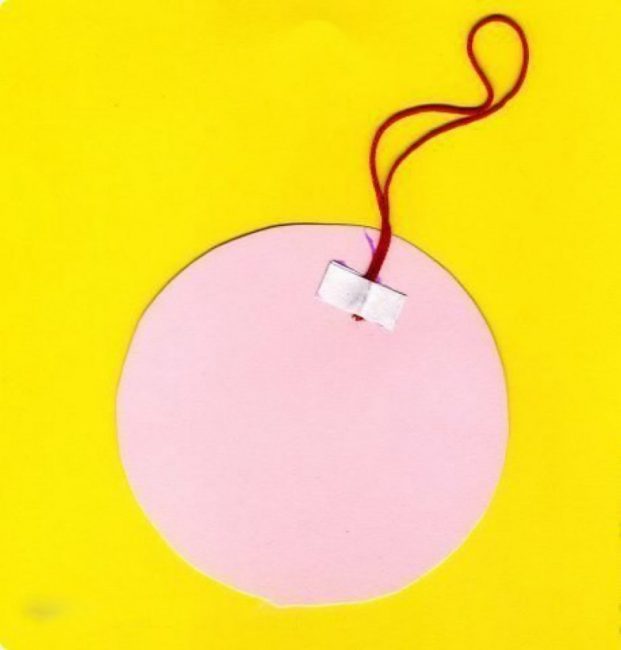
Circle with thread
To mask the thread, glue a blue hat over it.
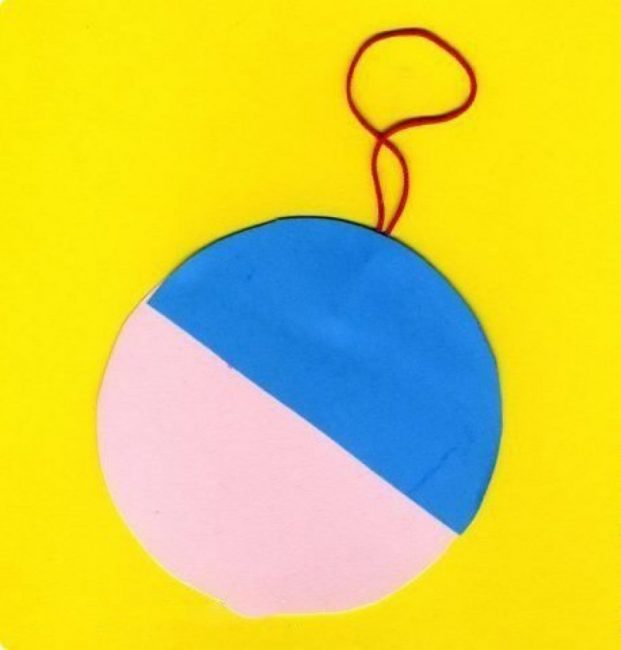
blue beanie
From white small circles and a narrow strip, form a beard and a hat field.
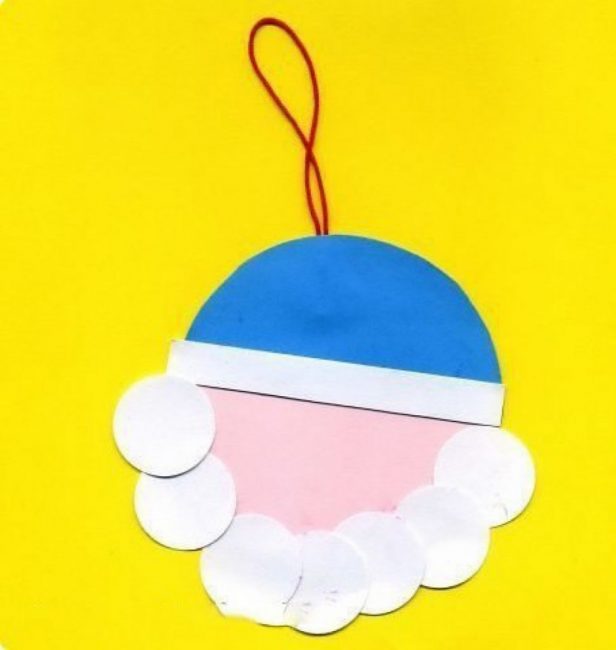
Beard and hat field
Glue the eyes, nose, and Christmas twigs onto the hat.
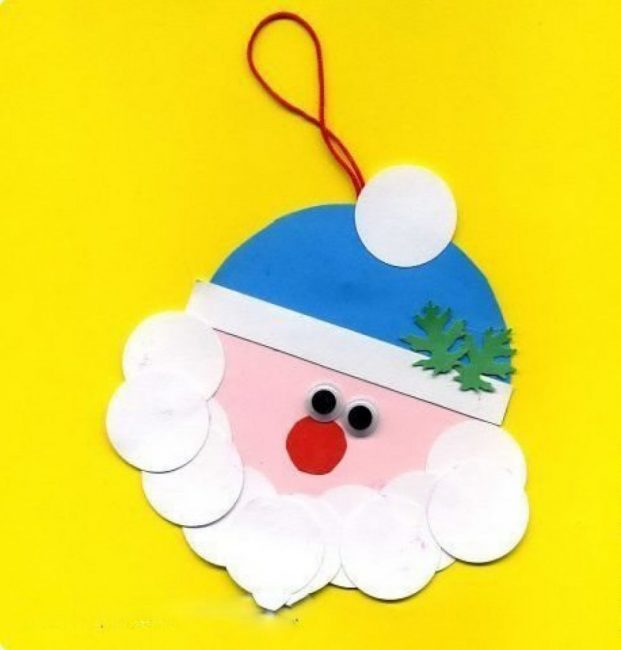
Eyes, nose and Christmas-tree twigs on the cap

How to make a paper snowman
Do-it-yourself Christmas paper toys: diagrams, templates and step-by-step instructions | (100+ Photo Ideas & Videos)
![[Instruction] Do-it-yourself laminate on a wooden floor: a complete description of the process. Laying schemes, what materials should be used (Photo & Video) + Reviews](https://iherb.bedbugus.biz/wp-content/uploads/2018/05/laminat-300x200.jpg) Read also: [Instruction] Do-it-yourself laminate on a wooden floor: a complete description of the process. Laying schemes, what materials should be used (Photo & Video) + Reviews
Read also: [Instruction] Do-it-yourself laminate on a wooden floor: a complete description of the process. Laying schemes, what materials should be used (Photo & Video) + Reviews Christmas balls
Christmas toys
To get Christmas balls on the Christmas tree, you will need a minimum of consumables. In this case, it is important to be patient, because the perfect toy may not turn out right away. But do not be upset, but continue and the result will surely please you.
Balls have always been considered universal Christmas decorations. They can be made from cardboard or colored paper. As a result, they turn out to be no less spectacular than purchased ones. Here are some options for making balloons.
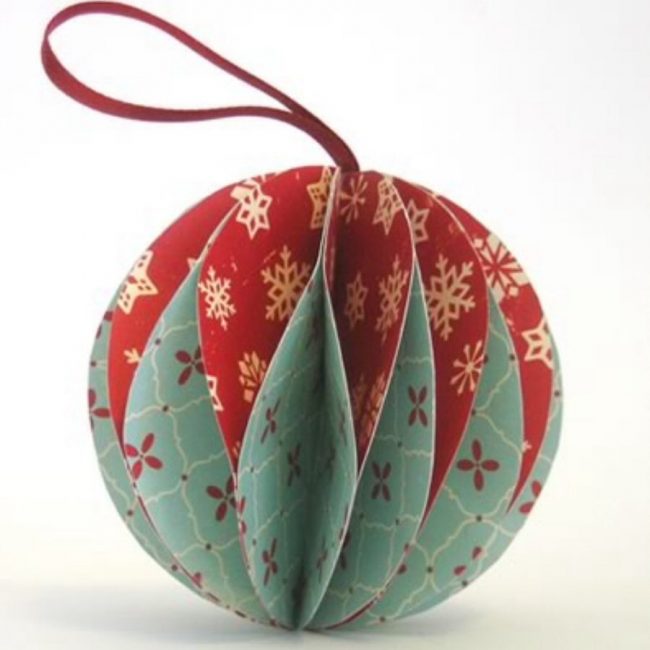
From stripes
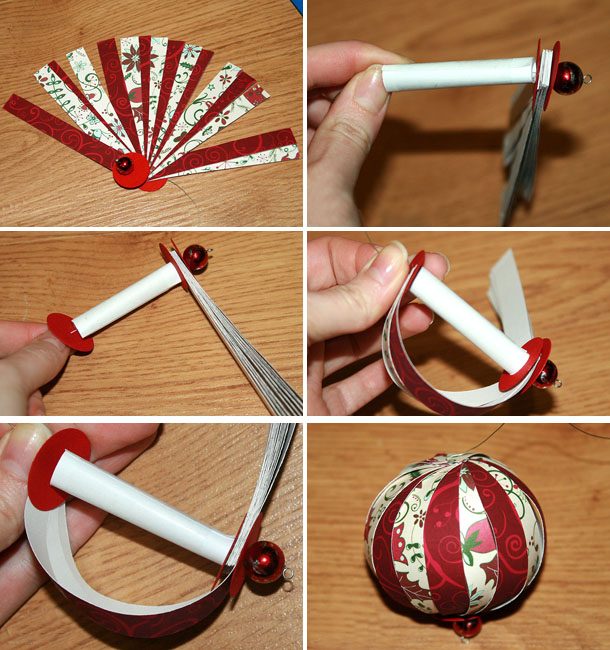
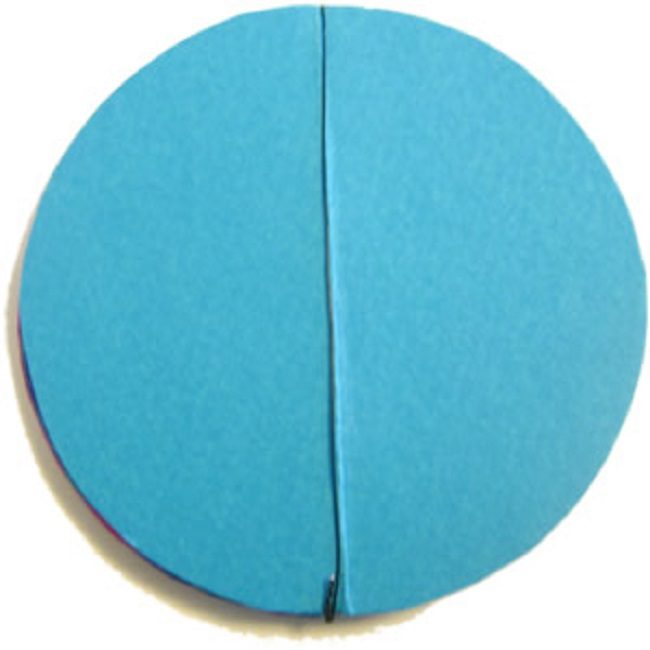
How to make a paper ball
Sequence of steps:
- From colored or any other decorative paper, cut a lot of strips (the more there are, the larger the ball will come out) and two circles of small diameter
- Then take a large bead with holes, thread a thread into it and insert both ends into a needle
- String a circle on the needle and all the strips from one end
- Next, they put a paper tube, a bead and a second circle on the thread.
- After that, pin the strips on the needle from the opposite edge, bending them into an arc
- Then you need to give the toy a finished look.To do this, straighten all the details in a circle and decorate the toy in your own mood.
From circles

12 Circles
Instruction:
From paper of three different shades, cut out 4 circles. You can use a glass as a template. You should get 12 parts.
Stack the rounds in a pile, alternating colors, and then they should be folded in half. Now straighten and draw the marked line along the ruler.

A stack of rounds
Fasten the blanks along the marked line with wire (wrapping it around) or a stapler. You can sew on a typewriter.
Bonded blanks
Glue the petals together in 2 pieces: one on top, the other on the bottom. The result is a voluminous ball.
Volumetric 3D ball
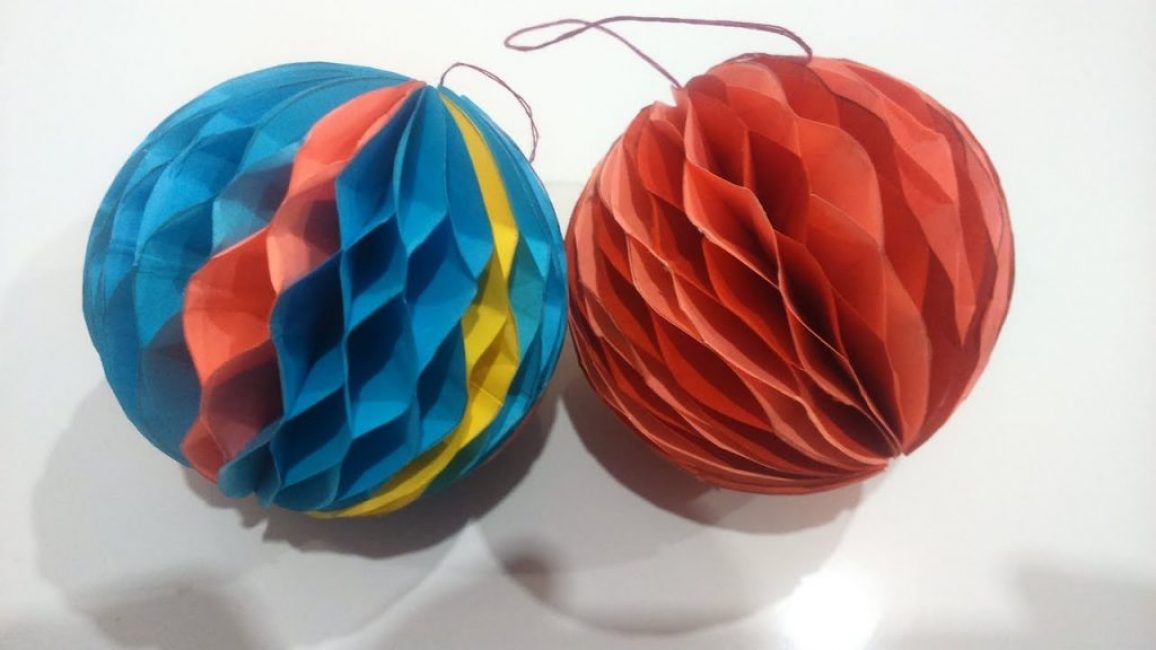
Wicker balls toys
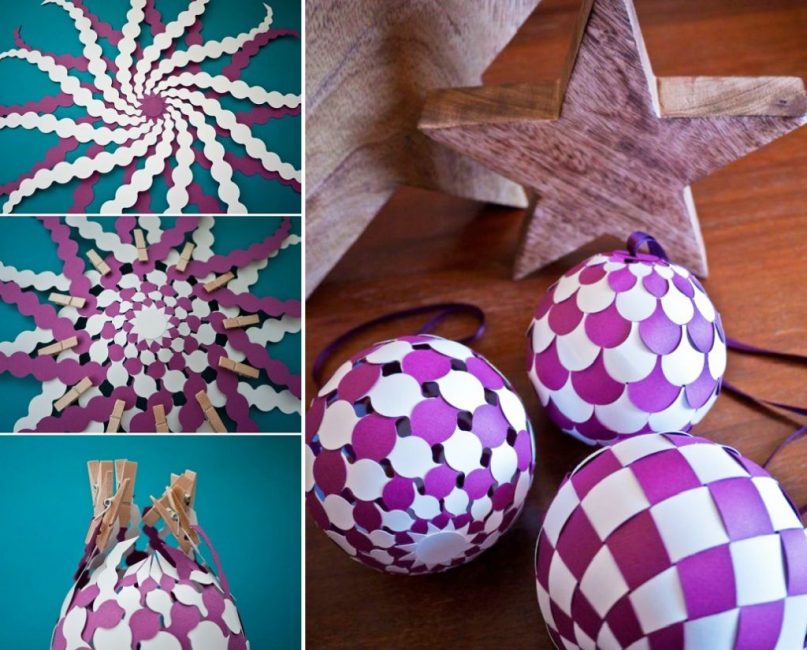
Wicker Christmas ball
You can download ready-made stencils of such balls from the Internet and print them on a printer, then cut and weave your own toy.
How to act:
According to the templates, you will need to cut curly strips and a circle. Form a flower shape from these elements, and glue a circle in the center.

Curly stripes and circle
Now you need to weave the strips, as you usually braid a braid. So that they do not fall apart during work, fix them with clothespins.
Woven strips
At the end, make a ball out of the braids and fasten the edges again in a circle.
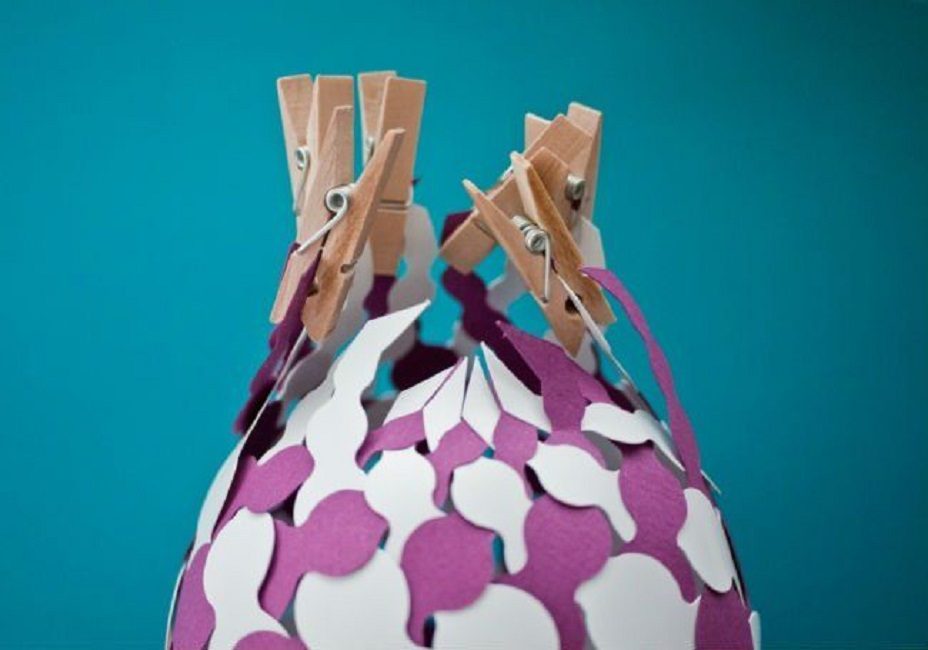
Pigtail ball
Make a loop of thread that will cling to a toy on a Christmas tree branch.
Types of templates are shown in the photo below.
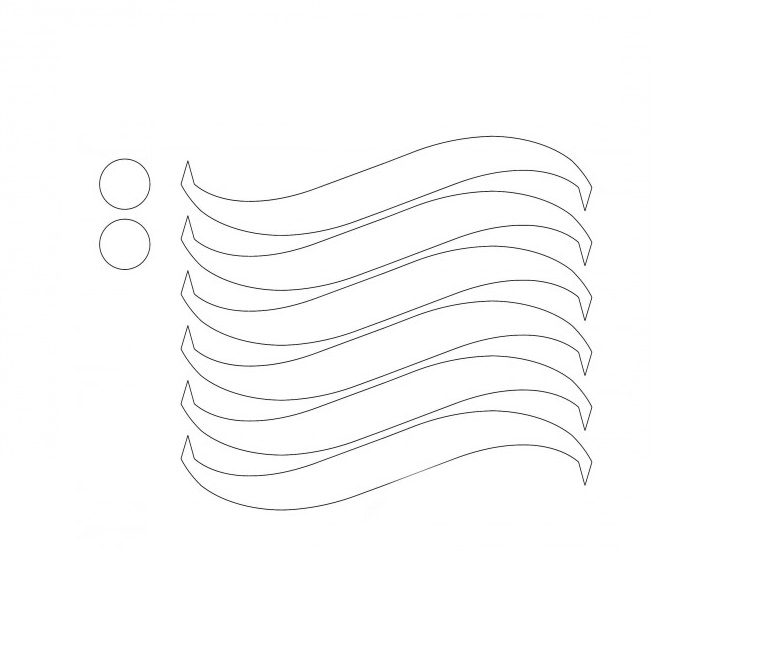
Option number 1
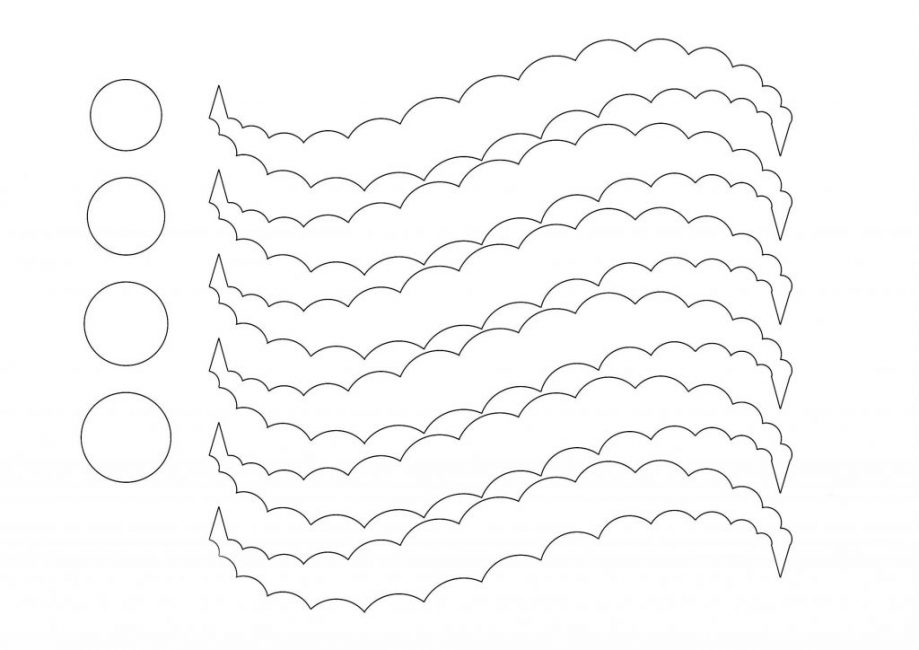
Option number 2
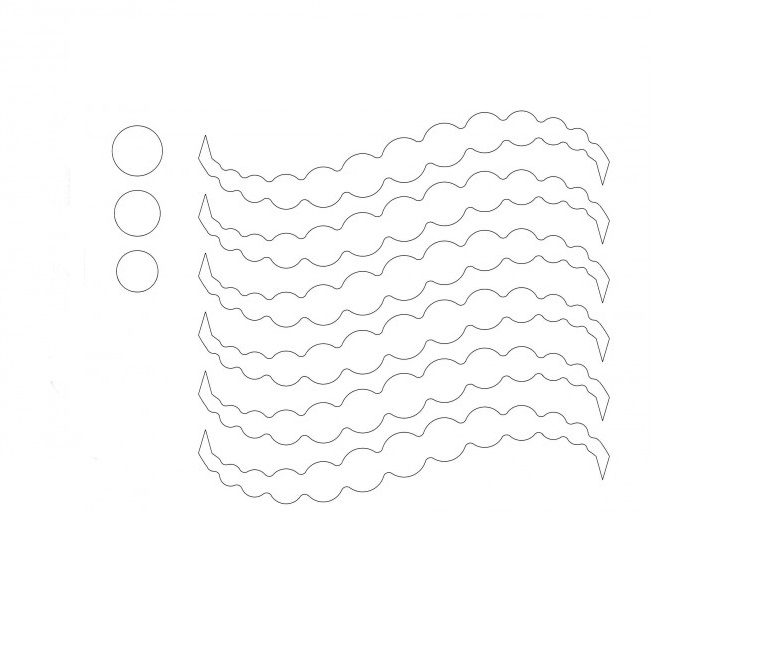
Option number 3
Cardboard balls
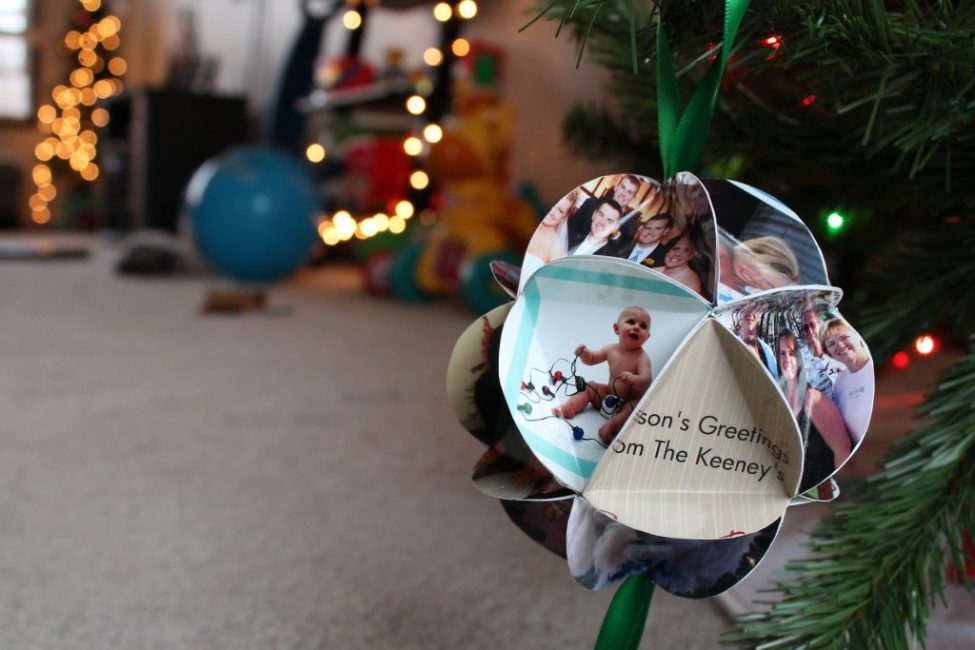
Cardboard balls
Any thick paper is suitable here: cardboard, postcards. These toys keep their shape very well. They are unusual and look good on the Christmas tree, especially when they are of different sizes. It is better to hang them randomly, then the picture will be more spectacular.
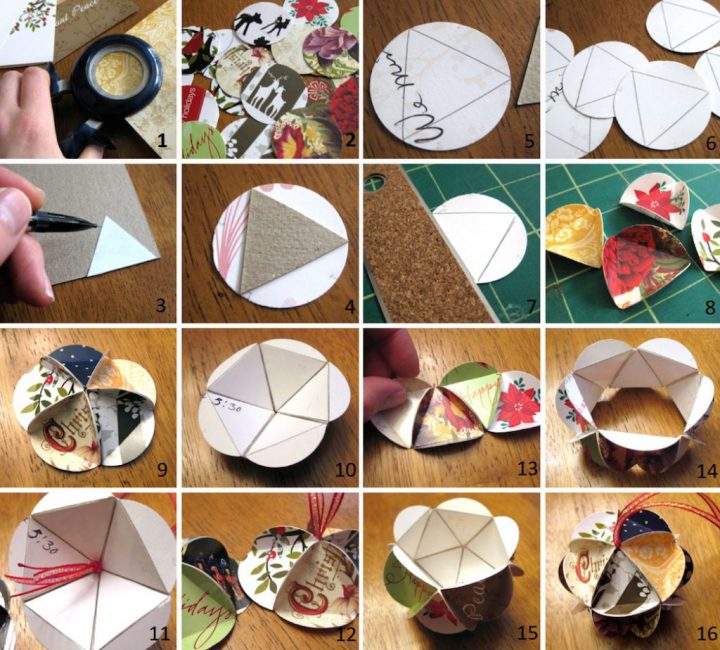
Photo instruction for making cardboard balls
How can you quickly make such a decor:
- Cut out 20 circles from cardboard, 3.5 cm in diameter
- Now separately make a triangle template with equal sides, which will clearly fit into the circle.
- Attach the template to the back of the round piece and circle with a pencil. Make even folds along these lines using a ruler.
- Then drip a little glue on the folds and glue the blanks together. Just connecting the top of the toy, do not forget to immediately make a loop. Only then glue the bottom
- On the bottom and top will go 5 rounds. And to connect them, you need a round valve in the middle - it must be glued from the remaining ten parts. Glue the bottom and top halves to this valve.
The finished toy can be coated with glue and sprinkled with sparkles.
 Read also: Do-it-yourself furniture and other wood products: drawings of benches, tables, swings, birdhouses and other household items (85+ Photos & Videos)
 Openwork Christmas trees
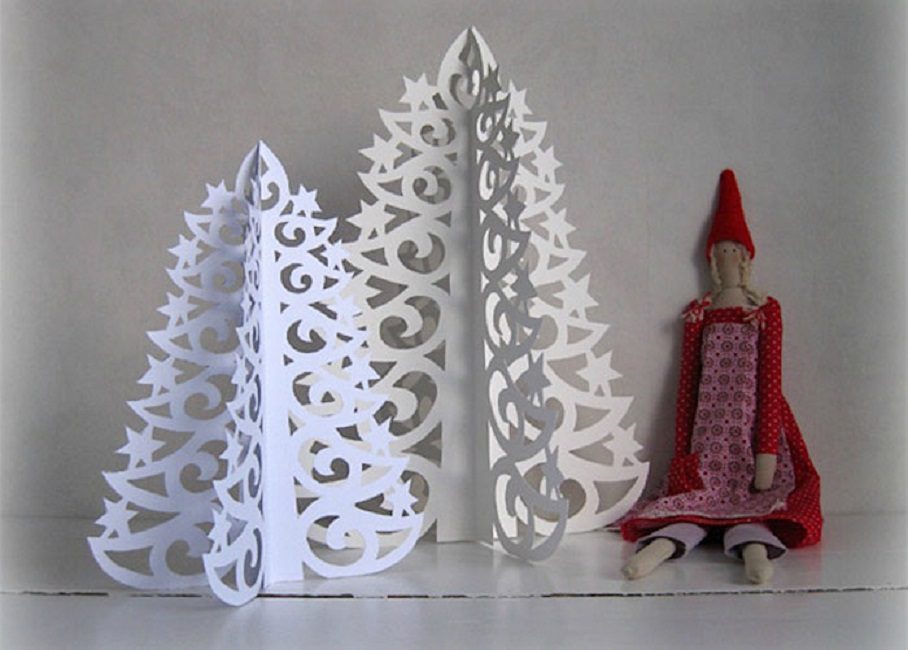
Openwork Christmas trees
It is very easy to make spectacular openwork Christmas trees out of paper, and then paint them green with paints. In the people they are called vytynanki. They can be a worthy decoration for a real Christmas tree or used as gifts. To work, you will need office paper, a template, a stationery cutter, glue and a cutting board (for cutting).
How to make such a Christmas tree:
First of all, print a stencil from the Internet. To obtain a three-dimensional figure, you need 2 identical copies.
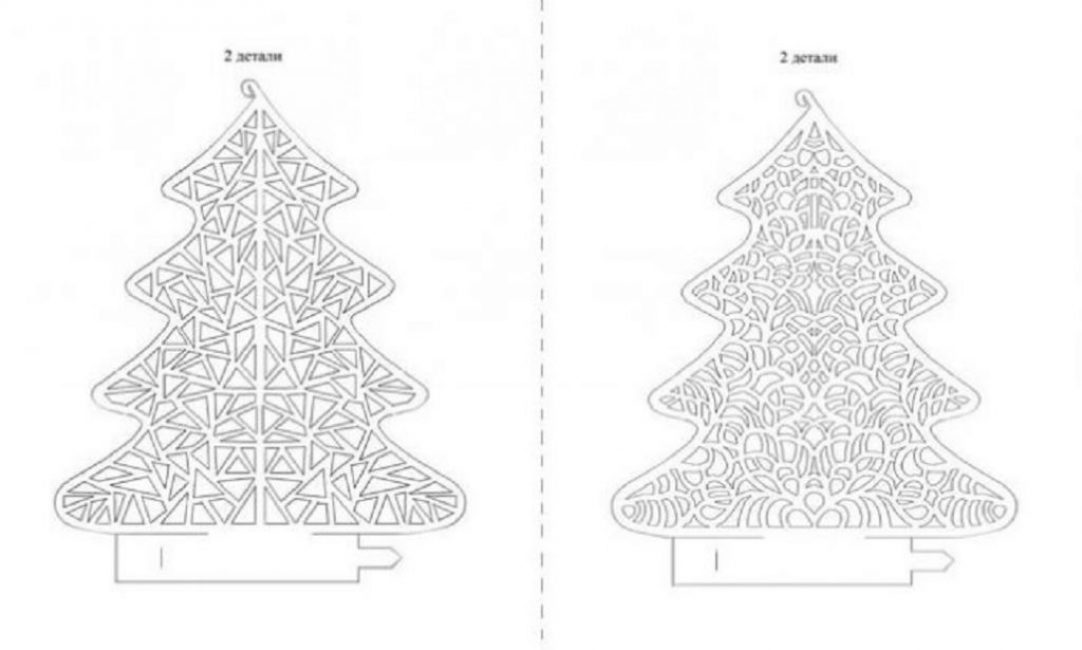
Internet stencil
Lay out the paper on the board and cut out the patterns with a knife. Leave a strip at the bottom along which the base-stand will be glued
Cut out the Christmas tree, fold and glue it on top. And from below, bend the strip into a ring and fix it using glue
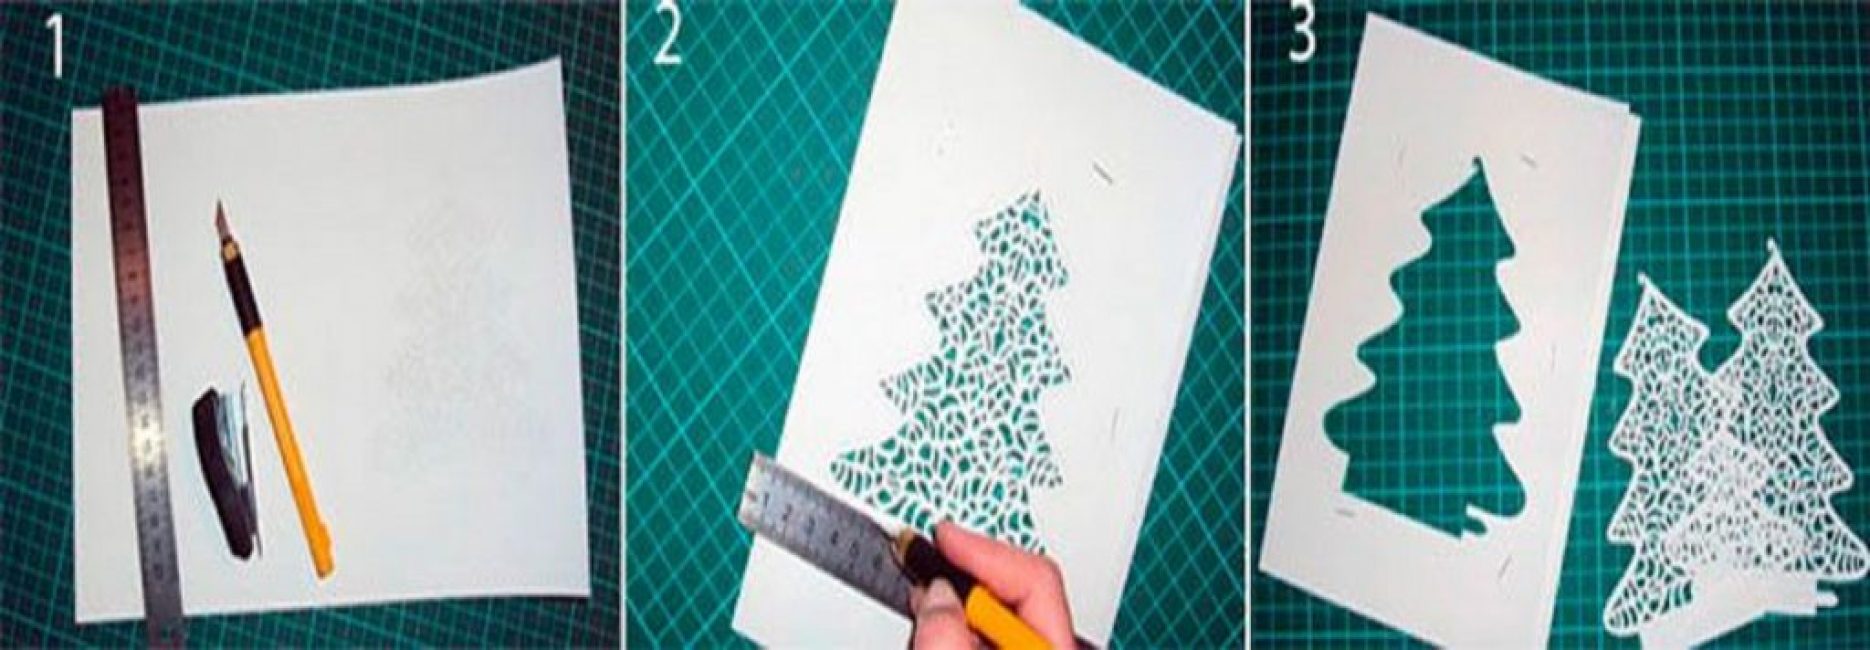
Herringbone
The product turns out to be stable, so that it can be safely placed somewhere.
How to make a Christmas tree with paper for kids
Do-it-yourself Christmas paper toys: diagrams, templates and step-by-step instructions | (100+ Photo Ideas & Videos)
 Read also: We build a house for a cat with our own hands. Interesting ideas and step-by-step instructions: from plywood, cardboard boxes, fabric. Dimensional Drawings (120+ Photos & Videos)
 Angels
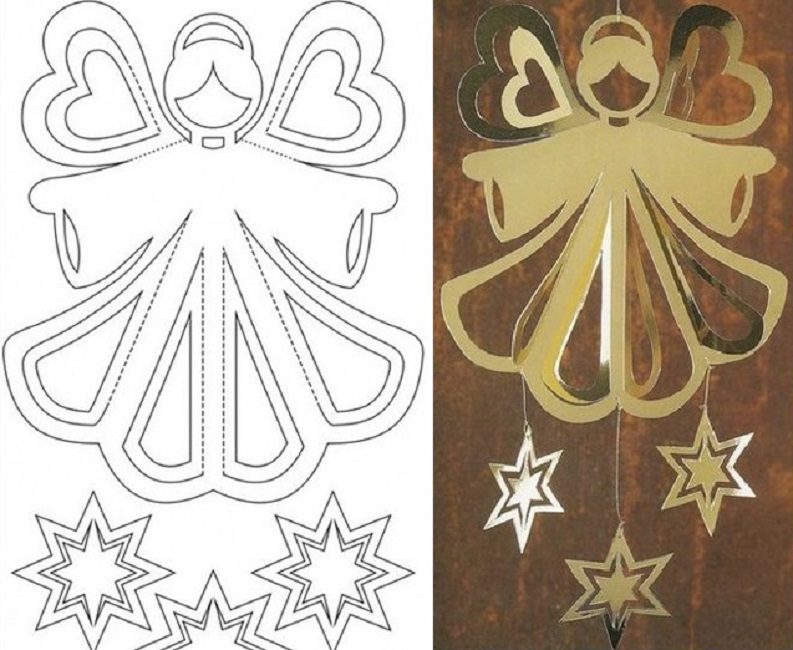
Stencil with an angel
Angels are perfect for New Year and Christmas themes. Usually they are made of white paper in the form of flat or three-dimensional figures.
How to turn an idea into reality:
- Print the desired template by downloading it from the Internet. Cut paper figures and decorate them as you wish with sparkles, rain, rhinestones and other elements
- To make a voluminous angel, you will need to cut out the appropriate details: head, body, halo, arms and wings. Glue the cone - this will be the body and make the sleeves in the same way. Attach all the details of the figure to the base-dress with glue
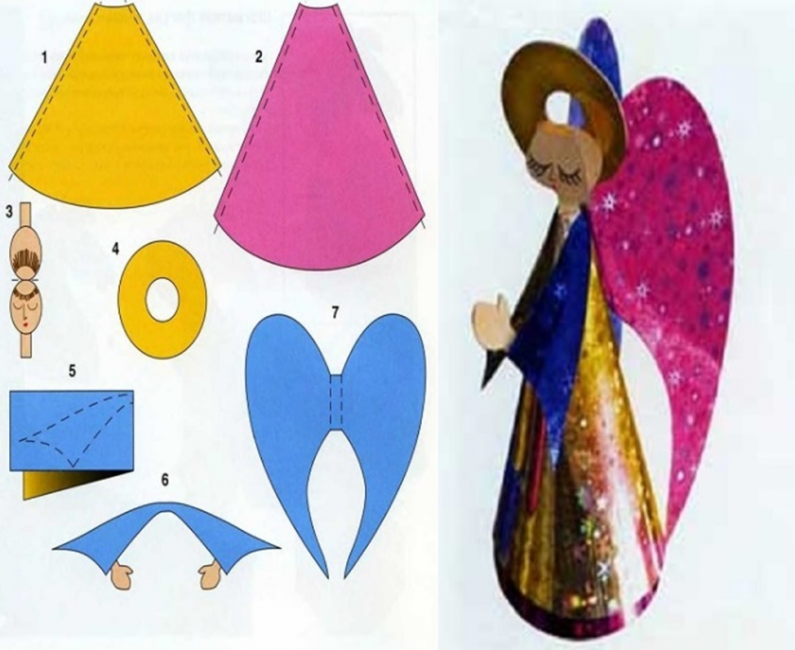
Volumetric angel
 Read also: We make vertical beds with our own hands: the best ideas of 2018. For vegetables, berries, herbs and flowers (65+ Photos & Videos) + Reviews
 cute houses
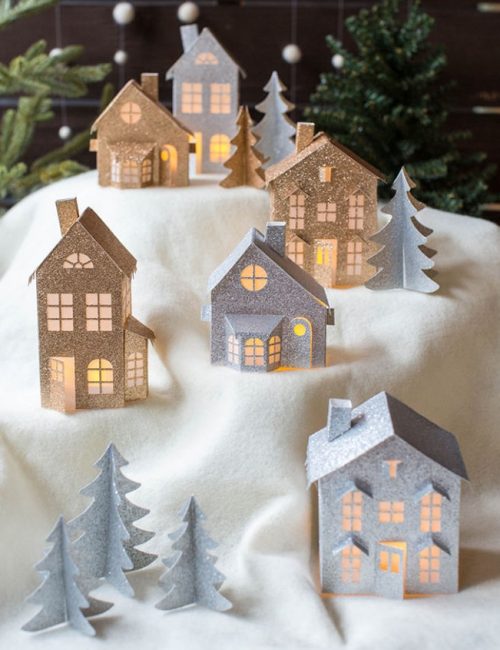
paper toy houses
Another option for New Year's decor is toy houses. Thick paper is suitable for their manufacture - it can be colored or plain cardboard, old postcards, unnecessary boxes. The template for them is downloaded on the Internet and transferred to paper.
Next steps:
- Cut out the blank and bend it along the lines to make a box
- Then cut out the windows, door, chimney and roof
- Glue all these components to the base and decorate the craft as you wish.
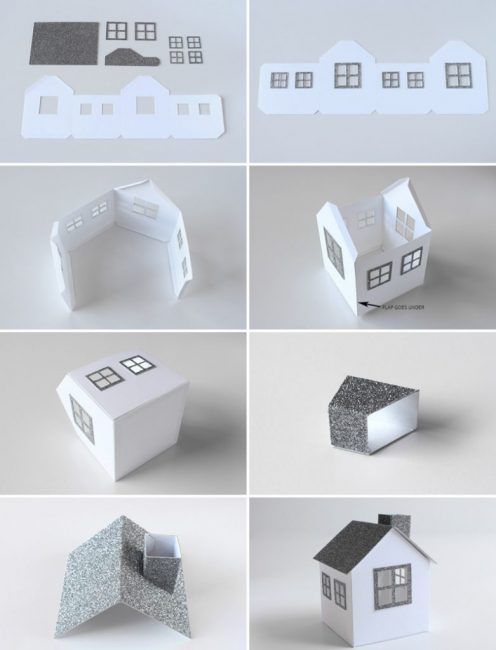
The sequence of gluing at home
With the help of such fabulous compositions, you can decorate the interior, placing them on the windowsill, fireplace (if any) or furniture.
 Read also: Dog bed: a description of the key points, step-by-step instructions for making your own hands (140+ Photos & Videos) + Reviews
 volumetric star
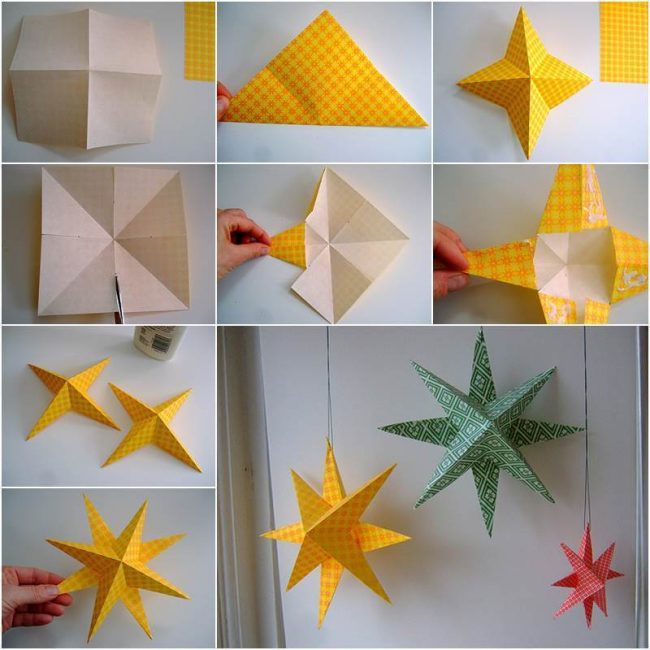
Visual instruction for work
A fairly popular New Year's toy is a star, which is usually attached to the top of the Christmas tree. You can make it yourself from colored paper. To make it look more realistic, let's make it 3D.
How to create a cute Christmas tree star:
- Cut out 2 squares of paper of any size and color
- Now fold the blanks 2 times in half and twice more diagonally
- Unfold and you'll see the fold lines
- Now fold each corner to the fold
- Fix the corners with glue so that it looks like bags. Thus, they act in relation to each fragment of the asterisk
- They also make the second part of the toy
- Connect both blanks together and glue
The result is a pot-bellied pointed star. Attach a ribbon or string to it if you plan to hang the craft somewhere. And when fixing it on top of the spruce, you need to make a hole for the trunk from below.
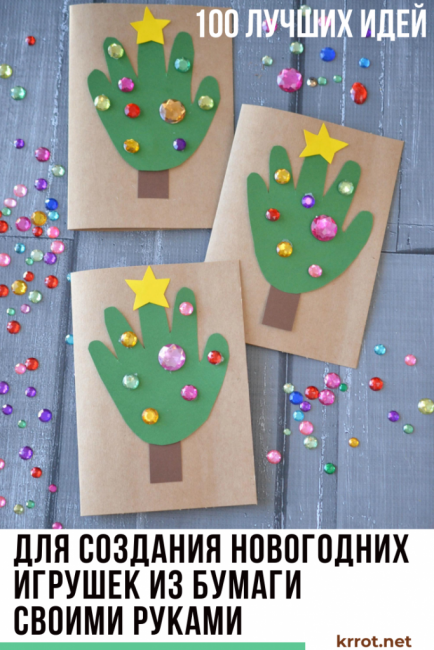
New Year's wreath
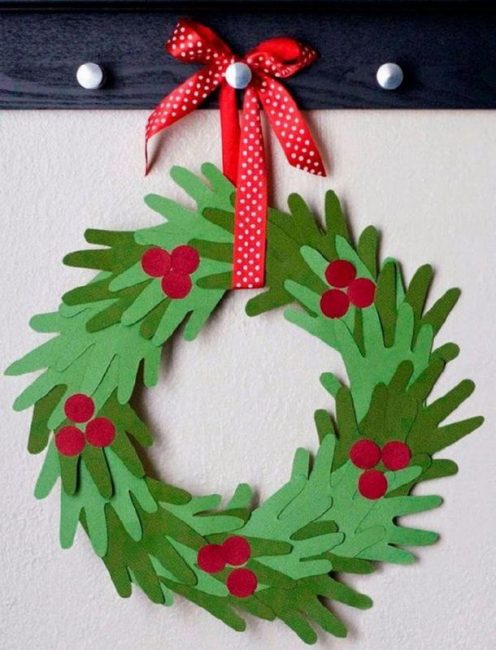
New Year's wreath
In crafts for the New Year holidays, you can’t do without a wreath, which is considered a symbol of financial well-being, longevity and happiness. This is a kind of amulet for the house from various adversities. It is usually hung on the front door.
To make a wreath, you need a lot of green colored paper.
It is recommended to involve a child in the process, who will definitely enjoy such an activity.
Step-by-step instruction:
- Take a large flat plate and circle it on colored cardboard. Then the wreath will turn out more solid and will serve as an ornament next year.
- Now take the saucer and placing it in the center of the large circle, circle and cut out a hole. The end result should look like a donut.
- Ask the child to put their palm on the sheet and outline it with a pencil. Such fragments will need to be cut more
- Ready-made palms must be glued onto a round blank in a chaotic manner, overlapping each other
- Glue all kinds of small decorations on top: beads, sequins, beads, bows, ribbons, bells, etc.
Wreaths can be of any design, it all depends on inspiration.
Unusual lamps
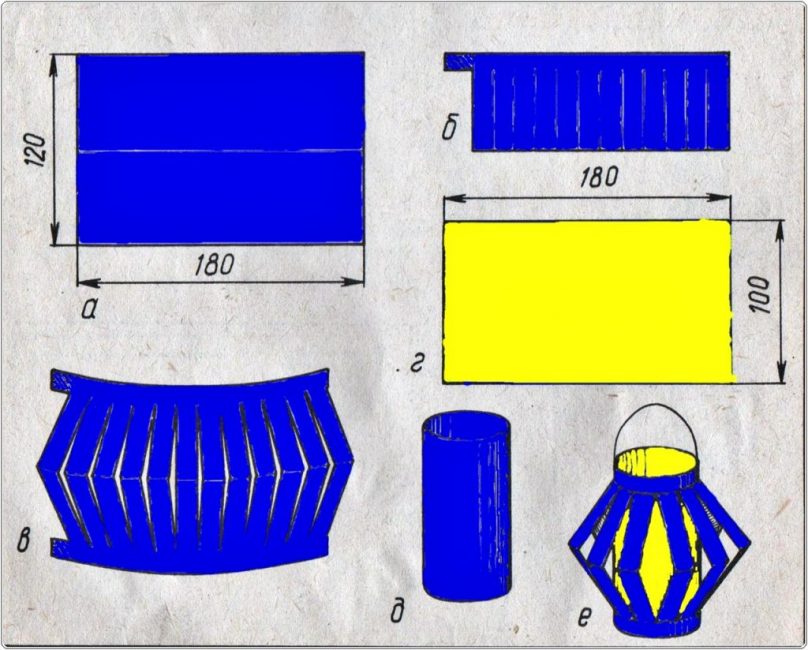
Scheme for making a paper lantern
Probably, everyone remembers from kindergarten how we were taught to make paper lanterns at art lessons. These delightful lamps are made simply and quickly from improvised materials: colored paper or cardboard from any package.
Master Class:
- From two multi-colored sheets of paper, cut out two rectangles measuring 100 x 180 mm and 120 x 180 mm
- Glue the smaller part in the form of a tube and set aside for now. Fold the second part in half and make cuts from the bottom, a little short of the edge.
- Similarly, you need to twist this rectangle like a bottle
If you did everything carefully, then the smaller tube should fit into the larger one. Only it is necessary to push it not to the stop - leave a little. Lubricate this edge with glue and only then insert the tube to the end. Do the same with the opposite edge. Glue a loop of colored paper strip on top.
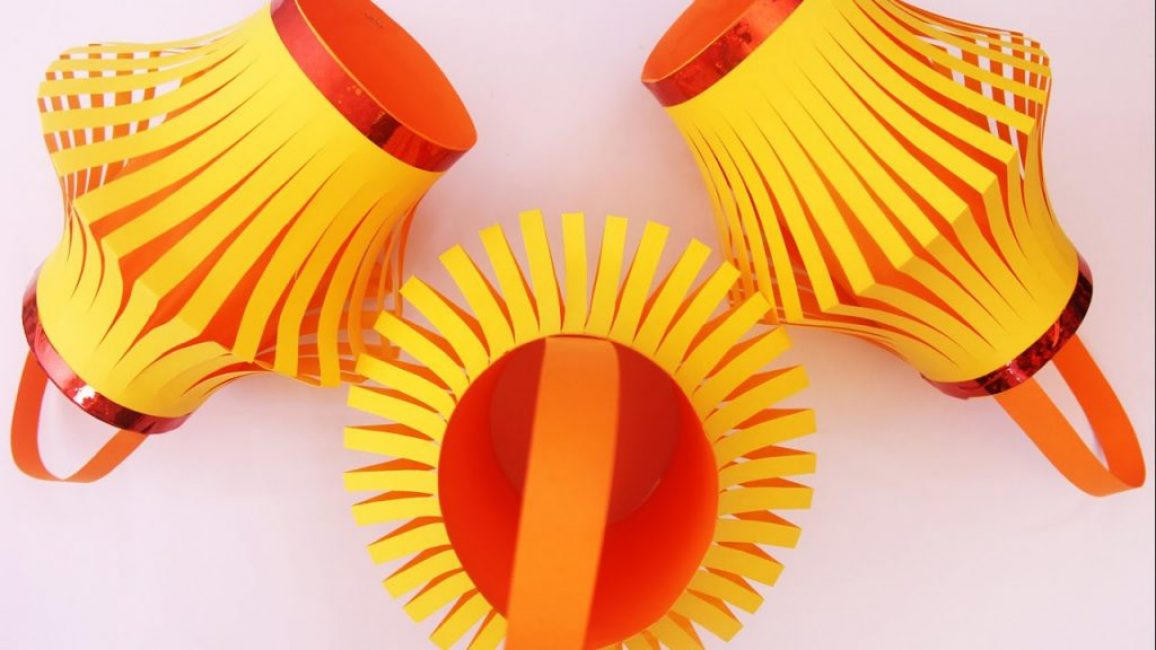
Simple but very beautiful lanterns for the Christmas tree
These are such beautiful lanterns for the Christmas tree.
Chinese lantern
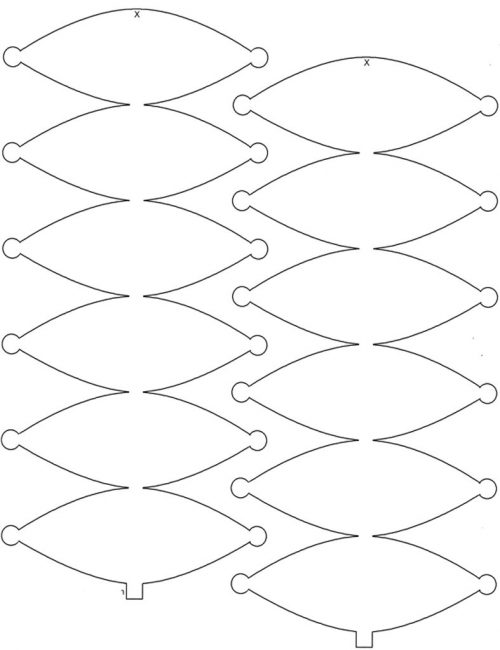
Detail cutting template
Another alternative decorative option is a Chinese lantern, which looks no less impressive.. To make it, you need to use the diagram or draw the segments yourself (as in the photo). The length of one piece will be an average of 10 cm.

How to make a Chinese lantern
Next steps:
- Trace the template on colored paper
- Cut out blanks - there should be six of them
- Form the bottom and top of the flashlight
- Sew the lower segments with a thread, then the upper ones.
- Make a loop and that's it, the flashlight is ready. Now they can decorate the Christmas tree
Quilling decorations
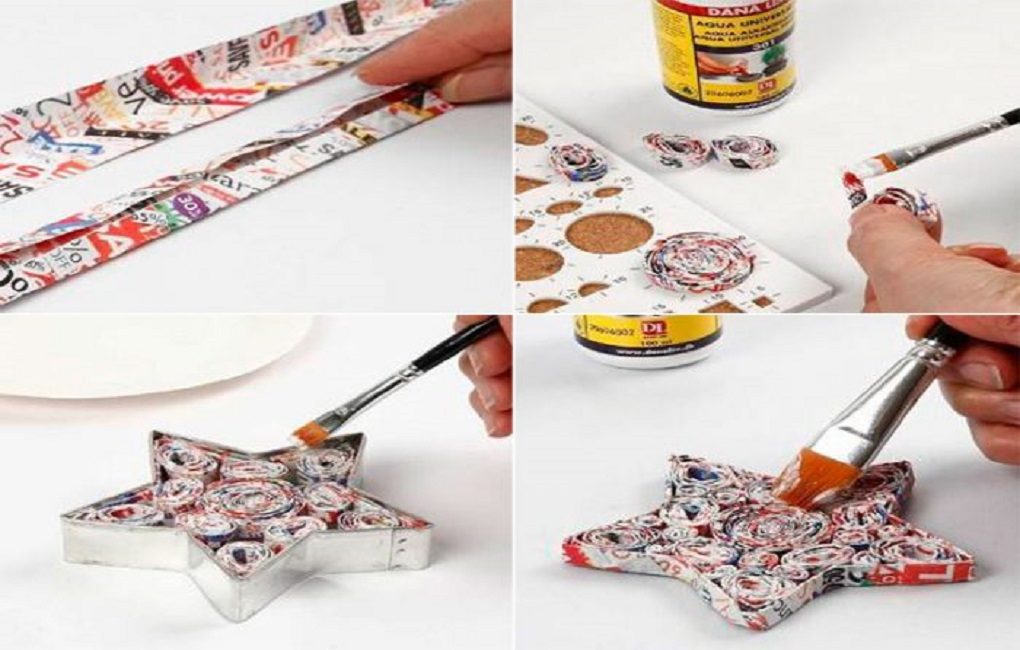
Quilling toy
Making quilling jewelry is not as difficult as it seems at first glance. To do this, you will need unnecessary newspapers or magazines, baking dishes, decor and a standard set of tools.
Step-by-step instruction:
- Cut strips about 5 cm wide
- Fold each in half lengthwise, straighten and fold again into an accordion.
- Lubricate them with glue and start slowly twisting one
- Take the mold and place the not yet twisted strip into it from the edge. Fill the rest of the space with twists, lubricating them with glue
- Wait for the craft to grab and pull out
- Attach a braid to the top and decorate the toy to your taste
Origami toys
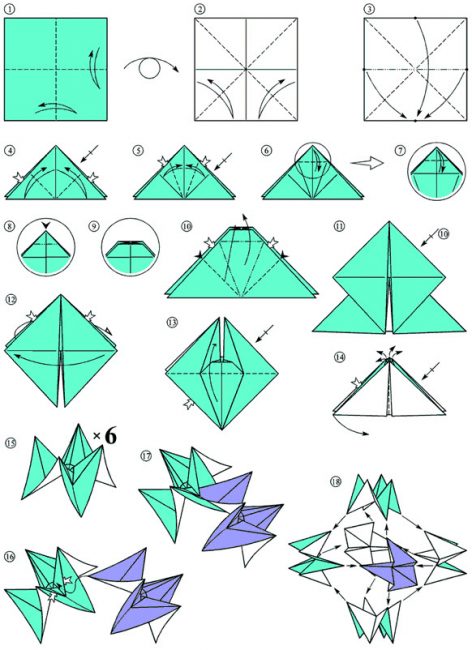
Scheme for making origami toys from paper modules
The technique of folding paper and fabric products without cuts and using glue is called origami. Having learned it, you can create many different toys for the New Year holiday: bunnies, snowmen, Santa Clauses, airplanes, birds and more. Origami gift wrappings will also look stylish.
For New Year's decor in the house and on the Christmas tree in 2020, discreet shades with separate bright inclusions (red, burgundy, yellow) should be selected. Then the coming year will surely be successful. The methods of making toys presented in the article are just a small example. Create, it all depends on your imagination or peep ideas on the net, there are many of them. Because it's so interesting.
Using the origami technique, you can make such a wonderful Christmas tree ball, as in the video below.
Kusudama origami superball
Do-it-yourself Christmas paper toys: diagrams, templates and step-by-step instructions | (100+ Photo Ideas & Videos)


