
Cooking in the heat, and even in a cramped room, is not a pleasant occupation. Especially if you have to do it quite often. Do-it-yourself summer kitchen in the country house in this case is just the perfect way out. Let us describe in detail the types of such buildings, their design features and construction methods.
Content:
 Read also: Do-it-yourself brick brazier | Step-by-step instructions, a simple drawing (25+ Photos & Videos) + Reviews
Kinds
In order for the erected building to fully meet the requirements of comfort and safety, the summer kitchen project should be thought out to the smallest detail. The use of non-standard solutions is permissible only if you already have serious experience in construction.
In order for the building to harmoniously fit into the surrounding landscape, it is better to use the same materials for its construction as for the construction of the house itself.
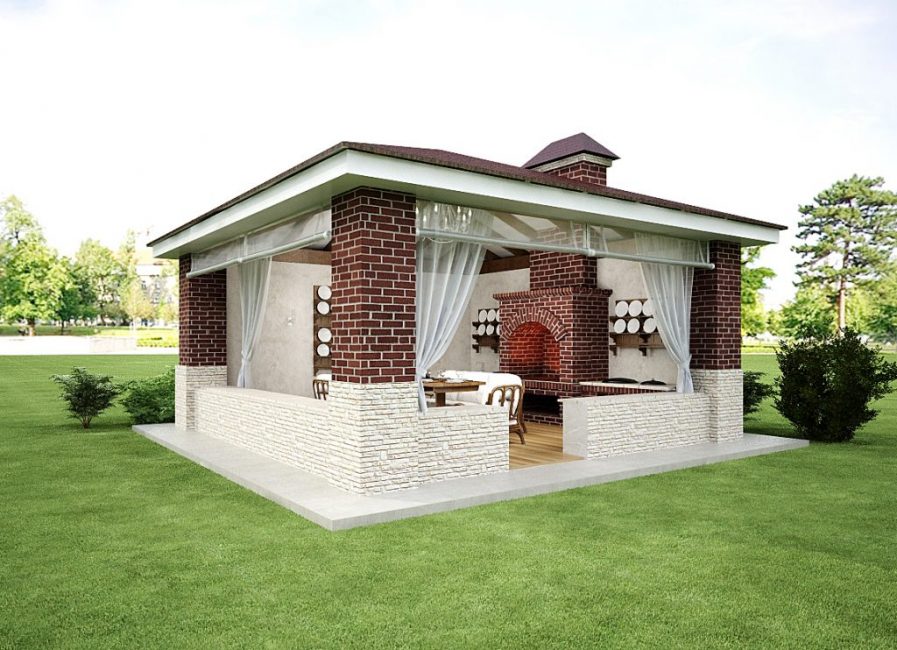
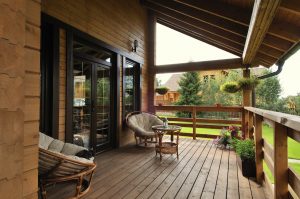
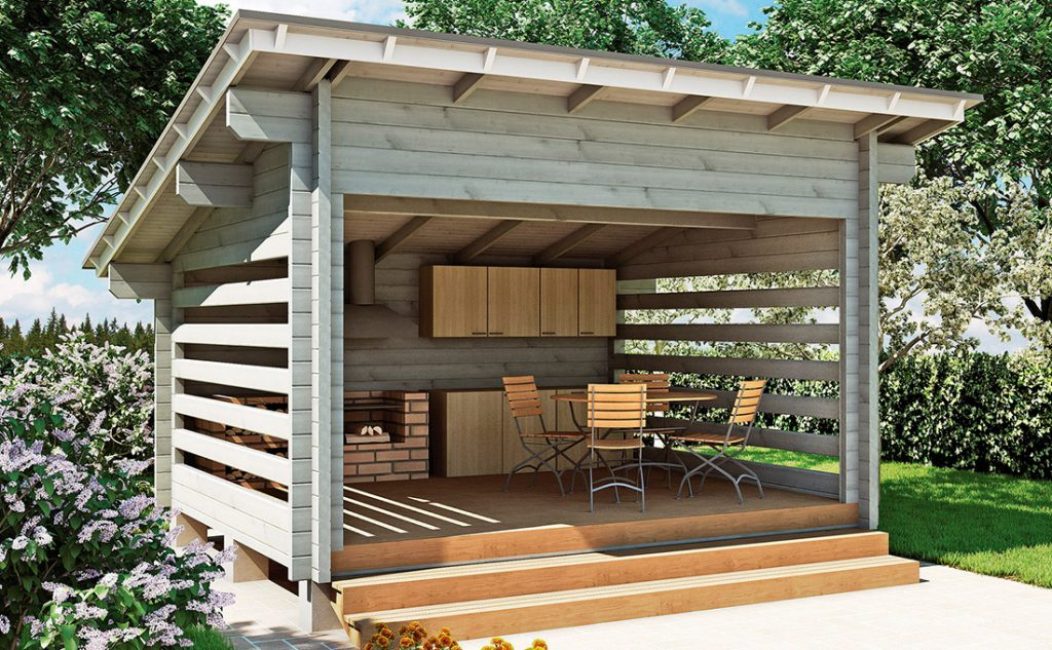
Open building with barbecue
A space for cooking suburban area may have the form of an extension to the house or be performed as a full-fledged detached building.
- open: the simplest option is a weatherproof canopy attached to poles
- semi-open with 2-3 walls
- closed in the form of a full-fledged building with 4 main walls, a door, windows and a roof
- combined open-closed, when part of the premises is completely closed by walls, and one or two remain half-open or completely open
 Read also: Kitchen design combined with living room | TOP-100 Ideas for a private house or apartment (110+ Photos & Videos) + Reviews
 Location selection
To begin with, such a structure should not be located too far from home. Firstly, with a strong removal, laying communications can turn into a serious problem.
Plus, if the kitchen is not equipped with a dining area, the hostess will have to carry breakfast, lunch and dinner daily to the house across the entire plot.
It is better to place the summer kitchen in the shade of trees, which will protect it from both heat and piercing winds.
Ideal - a place in the shade away from the road. It is good if the building is built on a slight elevation to ensure the flow of sewage and melt water. Do not place the building next to toilet, septic tank, compost pit, a barn in which animals are kept, an aviary and other places that exude unpleasant odors.
If you do not want to periodically "enjoy" exhaust gases, you should not build it near garage.
The summer kitchen in the country house can be adjacent to the house (for example, located on the spot verandas) or build separately. It is better to attach the kitchen to the house on the north side. The walls of the main building in this case will become a reliable natural protection from sunlight.
 Read also: How to drill a well for water with your own hands? Description, arrangement (Photo & Video)
Foundation types
An expensive strip base will be needed only when building a full-fledged building made of stone or brick.
For lightweight open or semi-open structures made of wood or aerated concrete foundation not required - it is enough to install the building on a columnar or pile-screw foundation. Such a summer kitchen is easy and cheap to make with your own hands.
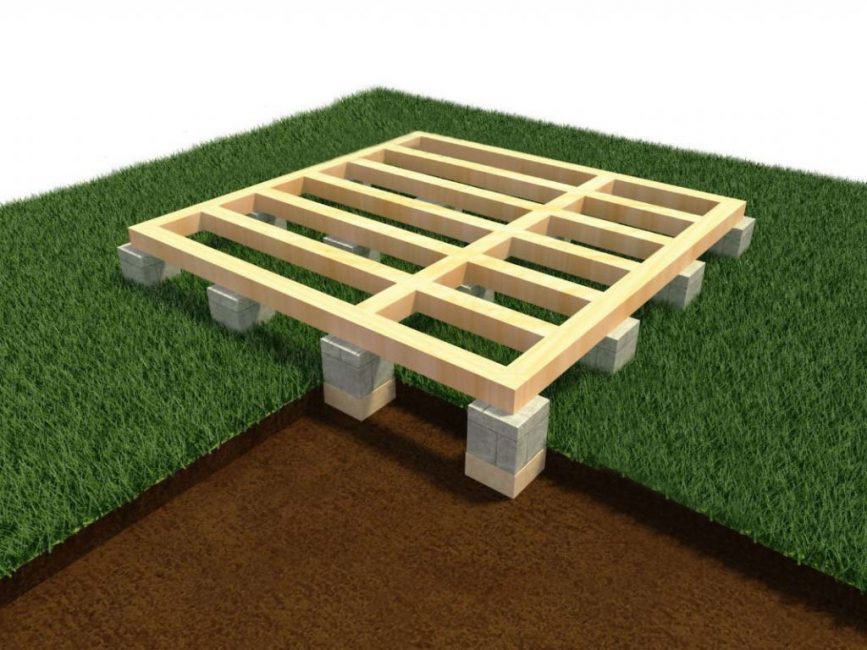
The simplest support for an open light structure made of timber
You can also use a concrete slab as a foundation, which will simultaneously serve as the floor of the summer kitchen. If desired, in the future it can be finished with a non-slippery paving slabs. Do not forget to make for such a site a slope for rainwater runoff of 1.5-2 degrees.
For the construction of a closed structure from a bar or foam blocks, you can use a pile, slab or strip foundation. For a brick building, the base should be more solid, therefore, during its construction, a deep-seated tape base is most often used.
 Read also: Projects of country houses for 6-10 acres: 120 photos, description and requirements | The most interesting ideas
 Water pipes. Drain system
When drafting a summer kitchen, think separately about the communications connection. After all, most of them are laid at the stage of earthworks.
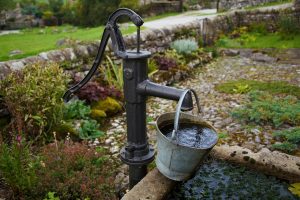
The simplest plumbing in the country
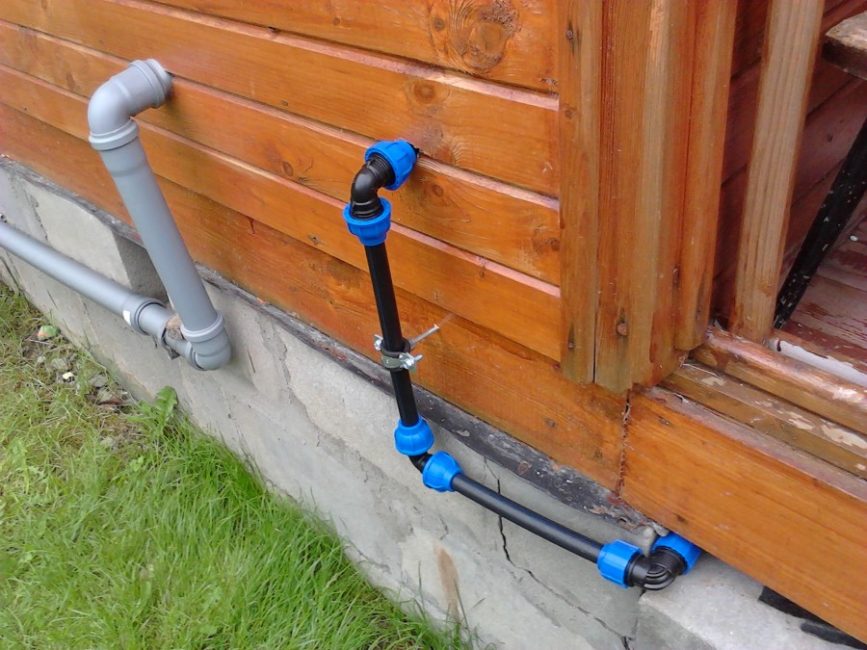
A full-fledged plumbing in the summer kitchen will be expensive. For its laying and thermal insulation (and in a cold climate this will need to be done without fail, otherwise the pipes will simply freeze in winter.) It will take about $ 300-500.
It is much easier to equip an electric pump for draining water for the winter or to make a water pipe at an angle - then it will be enough to open the valve to drain. You can do it even easier by connecting a regular garden hose to the sink for the summer.
You will also need to think about the drainage system. Pipes for these purposes are laid at the stage of foundation construction. To prevent fluid stagnation, they are installed at a slight slope.
None insulation in this case, it will not be required - the water will freely leave the pipes, and will not freeze in them. If there is no possibility of insertion into the central sewerage, to drain wastewater, you will also need an arrangement septic tank. It is erected at a distance of 5 m from the building.
 Read also: Terrace attached to the house: 150+ Best photo ideas | Do-it-yourself step-by-step arrangement
Supply of electricity and gas
For electricity supply for the summer kitchen in the house, it is better to provide a separate shield with automatic machines so that the system can be completely easily de-energized. It is better to take machines with a protective shutdown GFCI.
Get also waterproof sockets with grounding and a rubberized curtain. Pay attention to the labeling. The last digit indicates the degree of moisture protection. For example, products with the number "3" are able to work smoothly even in the rain. The number "5" means that the socket is able to withstand even a stream of water without a short circuit.
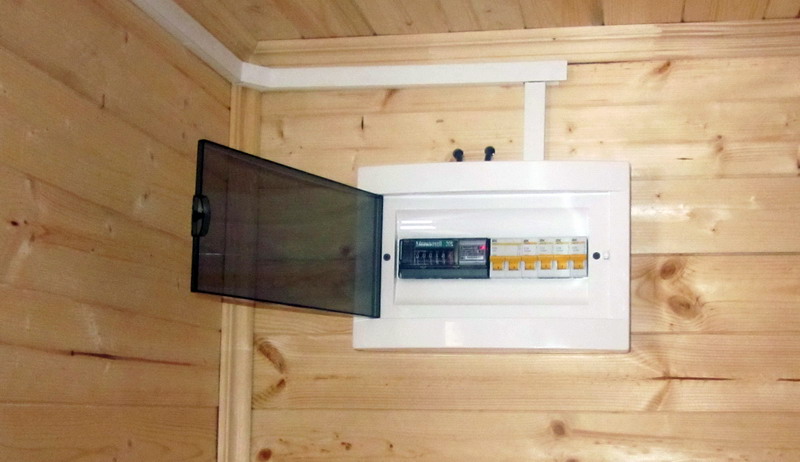
Allocate a separate RCD for the summer kitchen
The installation of gas stoves, even outside the home, is only allowed with the permission of the operating organization, taking into account the existing conditions. As a rule, there are no too big problems when arranging them in open areas.
Summing up gas will cost $ 500-600. Please note that any installation of gas equipment is carried out only by specialists from gas companies.
In the absence of a gas supply, you can use gas cylinders. They are stored at a distance of 5 m from buildings and basements in special locked cabinets or outbuildings with the inscription "Caution, gas." Such cabinets must have blinds for ventilation.
Summer gas will need to be used up before the onset of frost. Winter gas is not afraid of negative temperatures.
When applying to any type of device, you will need to lay seamless pipes with welding bends. They are connected to the stove or grill with flexible bellows tubes and gas valves.Such a room must be equipped with an exhaust hood.
 Read also: Veranda attached to the house - expanding the living space: projects, tips on how to create your own hands (200 original photo ideas)
 Open summer kitchen
Even in the absence of experience, installing a summer kitchen in the form of a canopy will not be difficult. Its construction is in many ways similar to the construction of a gazebo. The simplest structure will be a timber structure installed on a columnar foundation.
Sheathing can be any - from lining, OSB- plates up to plasters or siding.
Summer kitchen, one of the walls of which is capital
Very convenient is the building, which has two solid walls, along which the stove, tables and shelves will be hung. The rest of the space remains open.
To protect from the sun, it can be decorated with gratings, next to which climbing plants are planted. You can distinguish between the dining and working area on such a site using curtains or light partitions.
Foundation for light building
Even light open or semi-open areas should not be left unsupported. After all, loose soil will compact over time, and the building will warp.
Plus, due to the uneven moistening of the soil during its swelling during freezing, the pressure on the site will be uneven, resulting in deformation of the supporting structures and the appearance of cracks in them.
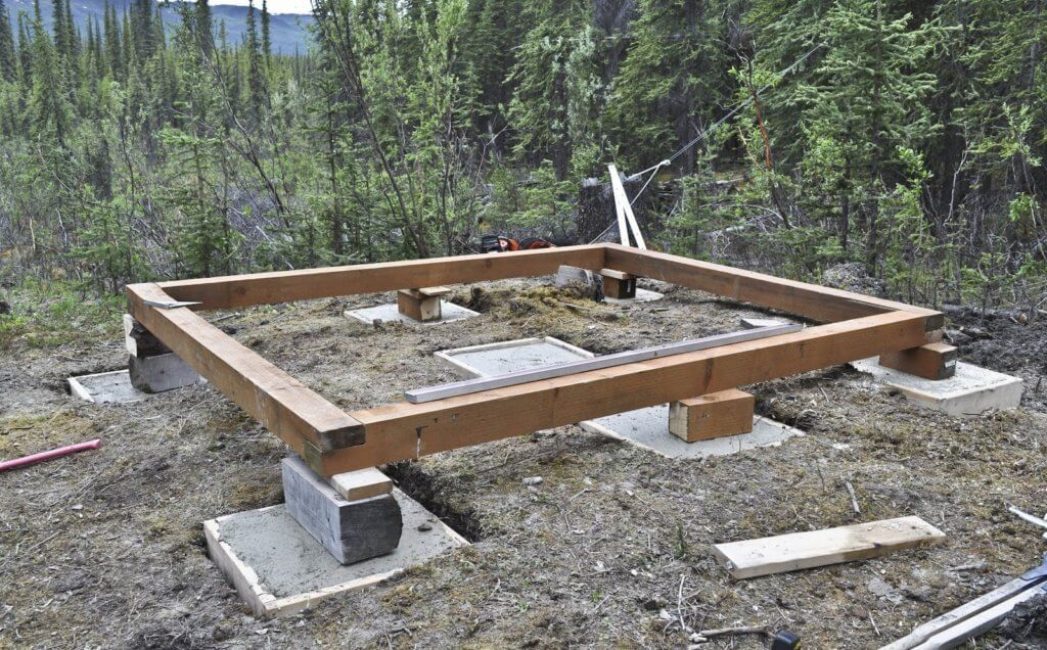
Column Foundation
So, we will describe how to make supports for the summer kitchen.
Even for the lightest structure, it is necessary to provide for the simplest brick or concrete racks:
Building walls and roofs
When preparing the base for the summer kitchen-gazebo, a thick-walled timber 100x100 mm is used. To do this, 4 interconnected bars are “mounted” on metal pins, pre-poured into concrete. Columnar supports are also installed on the same pins.
To strengthen the structure on all its sides, a strapping of timber is prepared, which serves as the railing of the building. For the arrangement of floors, an ordinary floor board or paving slabs are used.
The simplest wooden structure
The roof for the summer kitchen is made in the form of a frame made of timber (rafter system), sheathed with roofing material. The simplest roof is shed with a slope from the entrance to the building. With its gable version, inclined or hanging rafters are used.
 Read also: How to make a beautiful and inexpensive fence in the country with your own hands: wood, metal and polycarbonate | (70+ Photos & Videos) + Reviews
 Open area with tiled base
A platform made of concrete or brick is a rather expensive structure. To save money, you can simply lay it out with a non-slip paving slabs.
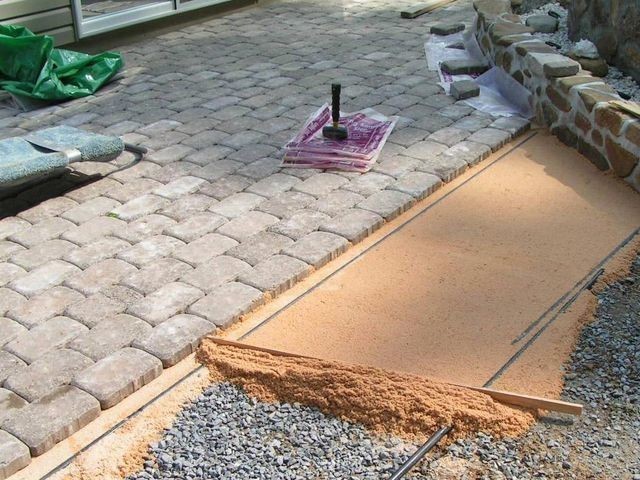
Dry laying
The principle of construction of such a building is similar to the previous one. The only difference is in the preparation of the foundation. At its location, the soil is leveled, on which layers of sand and gravel are alternately poured. Next, the tile is laid dry or wet.
In the first case, a mixture of sand and cement is used. After laying and leveling with the help of a building level, all seams are carefully sprinkled with sand.
The second (wet) laying method is the use of cement mortar, which is poured 2 cm thick. Too large a surface does not need to be laid immediately - the work is carried out in stages on an area of 0.5 square meters. m.
When installing the brazier, a small area is prepared separately, lined with refractory bricks. All subsequent work is carried out after the solution has dried for a couple of days.
 Read also: How to make flower pots with your own hands: outdoor, indoor, hanging | Step by Step Charts (120+ Original Photo Ideas & Videos)
 Arrangement of a stationary barbecue or stove
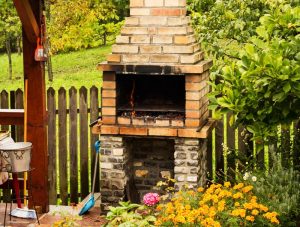
Since the brazier is a device for frying on an open fire, it can only be installed under an open or semi-open canopy. Such a building will require the removal of a chimney, so its design must be thought out in advance.
Foundation types
Foundation for barbecue
Remember the main rule - for a brick barbecue, barbecue or Russian oven, the construction of a separate foundation is required, which does not have points of contact with the main foundation of the building.
Indeed, even during the construction of a small hearth, at least 800 bricks will be needed, the total weight of which will be almost 3 tons.
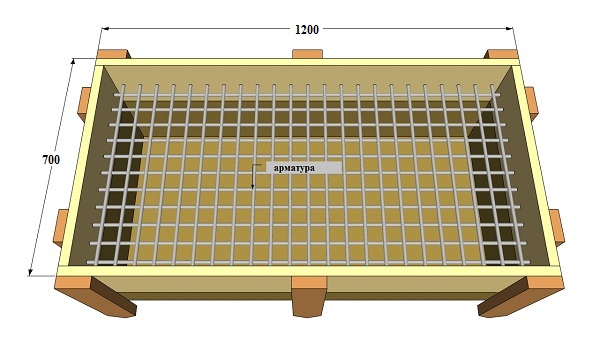
Without a strong foundation, it simply makes no sense to install a brick hearth - over time, it will quickly sag and become covered with cracks. Such a base is made in the form of a monolithic reinforced slab.
Foundation laying
Open building with barbecue
Let's describe the main stages of pouring the base for the barbecue or stove:
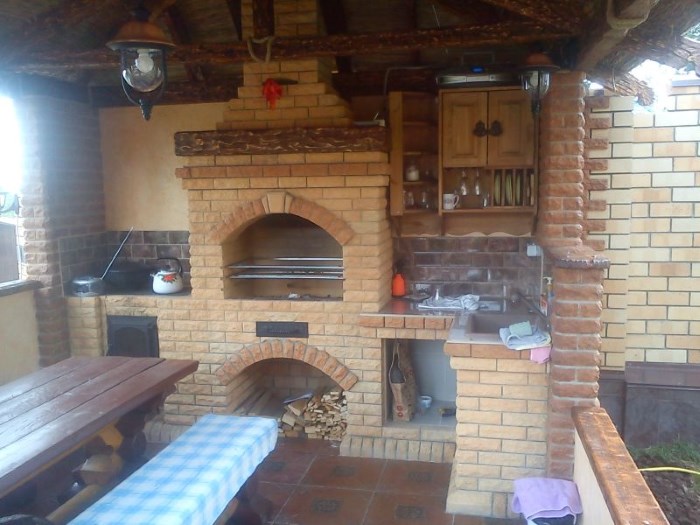
Construction of a stove or barbecue
For the construction of a brazier or stove, you will need a full-bodied red and fireclay brick. The walls are laid out of red brick, and fire-resistant fireclay will be needed for the construction of the hearth.
Since cement can crack under the influence of high temperatures, it is necessary to knead a sand-clay mortar for masonry.
For the hearth, it is better to use special dry mixtures of fireclay clay. Any hardware store has a wide range of them.
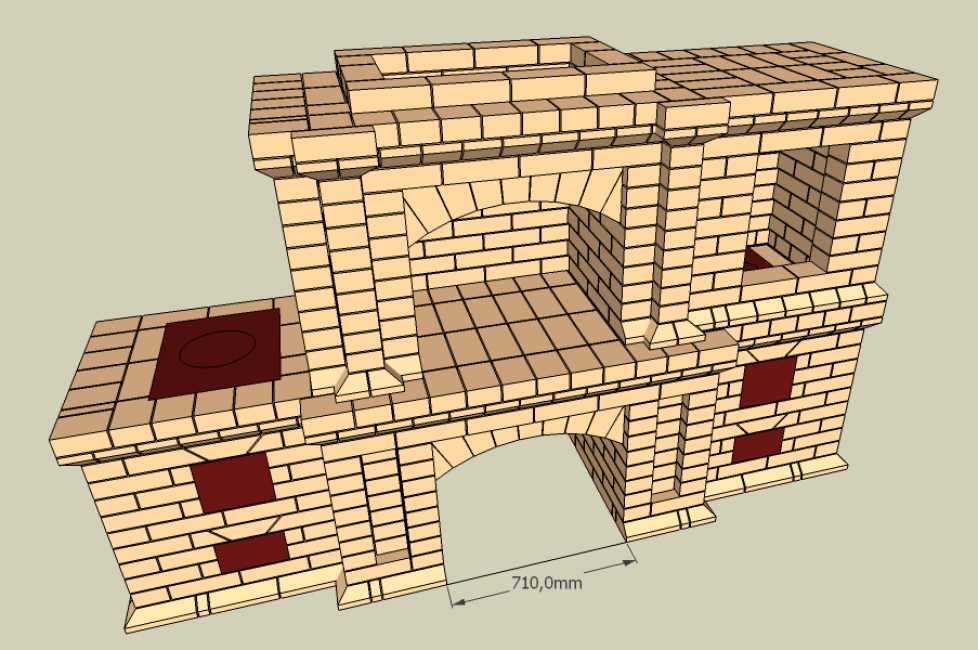
Barbecue layout
There are enough masonry schemes on the network (they are called ordering), but even if you undertake to do it yourself, be sure to invite a specialist who can help you with advice.
After all, the slightest mistake is enough, and the stove will begin to smoke mercilessly or not ignite at all.Even when building the simplest structure, you use only standard orders - any innovations with a complete lack of experience can end in failure.
Chimney construction
Regardless of the type of kitchen, when installing a stationary barbecue, a chimney will be required. Its height and diameter are directly dependent on the volume of the furnace. For example, for a metal barbecue 72x25 cm, you will need a 2-meter pipe with a diameter of 16-17 cm.

metal chimney
There are special formulas for calculating its size, but they are quite complicated, and you should not spend time on them if you have no experience. When laying a brick hearth, it is much easier to use standard ordering schemes - they indicate the number of bricks used in the construction, including the chimney.
Above the metal barbecue, before connecting the pipe itself, a smoke box is placed in the form of an expanded cap with a height of 0.8 m or more. Its edges should protrude 0.3-0.5 m beyond the brazier.
 Read also: How to make a children's house with your own hands: from wood and other materials. Dimensional drawings | (80 Photo Ideas & Videos)
 closed building
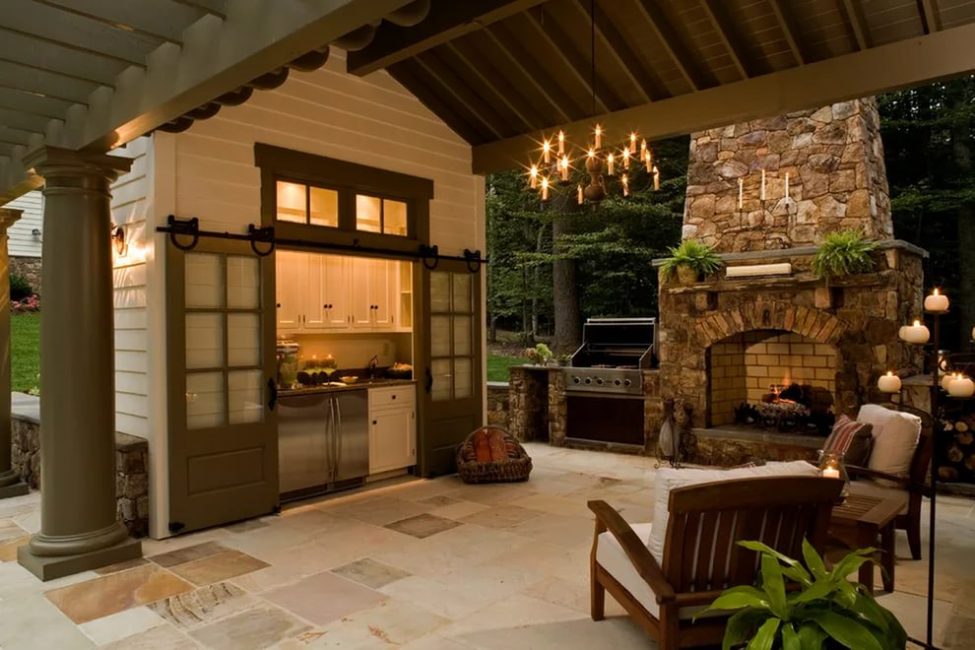
If kitchen in the country will be used in the winter, it makes sense to make it in the form of a completely closed building. In this case, it must be insulated from the inside.
Fresh air can be brought in during the summer by wide windows or by installing an air conditioner or sufficient fan in the cooking room.
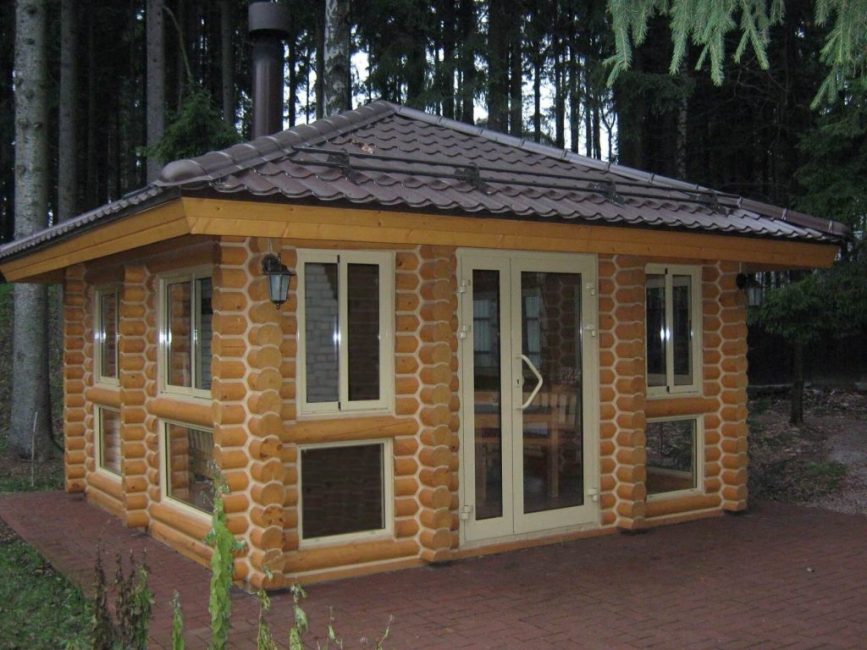
Completely enclosed building
The capital covered building, heated all year round, is good because you can equip a full-fledged kitchen with any kind of modern equipment in it. There are a lot of projects for arranging a closed summer kitchen in the country in the network.
It is convenient if a cellar or a bath is provided in the same building. A covered summer kitchen attached to the house may have a single foundation and a common entrance.
We will not describe the construction of the building itself in stages. After all, this is a rather laborious and complex process, little different from the process of erecting any capital building. A separate article will be needed for its detailed description.
 Read also: How to make a booth for a dog with your own hands: building a home in the yard and in the apartment. Drawings, dimensions and original ideas (55+ Photos & Videos) + Reviews
 Summer kitchen equipment
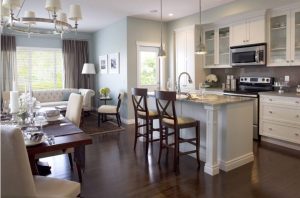
With the right supply of communications, just like in a regular kitchen, except for a sink, you can install any kind of equipment here from an electric or gas stove to a refrigerator and a dishwasher.
Separate side burners are very convenient in the summer kitchen, allowing you to boil water simultaneously with the grilling process. When installing the equipment, ensure that the wiring is protected from moisture and ubiquitous rodents.
A full-fledged large refrigerator in such a summer house is unlikely to be needed. It is enough to choose a compact model. But it is worth paying attention to the technical and operational characteristics.
Do not install this type of equipment in direct sunlight - find a place for it in the shade. Otherwise, it will soon fail.
Summer outdoor building equipment
In open space, an ordinary Russian stove, barbecue or grill is often equipped. If it is not possible to place them closer to the edge of the canopy, take care only of the ventilation system. Otherwise, during cooking, the site will be constantly smoky.
Installing a stationary Russian stove or barbecue will be justified if you have to cook often, and several dishes at once. If you mess around in the kitchen from time to time, a small stove with 1 or 2 burners and a light portable brazier are enough, which, if necessary, can be quickly removed to the house or garage for storage.
Grills are very convenient, in which cooking is carried out simultaneously on gas and wood. In this case, you won’t have to mess with fuel for a long time - it is used in small quantities only to add flavor to food. A gas grill will maintain the desired temperature.
Furniture selection
For an enclosed space, you can choose any type of furniture - the flight of fancy in this case is unlimited. But upholstered furniture installed in an open area is not the best idea. It is better to do it yourself or purchase light wooden or plastic chairs and armchairs with removable cushions. Such furniture will be no less comfortable.
Streamlined chairs and chairs made of rattan or wicker are very comfortable - by the way, their inexpensive plastic imitation is also on sale today. It is better not to use products of dark or bright colors - they get very hot in the sun, plus they quickly fade and lose color.
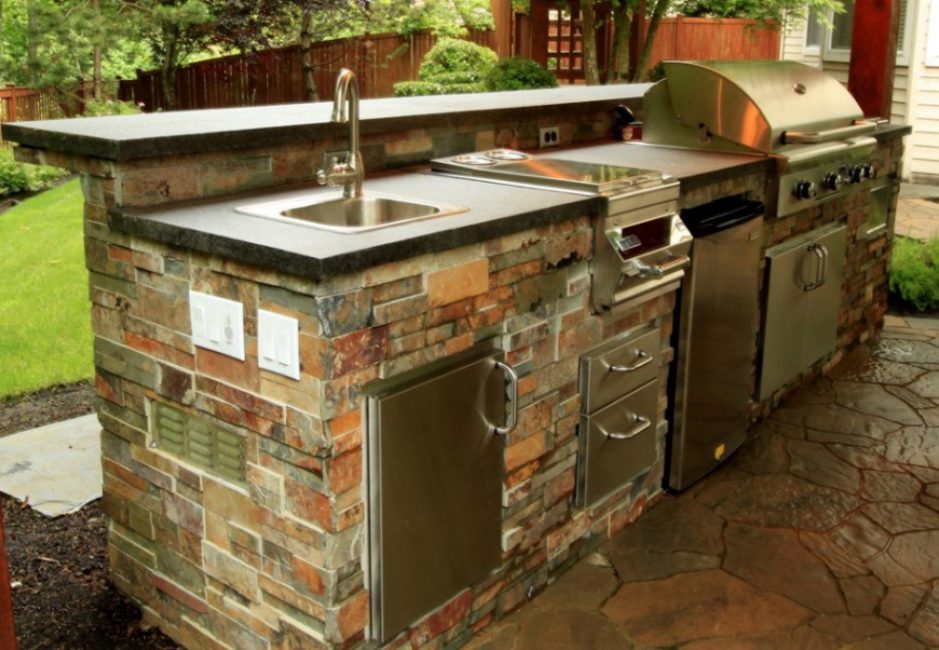
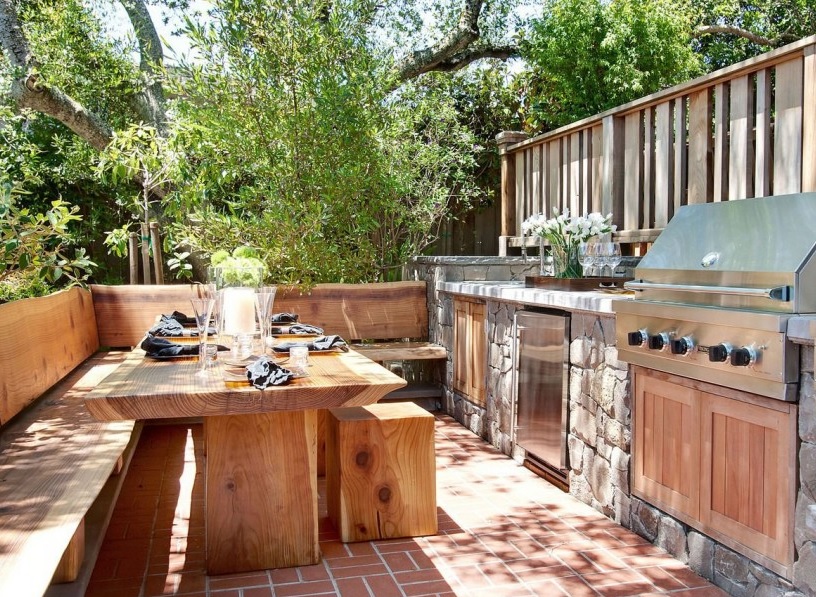
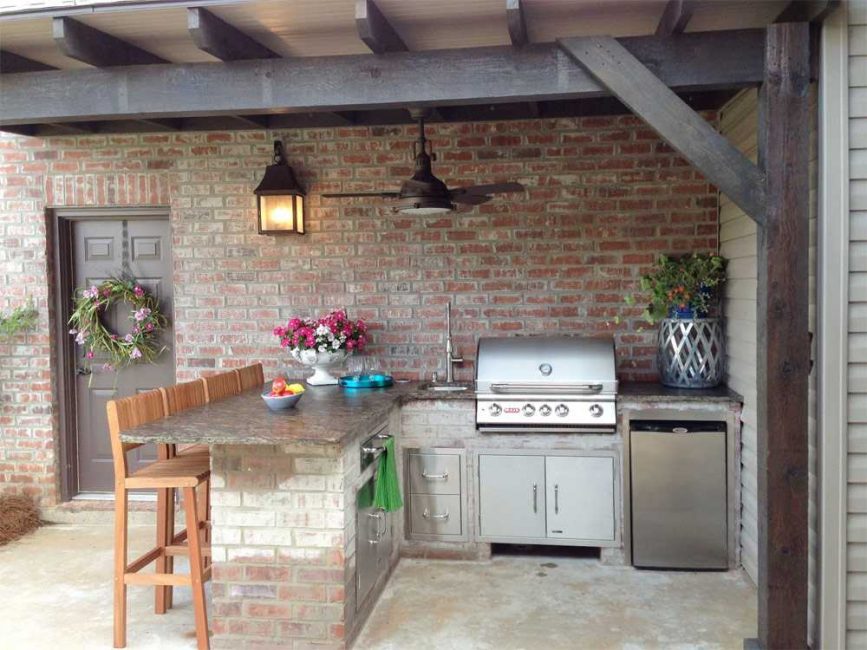
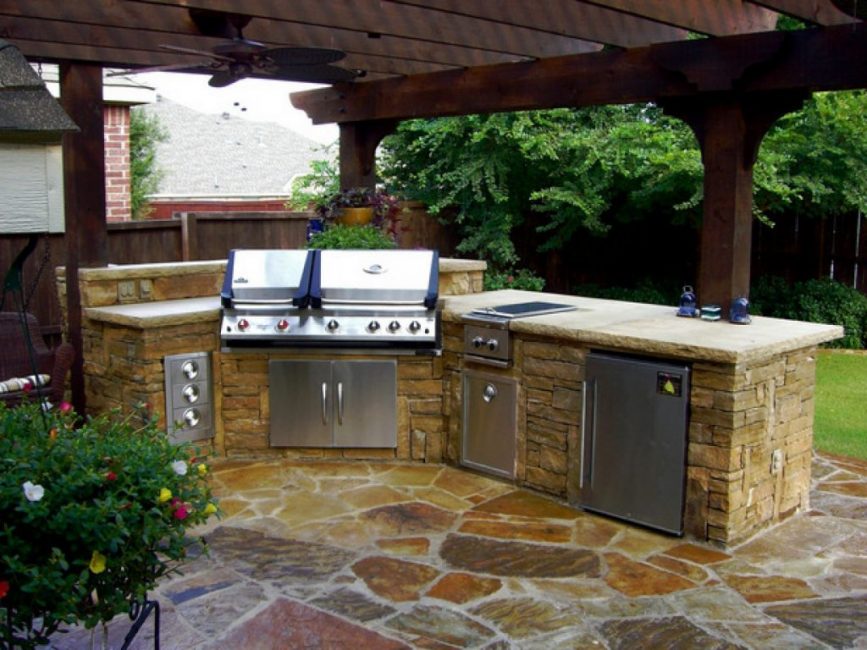
Stone-lined concrete kitchen island
When choosing tables and cabinets, also pay attention to the material of manufacture. Wooden or MDF furniture is best used if you plan to store it at the end of the season.
Do not install wooden structures near an open fire. It is better to build a "concrete kitchen island" from a wooden beam sheathed with a plaster mesh with two layers of cement mortar applied to it. After it is completely dry and strengthened, a sink, countertop are installed and doors are hung.
Choose a countertop from tile, concrete or stone. Plexiglas or quartz can quickly crack under sudden temperature changes. The ideal material for outdoor sinks is stainless steel.
In a small space, using the “working triangle” rule, in which the most important zones - the sink, stove and refrigerator - must fit into its tops, is not always feasible.
After all refrigerator it may simply not be, the plate should be replaced grill, and the shape of the room is not always close to ideal. But still, to ensure comfortable work, try to keep these main zones at a fairly close distance from each other.
Lighting
A single chandelier in an open area is unlikely to cope with the task - because in the absence of walls, the light will scatter. Therefore, consider several types of lighting. Be sure to place spotlights or LED strips near the work area.
Above the dining table, you can hang one large chandelier. Such lighting can be supplemented with halogen lamps or lanterns hung on nearby trees.
Lighting must be thoughtful
With the help of light, you will be able to easily divide the space into separate zones. For example, after you have set the table, hide the work tables by turning off the lights and leaving only the lighting of the dining tables and the area around the building.
Do not forget that for street lighting you will need lamps and fixtures with a high degree of protection against dust and water (their IP should be in the range of 54-65). The first digit is the degree of protection against electric shock. The second is to protect the case from moisture penetration. Products marked with the numbers "65" will be needed if the lamps are located outside the canopy area.
Conclusion
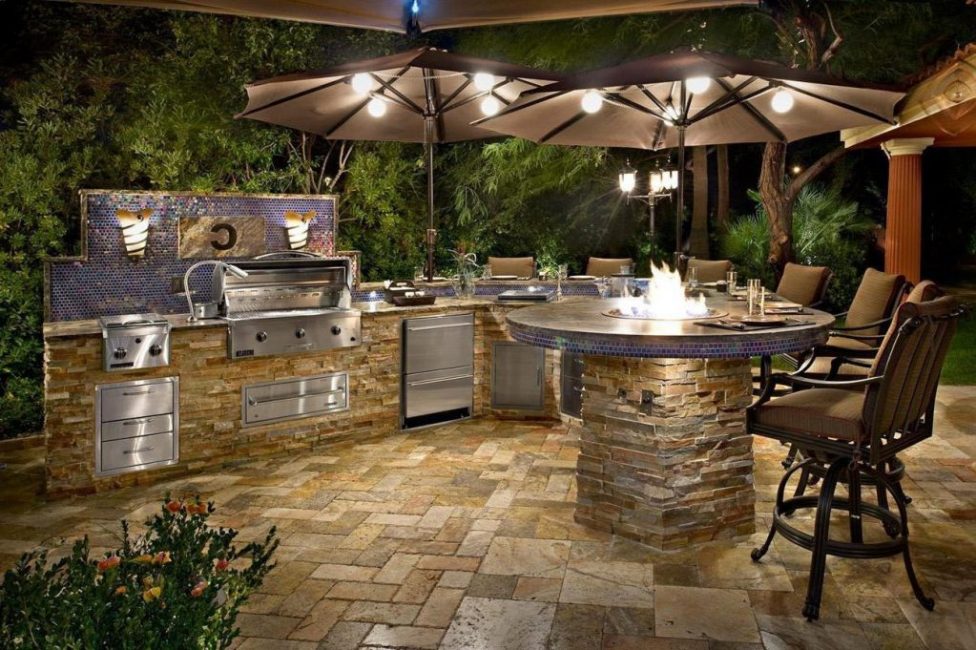
The construction of the original form and finish will be the highlight of your site. The size of such a building depends on the number of family members and the frequency of receiving guests. For a family of 3-4 people, a summer kitchen of 8 sq. m.When arranging a dining area in nature, its size increases accordingly.
One of the summer kitchen projects with a dining area
In the absence of an open hearth or stove, the summer kitchen can be assembled from polycarbonate. Such a light structure is installed on columnar supports or a platform filled with concrete, thus raising it 4-5 cm above the ground. The frame for it is assembled from a bar or a metal profile. Roof rafters are also made from the same material.
The summer kitchen is often equipped and ready-made terrace or in pergola. After all, it is much cheaper than building another building. Yes, and the place on the site in this case, it will be possible to save. The kitchen attached to the building can have only one blank wall. The other three sides remain open.

VIDEO: Arbor-summer kitchen. DIY
Do-it-yourself construction and arrangement of a summer kitchen in the country: projects, design, device, with barbecue and barbecue (60+ Photos & Videos) + Reviews


