

The choice of flooring in the construction market is very diverse, but the favorite of many builders and designers is the laminate. A laminated board can imitate the most expensive types of wood, but is more affordable. The most reliable installation method is installation on a flat concrete screed. However, subject to a number of rules, this coating is compatible with a wooden floor. Laying laminate flooring on your own is not difficult if you follow the detailed instructions provided in this article.
Content:
- Wood floor diagnostics
- Floor leveling methods
- How to choose a laminate
- Types of substrates
- Calculation of the amount of materials
- Installation tools
- Substrate laying steps
- Laying methods
- Laying schemes
- Laying sequence
- Laying laminate around pipes and other communications
- Optimum gap width between wall and laminate
- Selection and installation of skirting boards
- Forming a joint between a laminate and another coating
- Recommendations for combining laminate and tiles
- Causes of laminate creaking
 Read also: Landscaping your site with your own hands - (130+ Photo Ideas & Videos) + Reviews
Wood floor diagnostics
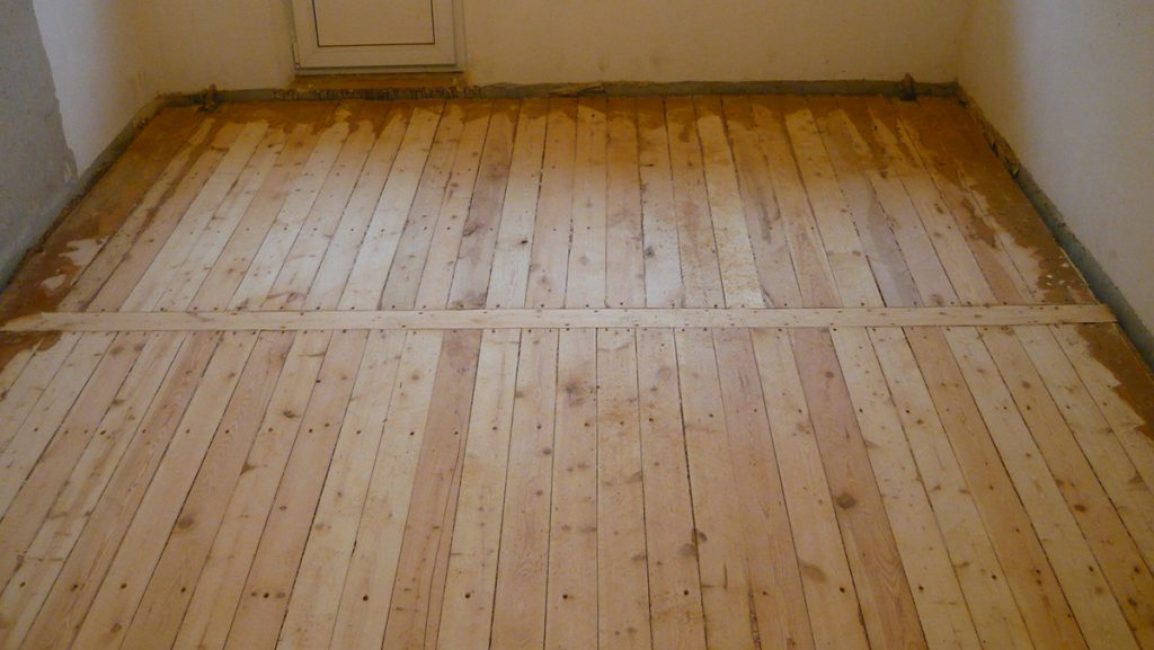
old wood flooring
The first step in renovating your flooring is assessing the condition of the old one. It is impossible to lay a laminate on an uneven base, especially if there is a strong difference from one corner of the room to another. The laminate board is installed by floating method, a large angle of inclination will cause the boards to slide to the bottom point. If the old wooden floor is strongly bonded, has wide gaps, and individual boards are rotten, it must be sorted out to the ground, replaced with old beams and strengthened.
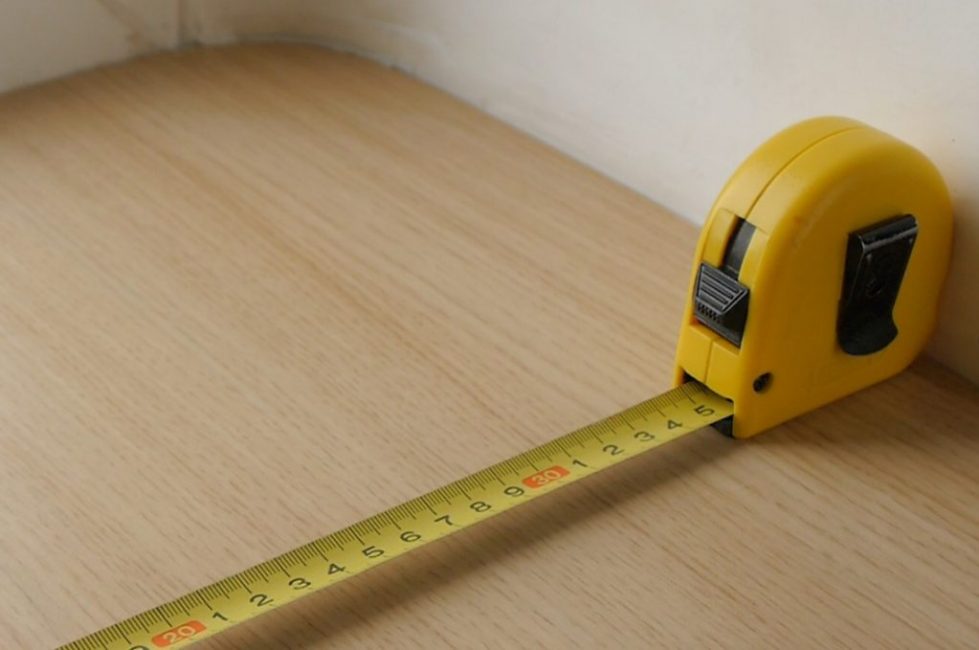
To accurately determine the degree of suitability of the floor, it is necessary to carefully measure it with a building level. Measurements should be taken alternately in all corners, in the center of the room and in the middle of the walls, and then compare the results with the table.
| Suitability of the floor for laying laminate | Board height difference | The size of the gaps between the boards | Jump from one wall to another | Depth of grooves on the surface of the boards |
|---|---|---|---|---|
| The floor is even, ready for laying, the thickness of the substrate is minimal | Not more than 2mm/m2 | There are practically no gaps | Not more than 0.5 mm | The boards are even, do not fasten, firmly fixed |
| The floor has irregularities, leveling by scraping or a denser substrate is possible. The thickness of the laminate is at least 8 mm | Not more than 5 mm/m2 | no more than 2 mm | no more than 2 cm | Boards are curved or concave, the depth of recesses and pits is not more than 3 mm |
| The floor needs to be leveled. Without leveling, the thickness of the laminate must be at least 12 mm, the substrate is made of expanded polystyrene | Not more than 10 mm/m2 | Not more than 5 mm | about 2cm | Boards have depressions up to 3-5 mm |
| The floor must be leveled beforehand (including sheet materials) | More than 10 mm/m2 | More than 5 mm | More than 3 cm | The boards creak strongly, have deep depressions of more than 5 mm |
 Read also: Perennial flowers (TOP 50 species): garden catalog for giving with photos and names | Video + Reviews
 Floor leveling methods
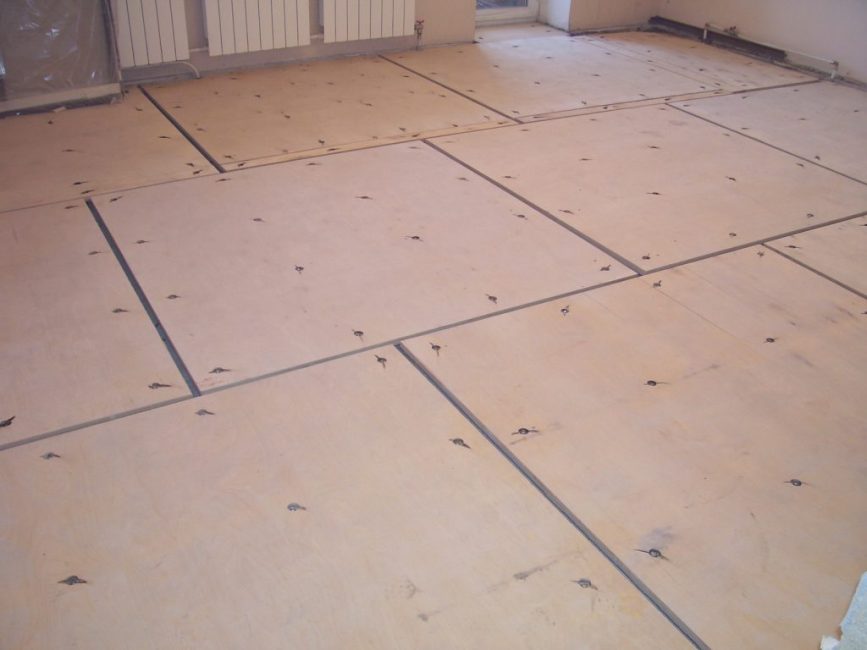
Leveling with plywood without lag
Acrylic putty or sealant used when the total difference does not exceed 3-5 mm. The advantage of such a putty is its high plasticity, which means that when the boards are displaced under load, it will not collapse. Before applying it, the boards should be treated with a primer to increase adhesion. You need to putty 1-2 times. Instead of acrylic, you can use a stronger mixture with PVA glue.The putty on the glue is applied in the same way, however, after applying it, the surface must be sanded.
Plywood cope with large and medium height differences. This material is often used when leveling floors because of its lightness, hardness and resistance to various loads. On sale there is a wide selection of moisture resistant varieties. Depending on the degree of unevenness, choose either plywood fasteners on the logs, or directly to the floor. Under the laminate, the plywood thickness must be at least 10 mm.
Fastening plywood without using lags:
- If the width of the boards does not exceed 20 cm and the floor is without significant irregularities, plywood can be chosen with a thickness of up to 8-10 mm. For a floor with large defects, deflections and a difference of more than 0.5 cm, the thickness should reach 18-20 mm. When there are wide gaps, the joints near the walls must be sealed with mounting foam. For ease of installation, plywood sheets can be cut into 1250x1250 squares with a jigsaw.
- The first step in leveling the floor with plywood will be the removal of the old baseboard, nails. Irregularities and protrusions are smoothed out with a planer, and then the floor is thoroughly cleaned of dust and debris.
- Plywood is fixed with screws or self-tapping screws with a gap of 15 cm, leaving small gaps near the walls and between the sheets. Gaps of 0.5-1 cm will be enough to avoid squeaks and swelling due to the expansion of the material.
Mounting plywood on logs:
- Logs are installed with a significant curvature of the floor, a height difference from one wall to another, or in a room with high humidity.
- The direction of the lag is determined by the direction of the sunlight. They need to be installed perpendicular.
sunlight or parallel to the movement of people in rooms without windows. - In the case when the difference from opposite walls is large (up to 8-10 cm), mini-logs are made - special linings of different thicknesses made of plywood or timber. Where the difference is not strong, a beam of small section is installed, but it is fixed more often, approximately every 30-35 cm, and where it is large, a beam of greater thickness is accordingly attached.
- Before starting work, engineering calculations must be made to determine the height of each support element.
- Then the logs are installed around the perimeter of the room at a distance of 40-50 cm and transverse bars.
- You should not put heat-insulating material like mineral wool between the lags, because it is not durable and over time the floors will have to be sorted out again and the insulation changed. If expanded clay is used for thermal protection, it must be hermetically covered with plastic wrap.
- After the crate, plywood sheets are attached with a gap of 0.3-0.4 mm. Installation is completed by sealing the gap with elastic mastic.
- The surface is primed and the laminate is glued.
Wet screed suitable for solid wooden floors with a maximum unevenness of 1 cm. It cannot be used for larger distortions. For maximum strength and elasticity of the screed, special dry mixes with plasticizers and fillers for a wooden floor are selected. Alignment begins with the imposition of a reinforcing mesh, followed by a primer floor. The screed is a layer of no more than 1 centimeter.
 Read also: Edible and non-edible mushrooms, double mushrooms. 16 species with names and descriptions (Photo & Video) + Reviews
How to choose a laminate
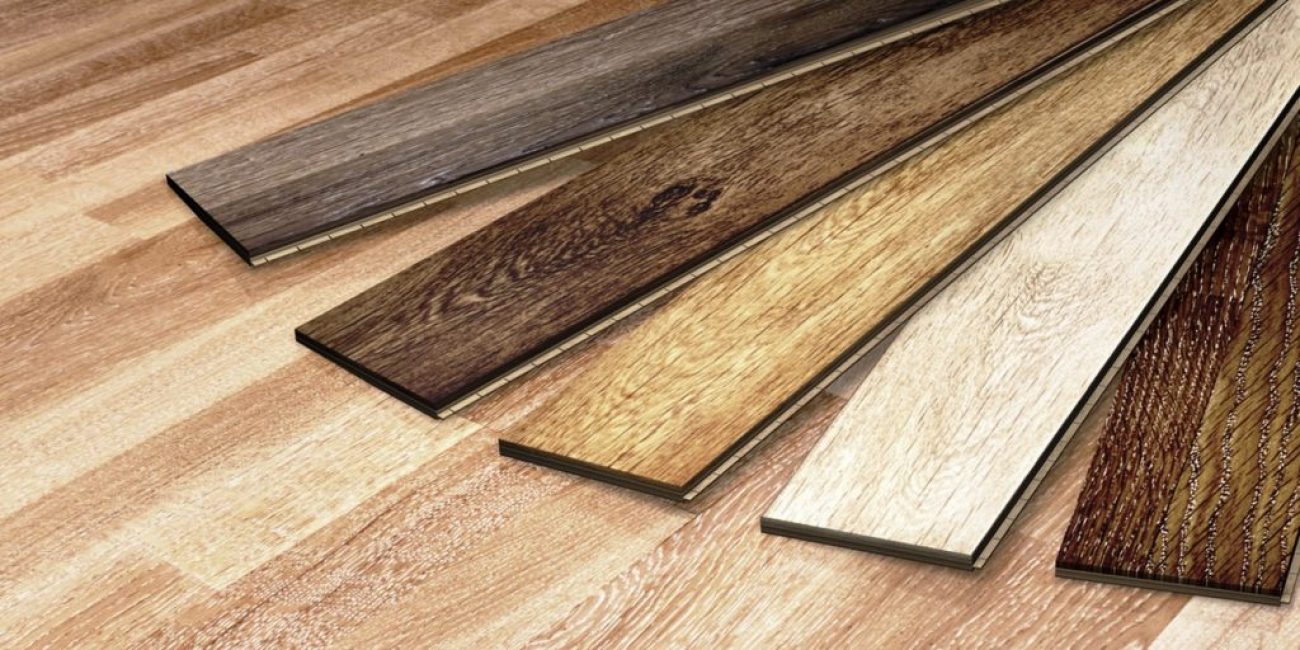
An important step is the choice of laminate
Quality and cost-effectiveness have made laminate such a popular flooring. Its characteristics include strength, moisture resistance, ease of installation and maintenance.
A solid laminate is similar in properties to natural wood: the same texture, pattern, shade.Before choosing a laminated board for certain rooms, the quality of the top layer and the required thickness are evaluated.
The wear resistance of a laminate is determined by the quality of the outer coating, which is indicated in the classes. Usually on the market there are classes 31, 32, 33, 34. The first two options are universal for any residential premises. A higher class is set if there is a large load on the floor, for example, in shopping centers, restaurants, hotels, etc. The service life of the coating also depends on the class. With proper care, class 31 laminate can last up to 12 years, and the most durable class 34 can last up to 25 years.
The thickness of the laminate is 5, 8, 10 and 12 mm and the higher it is, the stronger the coating. Sometimes a large coating thickness is used to eliminate irregularities. However, it is more correct and more reliable to pre-level the floor and use boards of medium thickness.
- Laminate for cuisine use moisture resistant so that it does not deteriorate from frequent cleaning. A textured surface will be preferable, because it does not slip and makes stains or stains less noticeable. Due to the high load in this room, class 33 is the most optimal.
- For bathrooms produce a waterproof laminate consisting of PVC boards with a rubber seal. Such boards do not let water through, do not deform and are similar in properties to the usual ceramic tiles. Laminate is warmer than ceramic and can be embossed to prevent slipping on wet floors.
- When replacing flooring in a residential area the main decisive factor is color, design and soundproofing properties. Although the board is sold with a special rubber layer glued to the decorative surface, you still need to additionally install a separate substrate for more reliable sound insulation. For living rooms, a class 31 or 32 laminate will suffice.
- Hallway - this is a room with high traffic and a significant load, so 33 or 34 coverage class will be chosen for it. The board must be moisture resistant so that frequent cleaning from dust and dirt does not disturb the decorative layer.
 Read also: Veranda attached to the house - expanding the living space: projects, tips on how to create your own hands (200 original photo ideas)
 Types of substrates
Coniferous substrate
The underlayment is a layer of insulating material that spreads between the subfloor and the decorative floor. It protects the flooring from friction, deformation, as well as from moisture and heat loss. The underlay smooths out floor irregularities up to 0.5 cm.
Choosing a substrate is not an easy task due to the wide variety of options on the construction market. In principle, they are all suitable for laying on a wooden floor and differ in price, service life, physical characteristics.
- Cork backing made from pressed crumbs of oak bark - an environmentally friendly material. Sometimes bitumen or rubber is added to the composition. Such a substrate is durable, long-lasting, has good thermal and sound insulation properties. Suitable for children's bedrooms. Among the disadvantages: high cost, poor resistance to moisture.
- Coniferous substrate another eco-friendly material with a density that allows you to hide the unevenness of the subfloor. It has increased thermal insulation, which is a big plus for the northern regions. Easy to install, but not suitable for damp areas due to the risk of mold.
- Extruded polystyrene - synthetic moisture-resistant material that is not subject to deformation and decay. Due to its high thermal insulation properties, it can be installed in an unheated room. The exact geometric shape simplifies installation, and the low price makes it affordable. However, the material does not have high leveling properties.
- Polyethylene backing light, moisture resistant and cheap, but wears out quickly from mechanical damage. It needs to be changed 4-5 years after installation.
- Foil isolon consists of two layers: foil and polystyrene. Suitable for wet areas like bathrooms and kitchens. The material is durable, but it should be borne in mind that it sags over time, so the optimal thickness should be about 5 mm.
- Integrated underlays. Some types of laminate are sold already with a substrate.
 Read also: Making a greenhouse with your own hands from a profile pipe and polycarbonate: a complete description of the process, drawings with dimensions, watering and heating (Photo & Video)
Calculation of the amount of materials
Before buying a laminate, you need to accurately measure the floors of the room.
The calculation of the amount of materials must begin with the installation of the area of \u200b\u200bthe room. The main problem is that the total area often does not correspond to the actual area. If there is a room 3 meters wide and 5 meters long, the total area is easy to calculate by multiplying one value by another. However, for the actual area, all ledges, doorways, thresholds, niches must be taken into account. Therefore, the best way to calculate the area is to take measurements meter by meter.
At the second stage, it is worth making a detailed drawing of the room, taking into account all the protrusions. A plan diagram will help you identify difficult spots and possible additional material costs. At this stage, it is good to determine the method of laying the laminate. The simplest and most economical laying methods are parallel and perpendicular, but it is worth remembering a material reserve of 10-15%. With a diagonal laying pattern, the margin reaches 15-20%.
The calculation of the amount of laminate is done on the basis of information on the label, which indicates the area covered by the boards of one pack. But this figure is valid only for the simplest installation scheme, without taking into account the characteristics of the room. For more accurate calculations, it is necessary to add the percentage of waste to the actual area of \u200b\u200bthe room, and thendivided by the area indicated on the package. The resulting number is rounded up.
The number of screws and self-tapping screws is calculated by the number of logs and plywood. Suppose there are 10 lags on the floor, on which 20 boards are laid. Multiplying these numbers, we get the number of fasteners. Additional margin should be 10-20%. Plywood needs to be fixed every 15 cm, so the number of screws is easy to calculate by dividing the length and width of the room by 15, and then multiplying by the total number of sheets.
 Read also: Lobelia: description, planting and care, when it should be sown, description of varieties (50 Photos & Videos) + Reviews
 Installation tools
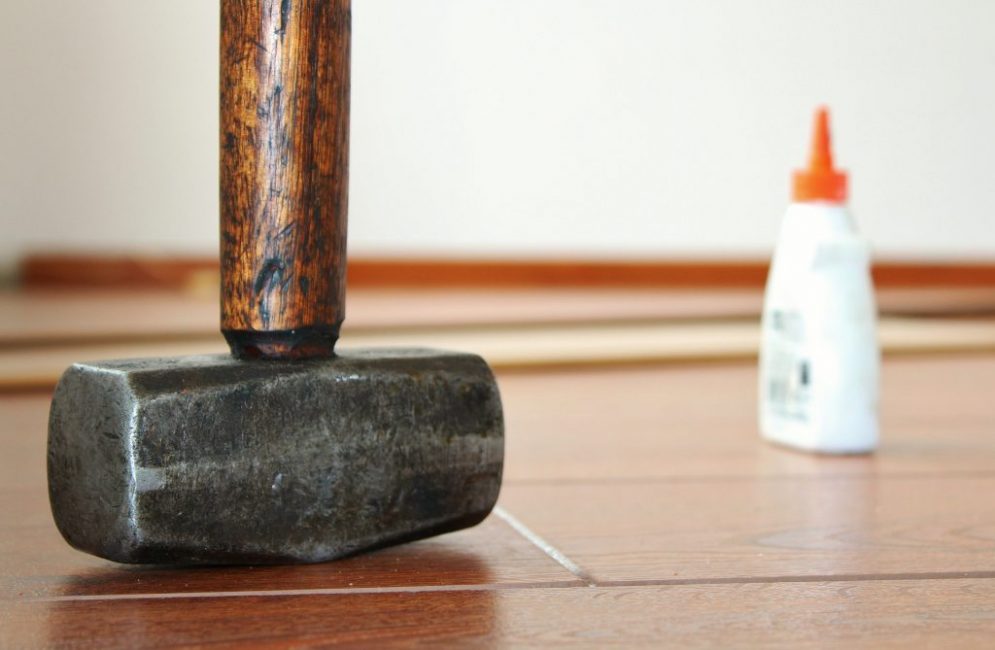
Do not use a hammer when installing
Laminate installation is not difficult to do on your own. You don't need to buy complex and expensive tools for it. The only thing worth spending money on is a good jigsaw. With any layout scheme, the last laminate boards in a row will have to be filed.
Minimum set of tools:
- tape measure 3 to 5 meters long
- soft construction pencil for precise marking
- square up to 30 cm
- jigsaw or handy saw
- hammer or kiyak
Special tools for laminate flooring are necessary so that the locks and decorative coating are not damaged during work:
- metal brace or fitter
- wedges
- doboynik (or bar)
- set of flat milling drills
Laminate brace - This is a thin plate with bends at the ends at an angle of ninety degrees.It helps when laying laminate boards near the wall, evenly distributes the load when pressed and does not deform the edges. The wide thin part of the bracket is placed under the board, and then tapped with a hammer on the opposite end.
Due to the fact that the laminate is a hygroscopic material that can expand, special gaps of 10 mm must be left along the walls. These temperature gaps are formed by wedges.
The plastic material of the hammer or bar softens the impact force of the hammer and helps to avoid the formation of chips on the decorative part. A set of drills is needed for large diameter holes for the pipeline and radiator.
Additional Tools
Additional tools may also be required to quickly install laminate flooring. The cutting machine and square help to quickly and reliably fit the board to corners and niches. For complex patterns, stencils are used.
 Read also: Growing potatoes from seeds: is it necessary? Full description of the technological process suitable for this variety (Photo & Video) + Reviews
 Substrate laying steps
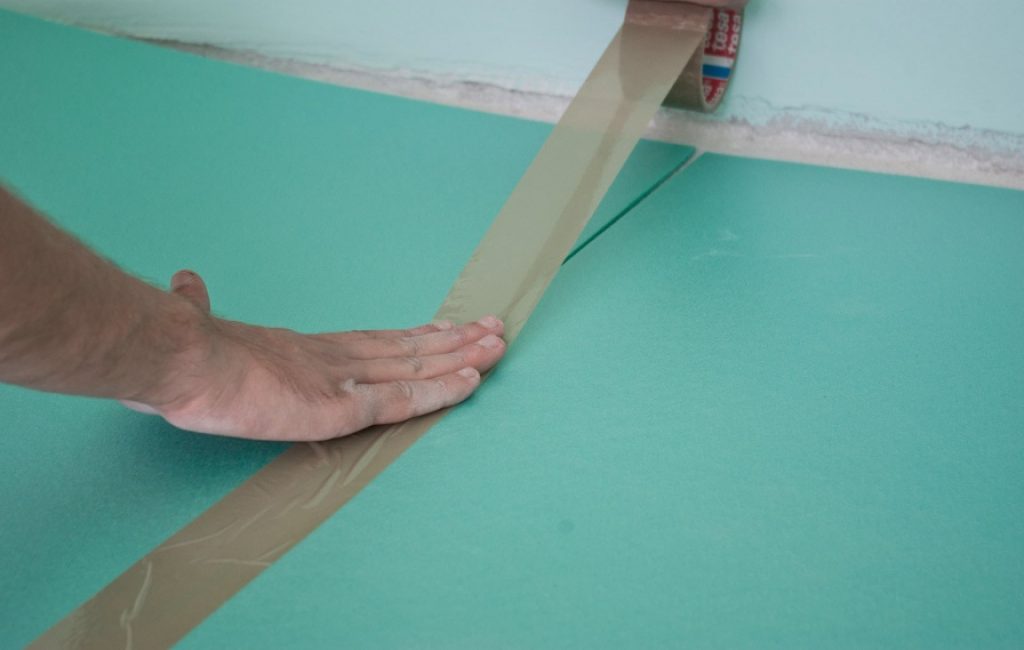
The sheets of the substrate are interconnected with adhesive tape
The underlayment process is simple. You don't need to buy any special equipment for it.
Minimum set of tools:
- roulette
- Scotch
- stationery knife
- pencil
As with steel materials, the sheets of the substrate must be left indoors for a day to accept the temperature.
Further stages of work:
- clean the floor from dust
- lay the sheets of the substrate on the floor with the smooth side up, overlapping in a checkerboard pattern to prevent coincidence of the joints of the insulation and the floor covering
- joints are sealed with adhesive tape
- the protruding edges of the substrate are cut off
- start laying laminate flooring
If not a sheet substrate was chosen, but a roll one, a transverse or longitudinal laying method is selected. When the underlay is placed across the laying of the laminate, it is installed immediately over the entire floor. With longitudinal laying, the material is laid in strips and a layer of laminate is immediately installed on top.
 Read also: How to make flower pots with your own hands: outdoor, indoor, hanging | Step by Step Charts (120+ Original Photo Ideas & Videos)
 Laying methods
Rules for installing different locking systems
Before choosing a method for laying a laminate, you need to familiarize yourself with the existing fastening systems.
- Adhesive fastening system resembles the fixing of a parquet board using the tongue-and-groove method. After applying glue to the edges of the lamella, the boards are firmly pressed against each other. This method is used to increase the strength of joints and seams in very wet rooms. Gluing protects the coating from environmental influences. However, fixing with the adhesive method is very time-consuming work and over time the adhesive loses its properties, which reduces the life of the coating and the impossibility of re-installation.
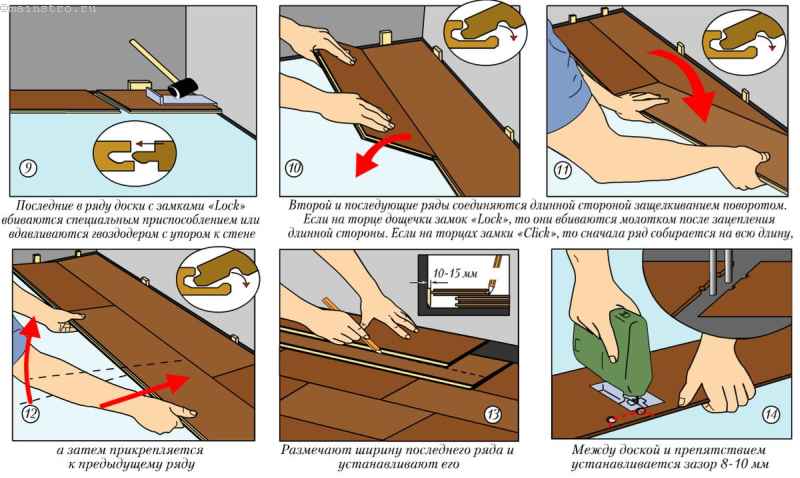
- Locking system "Lok" installed on the ends of the laminate board. The figured spike is fastened by driving an already laid board into the groove. Sometimes the spikes are pre-glued. This method is most convenient for horizontal laminate laying. Installation begins in adjacent rows, and then proceed to the end.
- "Click" locking system the most common because of the ease and ease of installation. Fastening occurs as follows: the spike of one row is inserted at an angle of 30 degrees into the groove of the previous row, and then pressed against the floor until a characteristic click. Then the laminated board is slightly knocked out for a stronger fixation.
 Read also: How to make a greenhouse with your own hands: for seedlings, cucumbers, tomatoes, peppers and other plants. From polycarbonate, window frames, plastic pipes (75 Photos & Videos) + Reviews
 Laying schemes
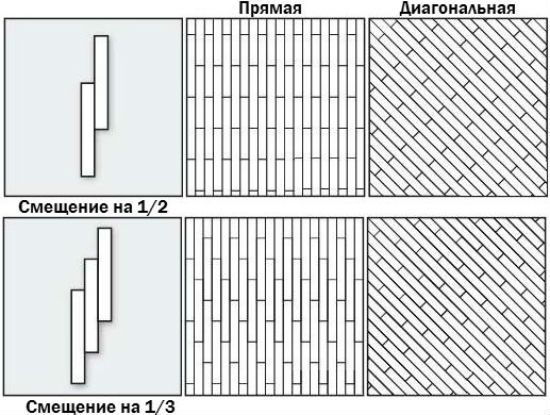
Straight and diagonal laying patterns
The most common way of laying laminate flooring is similar to laying parquet: the boards are laid in the direction of the window light.However, the design or construction of the room allows for a different arrangement of boards.
Laminate can be installed in one of the following ways:
- parallel to the direction of the sun
- perpendicular to the direction of the sun
- at different angle
If you want to visually change the width, height or length of the room by adjusting the flow of natural light, various laying patterns are selected: classic, diagonal or checkerboard. Regardless of the scheme, laminate boards are mounted with a shift of each subsequent row by 20-25 cm relative to the previous one. This gives the coating a reliable strength.
 Read also: Do-it-yourself furniture and other wood products: drawings of benches, tables, swings, birdhouses and other household items (85+ Photos & Videos)
 Laying sequence
Longitudinal mounting diagram
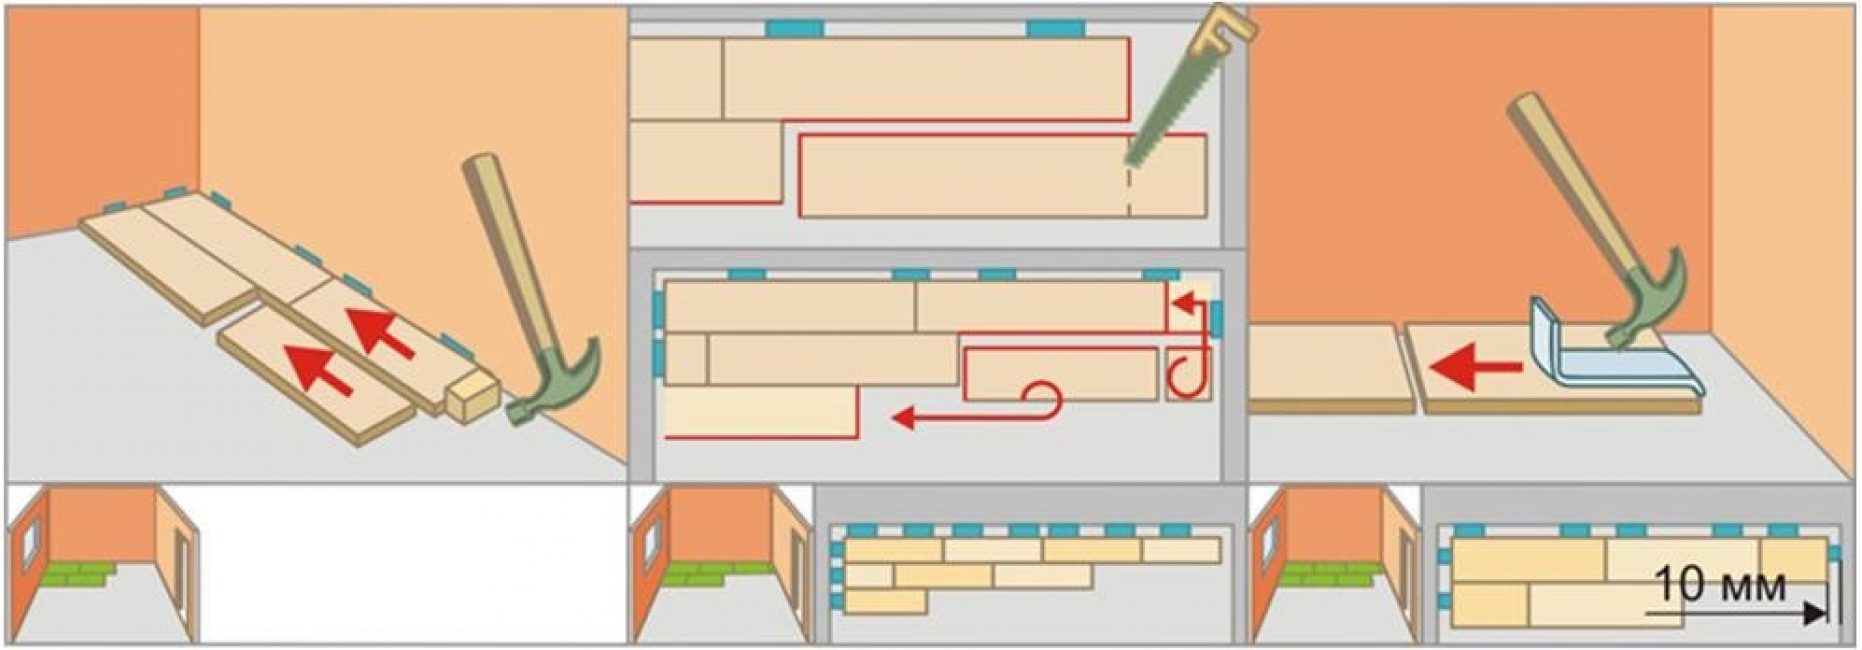
After leveling the floor, carrying out all the preparatory work and laying the substrate, the further actions of the master should be as follows:
For longitudinal and transverse mounting
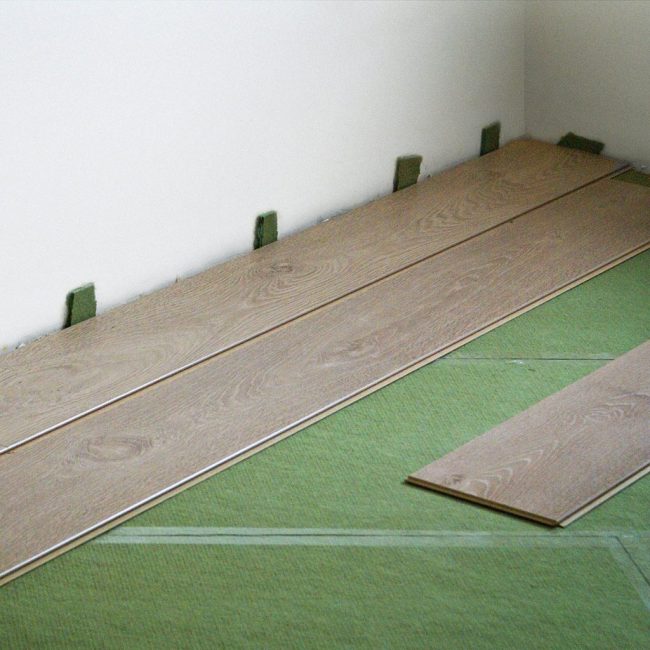
- installation of the first row of boards begins at the wall opposite the exit
- wedges are installed around the perimeter to separate the flooring from the walls
- the first panel is placed close to the gap made by the wedge
- the second board is attached in the manner recommended by the manufacturer and tapped with a hammer through the bar so as not to injure the locks. Installation will be easier if the locks on the boards are fastened with the Click system
- in this way the first row of laminate flooring is assembled
- for the first board of the second row, sawing across the laminate board
- starting the rows alternately: either from halves or from solid boards, creating a stronger grip. So the load on the floor is distributed evenly
- when the first two rows are assembled, it is necessary to dock them with each other. To do this, we raise the second line at a certain angle and connect the groove with the spike until a characteristic click
- lay rows to the extreme
- to assemble the last row, you need to measure the width of each board separately and make appropriate notes on the back side. Careful measurement of each board will help to avoid problems due to the possible unevenness of the walls. Be sure to take into account the gap between the wall. The laminate is cut along the drawn line.
- to fit the extreme row of panels, it is worth using a clamp-clamp. For the sake of economy, some craftsmen refuse to buy this tool and use a nail puller.
- after completing the assembly of all rows, the selections along the walls are removed, and the slots are closed with a plinth or a decorative threshold
For diagonal mounting
- diagonal mounting is mounting at any angle relative to the walls.You can start the installation in two ways: either from the center point of the room to the corners, or from the corner near window to the opposite corner of the wall with the front door
- to accurately align the direction of the laminated board, you can pull a dense nylon thread onto the screws from opposite corners of the room
- the main difficulty with diagonal installation is the correct cut of the last boards in a row. It must be made under a certain bevel in order to precisely dock with the walls and the baseboard. After installing the penultimate panel, the remaining distance to the wall is measured from the two end corners of the board. The segments of the resulting length are applied with a construction pencil to the back of the laminate, and then the points are connected. On the inside, trimming is done with an electric jigsaw or saw
- protrusions and niches are also a difficult moment with this type of installation. They are found in the form of decorative elements of the room or with a continuous flooring of boards in several rooms of the apartment at the same time. Laying panels in such places requires careful calculations and accuracy.
- Laminate boards are cut exactly to the shape of the protrusions and laying should begin right next to them
- the gaps between the flooring and the doorway are usually closed with a panel, which is two times thinner than the laminate, respectively, and the gap should be less
Laying laminate around pipes and other communications
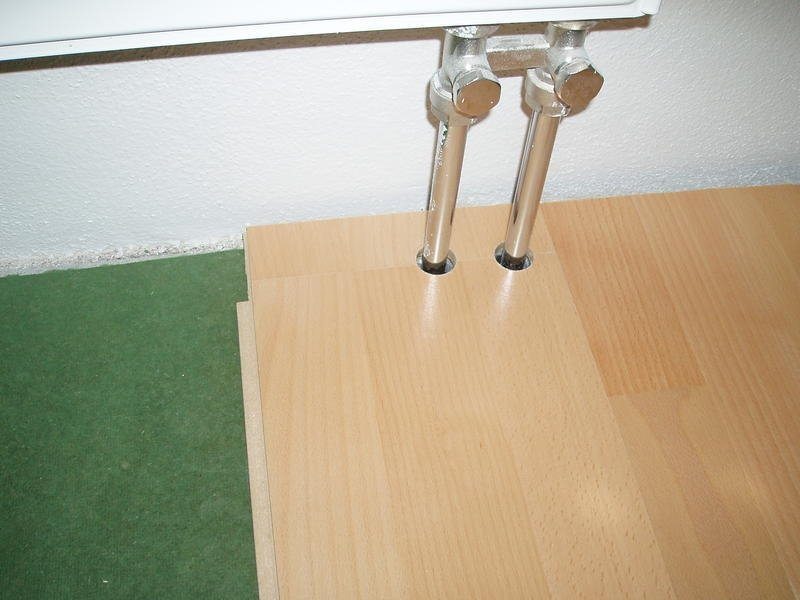
For installation around pipes and batteries, flat milling drills are needed
During the installation of laminate flooring in many rooms there are problematic places, such as pipes or radiators set too low. In this case, the board must be sawn to the desired length, and drilled so that the hole is larger in diameter than the diameter of the pipe. Then the board is sawn across in the place of the sawn circle. Most of it is fixed with a lock to the previous panel, and the smaller one is led behind the pipe and fixed with glue. They also come with radiators, the sawn off pieces are placed under them and glued.
The door frame can be designed in different ways. You can simply saw the last boards in the row to match the distance to the door, and then close the joint with a small plank. But more often a different method is used. The base of the door frame is sawn to the thickness of the laminate and the plate is pulled close under the jamb beam.
Optimum gap width between wall and laminate
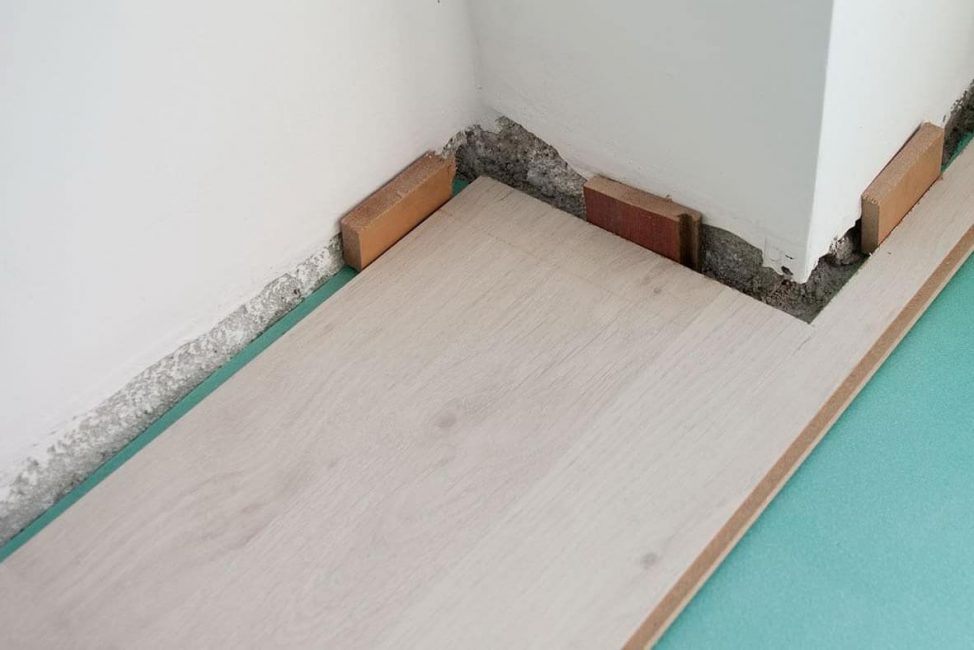
Joint wedges are made from remnants of plywood or other construction waste.
First of all, it is worth describing in detail what this gap is for. The temperature gap is more correctly called a compensation gap, it is necessary for the free movement of laminated boards when they decrease or increase due to changes in temperature or humidity in the room. If it is not observed, then the extreme panels installed close to the walls will begin to deform from expansion.
To prevent the board from deforming during use, it is necessary to carry out climatic adaptation of the floor covering. To do this, the purchased boards are taken out of the package and laid out in the center of the room. The material gets used to the temperature conditions of the room. It is important to lay out the laminate in the center, and not against the walls, so that it does not absorb their moisture. Acclimatization should last several days.
For standard rooms with normal temperature and humidity, a gap of 7-9 mm is enough, but for long and narrow rooms it should be increased. In particularly humid rooms, the gap width can reach up to 15 mm. To form them, you can buy special wedges or make them from the remnants of plywood or timber.
The plinth is attached not to the floor, but to the wall with glue. Its width must be at least 5 mm larger than the width of the gap. The fact is that if the laminate was installed without acclimatization, the boards can move and the gap between the coating and the plinth will become visible.There have been cases when, due to insufficient leveling of the subfloor, the laminate rolled into one corner and a gap formed at the opposite wall. Between boards and convex corners or niches, the gap can be masked with sealant.
Selection and installation of skirting boards
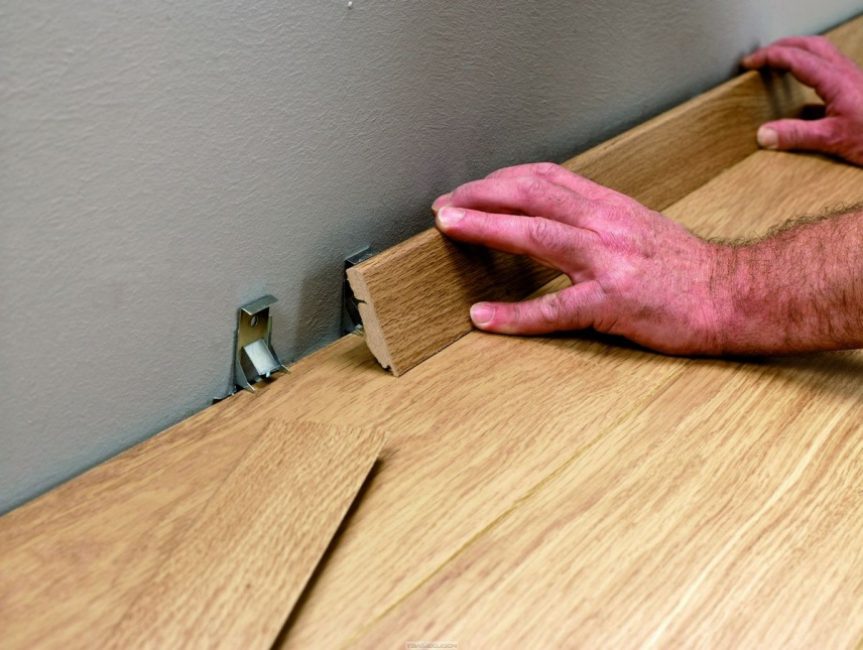
Fastening the decorative part with clips
In addition to the practical benefits of the floor border in the form of protecting walls from dirt and masking the expansion gap, the plinth plays an important aesthetic role. It can change the geometry of the room and give a neat finished look. Skirting boards of various structures and colors are sold on the construction market, and in order not to get lost in them, you should pay attention to several basic characteristics: color, thickness and material compatibility.
The closest to the laminate in terms of material composition and texture is the plinth made of laminated MDF. The same dense films are applied to the laminated board and the plinth, and it is very easy to choose a border in the color of the flooring.
The correct selection of the color of the skirting board can either visually expand the space, or reduce it and emphasize all the shortcomings of the repair. Plinth in the same tone with the floor makes the room wider. If you choose a color to match the color of the walls, the ceiling will seem noticeably higher. Sometimes designers advise using floor borders in contrasting shades to emphasize expressiveness. In order not to waste time on careful selection of the color of the plinth, you can buy wooden or veneered and repaint.
Under the unusual colors of the laminate, it is difficult to choose the right skirting board. Therefore, a plastic profile with a suitable texture would be a universal option.
The skirting board is installed in two ways. At the first, the plates are fastened together with a bayonet-groove system, and then on the wall with brackets and nails, or on glue. Due to the constant sliding of laminate boards under the influence of different temperatures, fixing the skirting board directly to the floor covering is impossible. Another problem arises, often the walls are not quite even, and in order for the profile to fit snugly against them, you should choose a plinth with a rubber backing along the entire length of the whip. Rubber additionally protect the coating from moisture and protect it from mold and decay.
The stages, as well as installation methods, depend on the specific type of skirting board model. The plastic profile consists of a fixing strip and a decorative panel. First, the base is adjusted to the dimensions and fastened with dowels or glue. The decorative part is installed with additional docking elements.
The plinth made of laminated MDF is attached to the wall with special clips. The clips are held on the wall with dowels, and a decorative profile is mounted on top.
Forming a joint between a laminate and another coating
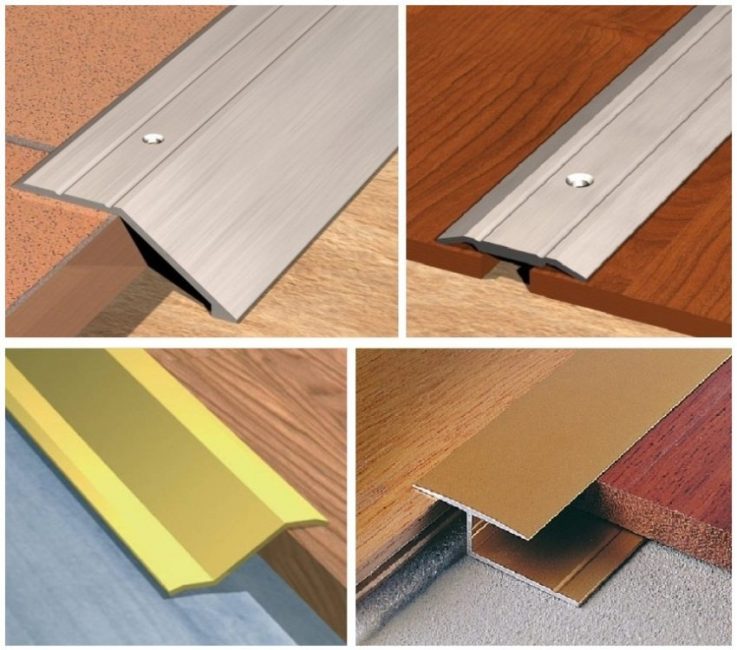
Aluminum multi-level thresholds
Between two types of laminate. Joints between several types of laminate appear when boards of different fastening systems are used, the floor area is too large, and the surface needs an additional expansion joint or protrusions or steps are formed by the material. To hide the joints, decorative moldings are used. They keep the gap, while covering it from dust and dirt. Moldings come in different types and solve several problems. Straight lines mask joints at the same level, leveling boards are designed for height differences up to 2-3 mm, multi-level planks eliminate differences up to 2 cm, and corner planks connect laminate boards arranged crosswise.
Between laminate and parquet/linoleum the gap is closed with a sill. Depending on the level of floor coverings, the sills are single-level or multi-level. Sometimes the joint with linoleum is filled with glue.
Joint with carpet It is designed as follows: a dense substrate is placed under the carpet to align it with the laminate. If the level is the same, the carpet overlaps.
Recommendations for combining laminate and tiles
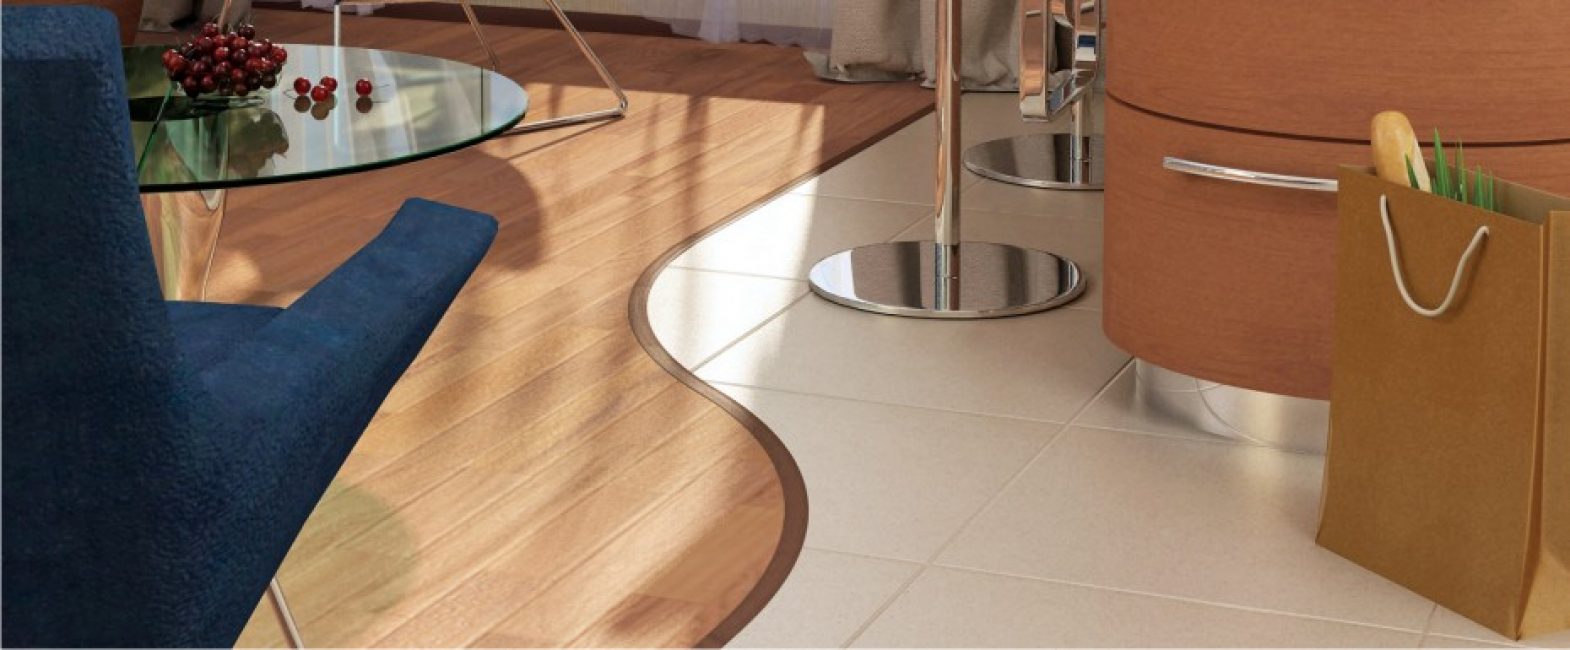
Flexible PVC profile in the interior
Different floor coverings are used in design, for example, for effective zoning of large rooms. In this case, it is necessary not only to choose the method of joint design, but also the features of the installation. In many apartments, you can find a combination of ceramic tiles and laminate, when the board is installed in the hallway, and the tiles are in the kitchen.
At the first stage, you need to find out the thickness of the coating, draw up a template for further installation and outline the junction. The next question is which of the materials should be put first. When it comes to tile and laminate, the tile should be installed first. It has standard parameters and thickness, while the final thickness of the laminate depends on the substrate and can vary by several millimeters under load.
It is not difficult to install the tile directly along the intended connection line with the laminate. The gap between the surfaces must be at least 5 mm. The laminate is easily adjusted to the joint due to the simple processing. Then one of the nut options is installed at the joint:
- flexible PVC profile is suitable for multi-level joints and even joints. Has a decorative part and is customized in color
- an aluminum sill is a good option if two floor coverings meet under a doorway. Such a threshold can hide a height difference of several millimeters. According to the method of fastening, they are self-adhesive, for self-tapping screws and with hidden fasteners
- a box threshold is a large threshold, up to 3 cm high. According to popular belief, it can protect against drafts and stop the flow of water in case of a leak in the bathroom
- however, in practice, the box threshold does not protect against anything, it causes inconvenience when washing floors. Many builders recommend leaving a gap of at least 2 cm between the door and the threshold.
- the profile from the array is very beautiful, but is considered the most expensive. Attached with glue
- cork compensator closes the temperature joint without forming significant protrusions. However, such material does not protect the gap from dirt and dust.
- PVC transition profile hides large level differences and is available in a wide range of colors
The joints between tiles and laminate can be designed without thresholds. If the length of the joint is not more than 2 meters, and the width is not more than 3 mm, it is sealed with a tiled fugue or sealant.
Causes of laminate creaking
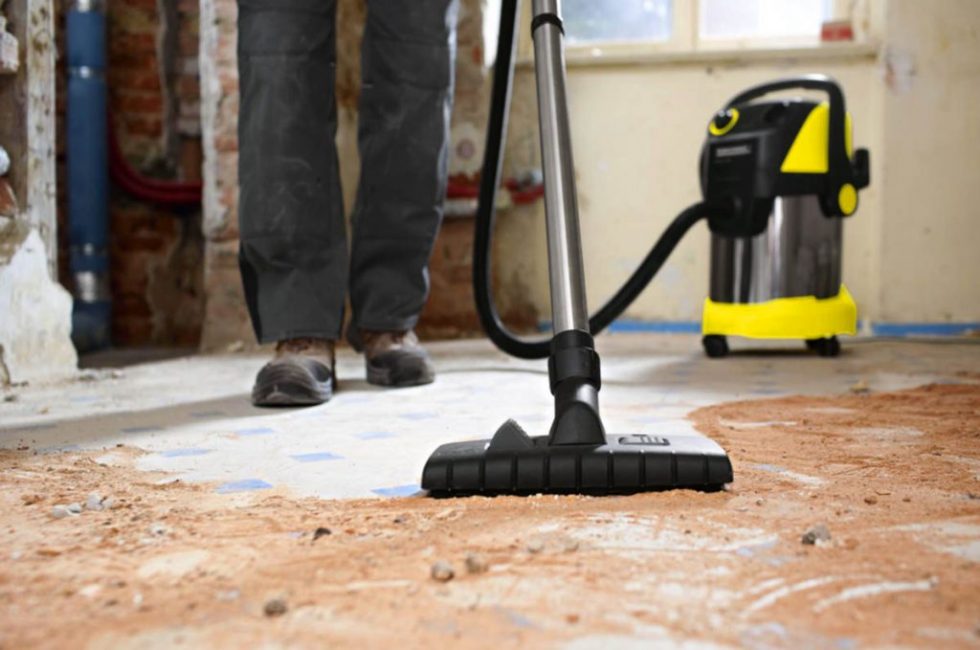
During repair, the surface must be thoroughly vacuumed.
On the one hand, the laminate is an affordable coating that is easy to install thanks to a convenient locking system. However, problems sometimes arise with it, because the board is susceptible to uneven subfloors. For proper installation, you must follow all the instructions exactly, but even in this case, sometimes even a new floor can begin to creak. Sometimes it is difficult to determine the exact cause of gender problems.
When the problem is global, the entire surface creaks, it is necessary to completely sort out the floor. For ease of reassembly, the panels should be numbered. The base needs to be leveled and the substrate replaced.
Need to sort out the floor and replace it. If this is not possible, it remains only to get used to unpleasant sounds and not to allow this mistake during the subsequent replacement of the coating.
The problem is much more serious if the dust did not arise as a result of replacing the flooring, but due to shedding of the screed. To avoid destruction, the surface of the screed must be carefully primed. To clean the floor of dust, it will have to be completely sorted out and then vacuumed. The outdated screed should be re-primed and a new substrate applied.
![[Instruction] Do-it-yourself laminate on a wooden floor: a complete description of the process. Laying schemes, what materials should be used (Photo & Video) + Reviews](data:image/gif;base64,R0lGODlhAQABAIAAAAAAAP///yH5BAEAAAAALAAAAAABAAEAAAIBRAA7)
Do-it-yourself styling - no big deal
[Instruction] Do-it-yourself laminate on a wooden floor: a complete description of the process. Laying schemes, what materials should be used (Photo & Video) + Reviews
![[Instruction] Do-it-yourself laminate on a wooden floor: a complete description of the process. Laying schemes, what materials should be used (Photo & Video) + Reviews](https://iherb.bedbugus.biz/wp-content/uploads/thumbs_dir/tree-2602732_1280-npojno9tnfa0j80dot14lxmwjjz90r13a8nwyj2b7g.jpg)
![[Instruction] Do-it-yourself laminate on a wooden floor: a complete description of the process. Laying schemes, what materials should be used (Photo & Video) + Reviews](https://iherb.bedbugus.biz/wp-content/uploads/thumbs_dir/rasteniya-dlya-detskoj-komnaty-o5kswvs5hhnog8yrkj0fbuknk359e23l17dfjcbjng.png)


