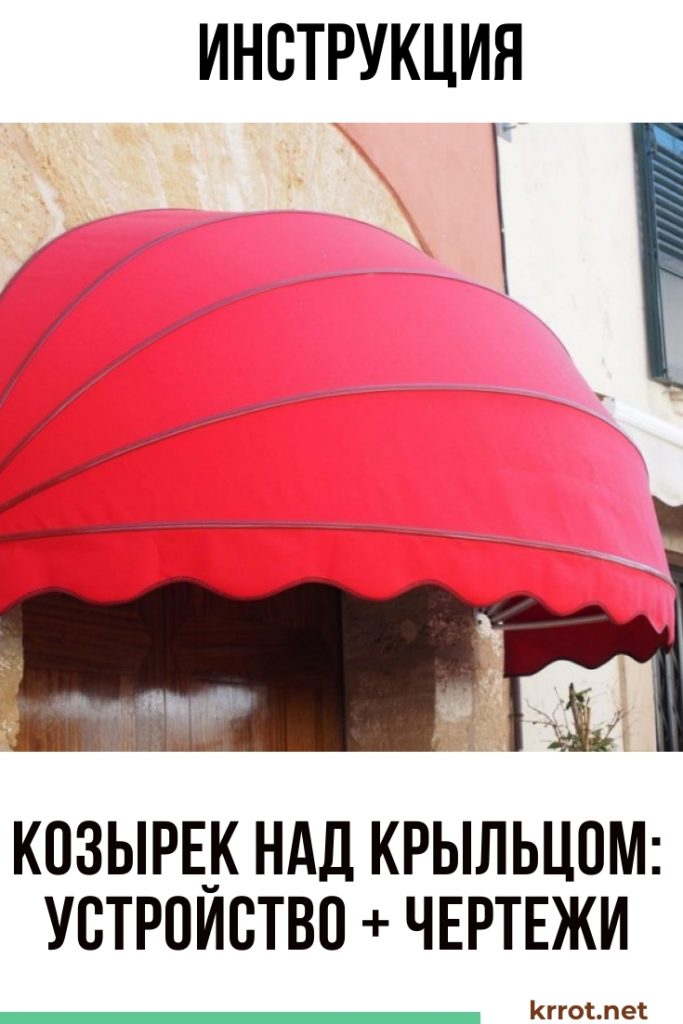
The canopy over the entrance is the most important architectural element of any building. After all, it performs not only an aesthetic, but also a protective function. To make a visor above the porch with your own hands, it is allowed to use materials that can withstand significant wind and snow loads.
Content:
 Read also: Projects of country houses for 6-10 acres: 120 photos, description and requirements | The most interesting ideas
Is it necessary to make a canopy over the porch?
Sheds made of polycarbonate and metal profiles
A canopy (canopy) above the porch is a structure consisting of a solid frame attached to a wall or supports, and a roofing. The building without a canopy looks unfinished. But still, the main purpose of such a structure is to protect the front door from rain, snow and melt water.
A canopy is needed not only so that the moisture flowing from the roof does not get into your collar while opening and closing the door with a key. The accumulation of water in this place is extremely dangerous even during small frosts. After all, the risk of slipping at the entrance in the absence of a visor is very high. It is also a protection against icicles that appear during the thaw.
During rain without it, it will not be very convenient for you to open and close the front door with an umbrella in your hands. Plus, in extreme heat, the metal door handle will not heat up in the sun. The visor will also help protect the entrance structure from premature fading and color loss.
 Read also: Veranda attached to the house - expanding the living space: projects, tips on how to create your own hands (200 original photo ideas)
 Basic requirements for awnings
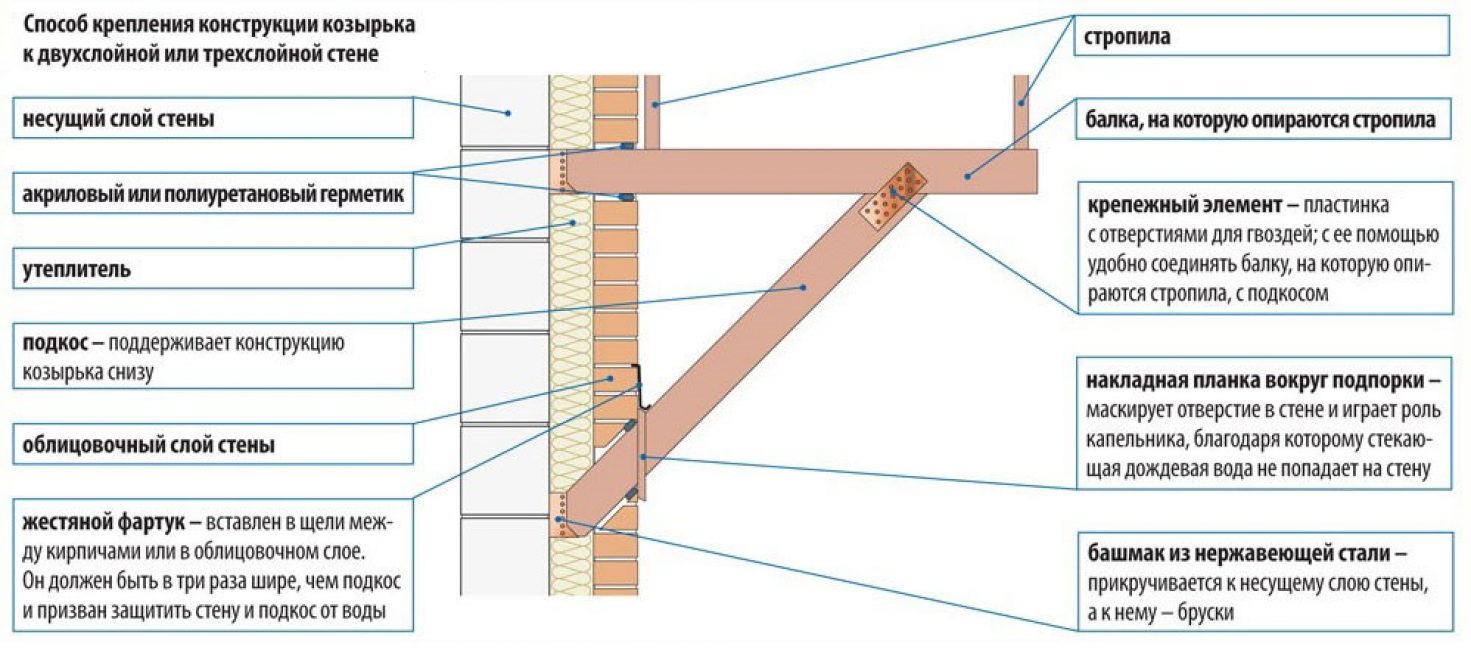
Way of fastening to the wall of the building
In order for the visor to perform the required functions and be absolutely safe, the following rules should be followed when creating it:
- for its manufacture, it is necessary to choose only durable materials that are as resistant as possible to wind and snow loads
- pay special attention to the strength of the frame fastening; it is attached to the wall by means of 6-8 strong metal anchors; when using heavy roofing materials or assembling products with a length of 2 m or more, the use of supports in the form of racks is required; support pillars are concreted to a depth of 0.8-1.5 m; it is allowed to start further work only one week after the hardening of concrete
- roof slopes must be at an angle of at least 20 °; the best option is a slope of 30-50 °
- additional waterproofing is required in the places where the canopy is attached to the wall
- in order to avoid the formation of ice, a system for draining rain and melt water should be provided; you can use both storage tanks and stormwater or gutters
- length canopy - 60 cm wider than the front door, that is, it must retreat from it on both sides by 30 cm
- visor width - not less than 70 cm
- so that the visor does not interfere with the door to open and close freely, it is necessary to make an indent of 30 cm from its top
- when installing a thin, flexible roof, the supporting crate is made solid
- since such a structure is part of the structure, it must fully comply with its general style
 Read also: Making a greenhouse with your own hands from a profile pipe and polycarbonate: a complete description of the process, drawings with dimensions, watering and heating (Photo & Video)
Types of visors
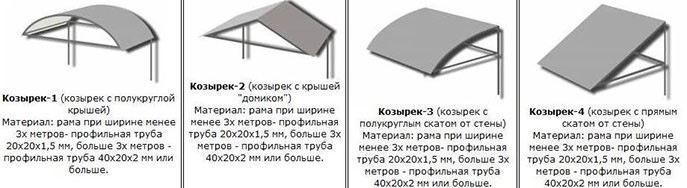
Types of canopies
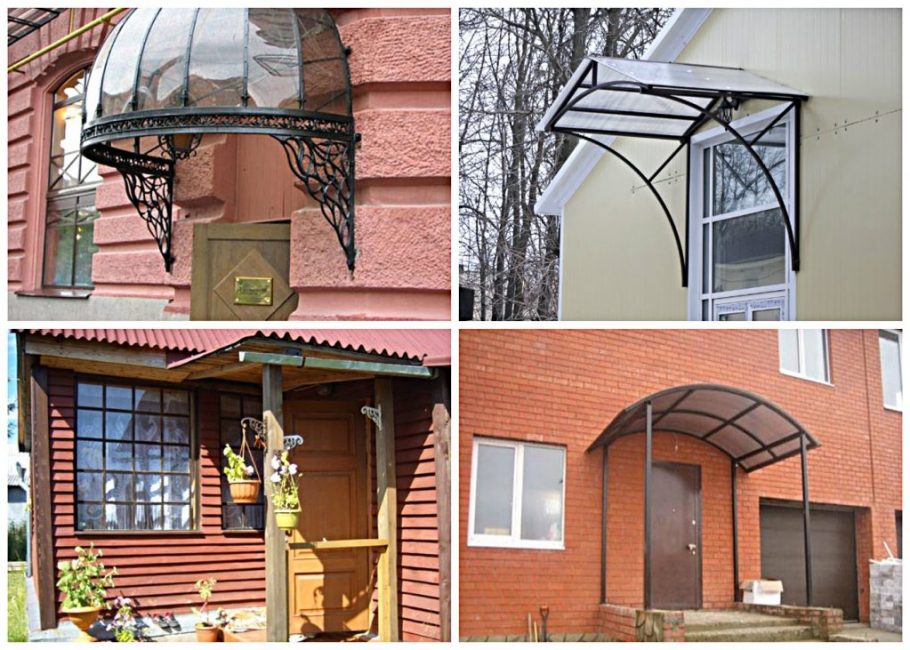
For the manufacture of canopies over the entrance to the building, you can use a variety of types of materials: from eco-friendly wood to translucent polycarbonate, corrugated board, metal or flexible tiles. Most The main thing is that the design is strong and reliable. As a frame, metal corners, pipes or thick bars of wood are more often used. When hanging light structures made of polycarbonate, it is allowed to use an aluminum profile.
In shape, they can be one-, two-, multi-slope, dome-shaped, arched, semicircular (awnings). Visors can have a complex, including a multi-level shape.
Depending on the materials of manufacture, the chosen style, canopies over the porch can be made in the form of:
- lightweight structures attached only to the wall of the building
- canopies with additional reinforcement in the form of metal supports or wooden beams
Tree
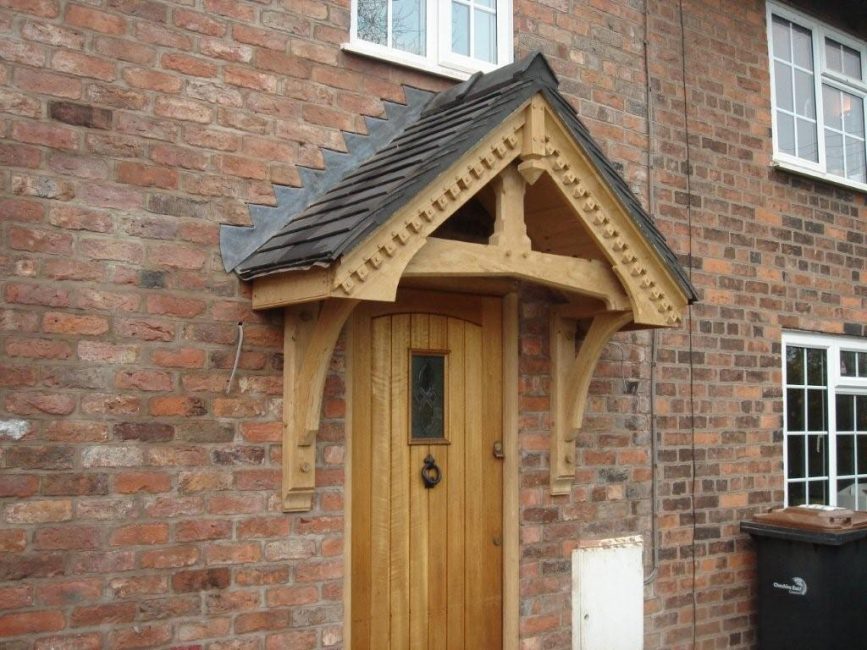
Wooden canopy with fastening only to the wall of the building
- It is not difficult to work with this eco-friendly material - it has a low weight plus it is easy to process, and when impregnated with special compounds, it can last at least 40-50 years.
- And wood can be used not only for the manufacture of the frame, but also for the roof. For this, a board is used, as well as various types of wooden tiles: shindel, shingle, plowshare.
- However, it makes sense to make a canopy over the porch (photo) from such material if the building is decorated in the same style. In other cases, it is better to replace the tree with a more practical and durable material.
Slate
Colored slate roof
- Inexpensive asbestos-cement slate, which is not afraid of moisture, decay and corrosion, is an excellent roofing material that can serve faithfully for many decades. But still, due to its large weight, it is not worth using it to cover the visor. Indeed, for such a roof, additional supports will be needed.
- Attaching the frame only to the wall of the house will not be enough. It will take the arrangement of strong supports. Otherwise, if this material under the influence of its own weight one day falls down, injuries will be inevitable.
- It is better to replace traditional slate with euro slate made of cellulose impregnated with bitumen, which has less weight or plastic slate. Since both of these materials are painted in bright colors, the structure of them will look more attractive.
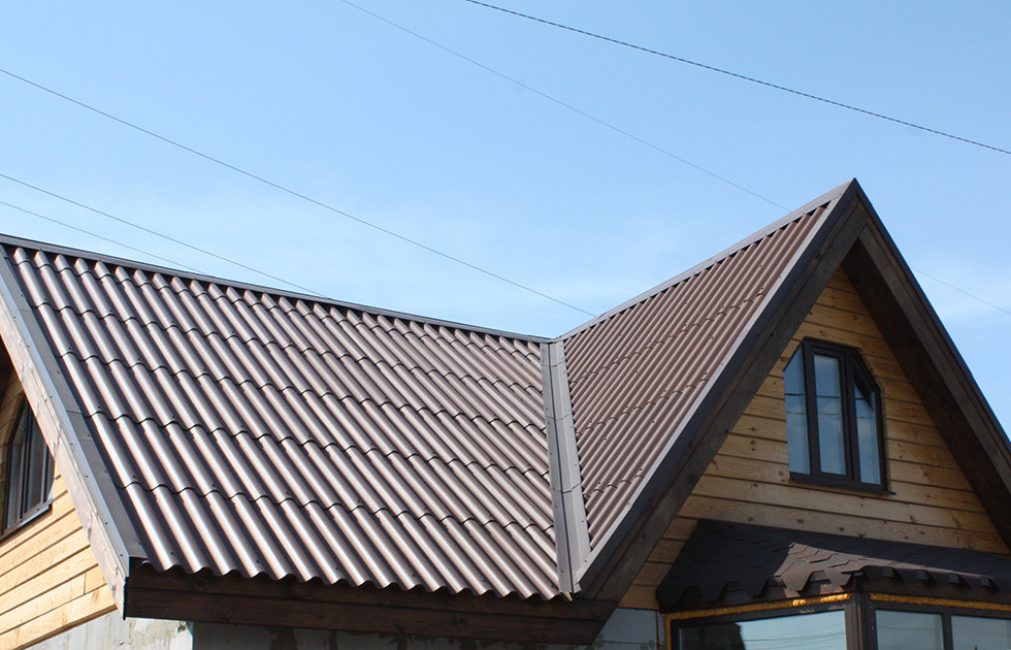
Decking and metal tiles
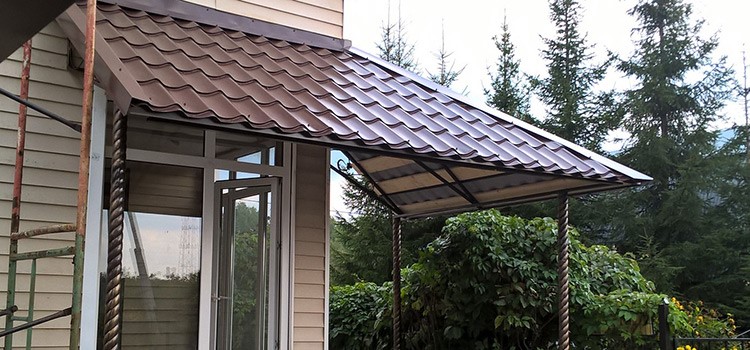
Visor from a metal tile
- To increase rigidity, these types of roofs are made from sheets of a special shape in the form of waves or trapeziums of small height. Construction stores sell corrugated board, metal tiles of different colors.
- Steel sheets are not afraid of fire, heat, frost and have a minimum mass. However, their windage (the ability to resist gusts of wind) leaves much to be desired. So, if you do not want the canopy to be torn off by strong gusts of wind, its shape must be carefully considered.
- Another significant drawback of such roofing materials is low sound insulation. To prevent the sound of rain, amplified by the metal surface, from getting on your nerves, take care of a soundproof substrate.
Polycarbonate
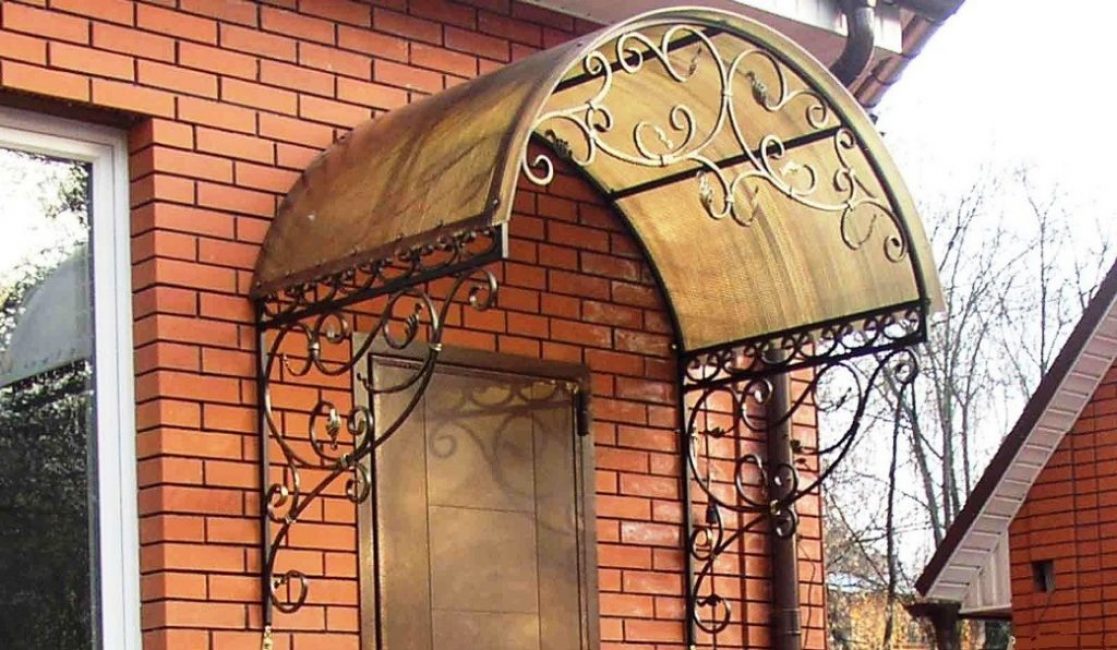
Arched polycarbonate canopy
- With this flexible material, you can create any, including arched structures or structures of arbitrary shapes. Another advantage is its low weight - the mass of 1 sq. m of polycarbonate is only 1.5 kg.The strength of thin light sheets is achieved through layers sewn together by numerous stiffening ribs. Upon closer examination, this design resembles a honeycomb with many cells.
- Polycarbonate is ideally combined with many modern finishing materials: facing bricks, metal, vinyl siding, clinker tiles, plaster. The disadvantages of the material include high windage and low resistance to ultraviolet radiation.
- Learn that its strength depends on the thickness of the sheets. To create canopies, you will need polycarbonate with a thickness of 6-8 mm. The thin sheets usually used to create greenhouses will not work.
Soft tiles
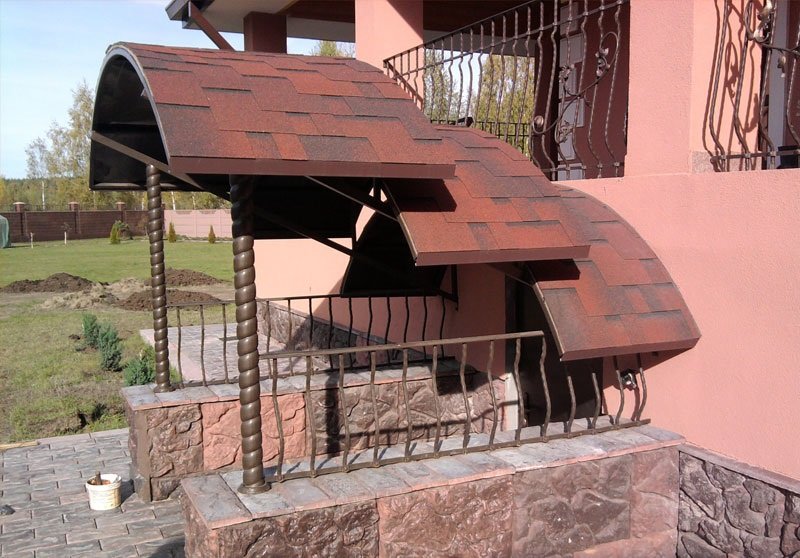
Canopy of soft tiles
- Material based on fiberglass and bitumen, coated with fine stone chips. Very attractive in appearance, easy to process, has a low weight and is made in a variety of colors.
- With the help of small fragments of tiles, you can make a visor of any, even the most complex, unusual shapes. The disadvantage, perhaps, it has one - the high cost.
 Read also: How to make a beautiful and inexpensive fence in the country with your own hands: wood, metal and polycarbonate | (70+ Photos & Videos) + Reviews
 Making a polycarbonate visor in stages
A canopy over the porch of the simplest form can be mounted even in the absence of special experience. If you know how and love to work with wood or metal, then you will be able to handle even products of the most complex configuration.
Product drawing
It is hardly possible to do without this stage of work. Even with some experience, a pre-drawn diagram indicating the dimensions of the product will help to avoid annoying mistakes. Sketches of the visor can be developed independently or you can use ready-made ones, of which there are plenty on the network.

The shape of polycarbonate products
After choosing the shape of the product, you need to arm yourself with a tape measure and measure the width of the front door. Now you need to add 60 cm to this size - you will get the width of the future visor. The height is chosen arbitrary - you should focus mainly on the architectural features of the building itself. Just do not forget that to ensure a normal flow of water and snowmelt, the canopy is made with a slope of at least 20 °.
When designing a canopy over a polycarbonate porch, it is worth considering the standard width of polycarbonate sheets. It is equal to 210 cm. The width of such sheets can be 300, 600 or even 120 cm.
It is necessary to calculate not only the length, width of the product, the dimensions of the struts, but also the number of jumpers. In order for the visor to fit snugly against the frame, a distance of 30 cm must be left between them.
Frame assembly
The metal frame is assembled by welding or fasteners. The metal is pre-cleaned from rust and dirt. After assembly is completed, it is primed and painted.
In the manufacture of a frame for a gable canopy over the porch of a house, parts located at a right angle are fixed in a clamp or vice before welding. It is not worth making a seam in one pass. It is better to make several spot tacks, check the correct location of the parts, align them if necessary, and only then finish welding.
To increase the rigidity of the structure, it is necessary to weld several transverse strips. Their number depends on the size of the visor. The last to attach the crossbars under the crate.
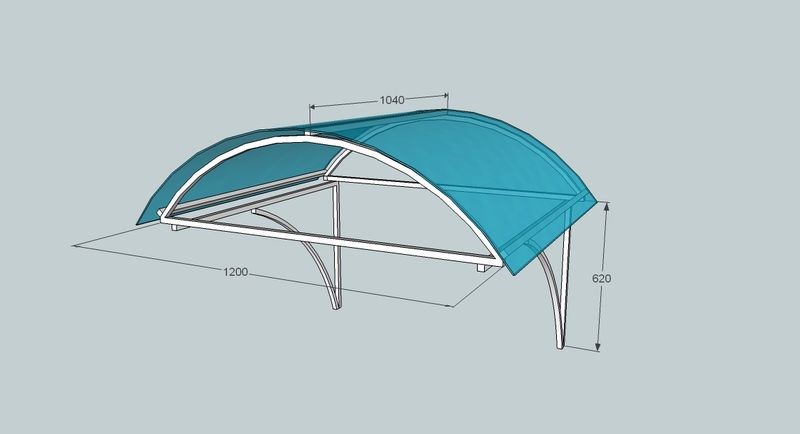
Drawing of the simplest arched canopy
In the manufacture of an arched visor or other complex shape, metal pipes are bent with a pipe bender. You can also bend the metal by making cuts every 30-40 cm along the entire length of the pipe. After it is bent, such slots are re-connected by welding. In the future, they are cleaned of scale with a grinder, primed and painted. For large visors, stops and connecting beams are used.The number of stiffeners directly depends on the size of the visor.
To attach a small canopy to the wall, 4 anchors are enough. To do this, holes are pre-drilled at the corners of the metal frame, the diameter of which is equal to the diameter of the anchors, and appropriate markings are made on the wall.
For large awnings, racks are prepared that are welded to the frame. They are deepened into the ground by 0.5 m and poured with concrete mortar. Part of the pipes that go into the ground are covered with bitumen mastic to protect against rust.
Products of complex shape in combination with forged metal look very attractive. They are quite difficult to manufacture. It is better to buy such a visor over a polycarbonate porch ready-made. You can attach it to the wall yourself.
Wall mounting methods
There are several such ways, the visor can be:
- weld to the fittings built into the wall; it is laid in masonry at the stage of building construction
- fix on U-shaped brackets; a similar method is valid only for the installation of light canopies
- fasten with anchor bolts (most common way)
Polycarbonate mount
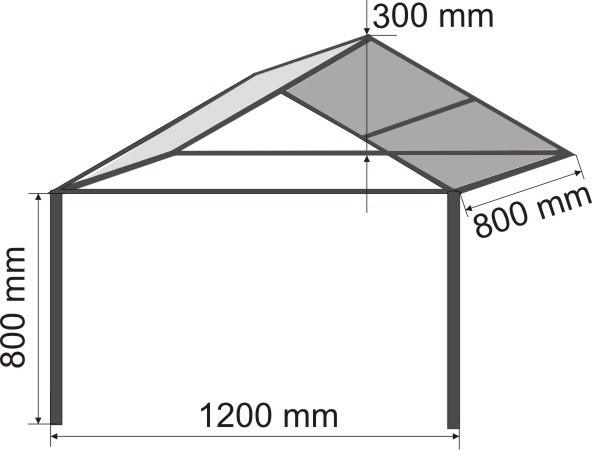
Schematic drawing of a gable polycarbonate canopy
Sheets of this material are interconnected using special profiles. Polycarbonate is attached to the frame with self-tapping screws equipped with thermal washers. To prevent the polycarbonate from cracking during thermal expansion during temperature changes, it is not worth screwing the screws too tightly.
To protect against raindrops and snow, the ends are also covered with a profile. For a snug fit of the material, it is necessary to provide a silicone or rubber layer between the frame and the roof.
To avoid moisture ingress, the places where the canopy is attached to the wall should be seal. To do this, use special mastics, roofing silicone or other materials with similar properties. You can also use rubber or pieces of flexible roofing material.
At the junction of the visor with the porch, it is necessary to attach baffle barotherwise water will run down the wall. This method is used for mounting any type of roof, including polycarbonate.
 Read also: How to make a patio in the country with your own hands: a variety of design options, decoration and arrangement (85+ Photo Ideas & Video)
Canopy from corrugated board
How to make a canopy over the porch from profiled metal sheets? The manufacturing process of such a structure is similar to the previous one. Since the corrugated board has a greater weight than polycarbonate, the use of an aluminum profile to assemble the frame in this case is unacceptable. It is collected only from a metal corner, pipes or wooden bars.

Canopy from corrugated board
Since metal sheets conduct sounds well, the visor must be soundproofed. Otherwise, the sound of drops falling on a metal surface will constantly get on your nerves. Styrofoam, which has low soundproofing properties, should not be purchased. It is better to use mineral wool.
Profiled sheets should have an average thickness and wave height of 20-60 mm. To fasten one sheet, you will need 11-12 self-tapping screws with a wide hat, always galvanized, equipped with a plastic or rubber gasket.
To mount the bumper bar, which serves as protection against moisture, the wall is pre-chased to a depth of 5-7 mm. The edge of the plank is inserted into the resulting recess and screwed to the wall. Its second edge should lie on the roof. The joint is sealed with mastic and laid with a rubber seal.
 Read also: How to make a children's house with your own hands: from wood and other materials. Dimensional drawings | (80 Photo Ideas & Videos)
 wooden visor
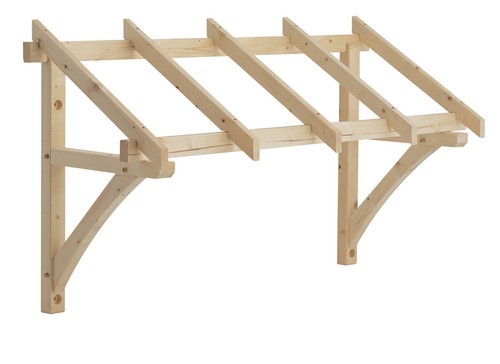
The simplest wooden frame
You will need two types of bars: with a section of 75x75 mm for the manufacture of supports and rafters with a section of 15x15 mm for arranging the crate. To protect against premature decay, they are pre-treated with bitumen.
You will also need a 25 mm board to create a roof or wooden tiles. Anchor bolts are used to fasten the product to the wall, and brackets and self-tapping screws are used to assemble the crate. The roof is mounted on slate nails or self-tapping screws.
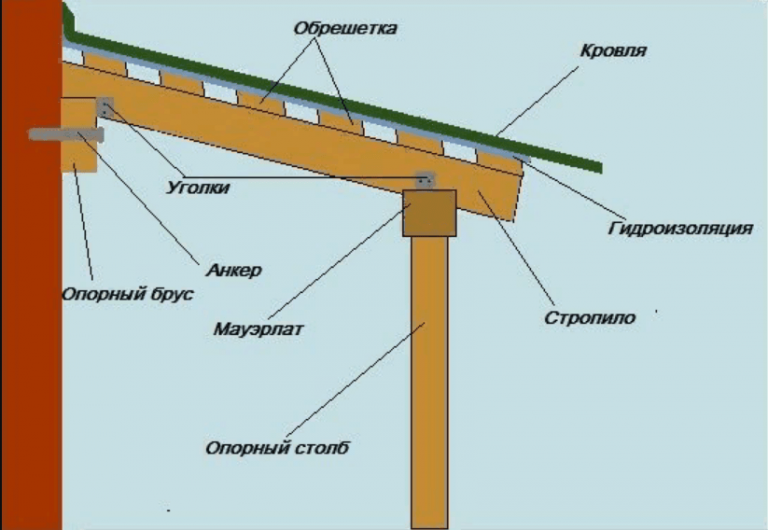
Making a canopy with supporting pillars
To make a canopy over a wooden porch:
- A wooden bar is attached above the door with metal anchors. The distance between the fasteners is 40-50 cm.
- The horizontal position of the bar is verified by the building level. For fastening the rafters, grooves are preliminarily prepared in it.
- Side, vertically located bars are also mounted on anchor bolts.
- To the bar attached to the wall with the help of metal brackets, struts are screwed, which serve as an emphasis for the visor, and a crossbar located horizontally.
- The front beam of the crate is mounted to the horizontally passing crossbar. The rear beam is attached from the ends of the vertically passing beams.
- To mount the battens, the ends of the rails are cut at the desired angle and fastened with self-tapping screws. You can, on the contrary, not cut the slats, but cut grooves for them in the rafters.
- Roofing material begins to be laid from the free edge
 Read also: How to make a greenhouse with your own hands: for seedlings, cucumbers, tomatoes, peppers and other plants. From polycarbonate, window frames, plastic pipes (75 Photos & Videos) + Reviews
 The main mistakes made in the manufacture of a canopy
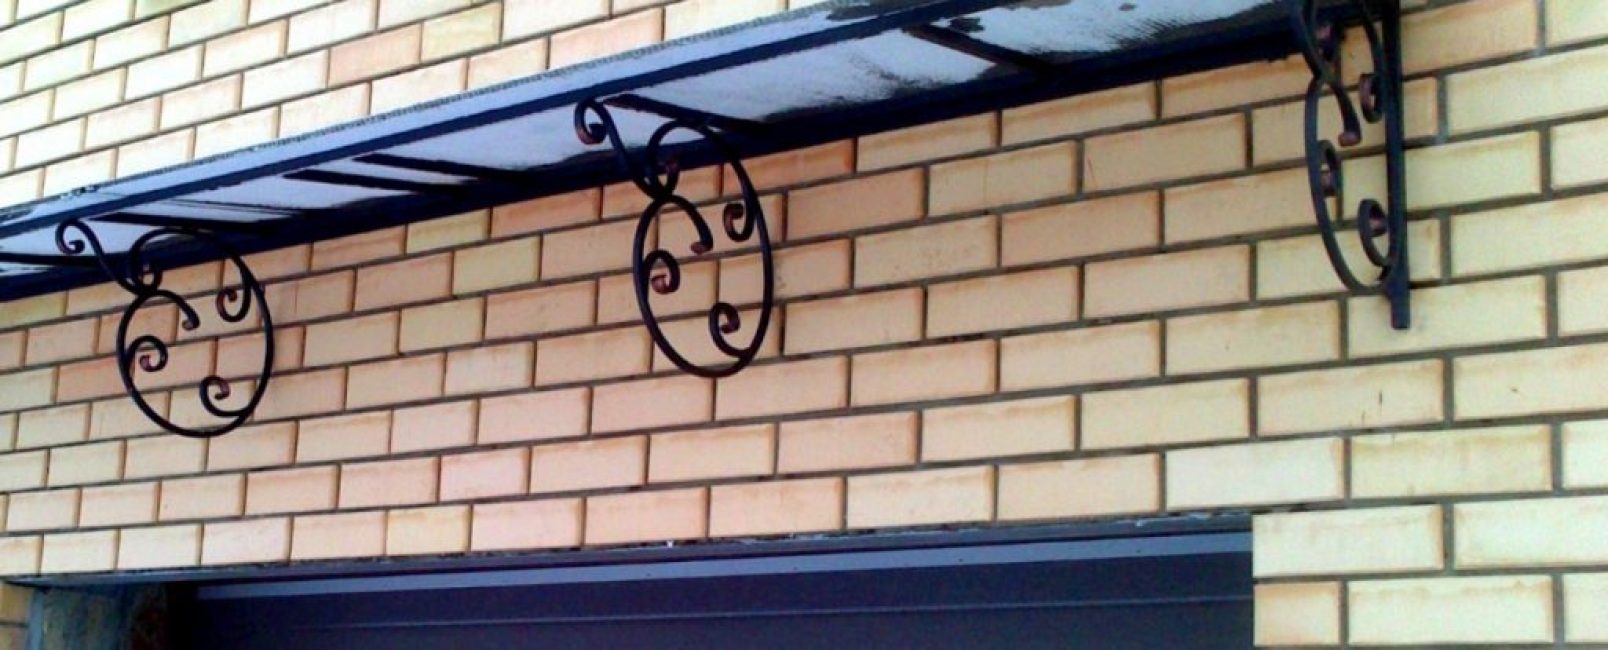
Canopy over garage entrance
If you have never encountered the manufacture of a canopy over the porch, it will not be superfluous to heed the advice of specialists.
The most common mistakes made when assembling such structures are:
- insufficient width and length of the structure: a small visor will not fulfill its main function - protecting the front door from wind, rain, snow
- low strength: the canopy must withstand not only its own weight, but also the mass of snow; otherwise, sagging is possible, and then the collapse of the structure
- lack of anti-corrosion and anti-rot treatment: no matter how decorative such a structure is, it will not last long; in the future, in order to prevent protective treatment should be carried out once a year
- a small number of fasteners: on fasteners, even during the construction of small structures, in order to avoid their collapse, it is better not to save
![[Instructions] How to make beautiful and unusual wall shelves with your own hands: for flowers, books, TV, kitchen or garage (100+ Photo Ideas & Videos) + Reviews](https://iherb.bedbugus.biz/wp-content/uploads/2018/05/19-6-300x213.jpg) Read also: [Instructions] How to make beautiful and unusual wall shelves with your own hands: for flowers, books, TV, kitchen or garage (100+ Photo Ideas & Videos) + Reviews
Read also: [Instructions] How to make beautiful and unusual wall shelves with your own hands: for flowers, books, TV, kitchen or garage (100+ Photo Ideas & Videos) + Reviews How much do ready-made visors cost?
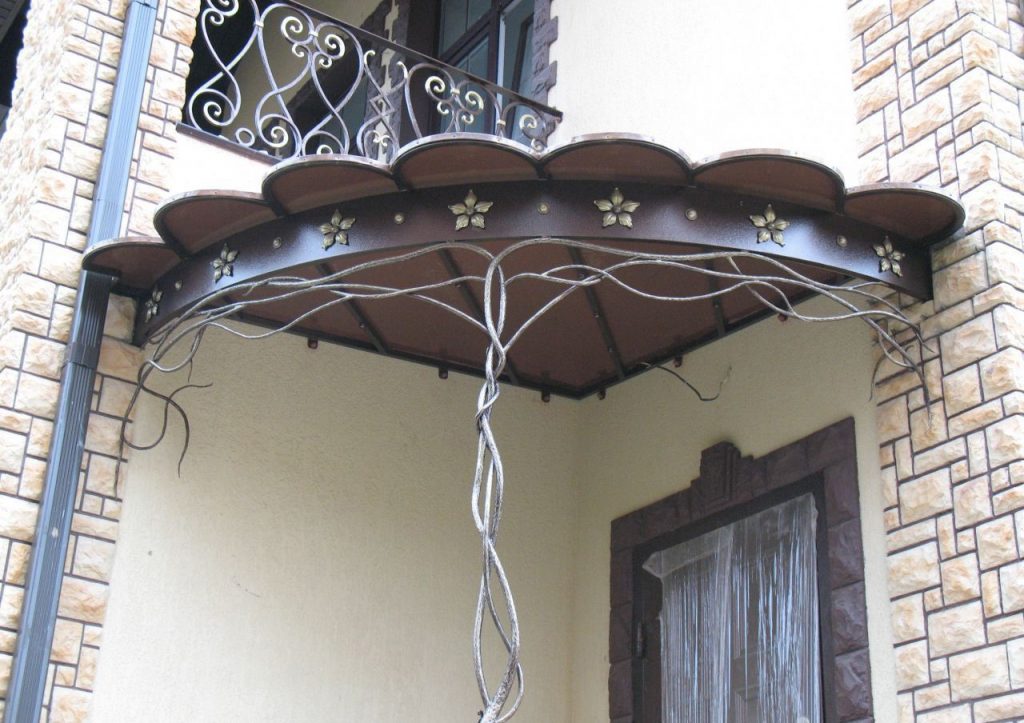
Complex structure with metal finish
If you are not confident in your own abilities, you can buy a canopy over the porch already assembled. There are a lot of companies involved in their manufacture in each region.
The cost of the product depends on the type and complexity of the design. The simplest polycarbonate canopy with a bent forged frame will cost 7-8 thousand rubles. Visors of complex shape cost from 25 to 50 thousand rubles. Works on their installation are paid separately.
When choosing a canopy, it is worth stopping at more durable products with a monolithic frame assembled by welding. Modular products will have to be assembled independently.
Those who know how and love to work with metal should watch a video on how to make a forged visor:

VIDEO: How to make a visor over the front door with your own hands
Canopy over the porch: what are the types, device, drawings, step-by-step instructions for making your own hands (80 Photos & Videos) + Reviews
![[Instruction] Do-it-yourself laminate on a wooden floor: a complete description of the process. Laying schemes, what materials should be used (Photo & Video) + Reviews](https://iherb.bedbugus.biz/wp-content/uploads/2018/05/laminat-300x200.jpg) Read also: [Instruction] Do-it-yourself laminate on a wooden floor: a complete description of the process. Laying schemes, what materials should be used (Photo & Video) + Reviews
Read also: [Instruction] Do-it-yourself laminate on a wooden floor: a complete description of the process. Laying schemes, what materials should be used (Photo & Video) + Reviews