
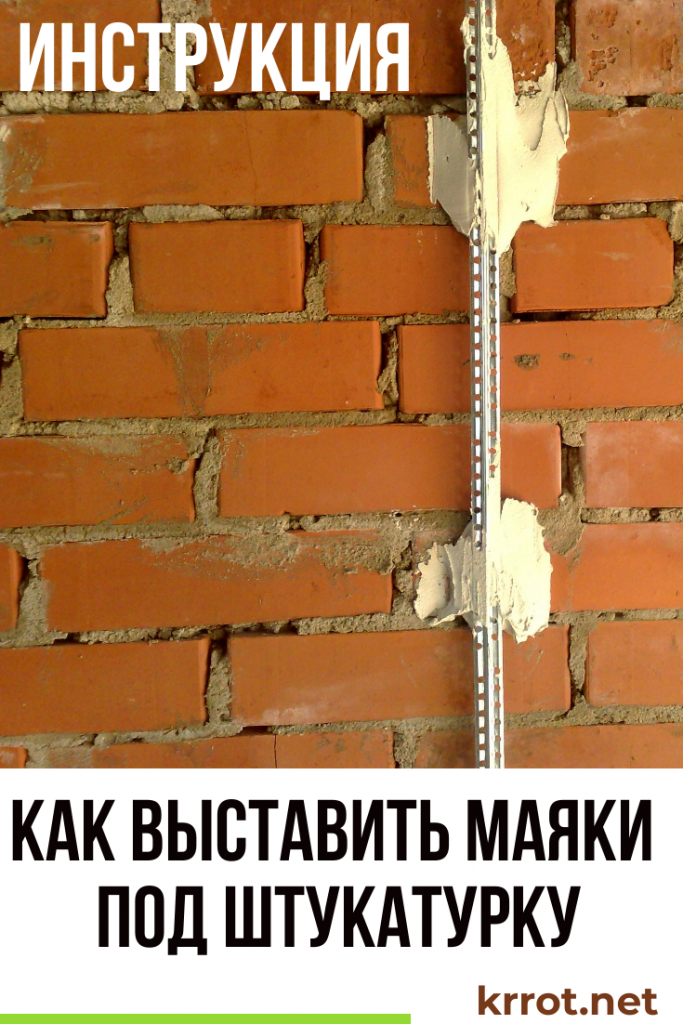
Every homeowner, sooner or later, faces renovation. And he, as you know, begins with the walls. The better they are prepared, the better the final result will be.
From how much competently plastered all internal surfaces of the house depend on all further work - the whole appearance of the room directly depends on this important stage of construction.
How to put beacons under plaster is the topic of this article. At first glance, there is nothing complicated here, but this is not entirely true - one cannot do without the knowledge and practical skills developed by whole generations of professional plasterers.
Content:
 Read also: Projects of country houses for 6-10 acres: 120 photos, description and requirements | The most interesting ideas
Introductory part - plaster beacons

Checking the vertical level of a wall
Not so long ago, the vast majority of plastering work was carried out without strict adherence to technical regulations, more precisely with its minimum requirements. And this is understandable, the country was going through a housing crisis - the main thing was getting housing, and not the correct geometry of internal partitions.
Yes, and with building materials there was a tension - paper wallpapers and those were in short supply. But times have changed, the requirements have changed somewhat, with a complete surplus of building materials, and everyone started talking about quality. I had to remember and learn to meet the increased building requirements.
So in this respect there are clear instructions prescribed in the main standards of the builder - SNiPs.
SNiP 3.04.01-87
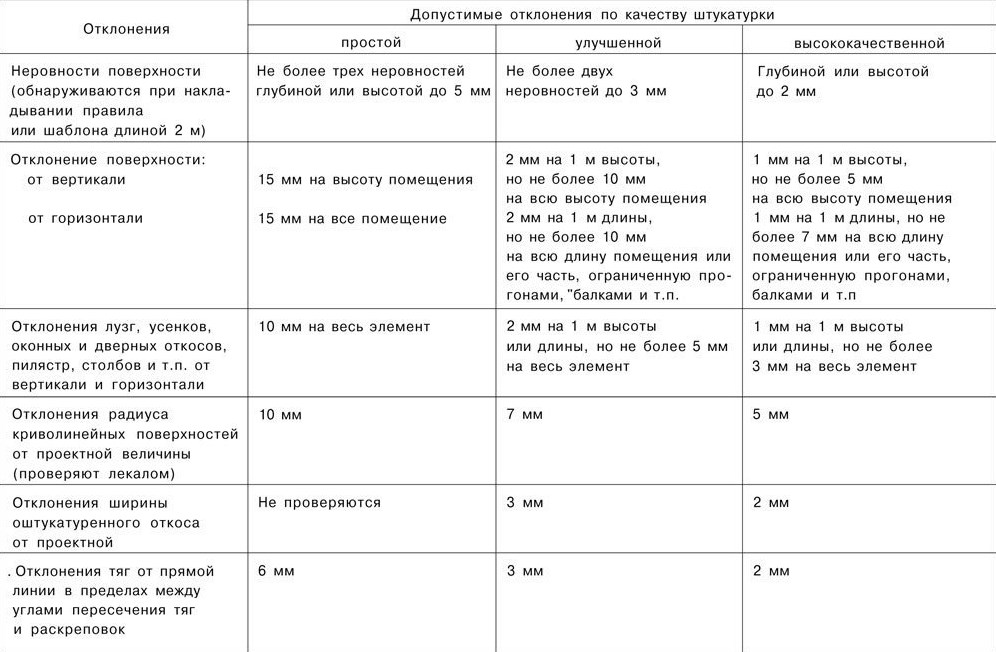
According to this provision, the plastered surface is subject to requirements regarding the following points:
- thickness of one layer of gypsum plaster
- reinforcement of the plastered surface
- maximum permissible humidity of the plaster material
- the formation of plaster beacons in the conditions of creating an improved and high-quality finish
- layer strength
- the concept of “European-quality repair” is also introduced
As can be seen from the situation, for improved and high-quality repairs, the installation of beacons is required.
 Read also: Veranda attached to the house - expanding the living space: projects, tips on how to create your own hands (200 original photo ideas)
 Types of plaster beacons
Installation of fasteners on a plaster beacon
Stucco beacon - this is a device designed to help find a reference point for the formation of geometrically correct surfaces from cement-sand and gypsum mortar mixtures. They facilitate and speed up the process of production of plastered surfaces, allow high-quality work, both by professional plasterers and general-purpose builders.
Classic lighthouses are a metal or plastic V-shaped profile, which is attached to the surface to be treated with special fasteners or fixed to an adhesive or plaster solution.
In the production of works, it is allowed to use lighthouses from other materials, for example, wood, as well as their formation directly from the plaster mixture using V- and T-shaped profiles.
So, beacons are distinguished by the material of manufacture:
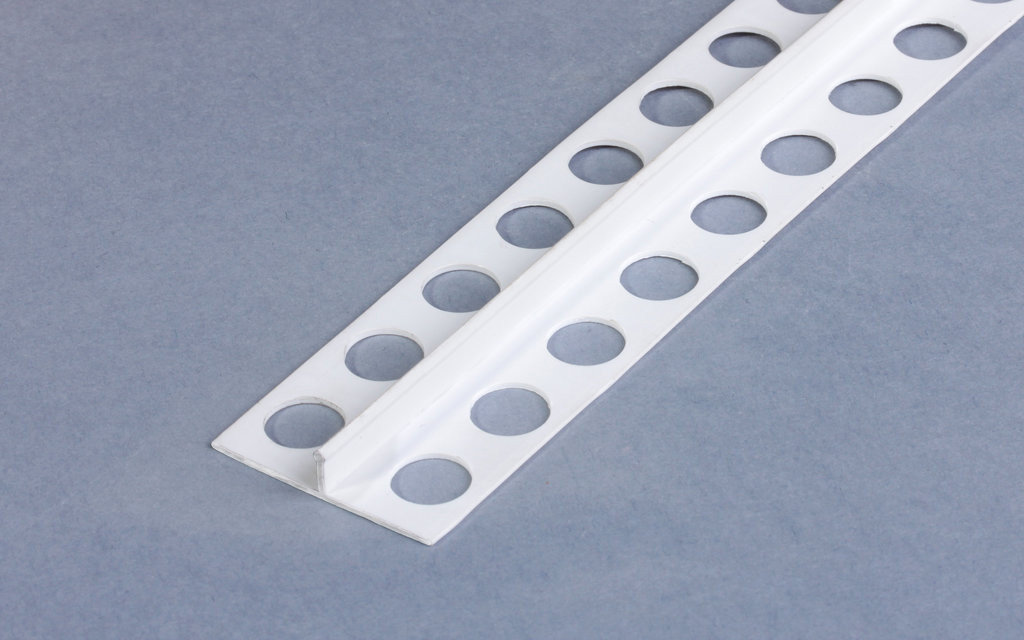
- metal, galvanized V- and T-shaped profiles, differing from each other in the height of the lighthouse ledge and the length of the profile (2.7m., 3m. M 6m.)
The most common consumable for plastering walls and ceilings. It is relatively light, easy to install, since it can be installed on "flat cakes", affordable (about 50 rubles per piece), sold in almost all building markets.
Among the shortcomings, it can be distinguished that it is easily deformed during transportation, and, most importantly, it requires its removal from the plastered surface, since it is prone to rust.
Metal plaster beacons
- plastic
For the price, they differ little from the metal "brothers". The advantages of this consumable include the fact that it does not have a mechanical memory, i.e. if you bend it, it will still return to its original state, and also that it is not subject to oxidation, i.e. does not rust and can be left in the plaster layer.
But when installing it, there are some differences - plastic products do not have the rigidity of metal, and therefore it is not suitable for installation on “cakes”, this beacon must be fixed with glue throughout its entire length.
If this is not observed, then the required level will not be maintained - it bends under the weight of the spatula, and its rigidity is not enough to return to its place. The surface will not comply with the norms of SNiP.
Plastic plaster beacons
- wooden
They are used for plastering wooden walls, since it is convenient to attach them to a homogeneous material. As such, wooden beacons are not produced; thin bars are used that are suitable in size. Also, they do not require removal from the plaster layer after completion of work.
In addition to the traditional ways of creating landmarks, there are alternative ones:
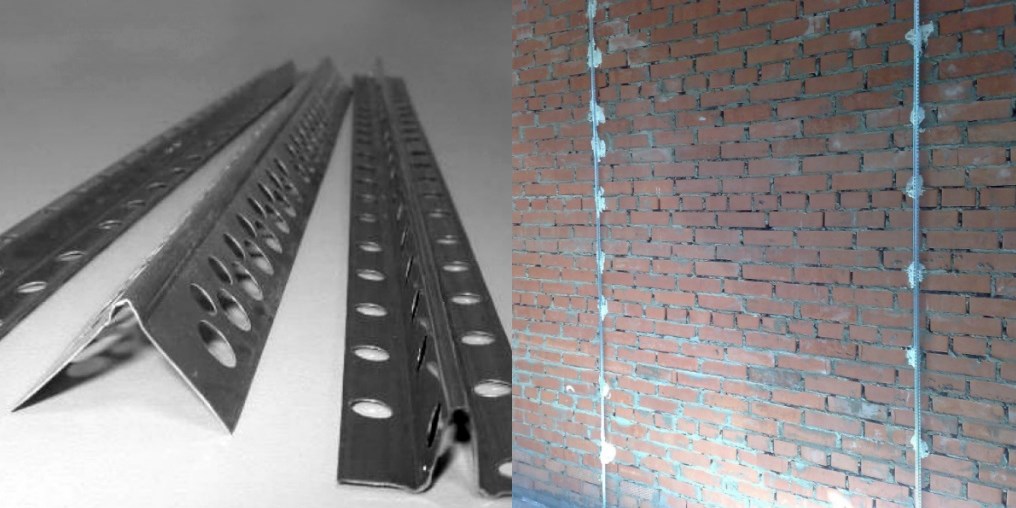
- String beacons - a curious and highly effective way to create perfectly smooth surfaces. They are used to level surfaces whose length exceeds 2.5 meters, otherwise this technique is not appropriate.
string beacons
The principle of this method lies in the fact that two carabiners are attached symmetrically to each other on the surface of the wall to be leveled from above and below, to which galvanized wire is attached.
Due to the bolts in the carabiners, the latter is stretched and forms an indicative guide. Then it is fixed with plaster or glue and serves as a reliable beacon.
The advantages of this design are obvious - the low price of consumables (350 rubles per kg), the speed of installation of beacons and an insignificant trace of the wire after it is removed from the plaster.
- Formation of beacons from plaster. In cases where not a single lighthouse was at hand, professional plasterers recommend forming them themselves.
The formation of beacons from the plaster mixture
There are many ways and technologies, but they have one principle - the formation of a lighthouse from a plaster mortar. A certain amount of mortar is applied along the markup, a level, as a rule, a profile, is pressed against it, a vertical is set, excess mortar is removed with a spatula, as a rule, the profile or level is removed. After solidification, the lighthouse is ready.
A fairly simple and effective method. Having acquired the skill, the formation of lighthouse landmarks will not take much time, and will also help save a lot on purchased consumables.
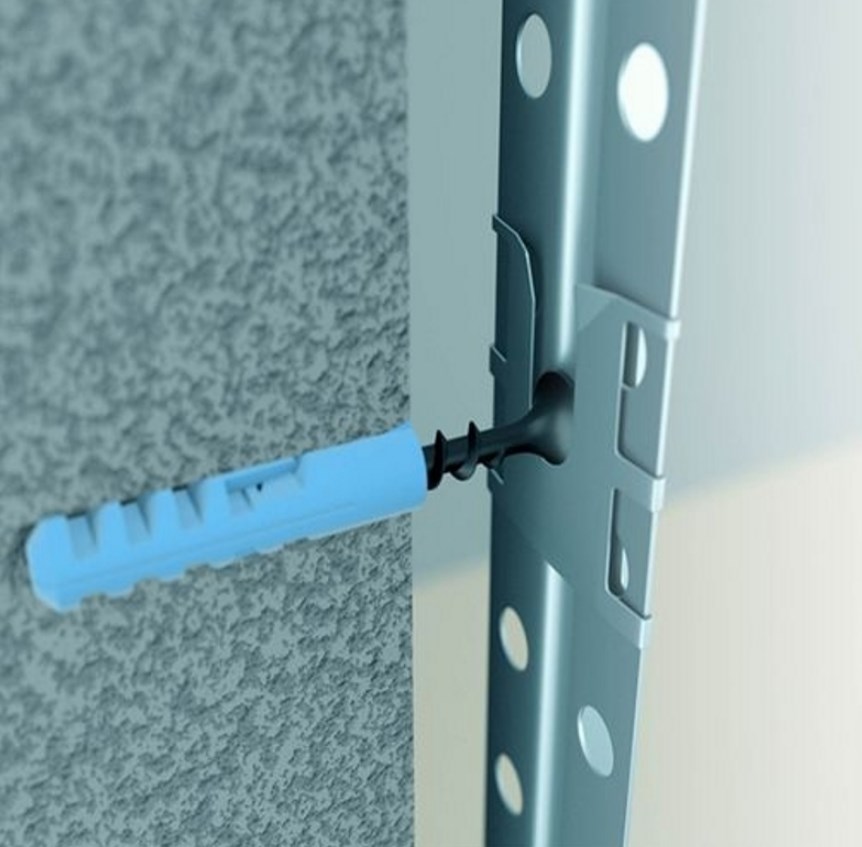
Fasteners for lighthouse profiles
In conclusion of this section, it should be mentioned that special fasteners for lighthouse profiles are on sale: eared, latches, etc. They are attached to the wall with dowel-nails or self-tapping screws, a profile is inserted into them, and, depending on the fastening system, it is fastened or bent on the latter.
Using them is quite simple, but almost all professional plasterers prefer to put the beacon on a gypsum or cement mortar.
 Read also: Lobelia: description, planting and care, when it should be sown, description of varieties (50 Photos & Videos) + Reviews
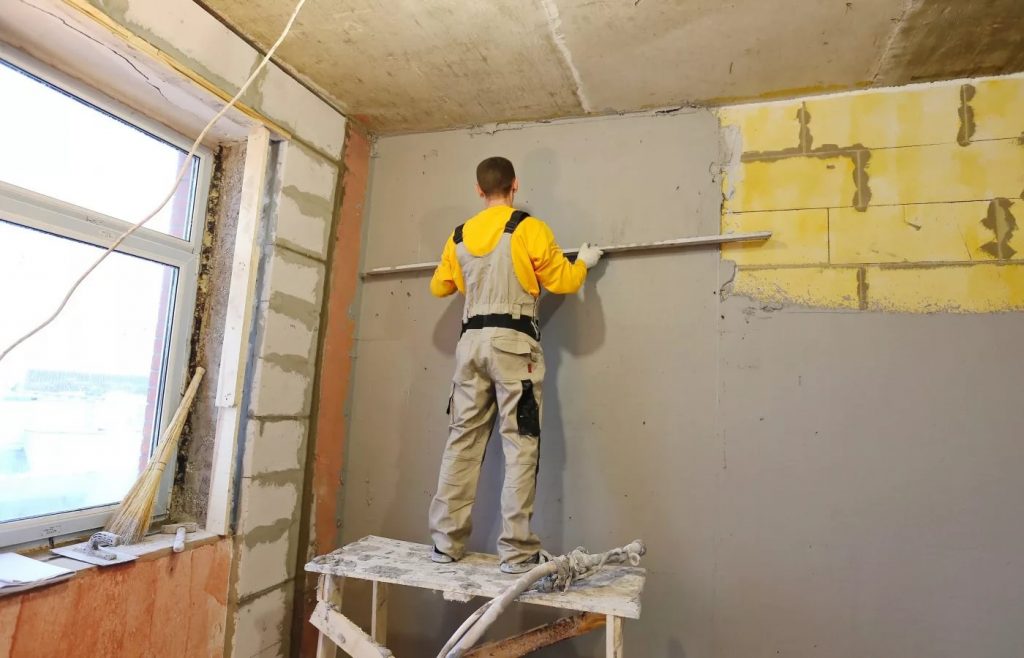
We expose beacons - instructions
Lighthouse wall plastering
Before setting up beacons, you need to decide which of the above types is better to use.
- Metal profiles are universal. It is convenient to install them on the so-called “cakes”, i.e.do not cover them completely with glue, but form three or four supports for each profile. This is convenient and fast, especially if the wall has a strongly disturbed geometry and there are large drops. In this case, the metal profile perfectly holds the geometry and does not bend during plastering, which cannot be said about plastic lighthouses. It is better not to use them in such cases.
- String analogues are suitable for leveling both relatively flat surfaces, as well as walls and ceilings with large differences. A wire stretched like a string has sufficient rigidity and, after mechanical action on it, instantly returns to its previous position. Two or three formed supports (cakes) for the entire length will be more than enough for comfortable work
It should be noted that if you want to set the minimum layer, then string technology will allow this to be done, which will significantly save the consumption of dry plaster. However, in small rooms this method is not appropriate, only in areas with a length of more than 2-2.5 meters.
- For small surfaces where you need to set the minimum layer, you can use a homemade beacon - to form it from plaster, minor defects and irregularities will not interfere with it. But it should be remembered that the minimum value for one layer is 3 mm. When using this method, you can use methods from other technologies, such as self-tapping.
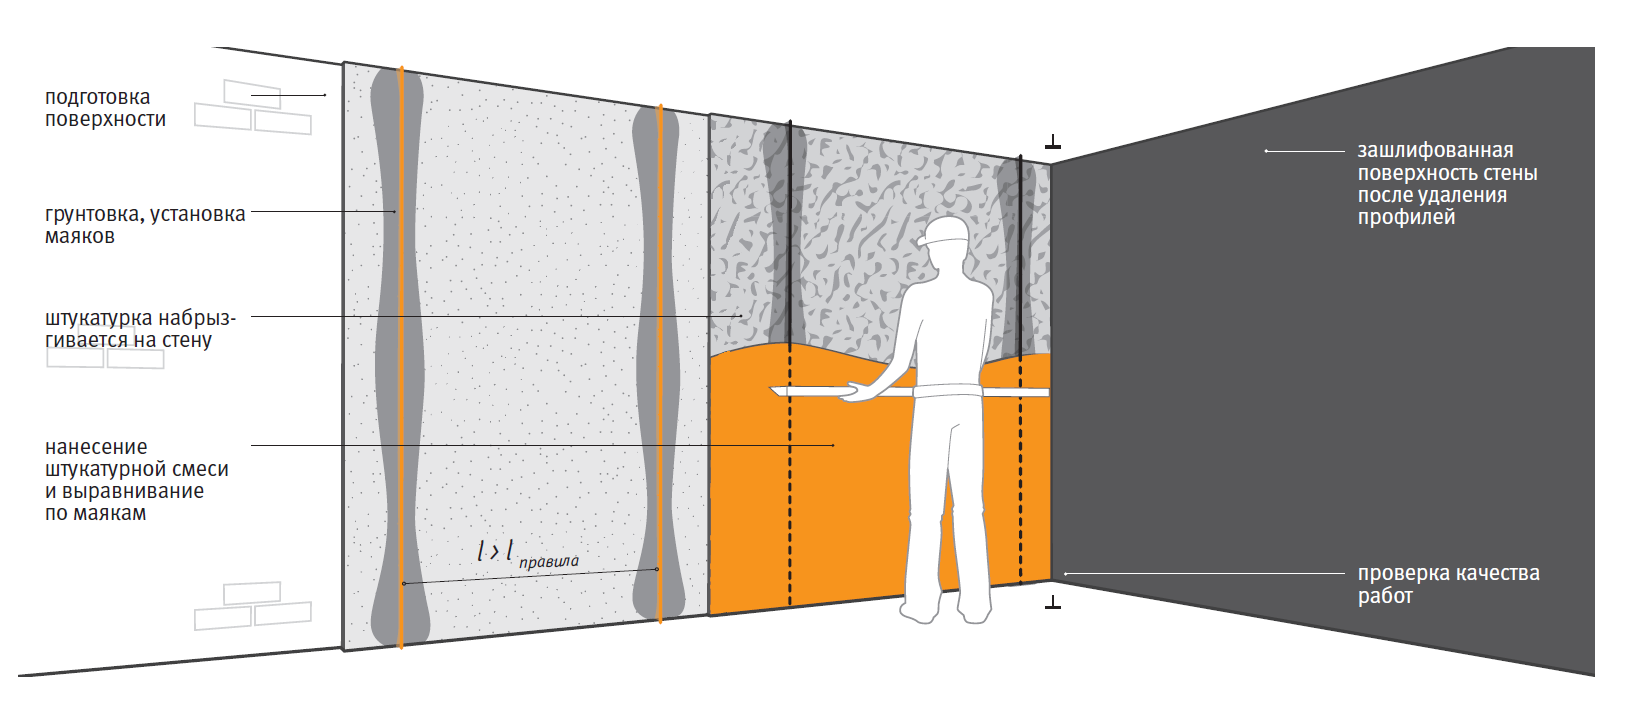
Getting Started with Markup
Almost every wall looks like this
There are no strict requirements for the formation of beacons. The marking is also made at the discretion of the worker - then plastering is for him. The main thing that is taken into account when marking and is taken into account is the length of the rule (long and wide spatula).
Plaster strip width, which is limited by two beacon guides, should be less than the length of the rule by about 20 cm - 10 cm in each direction for the rule to move when leveling the plaster. If the length of the plasterer's main tool is 2 meters, then the width of the strip is 1.8 meters, if 2.5 m, then 2.3 m, etc.
Start marking from the edge of the wall. Stepping back 10 cm, the first vertical is drawn using the building level. From it, at a distance of the rule length minus 20 cm (see above), the next vertical is formed, and so on. Similar actions are performed until the end of the wall. If the last band is smaller, then so be it. The main thing is that the last vertical line is from the edge or corner of the wall at a distance of 10 cm
This is the basis on which the entire scheme of beacons and their placement in the level will be formed.
There is no need to ideally set the vertical level, small errors are permissible, - in any case, they will not lead to a violation of the perpendicularity of the wall relative to the floor.
Next is the horizontal marking. Stepping back from the floor level 5-10 cm, beat off the bottom line. Similarly form the upper horizon. In the middle, you also need to make a similar markup - the distance from the floor level is taken arbitrarily, approximately in the middle of the wall.
It is available to show how approximately the level is set
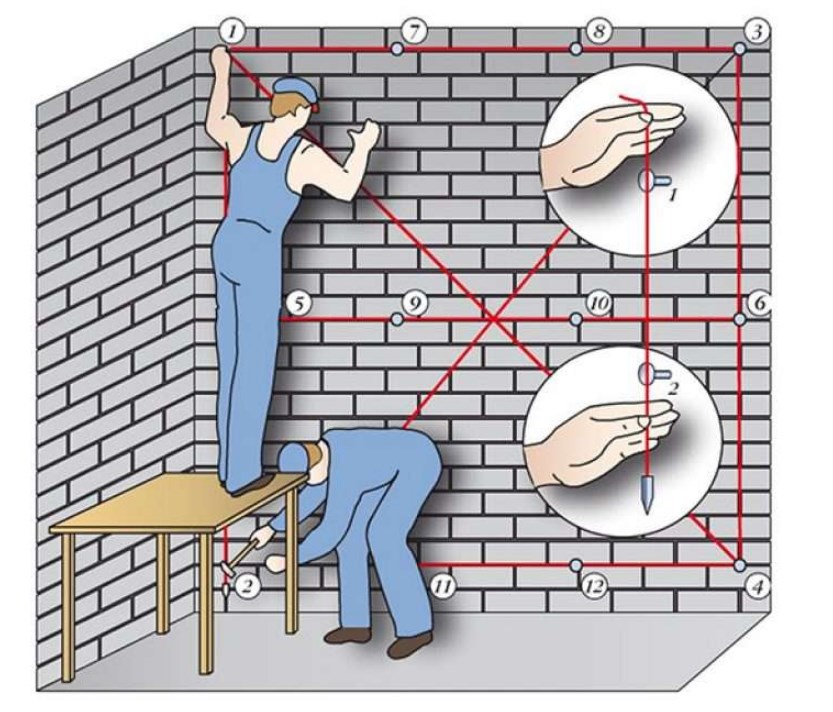
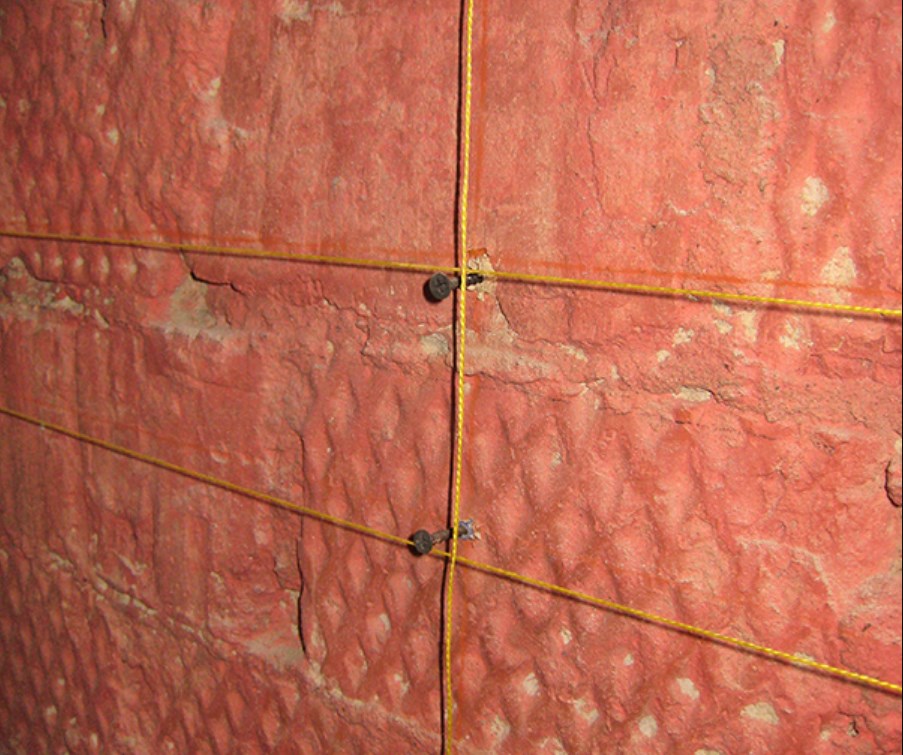
The intersections of the horizontal and vertical lines will be the control adjustment nodes for setting the plaster beacons to the level.
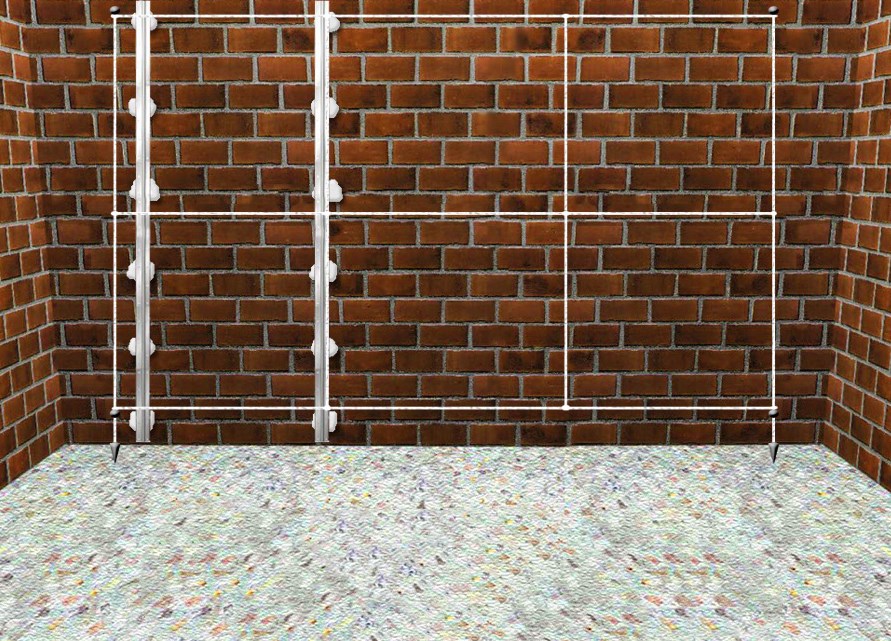
Depending on the material of the walls, a drill or a puncher is taken and holes for dowel-nails are drilled at the intersections - they will adjust the level of the profiles, when they are glued to the glue, the latter will rest on them (touch)
For all drilled holes located at the edge or corner of the wall, duplicate holes must be drilled at a distance of 2-3 cm. Those. to the right on the right side of the wall and to the left on the left, - this is necessary for attaching the cord, along which the level will be set.
dowels are inserted but the screws are not clogged, but neatly twisted
It's time to find out where the place is located, where the wall most fills up inside the room, where plastering work will be carried out.This will be the reference point for setting the entire level - in this place, the dowel-nail is twisted as much as possible
If there is more than one such place, then they must all be taken into account.
Next, the level is set along the edges. To do this, a building level is attached to the heads of the screwed dowel-nails, and, by twisting and pumping out the screws, they achieve a strict vertical
After the vertical level along the edges of the wall is set, they begin to bring the remaining (inside) guides to match
For self-tapping screws for which additional holes were drilled along the edges of the wall, lacing is tied and pulled. The cord is put on the caps of the nearest dupel-nails. They achieve the following: a cord is tied to the extreme screws, which lies on the hats of neighboring screws, and all other screws (what's inside) should lightly touch the lacing with their hats.
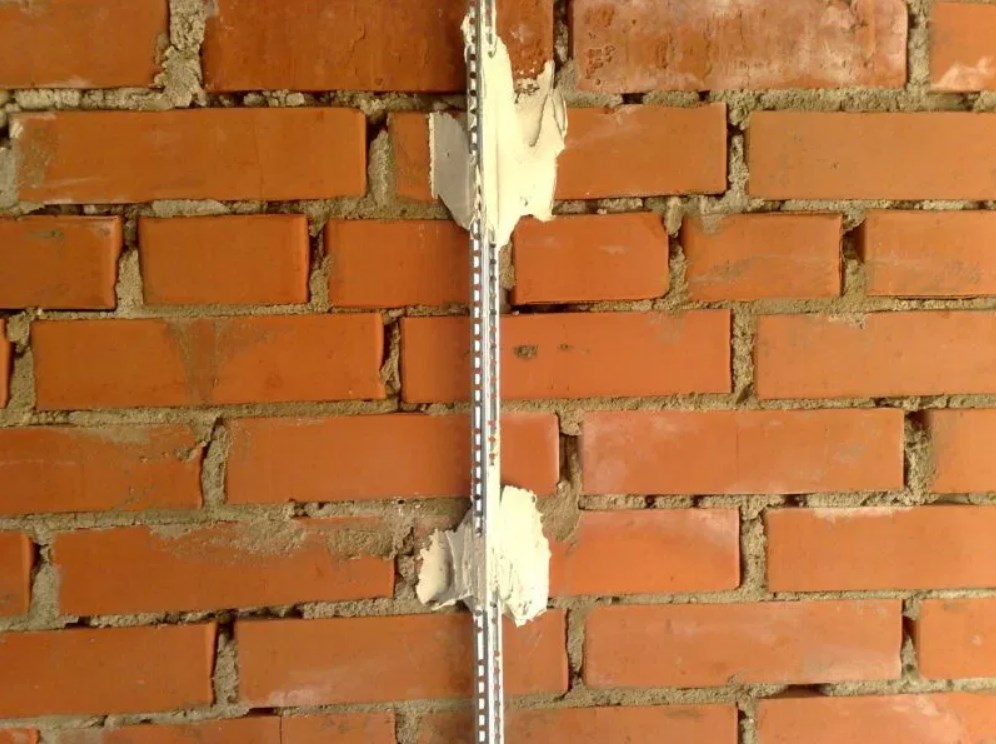
On glue or plaster - it doesn't matter
Preliminary adjustment of beacons is completed. Now they need to be fixed on the wall. We will do this with a plaster solution.
Plaster is applied to the places where the beacons will be located. A profile is attached, and pressed into the plaster mixture. The latter should stand strictly on the dowel-nail caps - this will be a guarantee of proper installation. Excess solution is removed with a spatula.
A similar operation is carried out the required number of times. After the solution has dried, you can start plastering the wall surface.
 Read also: How to make a patio in the country with your own hands: a variety of design options, decoration and arrangement (85+ Photo Ideas & Video)
 Conclusion
The main thing is to understand the principle of finding the vertical
There are many technologies for mounting beacons, - For a competent installation, you do not need to strictly adhere to one or another recommendation.
For example, we can cite the fact that many set profile landmarks not vertically, but horizontally. Why this is done becomes clear from the following video, where string technology is used.
VIDEO: A new secret method for quickly installing beacons with your own hands. Plaster on string beacons

A new secret method for quickly installing beacons with your own hands. Plaster on string beacons
How to put beacons under plaster: basic rules for beginners | (Photo & Video)


