

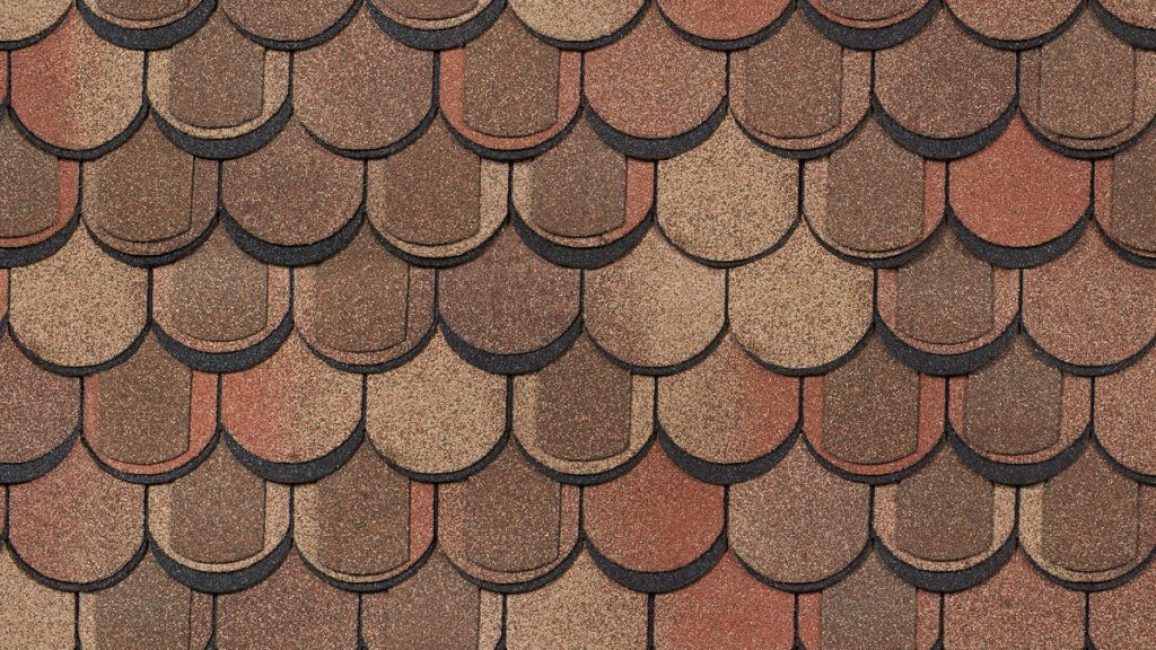
The popularity of flexible tiles is explained by high aesthetic characteristics and durability. A wide range of shapes and colors allow you to realize bold design projects.
Manufacturing technologies using composite materials make it very reliable, able to faithfully protect the house for many years. This article will address questions about technical specifications, manufacturer ratings, as well as how to lay shingles.
Content:
 Read also: Projects of country houses for 6-10 acres: 120 photos, description and requirements | The most interesting ideas
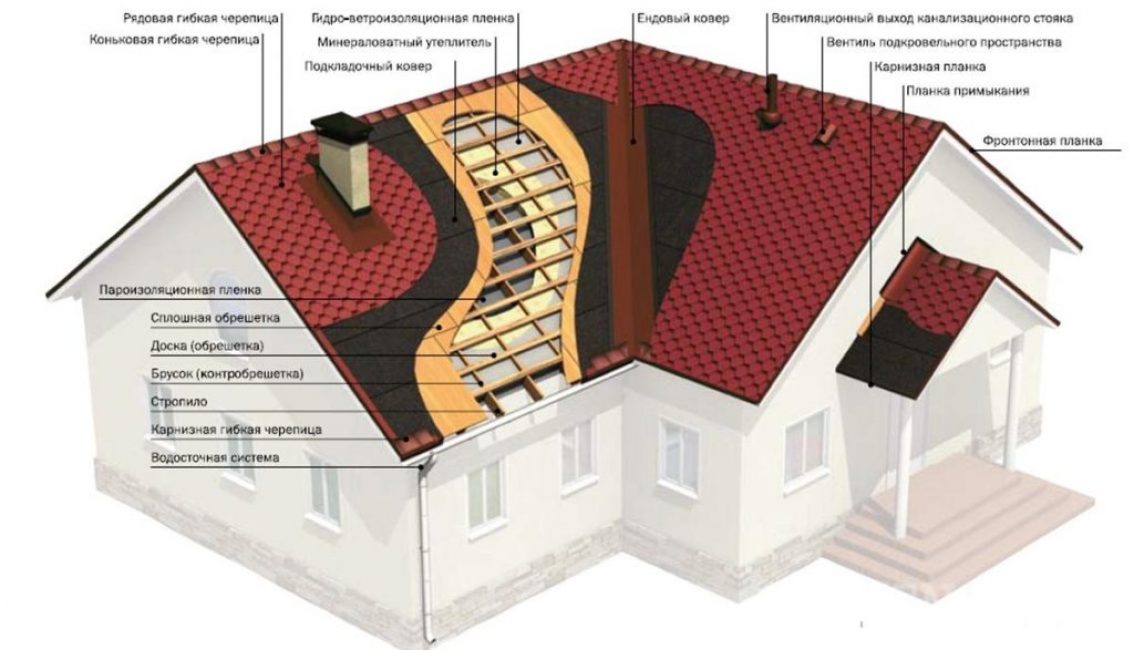
General description and device
Shinglas, shingle, roof tiles - these are all the names of one building material created to protect our homes, industrial and outbuildings from bad weather.
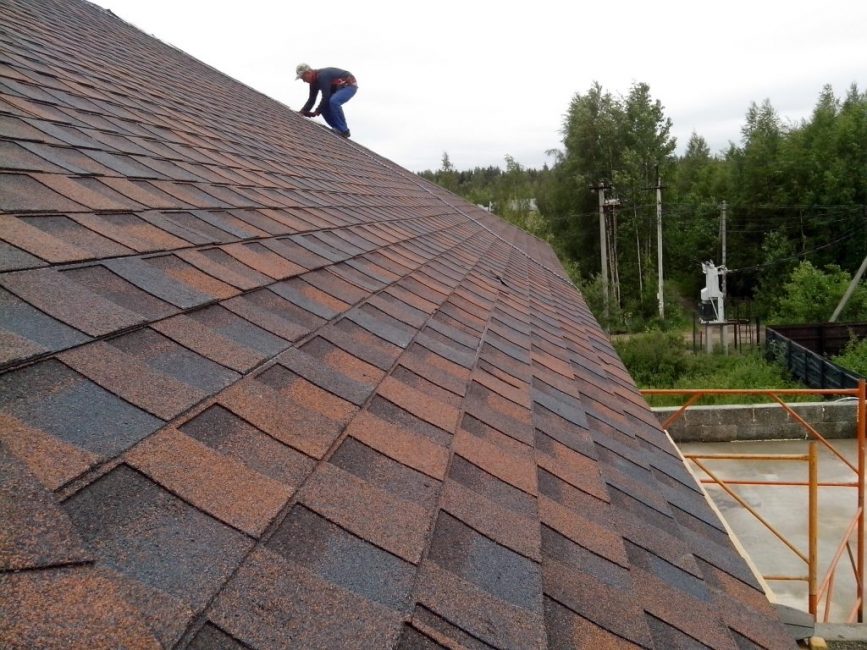
bituminous tiles
Technological progress has made it possible to create various forms of these products, produced in a wide range of colors. Despite the great variety and differences in the compositions used, a single technological structure is inherent in flexible tiles.
What does it consist of?
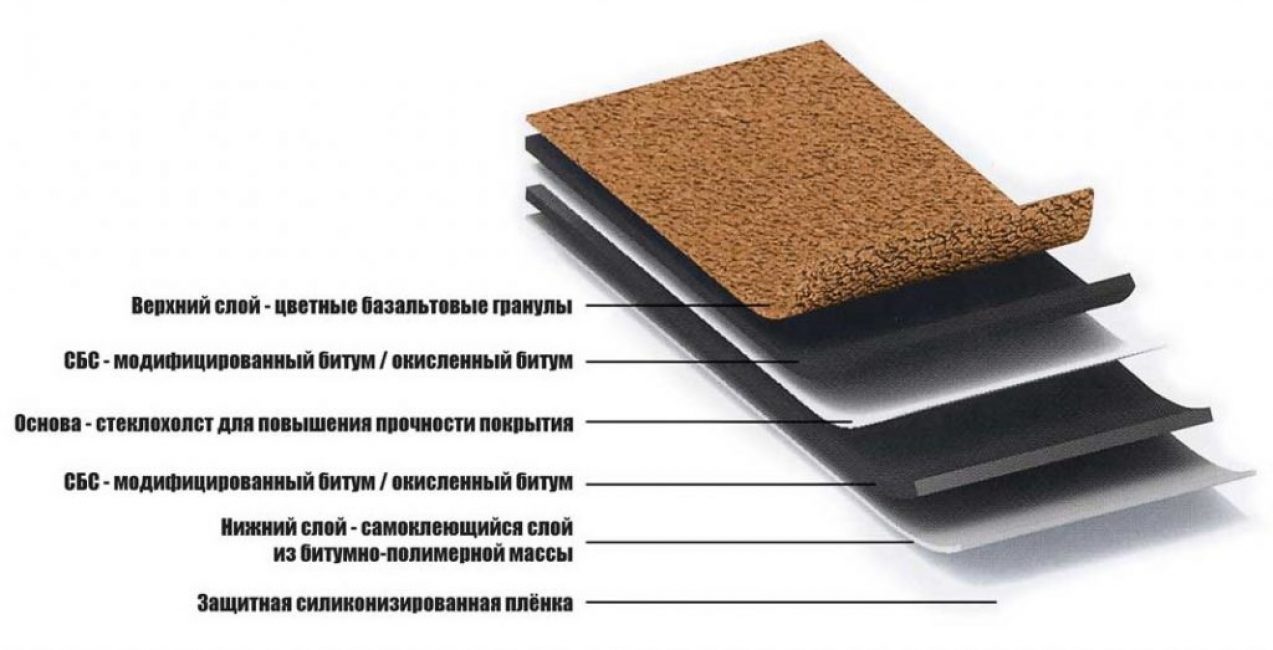
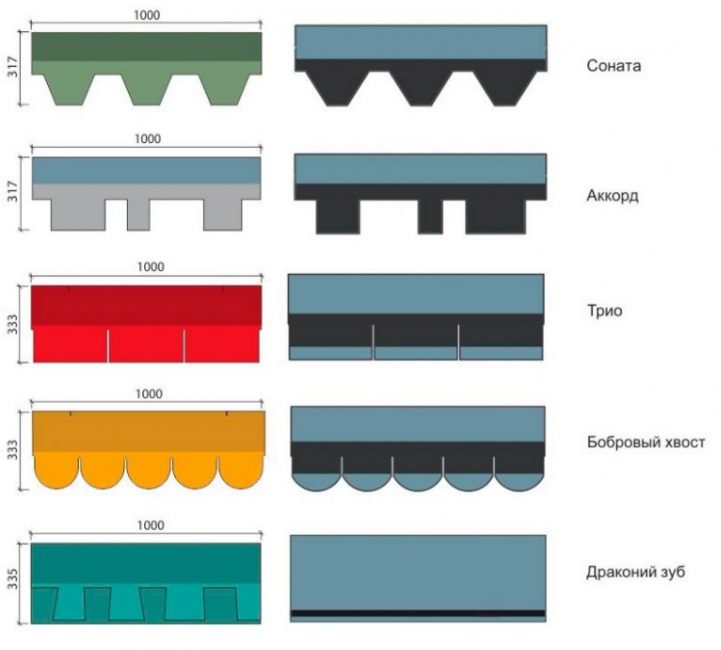
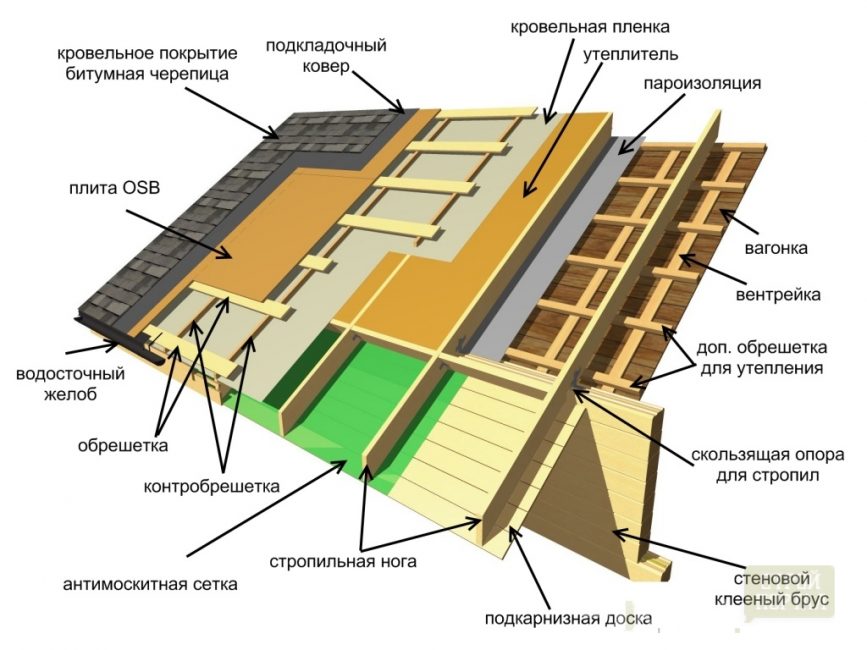
Shingle structure
The shingle or tile sheet, in contrast to the covering materials of the previous generation, is heterogeneous and consists of 6 layers.
- The top protective layer also carries a decorative load. May contain various granulators: basalt, mineral or shale. The use of colors allows you to achieve a wide range of shades. Resists aggressive environment
- The upper bituminous layer provides reliable protection against atmospheric precipitation. To increase the service life and give flexibility, various polymer additives are added to its composition.
- Fiberglass backing or organic equivalents, allows you to securely hold all the components of the shingle
- The lower bituminous layer, similarly to the first one, contains polymers. To some extent, it is capable of self-healing, for example, after damage to the coating by hail
- Polymer-bitumen layer with adhesive backing. Serves for adhesion with other roofing elements, facilitates installation
- Polyethylene film – protective layer for the adhesive layer of the shingle
There are plenty to choose from
The main element is bitumen. It is made from high quality oil with the addition of modifiers. Although combustible, it has a low fire hazard. Very durable.
The addition of certain additives to it gives various properties. So bitumen with APP (atactic polypropylene) is resistant to high temperatures and is used in climatic zones with a hot climate.
This can not be done with corrugated board
The modifier SBS (styrene-butabien-styrene), on the contrary, makes it possible to use bitumen in colder regions. Produced modified and oxidized. The first has better elasticity, but higher cost. The second is more economical, the quality is acceptable.
You do not need to be a luminary in bitumen technologies in order to purchase a high-quality and suitable product for yourself:
- Density and thickness of the tile sheet, - the thicker the shingle, the heavier and more expensive it is. For residential buildings, it is recommended not to use material thinner than 4 mm, for temporary and other households. buildings this criterion is not required
- The quality of the granulate it should stick well to the base.If the latter crumbles easily, then it is better not to take such building material - loss of granulate more than 2 grams from one sheet is not allowed
- Flexibility and plasticity. The absence of these indicators indicates that the product is either old or of poor quality.
- The presence of a pungent odor from the shingle indicates a violation of its manufacturing technology, - active evaporation occurs, and, as a result, loss of plasticity
- By the date of manufacture, one can judge the condition of the lower adhesive layer. With prolonged storage, the building material loses adhesion. Installation will be difficult, you will have to use a building hair dryer
 Read also: Terrace attached to the house: 150+ Best photo ideas | Do-it-yourself step-by-step arrangement
 Types of tile tiles
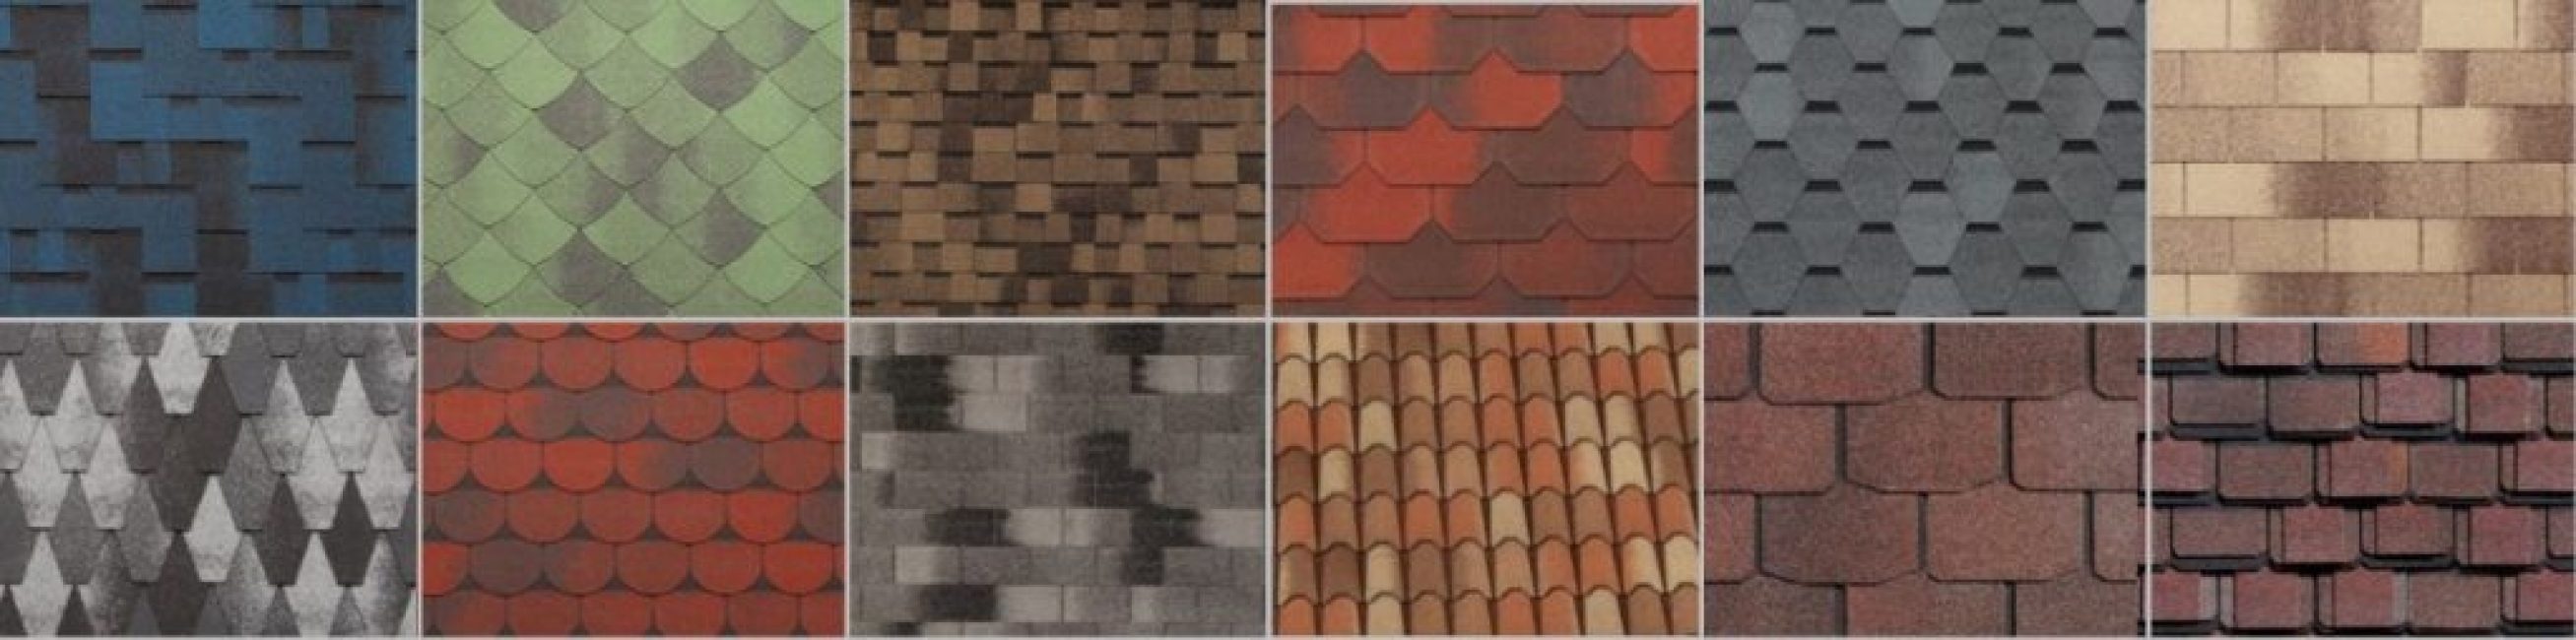
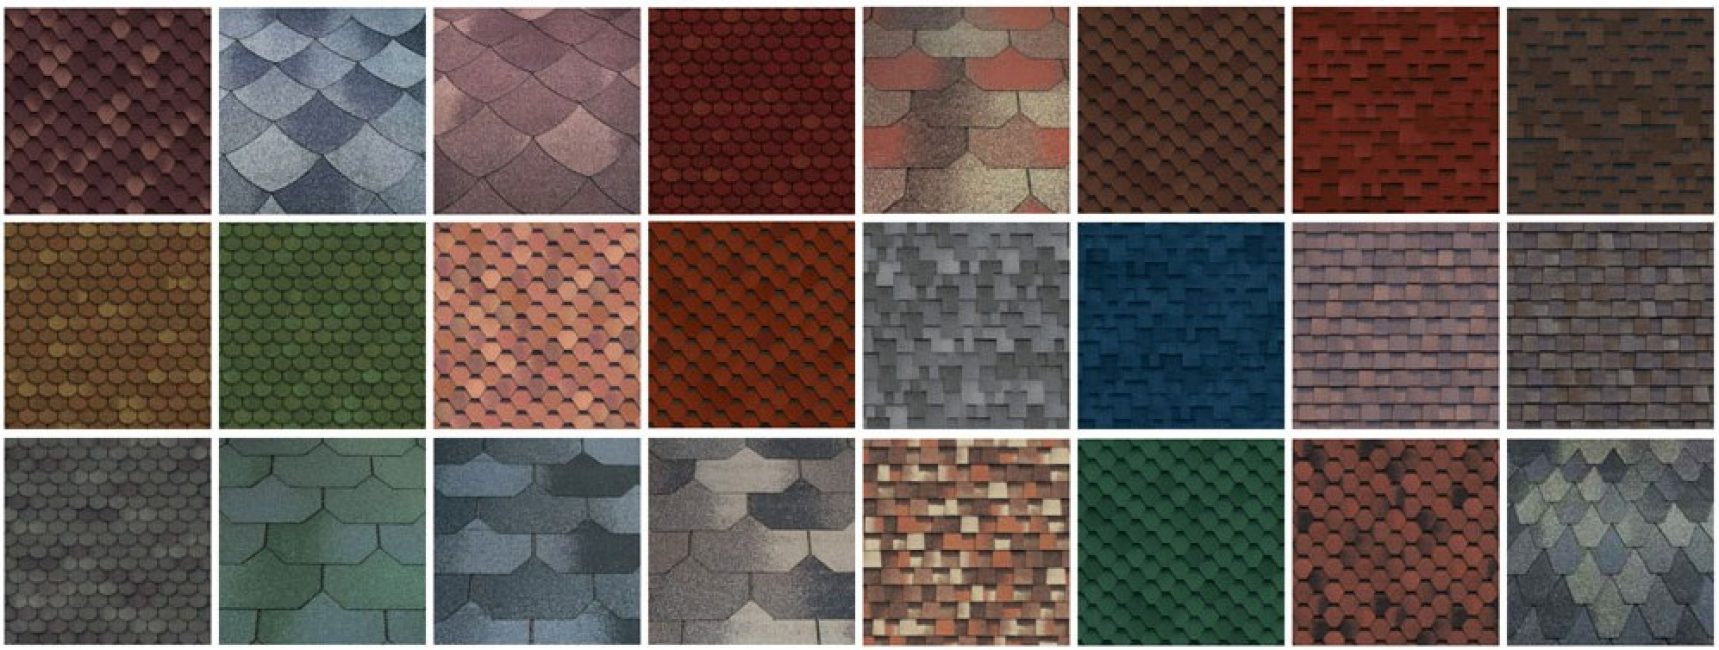
Variety of forms
There are two main criteria by which shingles are classified:
- Number of bituminous layers. Two-layer - roofing material of the middle price category
Three-layer - more expensive but more durable. Due to the additional layer, the service life can be determined by more than 60 years, against 30 for a two-layer tile. In addition, this type also has an external difference - the overlay of layers is done with some displacement, which gives a visual effect of volume.
- The shape of the cut. It is not uncommon that manufacturers want to distinguish their product from the countless variety, for which they give their product exclusive names. However, the following common forms can be distinguished: western, dragon tooth, beaver tail, trio, chord, sonata and continent. You can also meet such: shingles, brick, rhombus, hexagon, rectangle and others
Versions
 Read also: Veranda attached to the house - expanding the living space: projects, tips on how to create your own hands (200 original photo ideas)
Features and Benefits
The scheme of what the finished product consists of
If we consider the general characteristics of tiles, regardless of the raw materials used in it and various plasticizers and additives, then we can state the following:
- this roofing material is not subject to corrosion and rotting
- maintains the big temperature range from-50 to 110 °C
- service life of about 50 years - often this criterion is underestimated
- increased resistance to all types of precipitation
- wind-resistant, - unlike sheet materials, the complete absence of windage
- is a dielectric - no lightning rod needed
- the non-combustible granules used make the tiles fire-resistant
- during installation, there is practically no waste left - any segment goes to work
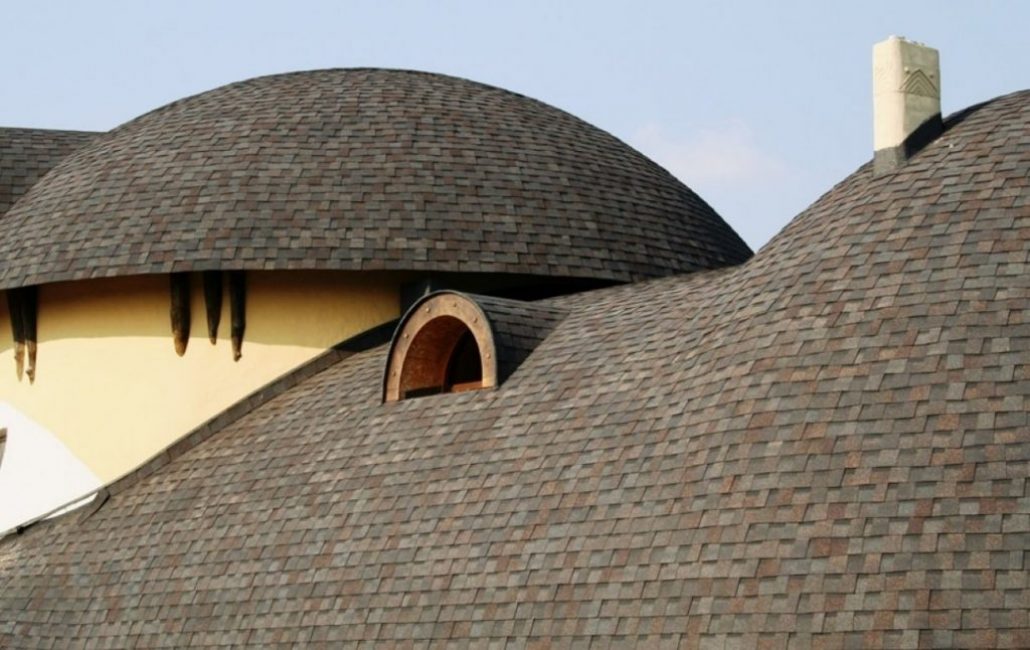
- you can cover the most complex shape of the roof
- ease of maintenance and repair - it is not necessary to redo entire sections, it is enough to replace individual elements
- the possibility of self-assembly, the availability of tools, and also does not require specific knowledge and skills
- wide range of colors, shades and shapes – excellent appearance
Flexible tile Shinglas
For objectivity, you should point out the disadvantages of using shingles:
- Average price category, not much more expensive corrugated board or slate
- For the construction of a tiled roof, a number of additional works will be required: the creation of a ventilation gap, the formation of a reinforced crate, a lining base, etc.
- Complicating work in the cold season - at temperatures below 5 ° C, you will have to use a building hair dryer, which will significantly increase labor costs
In addition, installation should not be carried out on a wet basis, - in case of wetting of the crate, it is necessary to wait for its complete drying.
 Read also: How to make flower pots with your own hands: outdoor, indoor, hanging | Step by Step Charts (120+ Original Photo Ideas & Videos)
 Leaders of sells
Flexible roof tiles
Many homeowners are confused by the question of which manufacturer to purchase this bituminous material from. And not in vain, because today on construction sites you can find several dozen famous brands. Foreign brands such as Katepal, Icopal, Finnmaster are popular.
TechnoNIKOL

TechnoNIKOL
However, due to economic reasons, a Russian representative confidently entered the stage "TechnoNIKOL". Roof tiles "TECHNONICOL SHINGLAS" confidently captures the domestic market - the main advantage is the ratio of price and quality of tiles.
The cost of the proposed line starts from 220 rubles per m².
Tegola

Tegola
A well-known manufacturer of roofing materials, this company has been operating since 1973 and deservedly enjoys prestige in the European space. A large number of shapes, color shades and high quality are Tegola's calling cards.
Budget offers start from 280 rubles for Jazzy, Katrilli, KL, Rocky, Foxy
Katepal

Katepal
Representative from the Finnish side. One of the oldest specialized organizations, has been working on roofing sites since 1949. Finland is a northern country, and is it not her to know about all the nuances of a cold winter.
Improved bitumen with increased frost resistance is a specialty of Katepal. A wide range of products: Jazzy, Katrilli, KL, Rocky, Foxy.
The average price starts from 280 rubles.
Döcke

Döcke
Those who are interested in more expensive shingles, which are of high quality, should take a closer look at Doeke.
Roofing products that comply with GOSTs start their cost line from 340 rubles.
 Read also: How to make a patio in the country with your own hands: a variety of design options, decoration and arrangement (85+ Photo Ideas & Video)
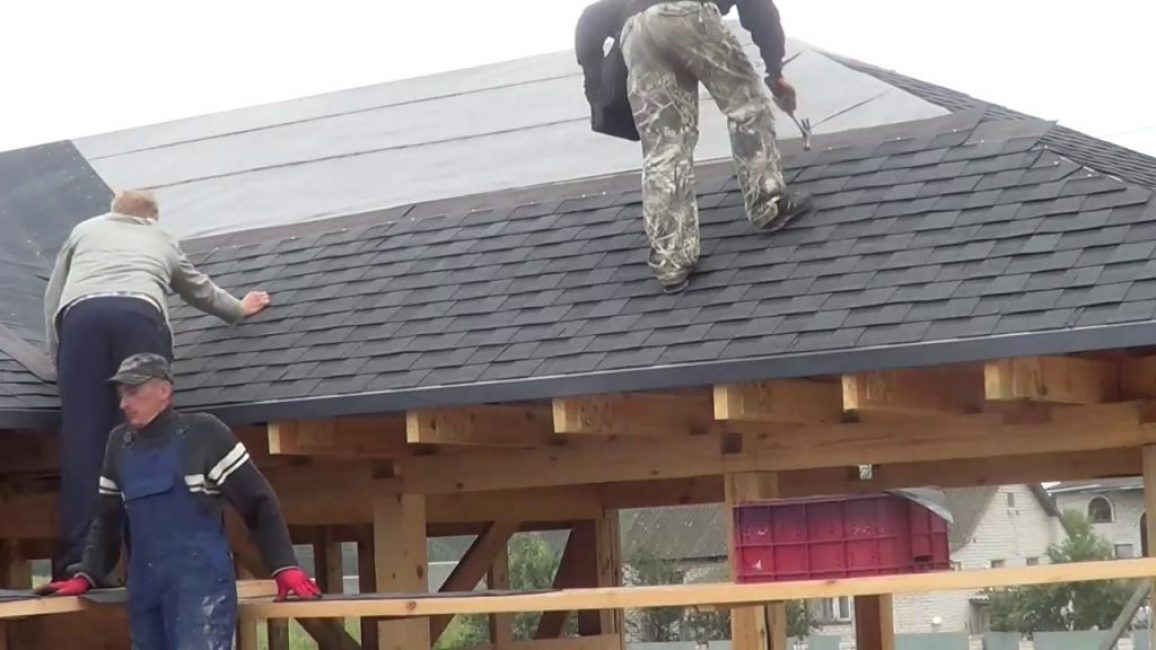
Self-installation of the roof
Despite the fact that each manufacturer gives its own recommendations for the production of installation of roofing from bituminous tiles, Everyone's workflow is pretty much the same.
Shinglas installation
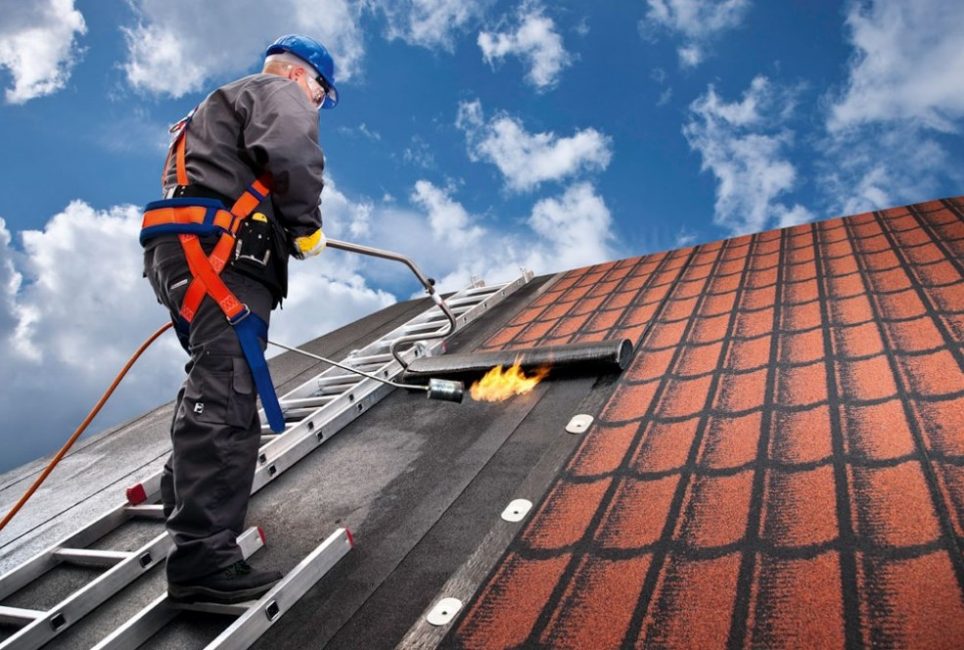
The first thing you need to pay attention to is the temperature regime of the work. The vast majority of bituminous materials are recommended to be installed at a temperature of at least 5 ° C, otherwise you need to use a building hair dryer.
Tools and materials
Tools and materials
For independent work, you will need the following materials:
- end carpet. It is used as a basis for tiles at the joints of the roof, i.e. where the roof changes its plane, as well as along the perimeter of the roof base
- lining carpet - this is the basis for laying the warhead
- ridge cornice tiles
- bituminous ordinary tile
- metal cornice strip
- end (wind) bar
- ridge aerator and foam tape for it
- galvanized roofing nails in two sizes: 35 and 55 mm
- bituminous mastic
Flexible tile Shinglas
You will also need the following tool:
- hammer
- stationery knife and a solid supply of blades for it
- putty knife
- building hair dryer, in case of work in cold weather
- safety twines and belts
The insurance must be treated with increased attention, since the crate is formed solid, for which it will be difficult to catch on in case of slipping.
Visual step by step instructions
For clarity
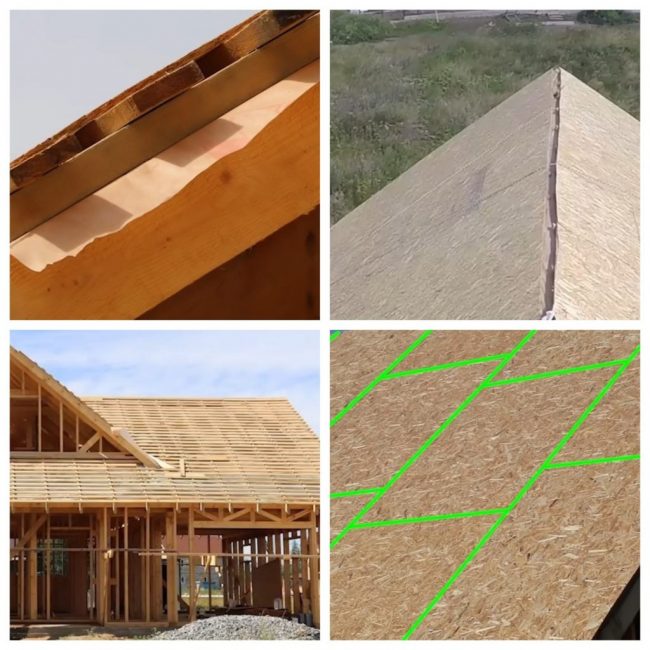
Consider the formation of a tiled roof from the material “Accord” based on a truss system of 50x150 mm rafters with a step of 60 cm.
For clarity, the instructions are equipped with photographs.
As a vapor barrier, a moisture-wind membrane is attached to the entire roof area using a stapler.
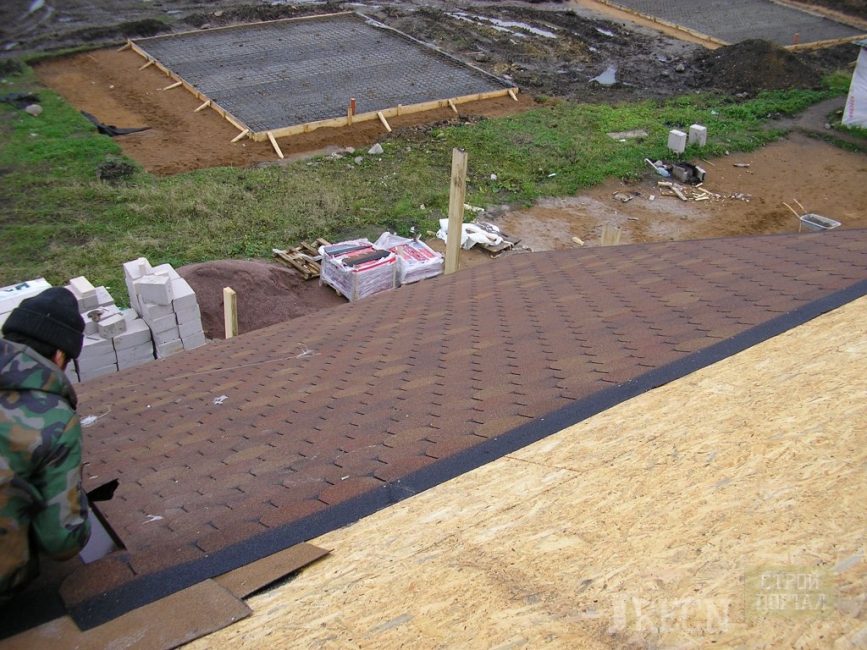
On top of the rafters, bars of 50x50 mm are stuffed. This is necessary in order to form a ventilation space under the reinforced crate and membrane.
A crate of 25x100 mm boards is stuffed onto these bars, in increments of 10 cm. The following should turn out: board, opening, board, opening, etc.
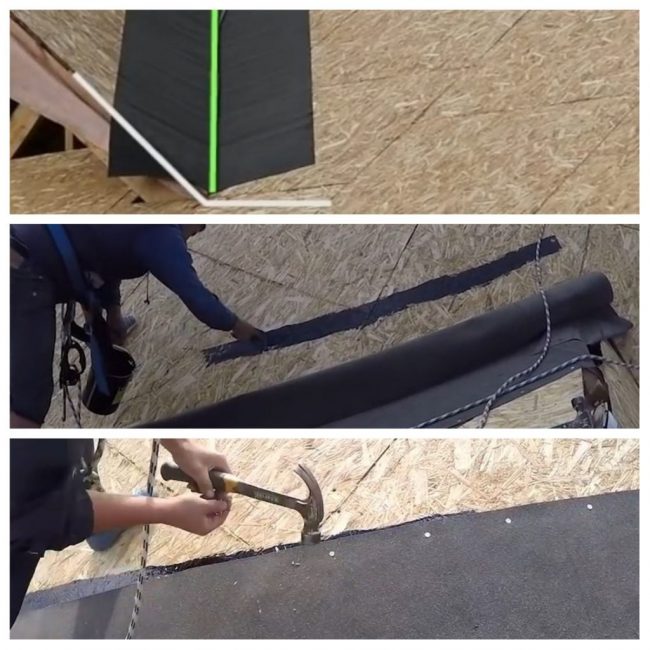
Fitting, mastic and nails
First, lining carpets are formed under the valleys. To do this, the lining strip is laid in the center of the valley. Along its edges, along the perimeter, mastic is smeared with a spatula. Nailed with galvanized nails 35 mm, every 15-20 cm. The operation is similarly repeated with all joints
They begin to form a lining carpet on the main slope. It is laid out horizontally, from bottom to top. The latter has two adhesive strips protected by paper, one on each side (top and bottom). The lining roll is rolled out so that the lower adhesive strip faces the crate, and the upper one away from it. These strips are needed for overlapping adjacent carpets.
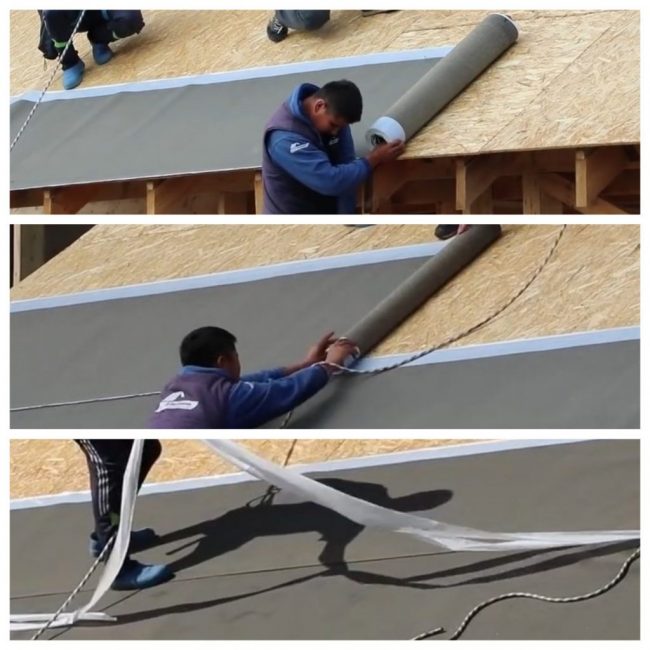
Laying the carpet strips with an overlap, removing the protective paper from the adhesive strips, and then onto the 35mm nails
Along the perimeter of the rolled carpets, mastic is smeared on the sheets of the crate. At the edges, the carpets are nailed with roofing nails by 35 mm, after 15-20 cm, retreating from the edge of 3 cm. If the roll is over, it is glued with mastic with the next roll. After laying the carpet over the entire area, proceed to the installation of eaves and end strips
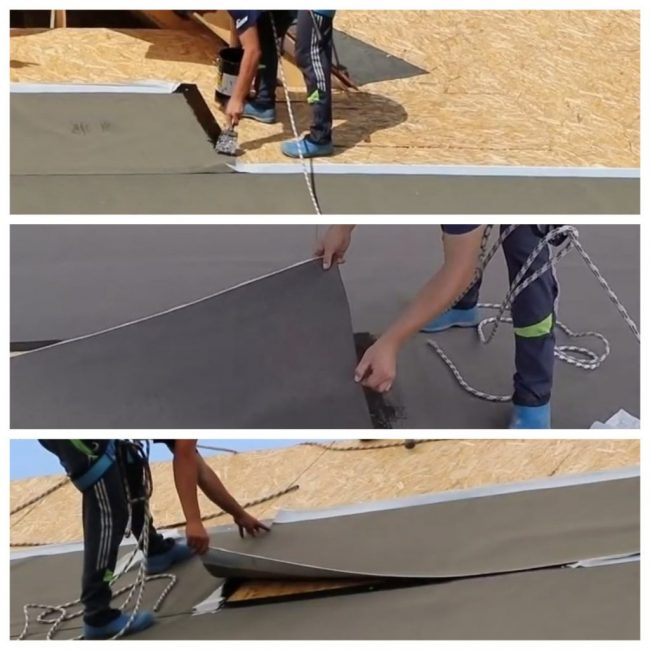
Carpet strip extensions
The first to install metal cornice strips, then the end ones. To get the eaves or end strips under each other, the corner of one of them is cut with scissors for metal. The planks are nailed with roofing nails by 35 mm in increments of 20 cm. In places where the nails are combined, both planks are pierced together

First, cornice strips are nailed, joined by cutting the corner of one of them. Similarly end (wind)
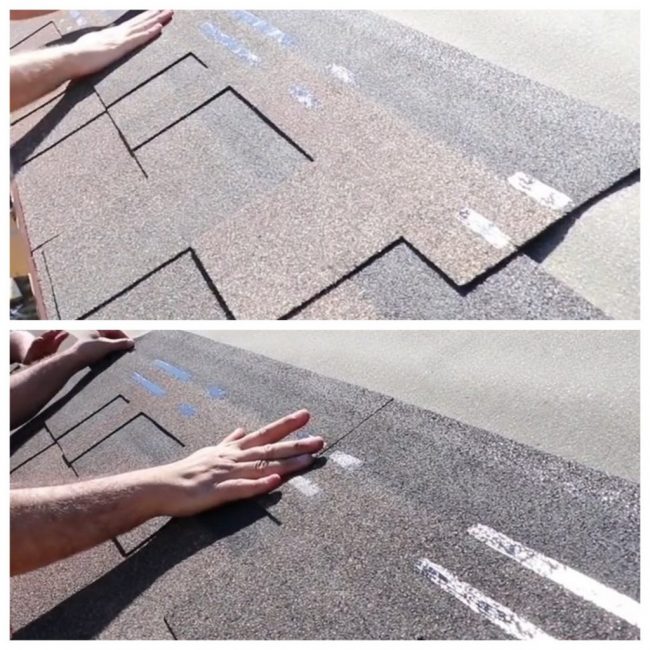
Start laying the cornice tiles. It should be laid at a distance of 10mm from the edge of the perimeter formed by the metal strips. For ease of installation, the required distance is measured along the edges of the end strips and a control line is beaten off with lacing with chalk. On the last end-to-end lay cornice tiles. They nail it on nails, as indicated in the photo.
Marking, cornice tiles are attached to the cornice strip
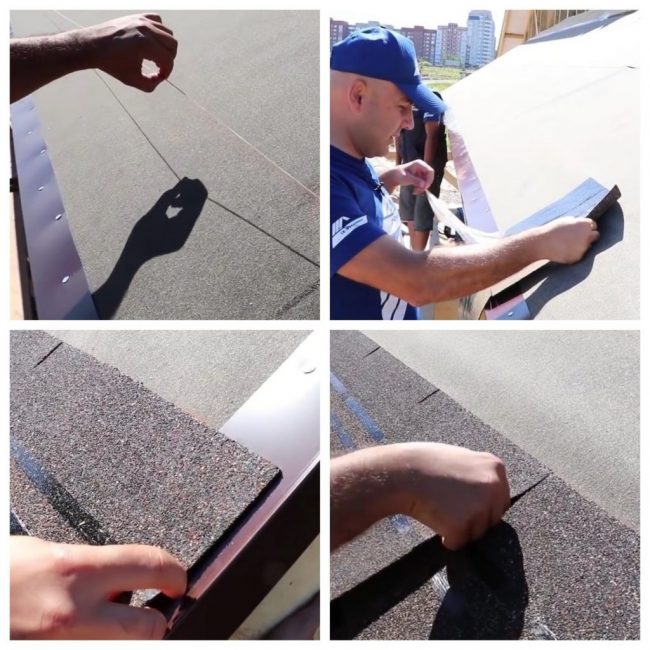
After the formation of a row of cornice tiles, ordinary bituminous tiles are laid on top of it without displacement. Docking with each other, and removing the protective film, lay the first row
Row tiles, on adhesive layer and on nails in marker places
The second row is attached with an offset, as shown in the photo. Do not forget to process the shingle petals with mastic, and also nail them under them. The following operations are repeated
Second row offset
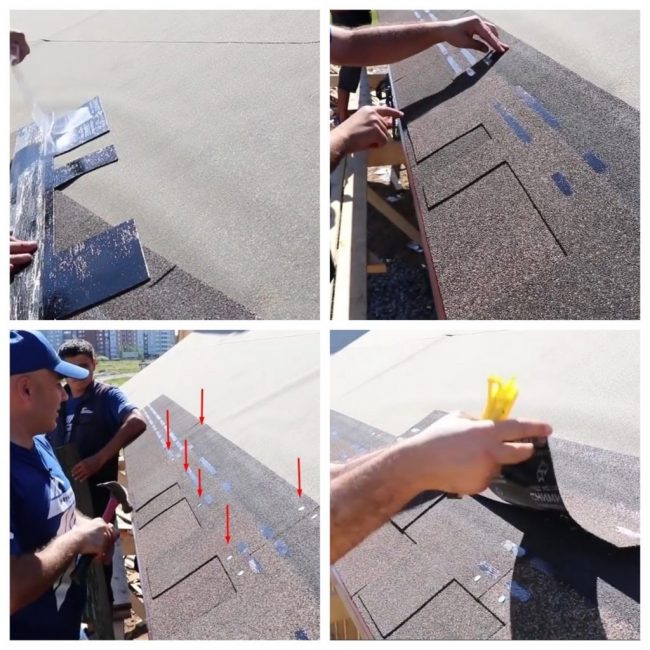
In butt places (valleys), the excess ordinary tiles are carefully (so as not to cut through the valley substrate) cut off, retreating from the axis of the joint by 5 cm.
In conclusion, the ventilation ridge slot is closed. Do this with a ventilation aerator. It is nailed to 55mm nails. Do not forget to equip the aerator with foam rubber - it is needed to restrict access to the ventilation of insects (wasps).
Ridge tiles are nailed onto the installed aerator. The latter should not be wider than the aerator.

Cutting the valleys and mounting the ridge
Installation completed
 Read also: How to make a children's house with your own hands: from wood and other materials. Dimensional drawings | (80 Photo Ideas & Videos)
 Conclusion
Installation Shinglas
To facilitate understanding of the installation of flexible tiles, it is recommended that you familiarize yourself with the following video.
Video: Installation of flexible tiles - soft roof
![[Instruction] How to lay flexible tiles yourself: description of the material, types, installation of the roof (Photo & Video)](data:image/gif;base64,R0lGODlhAQABAIAAAAAAAP///yH5BAEAAAAALAAAAAABAAEAAAIBRAA7)
Installation of flexible tiles (soft roof). VIDEO LESSON
[Instruction] How to lay flexible tiles yourself: description of the material, types, installation of the roof (Photo & Video)
Happy building!
![[Instruction] How to lay flexible tiles yourself: description of the material, types, installation of the roof (Photo & Video)](https://iherb.bedbugus.biz/wp-content/uploads/thumbs_dir/hranenie-kartofelya-oabi0j8bho5py59oto2dmtxirnxdbonsgm7sjxt2rg.jpg)
![[Instruction] How to lay flexible tiles yourself: description of the material, types, installation of the roof (Photo & Video)](https://iherb.bedbugus.biz/wp-content/uploads/thumbs_dir/Kak-Izbavitsya-ot-Bloh-v-Dome-Otzyvy-oailjjkq6ywqqt702hoc3zrfxd6gtp3a7hjdfwcegs.jpg)


