
Regardless of the type foundation he needs additional protection from moisture in the form of a blind area. Otherwise, when freezing, cracks will quickly appear in it, and the base will become unusable. It is not worth postponing the construction of such protection for later - they begin to manufacture it after facing the building. We will tell you in detail how to properly make a blind area around the house with your own hands.
Content:
 Read also: Interesting ideas for decorating your favorite dacha with your own hands | 150+ original photo tips for craftsmen
What is a blind area?
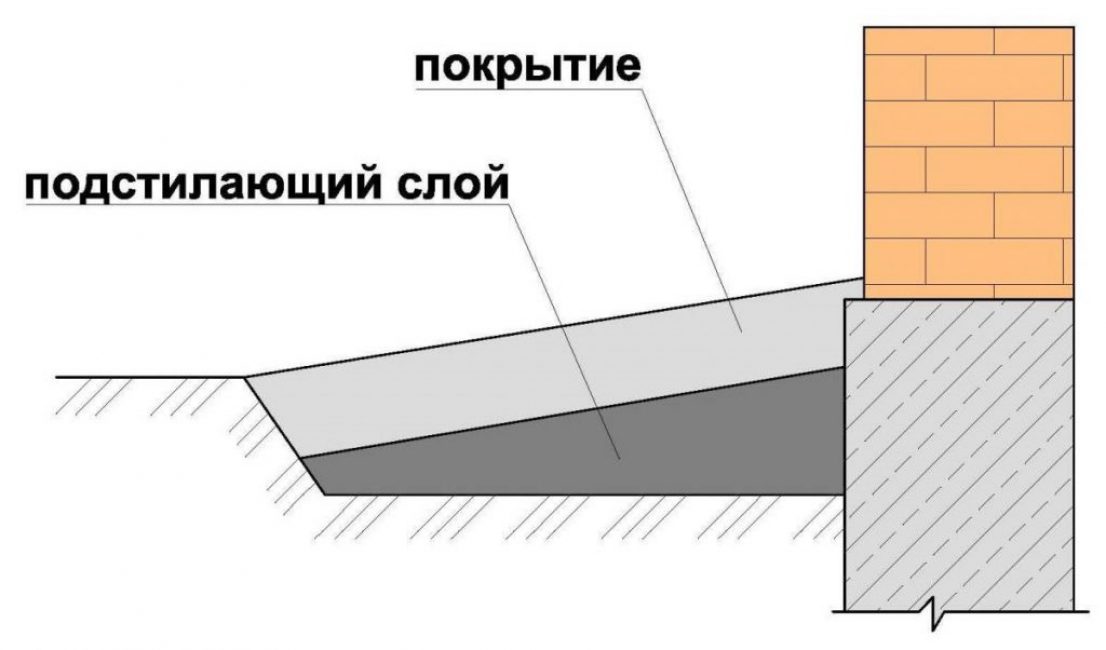
The main task of the blind area is to protect the base of the house and the basement from erosion by groundwater. Outwardly, it looks like a wide concrete strip or a strip of paving stones or gravel, which has a slight slope from the building. In its absence, the soil saturated with water will swell and destroy the structure in winter.
blind area device
The building with a blind area looks more decorative and has a finished look. It also serves as a sidewalk. Its width depends on the type of soil and the removal of the roof eaves. Such a strip is made wider than the roof overhang by at least 30 cm. Optimal Width - 0.6-1.0 m. On heaving soils - at least 1 m. With complex subsidence soils and the presence of karsts (voids) in them, the width increases to 1.5-3 m.
The depth of the structure is selected depending on the type of soil and the thickness of the finish layer. On average, it is 30-40 cm.
Blind area with drainage system
According to the type of materials used, blind areas can be of two types:
- soft: using clay, crushed stone, gravel or even lawn grass; such structures are less durable and require periodic refilling and repair
- hard: made of concrete, stone or paving stones with a thickness of 6 cm
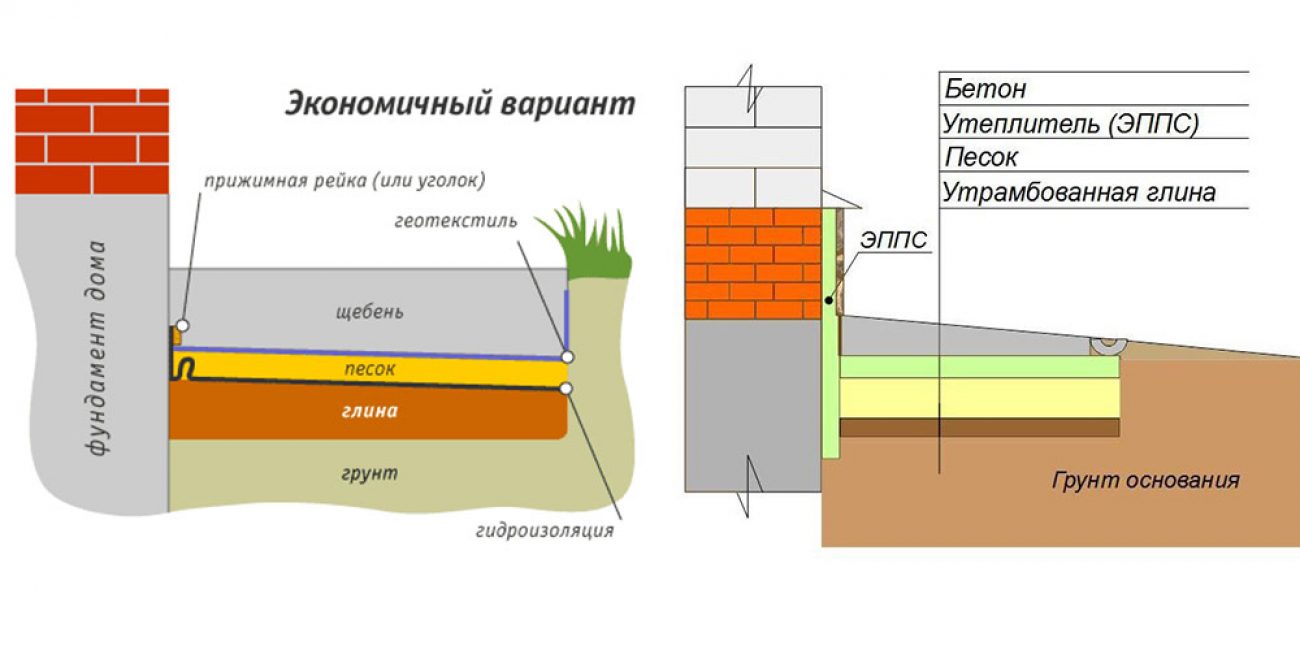
To protect the foundation from frost heaving, thermal insulation is laid in the blind area. You can use any materials that do not rot: foam, expanded polystyrene, expanded clay, etc.
Soft blind area
 Read also: How to make a swing with your own hands: design features, step-by-step instructions (drawings with dimensions) | (100 Photos & Videos)
 Design features
Rigid blind area consists of 3 layers. As first the underlying clay is used, which has waterproof properties. Its thickness is 10-15 cm.
The blind area is made at an angle
Second layer - PGS (a mixture of crushed stone and sand). Its thickness is 15 cm. When using paving slabs, so that it lays evenly, sand is poured over it and compacted. You can also use gartsovka - a mixture for the preparation of masonry mortars. Since a large load on the surface is not provided, the thickness third protective concrete layer is 5-10 cm.
To ensure the flow of water, the blind area is made at an angle. According to the norms, it should be at least 5-10%. For example, with a strip width of 1 m, the height difference should be 10 cm. Gutters (recesses in concrete) are prepared to drain water, or pipes are laid around the perimeter of the entire building.
 Read also: Landscaping your site with your own hands - (130+ Photo Ideas & Videos) + Reviews
The main stages of manufacture
Start making a blind area around the house as early as possible, preferably immediately after the construction of the building. It is better to do this simultaneously with the lining of the walls and the plinth.

Warming blind areas
- After sampling the soil to the required depth (average depth 30-40 cm, that is, on the bayonet of a shovel), it is leveled and rammed. If it is too loose, sand should be made with a slight slope from the building or the foundation pit should be fixed with carefully compacted clay.
- With heaving soils, a layer of clay is laid along the bottom of the underlying layer, and then sand is poured. On ordinary soils, only a layer of clay is enough
- The next layer is filled with a mixture of sand and gravel. It is carefully leveled and tamped
- A heat-insulating material that is not subject to decay (foam plastic, polystyrene foam) is laid on top or expanded clay is covered. So further waterproofing will be applied, fixing thermal insulation is not required
- As a waterproofing layer, it is better to use a polypropylene film. Polyethylene or roofing material is less durable and will last a shorter period. Roll materials overlap each other with a 15 cm approach to the foundation. The seams are additionally glued with construction tape. To prevent the film from moving away from the walls, it is fixed to them with mastic or wooden blocks.
Formwork manufacturing
The concrete monolithic strip is more durable and will last longer. You can also use ready-made concrete slabs.
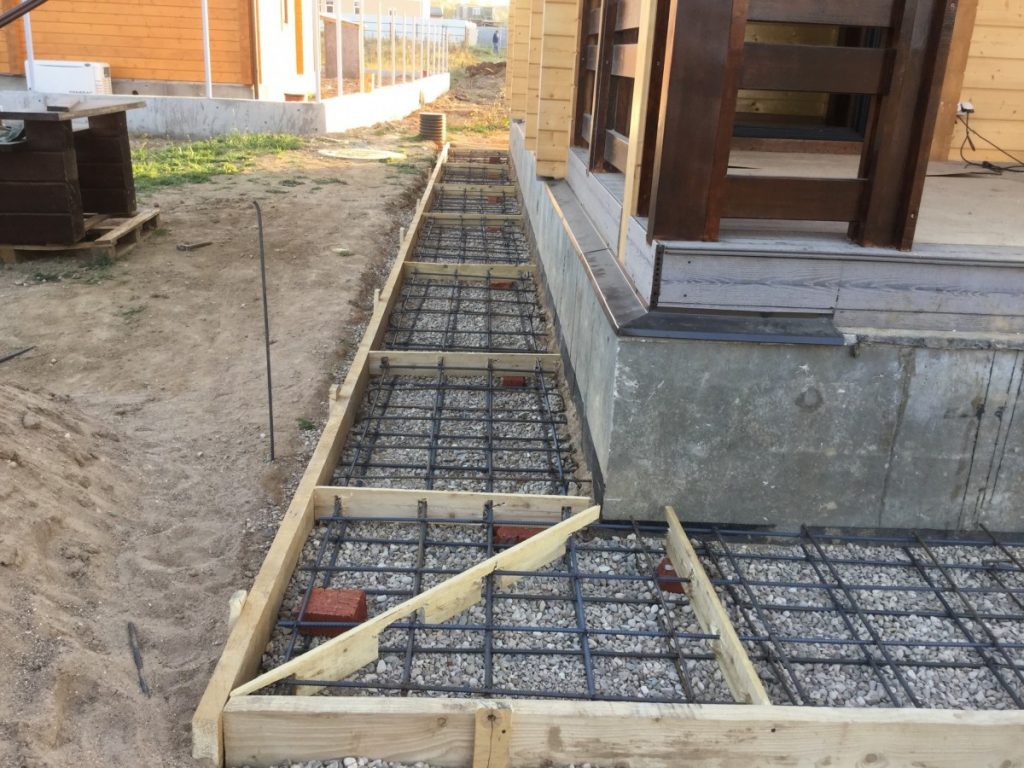
Formwork with expansion joints ready for pouring concrete
- Before proceeding with the installation of a blind area made of concrete, its thickness should be determined.
- When calculating, it is assumed that reinforcement will be laid inside it, for which 30 cm should be retreated from both sides. Thus, the minimum thickness of the blind area will be 70 mm
- As reinforcement, a metal mesh with cells of 100x100 mm or rods with wire binding is used. When using bars, the cell size is at least 50x50 cm. A strong metal frame is required so that the concrete does not crack under strong temperature changes and under the influence of physical factors
- For the manufacture of formwork, pegs are driven in along the perimeter of the pit, to which boards mounted on the edge are screwed with self-tapping screws. They are connected using 40-centimeter wooden bars and self-tapping screws.
- At the corners and at the joints, it is necessary to additionally strengthen the formwork with stakes and metal corners
- To protect against cracks, thin wooden bars must be laid across the formwork.impregnated with bitumen. They will act as expansion joints. The distance between the bars is 2.5-3 m. The structure, divided by them into squares, will not be afraid of soil movements. They are laid in such a way that the upper ribs are flush with the concrete pavement. It is also necessary to take into account its slope. When pouring the solution, they will serve as beacons for leveling
- The formwork can also be made non-removable. As it is often used curbs dug into the ground. They also need to provide expansion joints. They are then filled with sealant.
- When using drainage pipes to collect and drain water from the blind area, they are laid in the formwork
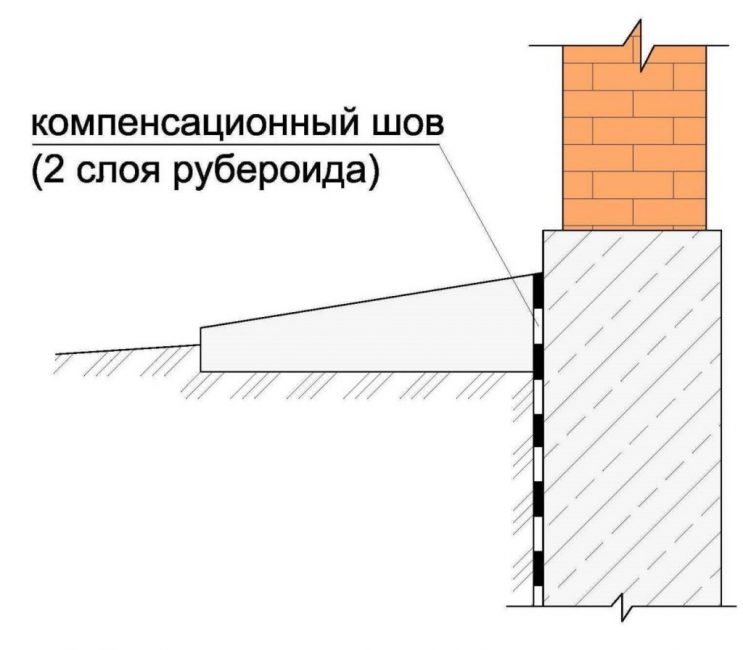
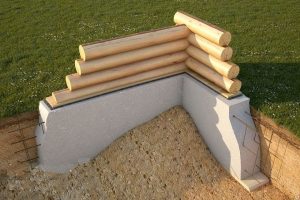
Expansion seam
Solution preparation
The strength and durability of the concrete pavement, directly depends on the quality of the solution. It is desirable to use cement with the VRC marking - waterproof.
According to SNiP, the use of cement M200 and above is allowed for the blind area. But, since its quality has not been up to par in recent years, it is better to play it safe and use the material of the M300-400 grades. For pouring on difficult soils, it is better to purchase cement grade M400. He is not afraid of moisture and tolerates sudden changes in temperature.
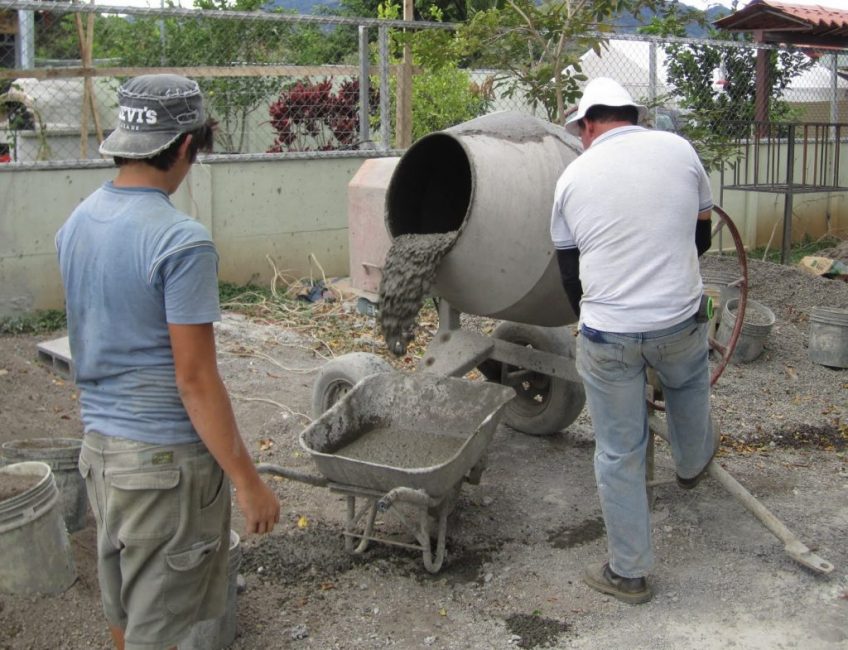
Preparation of concrete mortar
When calculating the amount of concrete, it is taken into account that about 350 kg of mortar will be needed per cubic meter of construction. The recommended pour thickness is 10-15 cm.
- Crushed stone or rubble stone is used as a filler to relieve concrete stress. Gravel is undesirable. It is too smooth and does not adhere well to mortar.
- The proportions of the solution are selected depending on the brand of cement. For example, for M400 cement with the addition of crushed stone and sand, the proportions will be 1: 3.2: 1.6. Please note that the calculation is by volume as an example, that is, in liters, not in kilograms. To calculate by weight, use the table (see photo)
- To avoid the formation of lumps, it is necessary to mix dry materials first, and only then add water to the mixture
- After adding water, the solution should not stick to the shovel, but should not drain from it either.
- It is necessary to knead it at a temperature not lower than 5 ° C, so it is not worth working during the cold season. Otherwise, the quality of concrete will not be up to par.
- Sand is used only clean, better than river sand, without admixture of clay and debris. Mix it with water to test. If the liquid becomes very cloudy, you should not use sand - it contains clay impurities
- To increase frost resistance and reduce water resistance, special additives can be introduced into the solution, for example, powdered Betonoprav or Dehydrol. For 200 kg of dry ingredients, they will need 0.4 liters. The order of their addition can be specified in the instructions.
- The solution should be used within an hour. After this time, he will seize and be unsuitable for work.
Solution proportion table
| Concrete brand | Mass composition (C:P:Sh) kg | Volumetric composition per 10 l. cement (P:Sh) l. | Output of concrete from 10 l. cement, l. |
|---|---|---|---|
| M100 | 1:5,8:8,1 | 53:71 | 90 |
| M150 | 1:4,5:,6,6 | 40:58 | 73 |
| M200 | 1:3,5:5,6 | 32:49 | 62 |
| M250 | 1:2,6:4,5 | 24:39 | 50 |
| M300 | 1:2,4:4,3 | 22:37 | 47 |
| M350 | 1:1,6:3,2 | 14:28 | 36 |
| M400 | 1:1,4:2,9 | 12:25 | 32 |
 Read also: Making a greenhouse with your own hands from a profile pipe and polycarbonate: a complete description of the process, drawings with dimensions, watering and heating (Photo & Video)
 Pouring solution

Filling and leveling the solution
- Since the concrete layer has a small height, the correct filling of the blind area is done in one step.
- Wooden transverse bars serve as beacons when pouring, with the help of which the concrete is leveled. To do this, use a metal rule (a tool in the form of a long metal rail) or a flat board
- To avoid the formation of voids after pouring, the solution is compacted with a shovel or metal pin
- After pouring, the concrete is covered with a film or damp cloth and left for a week to dry. During all this time, it is periodically (preferably a couple of times a day) watered. This will ensure uniform drying of the concrete and protect it from cracking.
- Formwork is removed no earlier than in a week. But the concrete is fully gaining strength only after a month
- To enhance the waterproofing properties of concrete, after the solution has completely set, it is better to iron it.. This can also be done a couple of hours after pouring with a still wet solution. To do this, it is sprinkled with dry cement M400 with a small 3-7 mm layer and evenly distributed over the surface.
 Read also: Peat tablets: how to use it correctly, a mini-greenhouse device for seedlings (20 Photos & Videos) + Reviews
Making a soft blind area
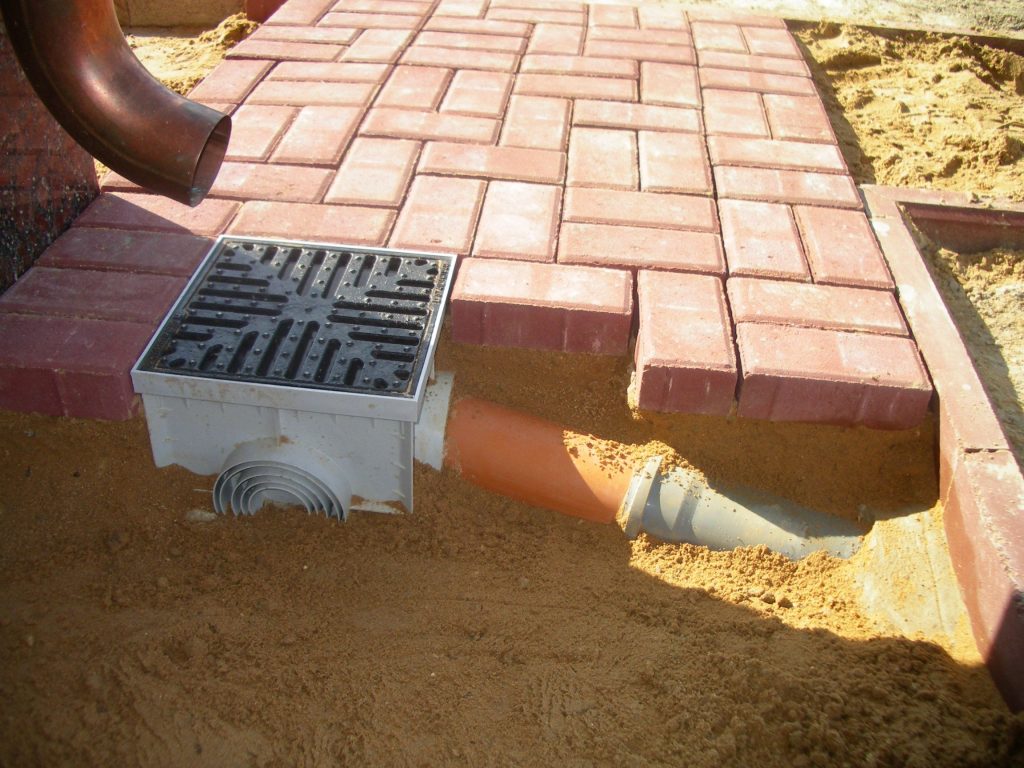
We will tell you in detail how to make a soft blind area. If water is drained using a concrete pavement more often using open trays located on the surface, then in soft blind area uses a drainage system in the form of perforated pipes, which are laid around the entire perimeter of the building.
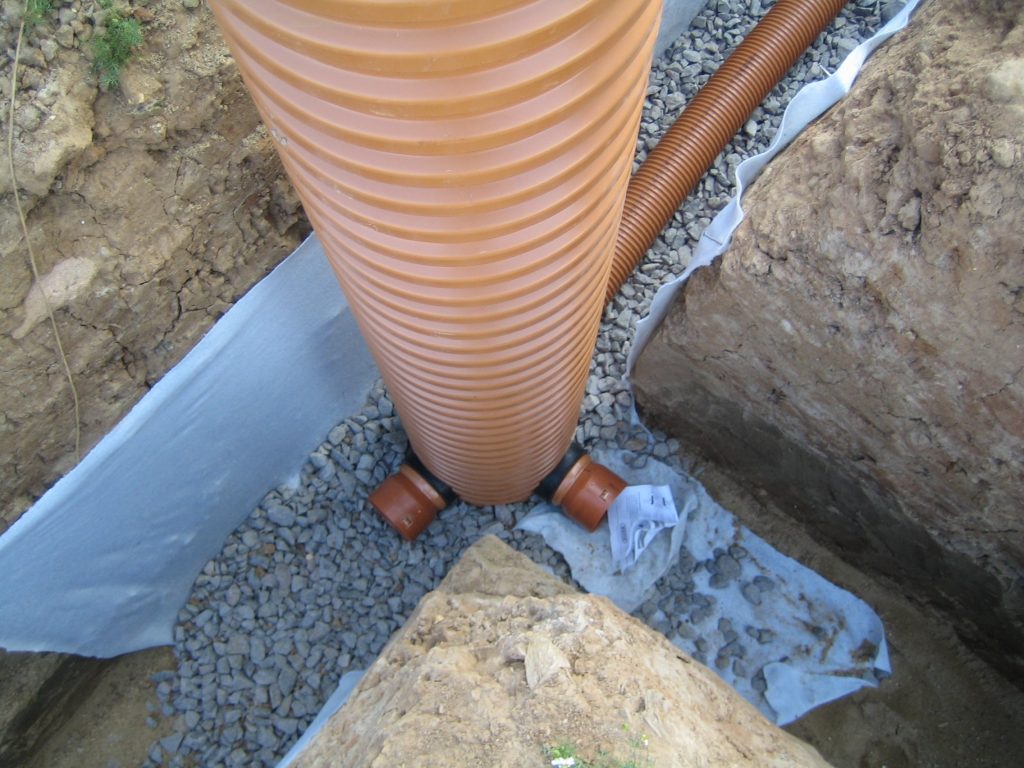
Drainage around the house
On wet swampy soils, when the installation of a concrete pavement is not possible, such structures are the only way out. Moreover, their cost is an order of magnitude lower, and the manufacturing process is much simpler. It will not be damaged even when the ground moves and will not move away from the wall.
The only drawback is that it will have to be sprinkled regularly. It is curious that in Finland this type of foundation protection is the most common.
- After preparing the trench, curbs are laid along it. They can be replaced with a small groove dug around the entire perimeter of the building
- At the bottom of the pit, a 15-20-cm layer of wet, compacted clay is poured. So that it mixes well with water, it stands for several days, stirring occasionally. Clay for these purposes requires clean, without sand impurities, otherwise the layer may swell over time. On loose soils, a small layer of sand is poured over the clay
- When leveling it, it is necessary to provide for a slope away from the building
- On simple soils, clay can be replaced with a layer of well-compacted soil.
- The next layer is waterproofing made of polypropylene film. It is laid with an overlap with a visit to the walls of the foundation
- To stabilize the coating, a layer of large gravel or pebbles is first filled up. It will help to evenly distribute the load and protect the coating from subsidence.
- A layer of crushed stone or pebbles of a finer fraction is poured over it
- The final leveling of the blind area is carried out using screening or sand
- To stabilize the layer between sand and gravel, it is desirable to lay a layer of geotextile
- The last layer is crushed stone 20-25 mm in size. Its thickness is 60mm
- In a layer of clay or compacted soil, a groove is immediately formed for laying perforated drainage pipes. You can replace them with metal pipes in which 20 mm holes are made.
- To protect the holes of drainage pipes from silting and clogging with soil, they are wrapped in geotextiles.
- Water is discharged into a trench dug to a depth of 1 m, which is covered with a mixture of crushed stone and soil in a ratio of 7: 3
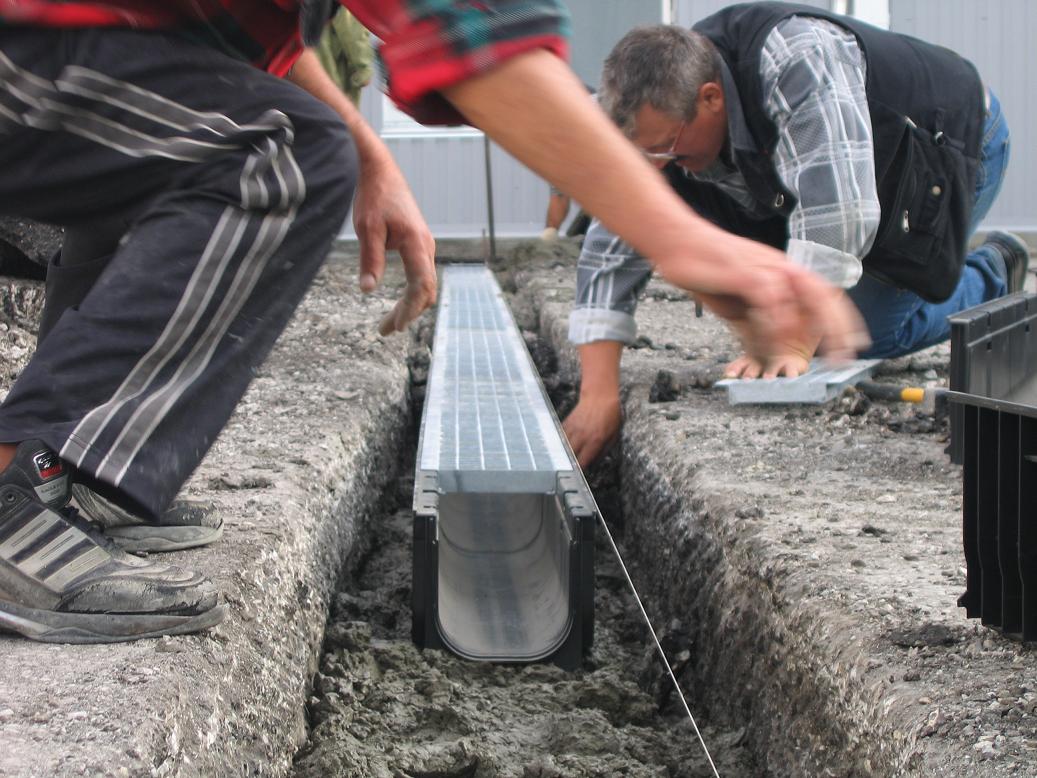
Laying drainage trays for water drainage
 Read also: How to make a children's house with your own hands: from wood and other materials. Dimensional drawings | (80 Photo Ideas & Videos)
 Production of pavement from paving stones
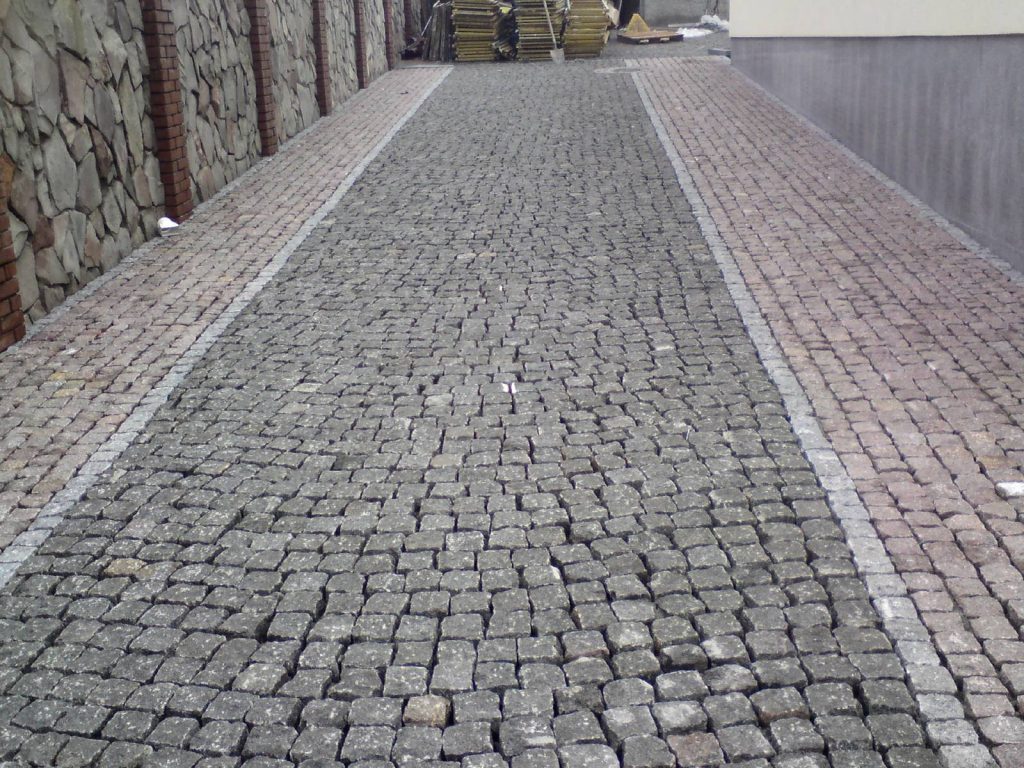
Paving stone pavement
In addition to protecting the foundation from moisture, such a blind area also performs a decorative function. It looks much more solid and attractive than a concrete coating.
Pit preparation
- Just as in the case of concrete, the pavement pavement consists of two main layers - a hard coating and a bedding (cushion) of crushed stone and sand
- If you have never worked with tiles, it is better to lay out small ones. Working with large-sized paving stones is more difficult. In the absence of experience, a lot of time will be spent on laying corners
- The width of the blind area must be calculated in such a way that tiles didn't have to cut
- After determining the dimensions of the blind area along the perimeter of the building, a layer of sod is removed and the soil is removed to a depth of 30-40 cm. The soil in the prepared pit should be carefully compacted. In this case, it is immediately necessary to take into account the slope, which is done away from the building
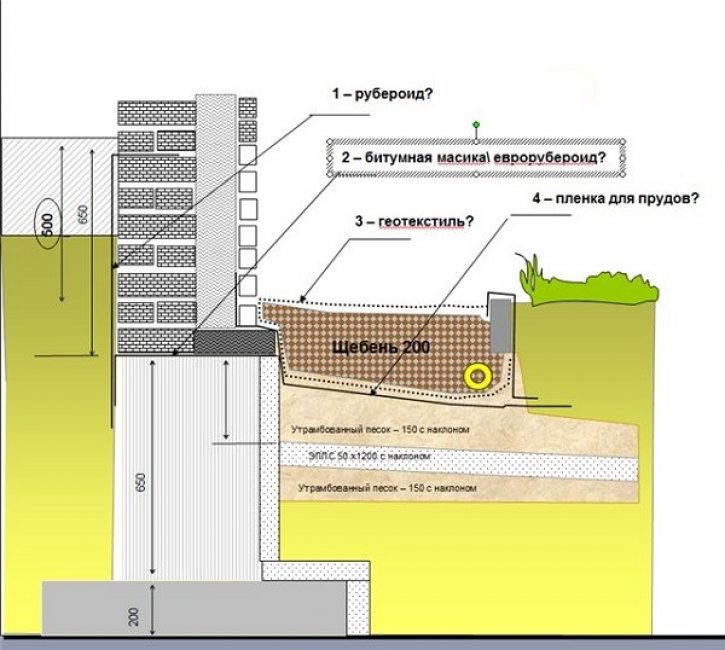
- Between the blind area and foundation a compensation gap 1-2 cm thick should be left. It is filled with a roofing material folded in half or covered with sand
- At the bottom of the pit, to protect the soil from moisture penetration, it is recommended to provide a clay castle - a 10-15 mm layer of wet, carefully trampled clay. It is pre-soaked for a couple of days in water so that it becomes plastic.
- Pegs are placed at the corners of the prepared bed and a string is pulled, which will serve as a guide when laying out the paving stones
- The border is laid strictly along the cord. The horizontal position of its location is verified by the building level. To avoid displacement, it is temporarily fixed with pegs. After filling the rubble they are removed
- To prevent the blind area from spreading, the border on the outside should be fixed with cement mortar
- To protect against moisture, the pit is covered with a layer of roofing material, film or geotextile. They are laid with an overlap on the foundation, pressing the edge with wooden slats.
- Perforated pipes are laid along the perimeter of the blind area to equip the storm system.
- Next, a layer of sand is poured, and then rubble. They are filled with water and carefully rammed.
- Inexpensive polystyrene foam or more durable polystyrene foam are used as insulation. To level it and protect the insulation from damage, after filling the rubble, add a little more sand on top. It is unacceptable to lay polystyrene foam or expanded polystyrene immediately on rubble
- The last, finishing layer is a mixture of cement and sand in a 4: 1 ratio. It will be tiled. Don't forget to align it with the slope away from the building.
 Read also: How to make a booth for a dog with your own hands: building a home in the yard and in the apartment. Drawings, dimensions and original ideas (55+ Photos & Videos) + Reviews
 paving stones
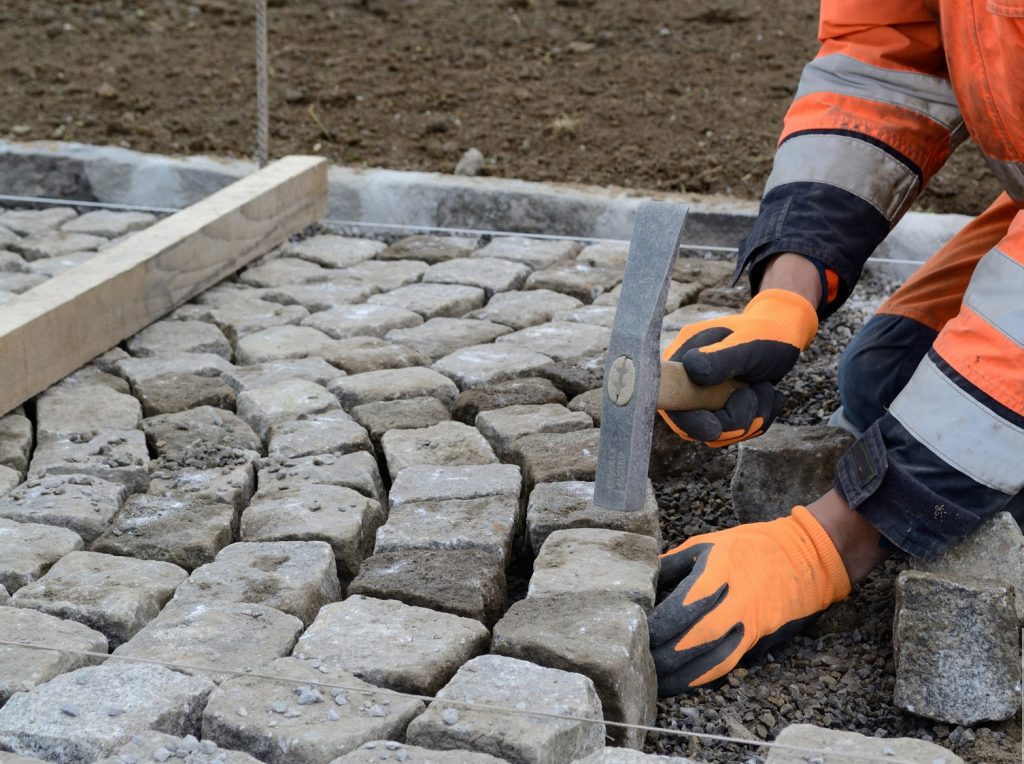
Laying pavement from paving stones
- Laying tiles starts from the foundation. It is more convenient to do this from yourself, so as not to damage the compacted cement-sand cushion
- Each tile is leveled with a building level and adjusted to the next one with a rubber mallet. In order not to damage the paving stones, this must be done through a wooden block. If the tile lay unevenly, a small layer of cement and sand is poured under it
- The gap between the tiles is best set with plastic crosses. The size of such a gap is 2 mm
- Cut tiles and edging paving stones (it is used in the absence of a curb) are laid last
- The joints are grouted with the same cement-sand mixture that was used to fill the pillow. After their grouting, the surface is swept with a broom so that the mixture is well distributed in each of the seams, and then spilled with water
 Read also: Do-it-yourself furniture and other wood products: drawings of benches, tables, swings, birdhouses and other household items (85+ Photos & Videos)
 Common Mistakes
Inexperienced builders often make the same mistakes when building a blind area.
Here are the most common ones:
- insufficient width: water flowing from the roof will fall on open ground, soak into the ground and gradually destroy the foundation
- a slight slope of the surface and, as a result, the accumulation of water in the foundation area
- violation of proportions in the manufacture of concrete: measuring components by eye often leads to the preparation of poor-quality mortar, cracking of the concrete blind area; through the cracks formed, water will freely penetrate into the soil, and there will be little benefit from such a blind area
- no waterproofing layerprotecting soil from moisture penetration
- lack of insulation: in the process of frost heaving due to the formation of cracks, the foundation will begin to collapse; Therefore, saving on heat-insulating materials is not worth it.
The author of the following video shares his own experience in replacing the old blind area on loamy soil:

VIDEO: Blind area at home, we do it right!
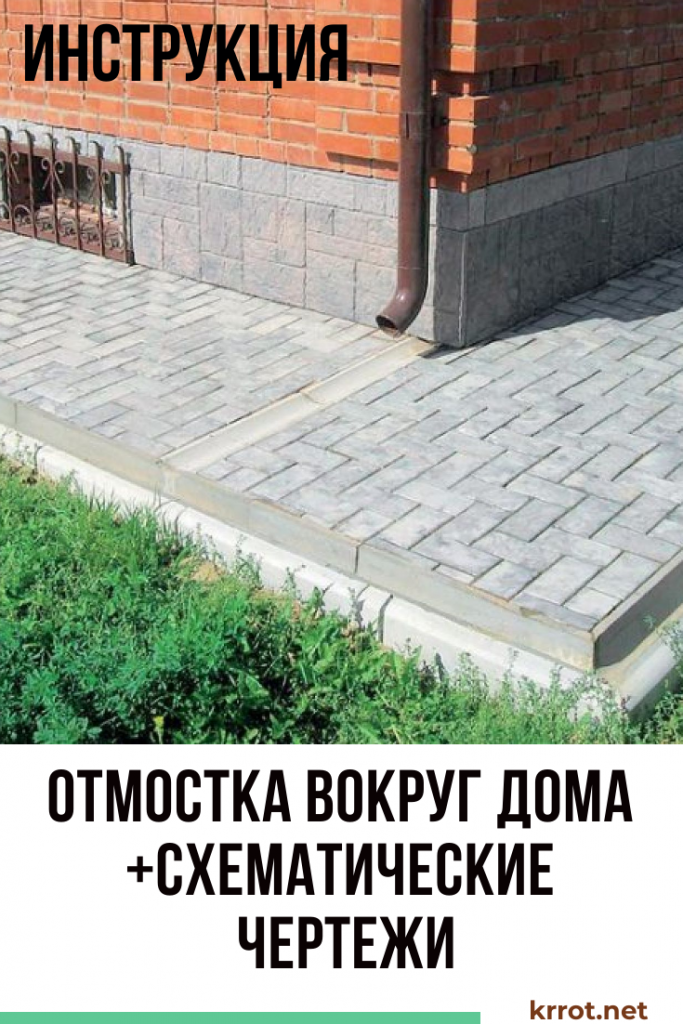
The blind area around the house: views, device, schematic drawings, instructions on how to do it yourself (30 Photos & Videos) + Reviews
 Read also: Foundation: types, device, step-by-step instructions for laying a strip foundation with your own hands | Photo & Video +Reviews


You read such articles, and you don’t want to build anything anymore.
How tedious and expensive! Build houses on stilts.