
It makes no sense to spend significant funds for the construction of a building in which it is planned to store only garden tools and household trifles. It is enough to build a wooden frame and sheathe it with boards. A warm building can be assembled from foam or cinder blocks. Let us consider in detail how to build such a barn with your own hands in stages.
 Read also: Veranda attached to the house - expanding the living space: projects, tips on how to create your own hands (200 original photo ideas)
Place to build
If you have just started developing the site, it is better to immediately designate the zones of future buildings. Draw a detailed plan and pay attention not only to their location, but also their placement relative to each other.
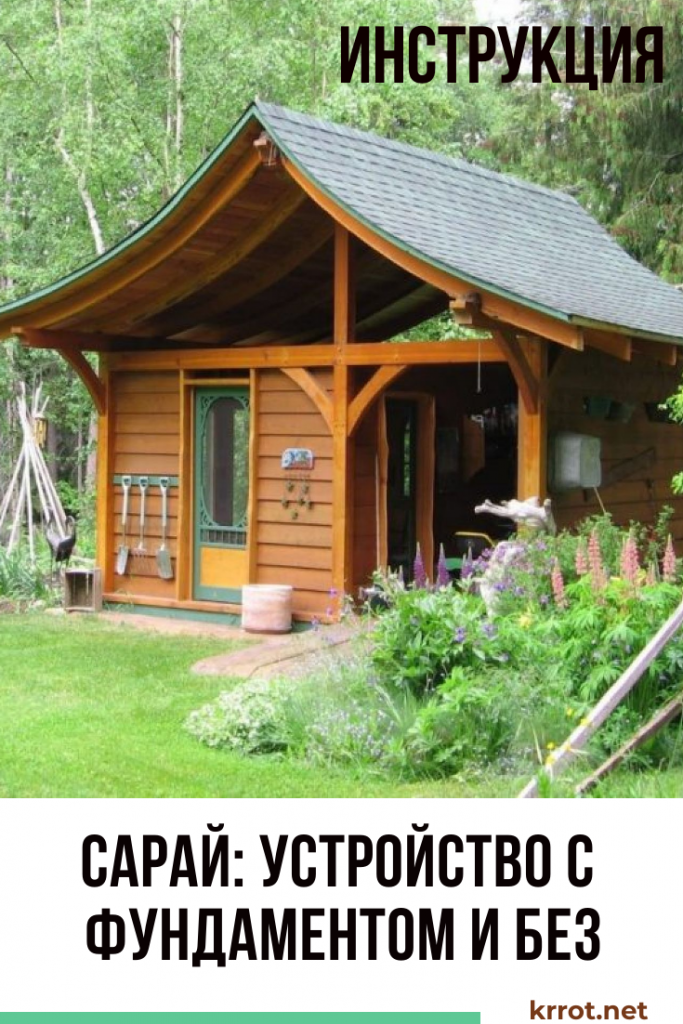
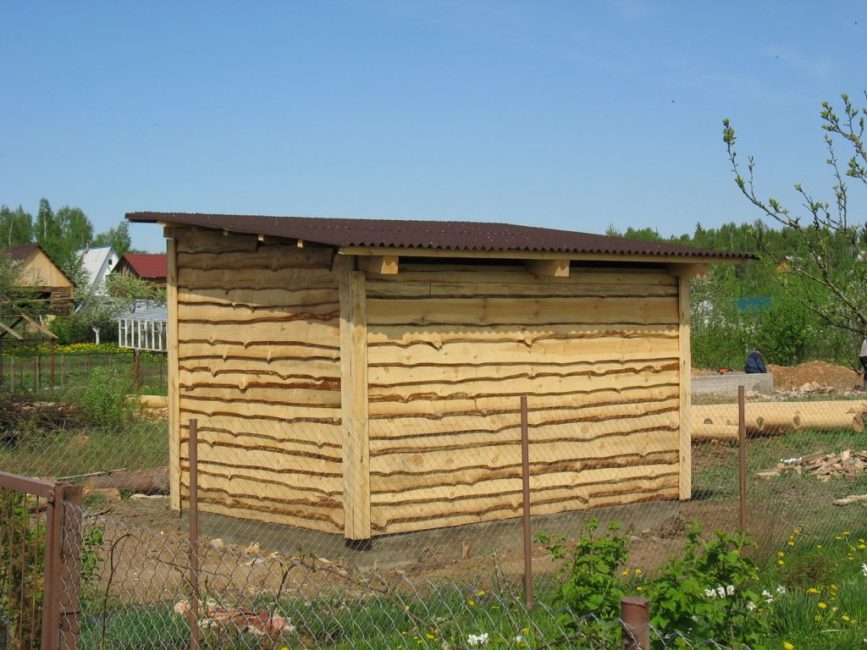
wooden barn
It is desirable to take a place for a barn near the houseso that every little thing is always at hand. You can disguise such a building with the help of green spaces.
If the area of the site does not allow you to completely hide the utility block behind a residential building, the barn is sheathed with inexpensive finishing material, for example, siding. A wooden building will look more presentable if the boards for its sheathing are carefully sanded, oiled, and then covered with stain, varnish or simply painted.
It is not worth building a barn in the shade or in a lowland - due to high humidity, the foundation will quickly become unusable. So that the building does not block the neighboring buildings and plantings from the sun, it will be necessary to retreat 1 m from the neighbor's fence. In the case of breeding animals in the household unit, at least 4 m. At the same time, there must be at least 12 m to the neighbors' residential building.
 Read also: How to insulate a private house with your own hands: roof, walls and foundation, description of thermal insulation materials offered on the market (Photo & Video) + Reviews
 Barn with wood frame
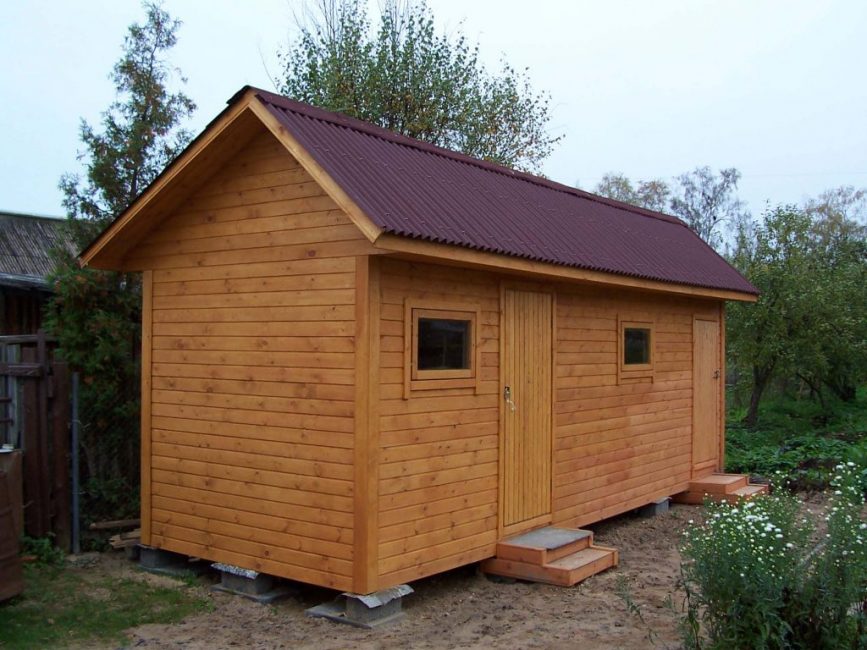
wooden barn
An inexpensive wooden structure with sheathing from edged boards or even slabs can be erected in a matter of days in the absence of any experience in construction. It will take no more than 2-3 days to assemble it. We tell you how to build a frame barn in stages.
Required Materials
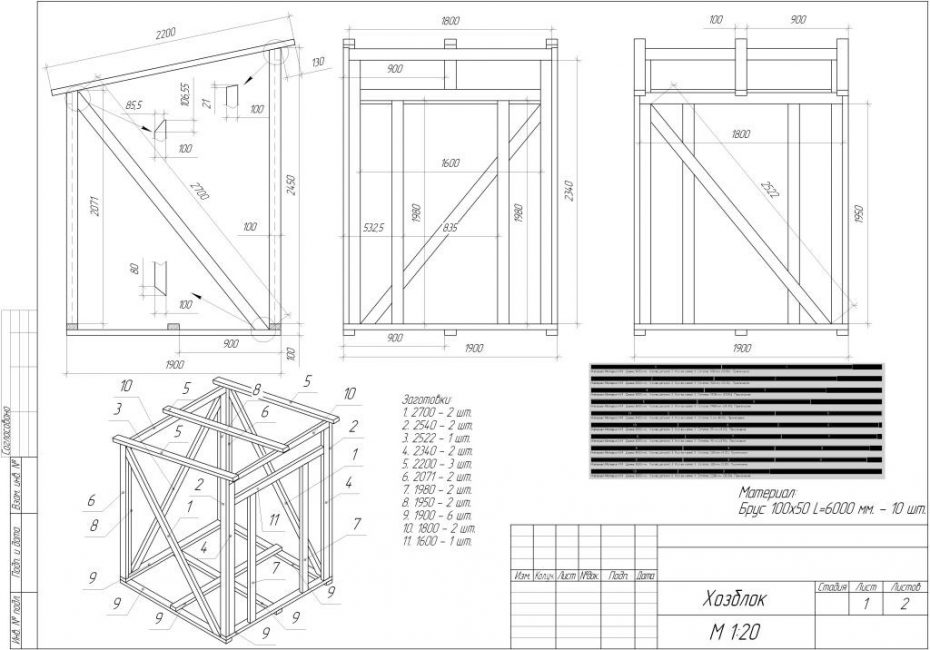
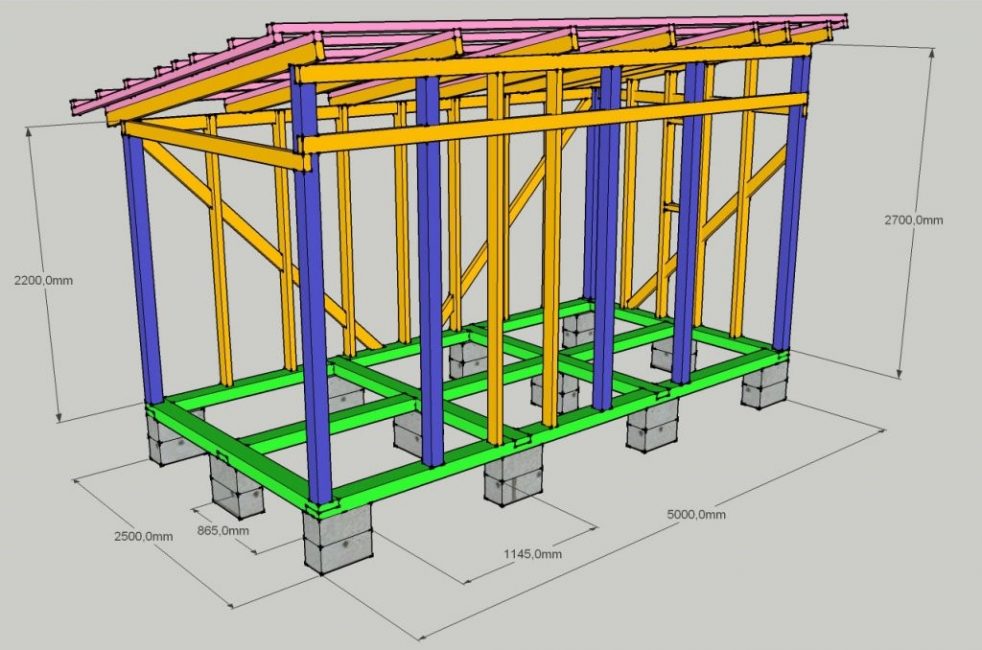
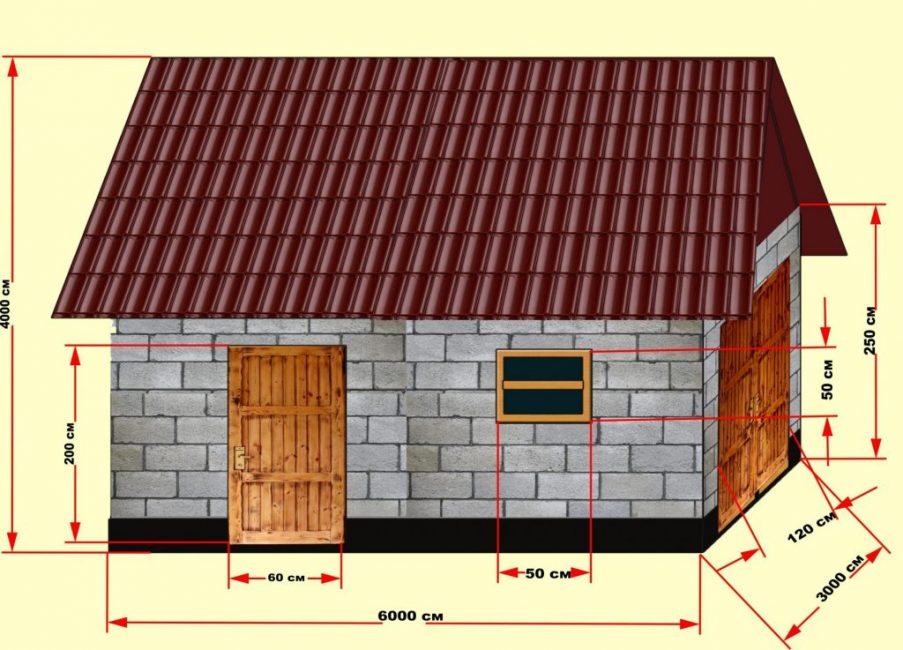
Drawing of a small hozblok
The amount of materials used directly depends on the height, length and width of the future structure. Its minimum size is 2x2 or 2x3 m. The height is 2.0-2.2 m. In a shed measuring 2x4 m, it will be possible to store not only household items and tools, but also firewood.
For its construction you will need:
- 0.5 cu. m of sand for filling under the supports foundation
- concrete blocks to create supports: for a small building, 7 pieces will be enough, 4 of them will be located at the corners of the building, 2 additional ones will be placed in the center of the long sides, and 1 block will be installed in the very center - the central floor lag will rest on it
- a pair of roofing felt rolls: for laying between concrete supports and joists, as well as roof waterproofing
- timber 100x100 mm for the construction of the frame, rafters; it will also be used to produce the upper frame for a shed roof
- beam 50x100 mm for creating window and door openings and horizontal beams of the frame
- 6-meter edged board: 11 pieces for arranging floor logs, rafters, crossbars and braces of a small building will be enough; the cross section of such a board is 50x150 mm
- 25-30 mm board for battens and floor; it is measured in square meters, you will need no more than 14 square meters. m
- edged board 25 sq. m for building sheathing
- 12 kg of galvanized nails 70-150 mm and 3 kg of self-tapping screws
- slate, metal profile or roofing material and self-tapping screws for them; for example, when purchasing a 2.5-meter profile, you will need 8 sheets
- door, window or window blocks, as well as hinges and handles for them
- about 10 l. drying oils and paints for covering wooden sheathing in 2-3 layers
Is a foundation needed?
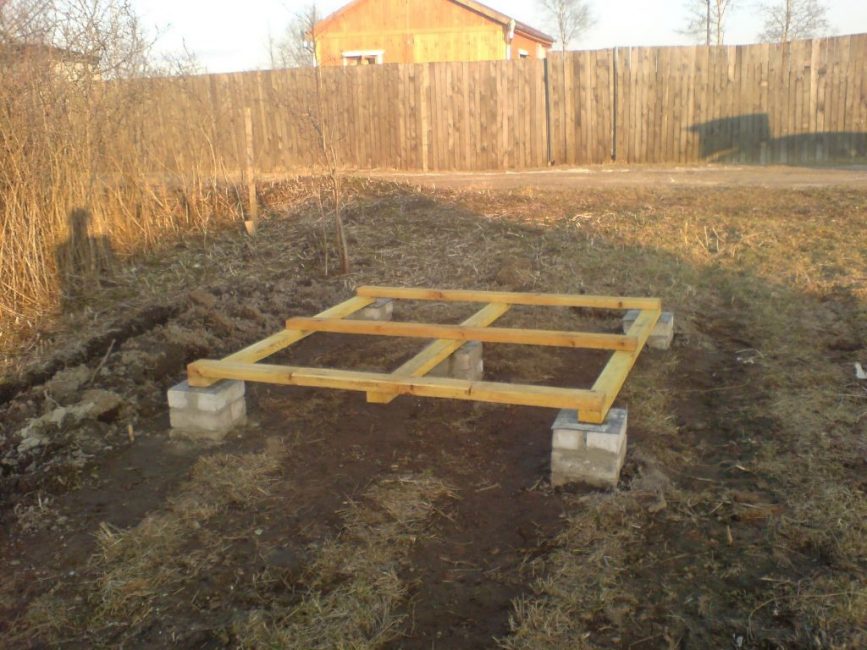
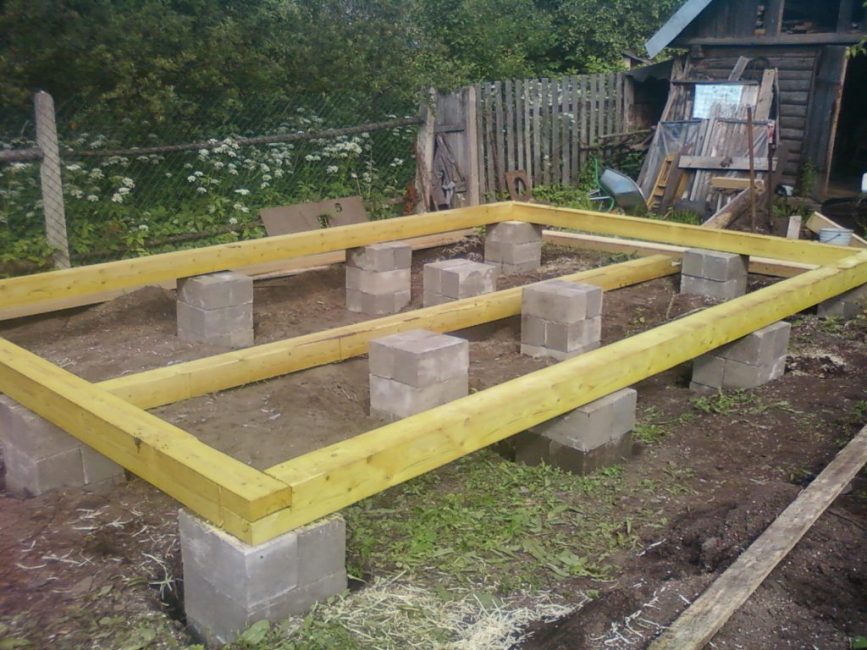
Building on concrete pillars
When building a barn in the country from light boards, the mass of the building will be insignificant. Therefore, you can completely do without a foundation, replacing it with supports made of concrete or brick blocks. They are installed around the perimeter of the future building every 1.0-1.5 m.
- To begin with, the site on which the construction will be carried out must be leveled. The top layer of soil (sod) is completely removed to a depth of 20-25 cm. It will also be necessary to uproot the roots of shrubs and trees. Otherwise, during germination, they will damage the structure.
- Concrete blocks can be purchased ready-made or you can make them yourself from cement mortar. It is more convenient to use asbestos-cement pipes as formwork. They are installed in the ground, reinforcement is laid inside, and then concrete is poured. You can also use brick to create supports.
- Pits are prepared for the installation of ready-made blocks 30x30 cm deep on the bayonet of a shovel (20-25 cm), into which sand is first poured. Six supports are located a meter apart from each other along the perimeter of the building, the last, seventh - in the center
- Blocks are installed flat in a strictly horizontal position. If necessary, add sand for leveling
- On wet soils, it is better to first fill the area with rubble. To protect against moisture, before installing the supports, a layer of waterproofing from a thick film is laid. It is laid on the ground with an overlap and fastened together with construction tape.
Strip foundation
You can replace concrete or brick blocks with wooden poles dug into the ground to a depth of 50-60 cm. To protect against decay, their lower part, which will be in the ground, is pre-fired at the stake, treated with bitumen and wrapped with roofing material. In the future, wooden supports are attached to the pillars, and then the shed frame itself.
The method of assembling a building on pillars is more economical - after all, you don’t have to spend money on concrete. But it is better to use it on sandy dry soils. On swampy clay soil, racks dug into the ground will quickly become unusable, and the building will simply collapse.
Frame assembly
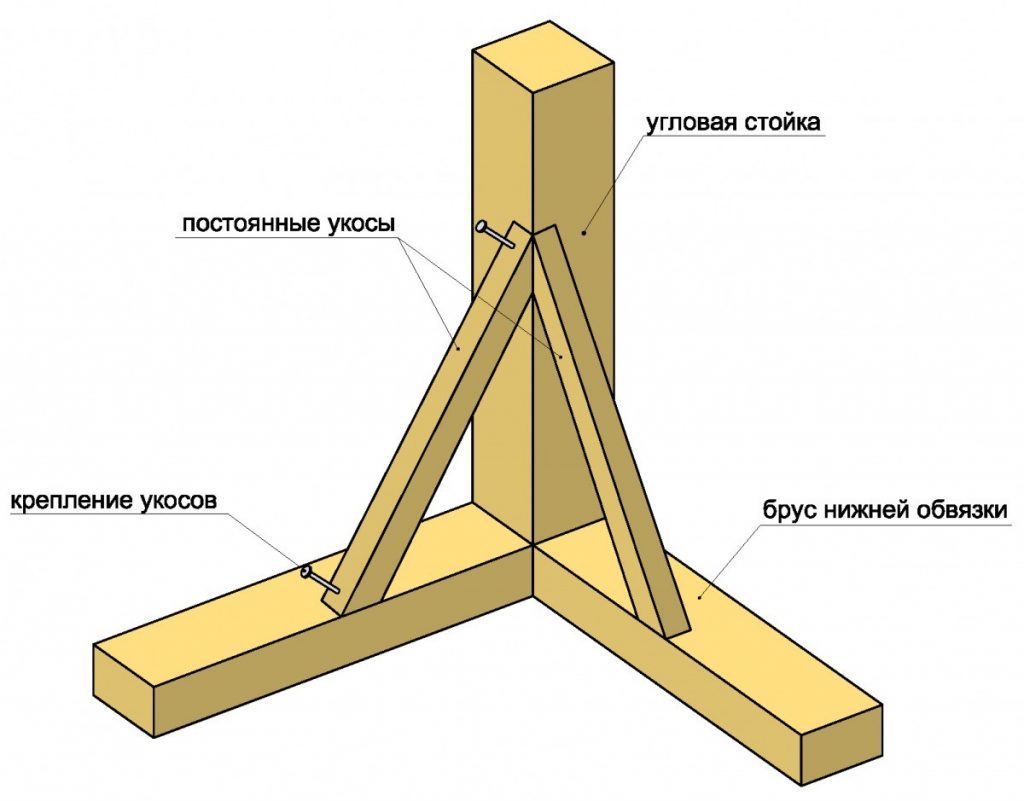
The slopes are attached on both sides of the rack
Construction begins with the assembly of the frame. It consists of a lower, upper trim (crown), running horizontally, as well as vertical corner and intermediate posts:
- The lower trim of the frame must first be waterproofed. Otherwise, moisture from the concrete will penetrate into the wood. For these purposes, a double layer of roofing material is laid on concrete supports.
- The bars of the lower trim are laid not only around the perimeter of the building, but also in the center. They are connected to each other by a “cut in half a tree”. In the absence of experience, cutting out such a connection may seem difficult. It is especially difficult to get an accurate cut across the grain. Yes, and maintaining right angles without a habit is difficult. It is better to leave a small supply of wood, and then bring the cut to mind with a file
- Additionally, the junction can be strengthened with metal corners and self-tapping screws.
- To the supports, the bars are mounted with anchors using nuts
- When using a beam of 50x100 mm to give the frame greater rigidity, the bars are installed on the edge
- Next, racks are attached to the corners.To strengthen the structure, they are supported by braces (cuts) located at an angle of 45 °
- Intermediate racks are placed every 1-1.5 m
- Door racks are attached at the location of the door. The distance between them is equal to the width of the future door
- Corner and intermediate racks are interconnected using strapping - bars located horizontally in the upper part of the frame
- For the convenience of its assembly, you can temporarily throw the floorboards without fastening
- It is better to install the front door immediately. Doing this after sheathing the structure will be less convenient.
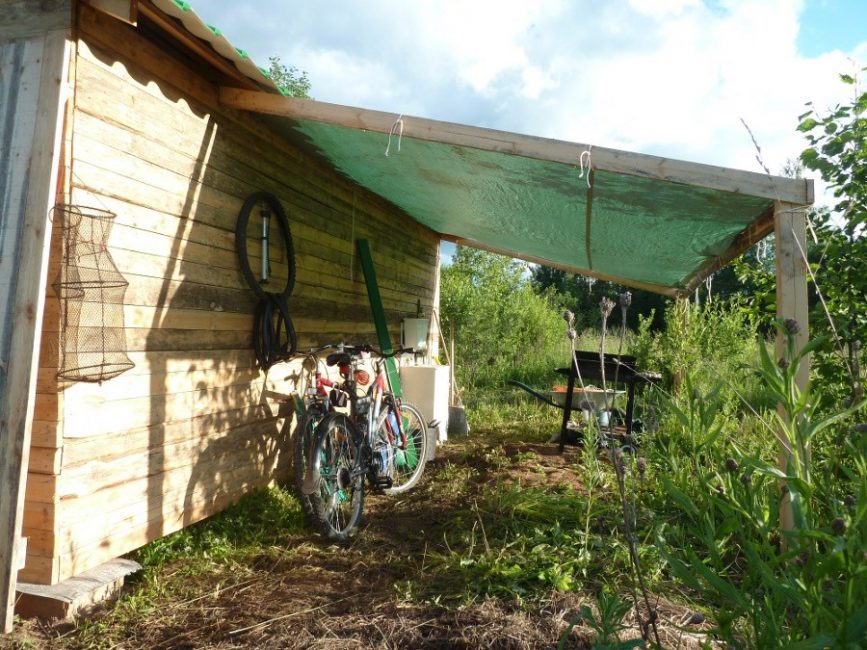
Canopy attached to shed
Log laying. Installation of floor boards
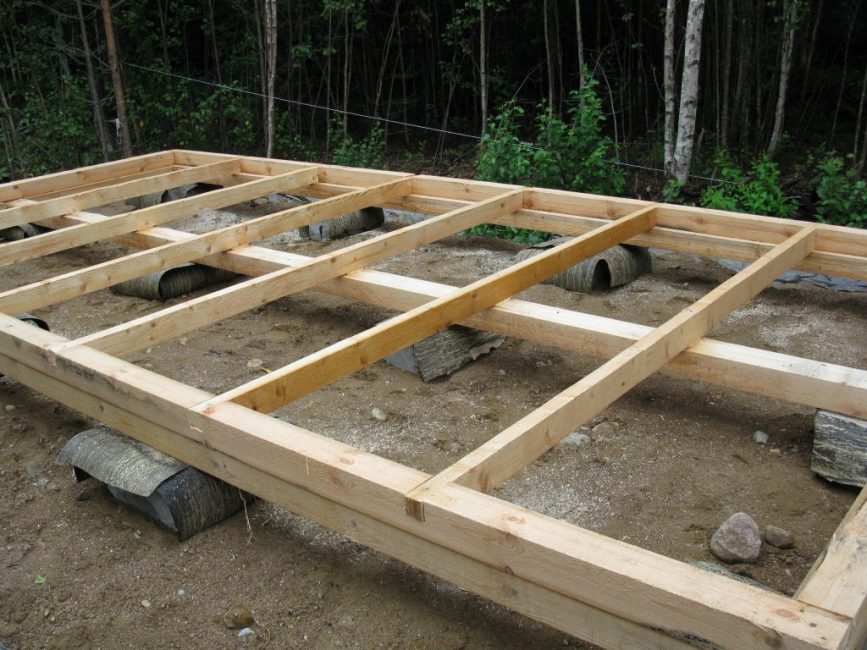
Log laying
To obtain a solid floor, it must rely not only on the base trim, but also on the logs:
- They are laid on top of the frame strapping with a minimum step of 75 cm and screwed onto metal brackets with self-tapping screws.
- As a floor, it is better to use a grooved board or OSB-plates
- To give the floor strength, the logs are placed parallel to each other along the short side of the building. The distance between them is 1 m
- To avoid floor deflections, additional blocks of bricks can be placed under the logs.
- The floors in the barn can also be assembled from old pallets (pallets). They are laid on bricks, and then connected to each other. Plywood is laid on top
roof rafters
The rafters are laid on the Mauerlat
How to build a simple barn roof? For frame wooden buildings, it is enough to use its single-sided version. To create such a roof, it is enough to make the front wall of the building 20-40 cm higher than the back. Thus, the height of the front wall will be 2.2-2.4 m, the back - 2 m.
- Even before the stage of erecting the rafters in the barn, it is necessary to lay the floor - work will be much easier
- A complex roof system, consisting of a large number of racks and rafter legs, is needed only for buildings with a length of 6 m or more. For a small barn, it is enough to attach holes (cuts) in the inclined rafters to insert the Mauerlat - support bars and make several jumpers in the rafters
- The rafters are placed parallel to the short walls in increments of 1 m. A crate is screwed on top so that a 30 cm outlet is formed on the sides
- Further rafters are sheathed with a croaker or board, and then the roof is covered with roofing material
The simplest shed roof
Roofing materials
As a roof for sheds, classic asbestos-cement slate, profiled sheet or roofing material is more often used. We will not consider such expensive materials as ondulin or flexible tiles in this article.
The advantages of slate are many. It is characterized by high strength and durability. However, due to its significant mass, it requires the installation of a reliable crate. It is problematic to lift it to the roof alone - you will need an assistant.
Double-pitched roof made of profiled sheet
A profiled sheet or metal tile will not cost too much. Products with a protective color coating look quite presentable and are able to serve faithfully for many years. Their main disadvantage is that the metal is able to amplify the sound many times over. In the room, even the sound of raindrops on the roof will be heard. But for non-residential premises, this disadvantage is not so important.
If you decide to build a barn as cheaply as possible, several layers of roofing material can be used as roofing material. When arranging a pitched roof, it will not be conspicuous, so its aesthetic properties are not important in this case. But, since the strength of this material is low, after a few years the roof from it will require replacement. It is laid in 2 layers. The joints are closed with wooden planks 40x25 mm.
Building sheathing
Sheathing overlap
It is better to nail the boards not end-to-end, but overlapping, overlapping each other (see photo). Material consumption in this case will be slightly higher. With this method of fastening, there will be no gaps, and rainwater will flow down freely. Plus, the building will be more reliably protected from the winds. Yes, and such walls will look more solid.
 Read also: How to make flower pots with your own hands: outdoor, indoor, hanging | Step by Step Charts (120+ Original Photo Ideas & Videos)
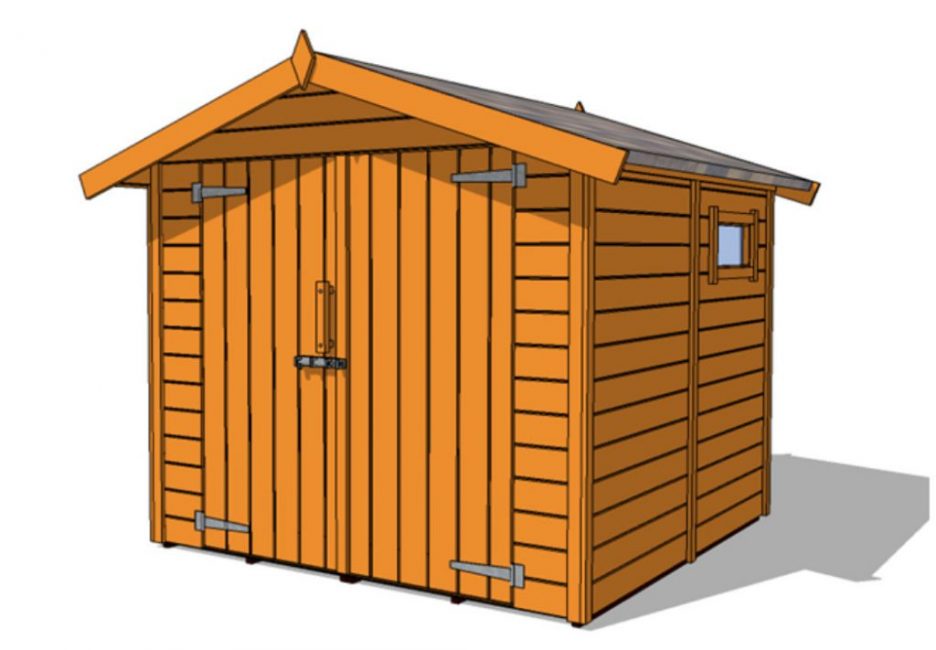
Building from foam blocks
Barn from foam blocks
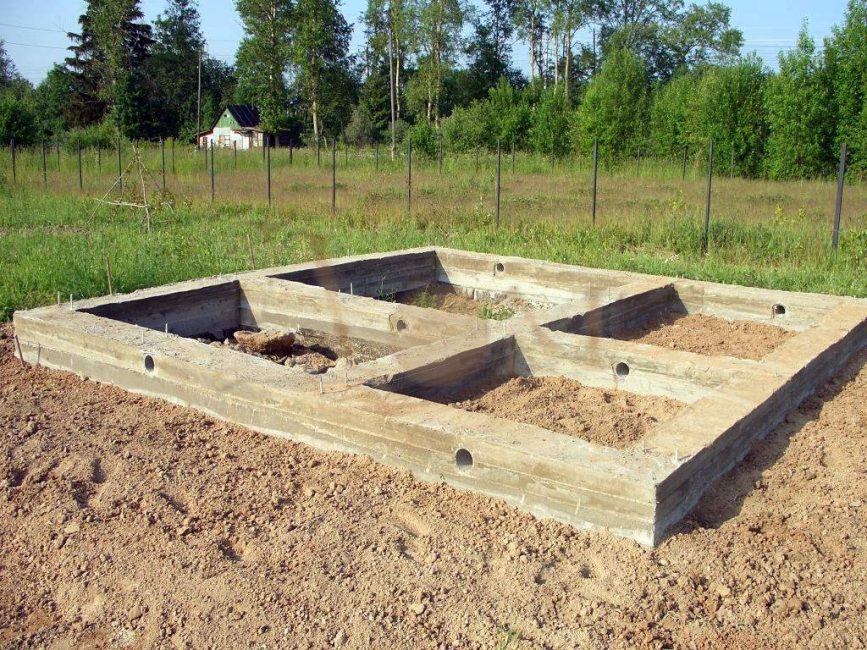
Such a structure will turn out to be more solid and reliable. Since the blocks are lightweight (up to 11 kg), their installation will be as simple as possible. But still, the total mass of the building will turn out to be considerable, so it will require arrangement foundation. Otherwise, under the weight, he will eventually settle into the ground, and he will be led.
Choosing the type of foundation
Column Foundation
The choice of base depends on the severity of the structure and the characteristics of the soil:
- on loose sandy, not too stable soils, piles are more often used; there is simply no point in using an expensive slab foundation for building a barn from foam blocks
- on clay soils that can freeze to a considerable depth, it is better to stop on a pile or strip foundation; for the construction of a small mass, it will not be necessary to deepen it too much
- for soils with a significant content of gravel, the ideal option is a columnar foundation
- for rocky soil use any type of base, except for screw
Laying foam blocks
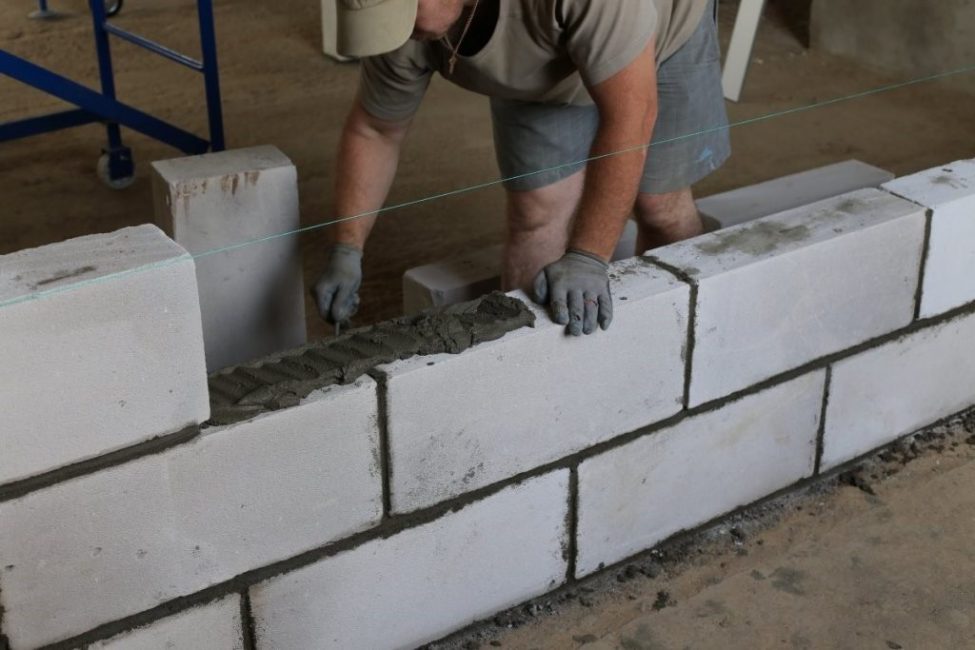
Laying foam blocks
You can build such a barn quite cheaply and quickly. The standard dimensions of foam blocks are 20x30x60 cm, so the process of building a building from them will be much faster than from bricks.
- The concrete base is preliminarily waterproofed with roofing material or hydroisol
- Laying is carried out on a special glue, which can be purchased ready-made, or cement mortar (proportions of cement-sand 3: 1)
- The first block is installed at the highest point. In the future, it will serve as a beacon for aligning the remaining blocks horizontally. It is laid out only on cement mortar. Glue is not used in this case.
- Then a second block is placed in the opposite corner of the wall. A thread is pulled between the blocks to align the rows.
- For extreme blocks, it is better to choose the most even products with ideal angles. Further alignment of the walls will be simplified
- The rest of the blocks are installed between the two corner ones. If necessary, trim one of them.
- Glue for foam blocks is more plastic and easy to use than conventional cement mortar. It is spread over the surface with a notched trowel in a 5 mm layer.
- The blocks are knocked together with a rubber hammer (mallet). Since the mixture begins to solidify after 10-15 minutes, they should not be moved after this time.
- To strengthen the walls, the first and every fourth rows are necessarily reinforced with a metal mesh or rods. They are also laid in the locations of jumpers and under window openings.
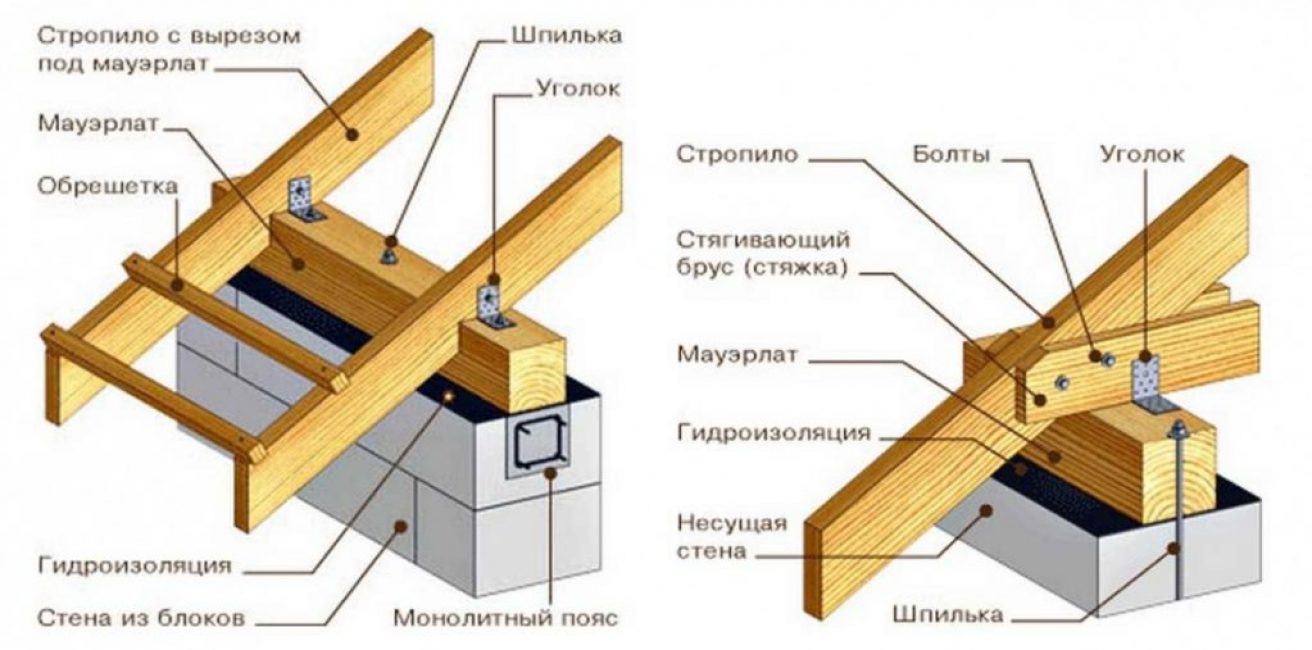
Mauerlat installation. Installation of rafters
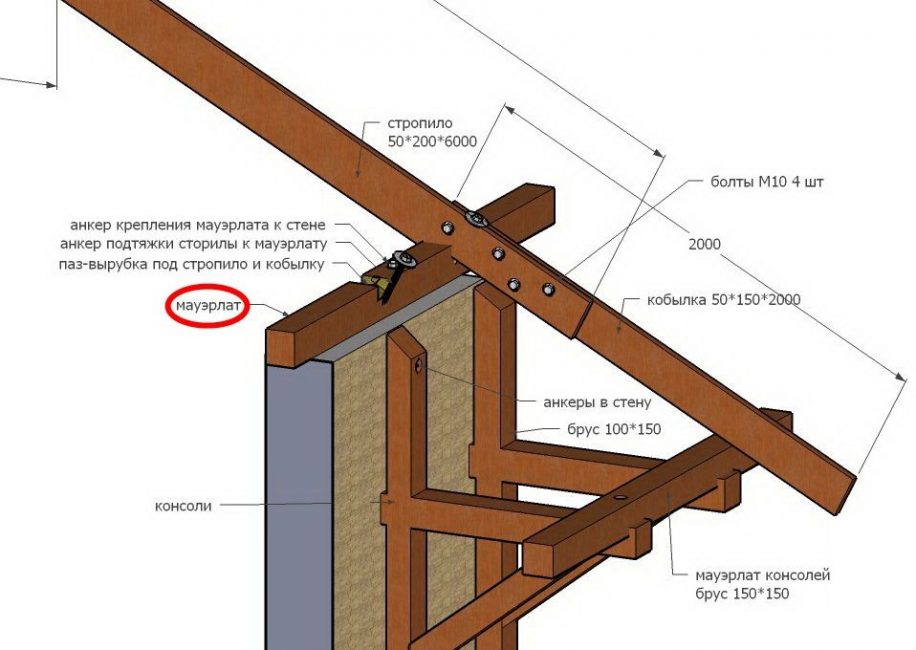
Mauerlat mounting scheme
After the masonry is completed and it dries, 50x150 mm bars are attached to the upper row of walls, which act as a Mauerlat - a support for future rafters. It is mounted on metal studs with a step of 120 cm.
- So that the tree does not draw moisture from the foam blocks, it is waterproofed with two layers of roofing material
- The installation of a shed roof is completely identical to the construction of the roof of a wooden building, which we described above.
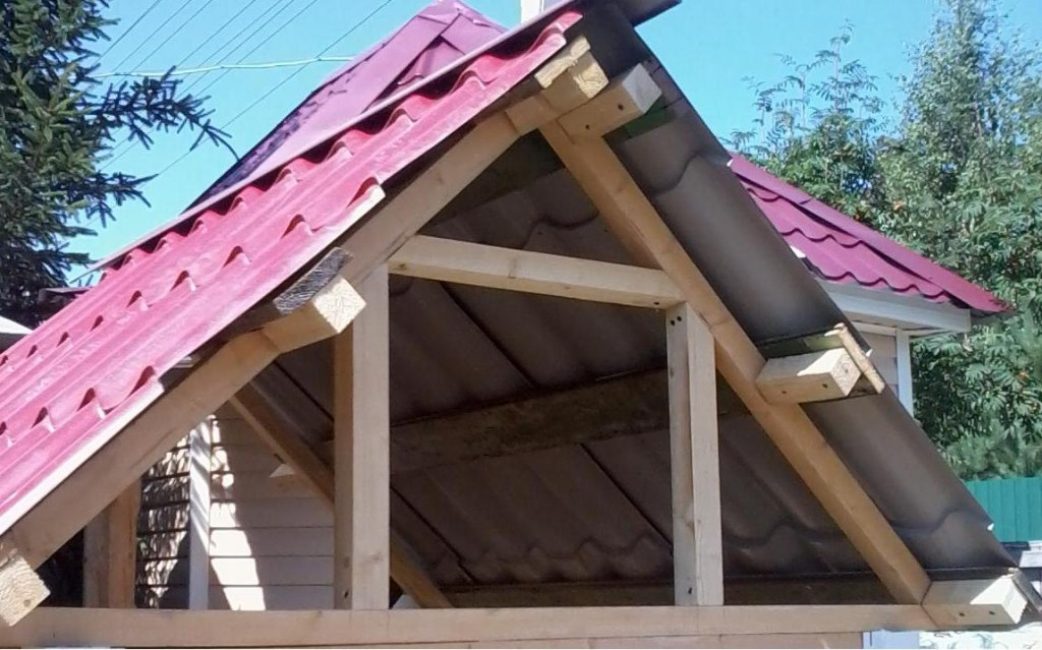
- For the construction of a gable roof, trusses are the first to be exhibited - systems of wooden rafters. For a small building, a simple E-truss with a minimum of lintels is enough
- In the absence of partitions in the building, the truss system becomes hanging
- Rafter pairs are best collected on the ground. The first farm is always the template. It is possible to assemble them at the top or in detail already at the installation site only with certain experience and skill
- After leveling the first extreme farms, they are first nailed to a temporary stop (boards), then screwed to the Mauerlat using metal plates and self-tapping screws. For this, special cut-outs are prepared in it (see the photo above in the subparagraph “Rafters for a pitched roof”). It is better not to use nails for assembly - over time, the tree will dry out and the fasteners will loosen
- Installation of rafters is carried out on metal brackets with self-tapping screws
- A twine is pulled between the first two trusses, along which the rest of the truss system is aligned
- Waterproofing is laid on top of the rafters, then slats, counter-battens, lathing, and then roofing material are attached
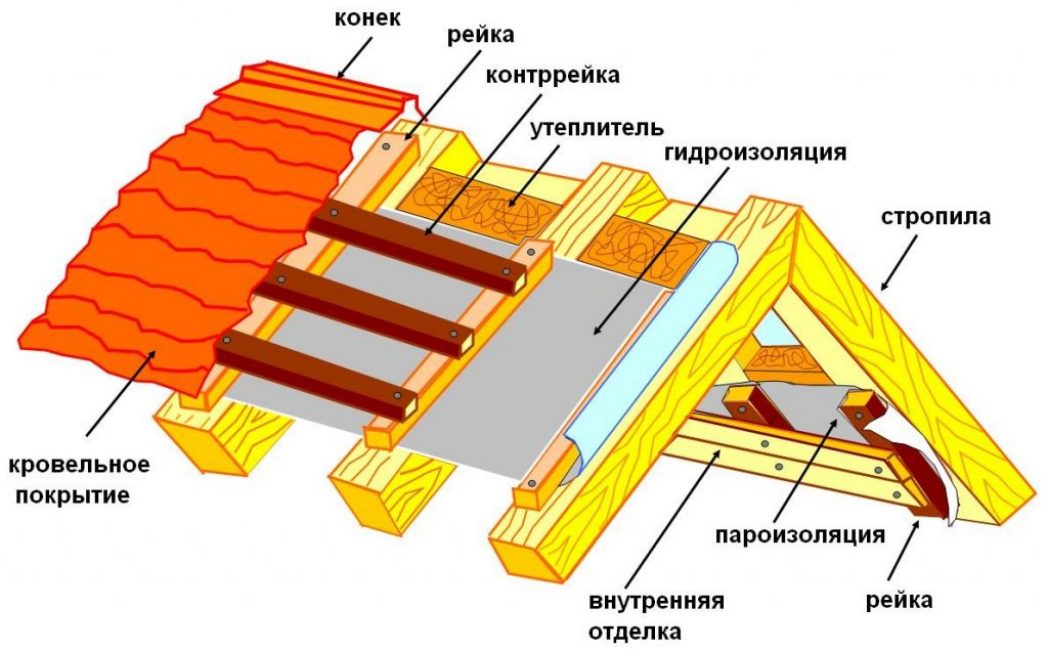
Roof laying procedure
Insulation and decoration of the building
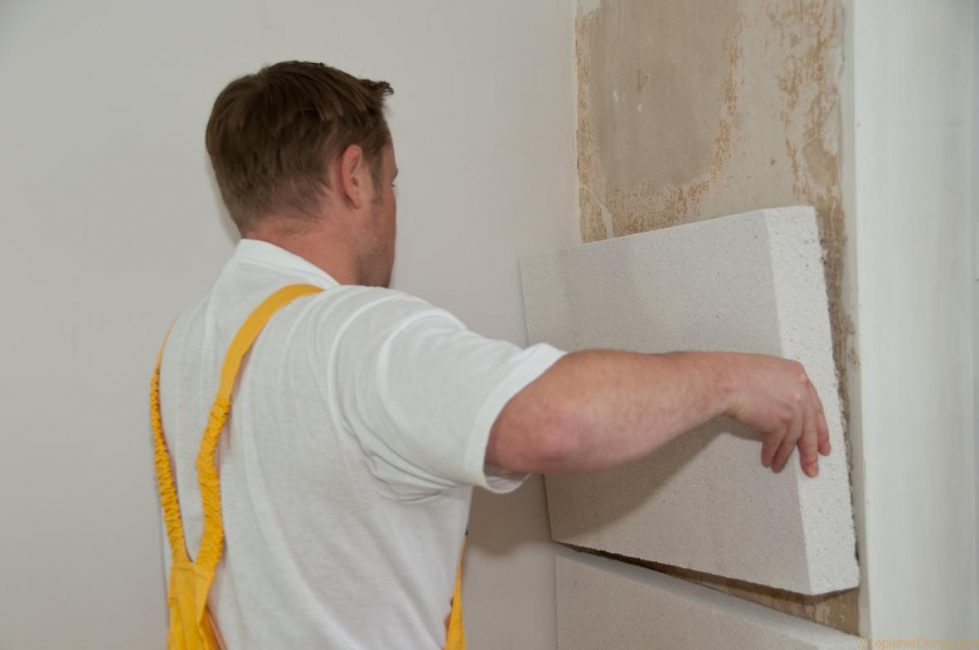
Wall insulation with foam
To keep birds or animals, the building will need to be thermally insulated:
- The simplest way to insulate a building from foam blocks is to finish it with foam from the inside. It is attached to dowels-umbrellas or glued to the surface with special glue. All joints between sheets are sealed with foam
- Since the foam is not able to absorb moisture, vapor barrier is not required for it. But with the help of a film, you can protect the building from the wind - in this case, the premises will be blown less. Next, the walls are finished with moisture-resistant fiberboard or plywood
- Wooden walls can be insulated with a mixture of clay with the addition of straw or shavings. It is thrown on a shingle made of a thin lath, willow twigs or vines from below.
- After the solution dries, the clay always cracks - there is no need to be afraid of this. To remove cracks, the walls are rubbed with a mixture of sand and clay (2: 1), and then whitewashed with ordinary lime.
- The floors for a warm building are made double with a laying of heat-insulating material
- Ceilings will also need to be insulated. They are covered with slag, sawdust or expanded clay. Before laying the heat insulator, a waterproofing layer is necessarily laid - a thick film. It is laid with a stop on the walls
- If the attic is to be operated, so as not to dislodge the heat insulator with your feet, it is filled up between the crate 20 cm high, and then covered with boards
- Too high walls in winter sheds intended for breeding animals are not economically profitable. It will be more difficult to warm them up. The height of the walls should be slightly more than human height
The author of the next video has prepared a detailed video on how to build a wooden barn with your own hands. In it you can clearly see the entire process of erecting a frame structure from assembling the base to installing the roof and wall cladding:

VIDEO: Construction of a simple hozblok
Barn: a device with and without a foundation, step-by-step instructions on how to build your own hands (50+ Photos & Videos) + Reviews


Good article! But for home insulation, I want to advise you to choose a more effective insulation - Airgel thermal insulation, because this material has many unique qualities, for example, incombustibility, environmental friendliness, long service life without a change (20-30 years), absolutely hydrophobicity, etc.