
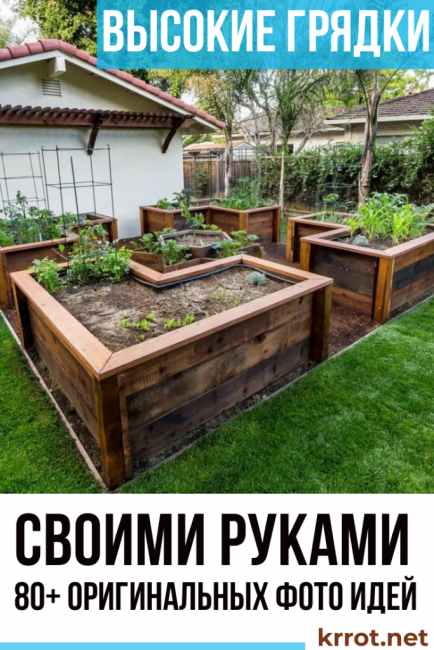
The yield of plants depends not only on the time of planting seeds, their germination, but also on the place of planting and the height of the embankment. We hope that our advice on building beds in the country with your own hands will be useful not only for beginner gardeners.
Content:
 Read also: Projects of country houses for 6-10 acres: 120 photos, description and requirements | The most interesting ideas
Location selection
Some vegetable crops, for example, peas, dill, sorrel, lettuce, can grow in partial shade. But most plant species are not able to fully mature with a lack of light.
Therefore, when placing beds on a garden plot, they are primarily guided by their illumination - it is desirable that they be warmed up by the sun from the very early morning until 6-7 pm.
Decorative garden plantings
When choosing a landing site, the following requirements must be taken into account:
You should not plant plants in the lowlands or on the northern slopes, where the soil freezes deeper than on flat areas; productivity in these places will be low; plus the water in this place will constantly stagnate, which can lead to root rot
The site should not have a strong slope, otherwise the water will simply drain from it during irrigation, and the plants will not receive moisture.
There should not be large trees, buildings and fences near the plantings that can shade the plants.
It is desirable to arrange them north to south, so that during the day they are evenly illuminated by the sun.
For growing vegetables for a family of 3-4 people, about 1 acre is enough; the rest of the territory can be planted with potatoes, berries and flowers
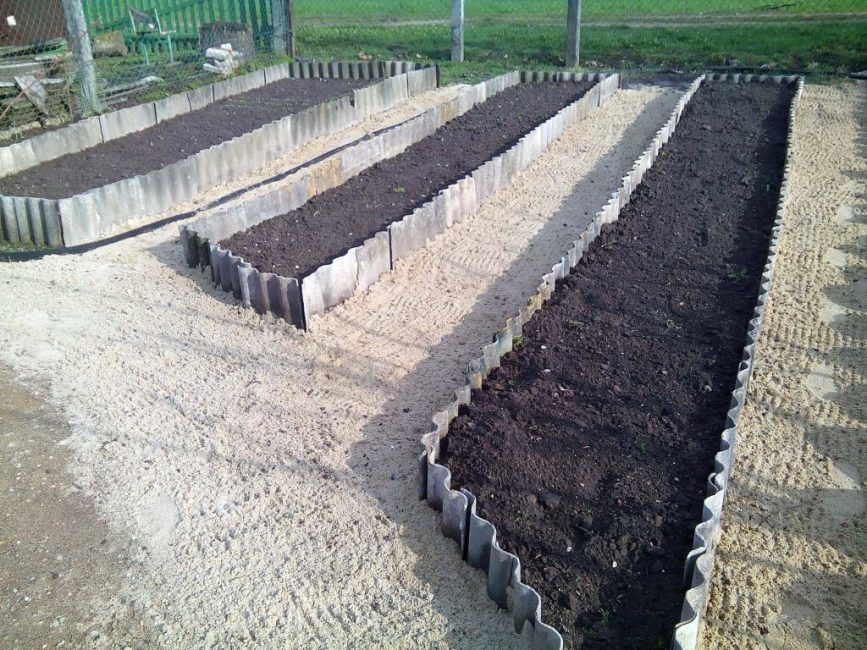
To make the plot look neat, try to make “correct” beds of the same width and length; standard dimensions - 3.5x0.8 m
Do not forget about the compatibility of plants: some of them do not get along well with each other
 Read also: How to make a beautiful and inexpensive fence in the country with your own hands: wood, metal and polycarbonate | (70+ Photos & Videos) + Reviews
 Dimensions
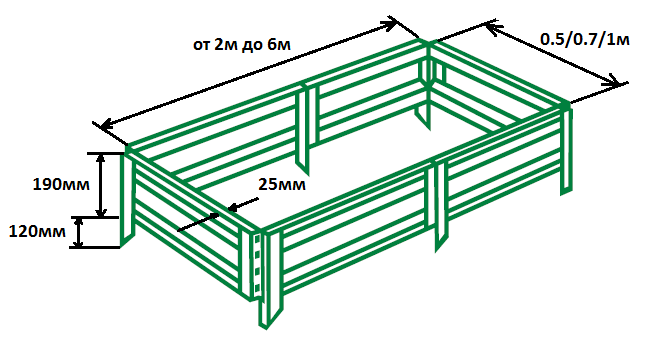
Standard bed sizes
In principle, you can make a bed of any length - up to 10 m. Agree, such beds look original. But constantly bypassing them when watering is very inconvenient. It is better to prepare an embankment 3.5-4 m long. This size is considered optimal. Or break a long bed into two with a small path. This will greatly facilitate your movement around the site.
Standard width 0.8 m. Do not save space (!) and in no case make it wider. You may be able to reach the center of the bed when planting and scatter the seeds, but weeding will turn into a real torment. Don't believe? Experiment and prepare a small but wide mound. Believe me, next year you will lose the desire to make beds of this size.
More compact version, only 0.45 m wide, make for carrots. This culture does not like dense plantings - the sprouts should be well blown. For the same reason, try not to place tall plants next to carrots. Otherwise, you will significantly reduce its yield. On thickened plantings, it will grow small.
 Read also: How to make flower pots with your own hands: outdoor, indoor, hanging | Step by Step Charts (120+ Original Photo Ideas & Videos)
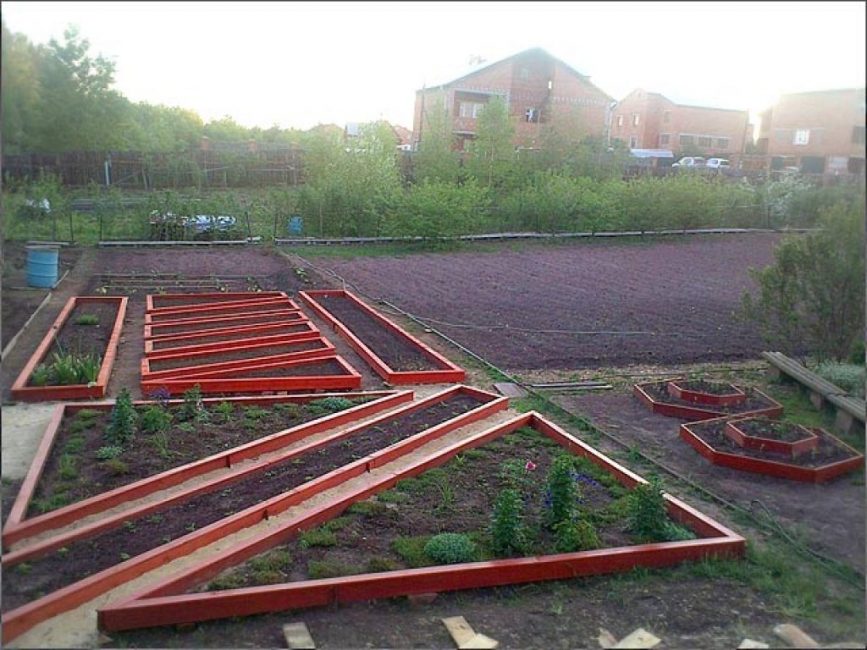
Shape and height
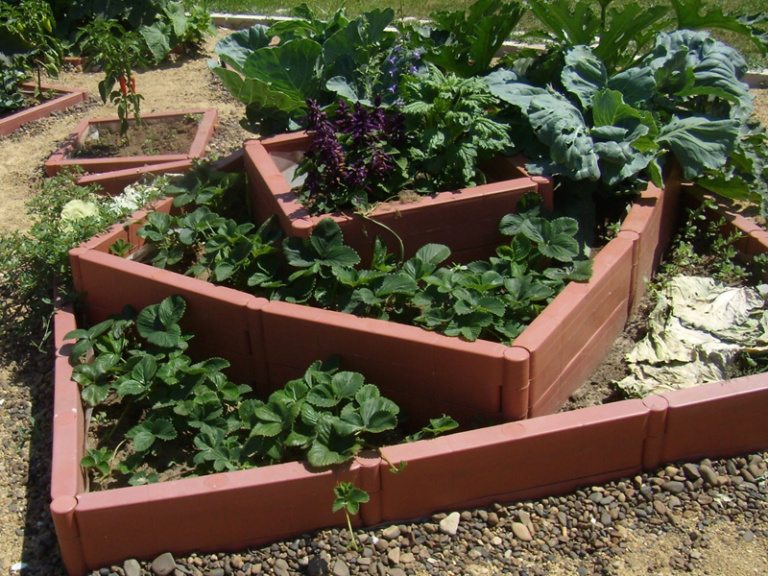
When decorating the site, we can decorate it with beds of various shapes, from standard rectangular to triangular, trapezoidal or oval. There are plenty of ideas for unusual beds on the net. The main thing is that it is convenient to approach them from either side for watering and weeding.
Any form can be
The height of the embankment depends on many factors, including the type of site. In most cases, it is enough to raise them to a height of up to 35-50 cm. This will be enough so that the roots of the plants do not rot. Too high beds - up to 0.8 m - are usually made in heavily swampy areas.
But such structures are very labor intensive. Plus, they will need to bring at least a couple of KAMAZ trucks of fertile soil to the site. For one small bed it will need at least half a ton.
Raising beds is often also required for growing heat-loving crops, for example, cucumbers. Indeed, in high beds, the earth warms up much faster. It is often impossible to get an early harvest without it.
Raise the beds sometimes and just for their own convenience
Caring for plants in this case is much easier. Just keep in mind that in beds of great height, the earth dries out much faster, so you will have to water the plants more often. Experts also advise raising a landing site in areas located in the shade. The optimal height of the embankment in this case is 50 cm.
 Read also: How to make a patio in the country with your own hands: a variety of design options, decoration and arrangement (85+ Photo Ideas & Video)
 Arrangement of a high bed
The use of high boxes-beds
A box for it can be made from improvised means: boards, plastic, metal or stones:
It is better to put a metal mesh at the bottom - it will protect the plants from the ubiquitous rodents.
Crushed stone, expanded clay or broken bricks are used as drainage. The thickness of this layer is 10-15 cm.
It is better to treat the prepared soil in advance with agents from pathogenic microbes and insects -pests. If you do not want to use chemistry, mix the earth with a small amount of wood ash - it will protect the plants from harmful bacteria.
It is not worth filling the bed with soil up to the very sides - it will constantly fall asleep on track. It is necessary to leave about 5 cm.
 Read also: How to make a tapestry with your own hands? Original ideas and drawings (110+ Photos & Videos) + Reviews
Drainage
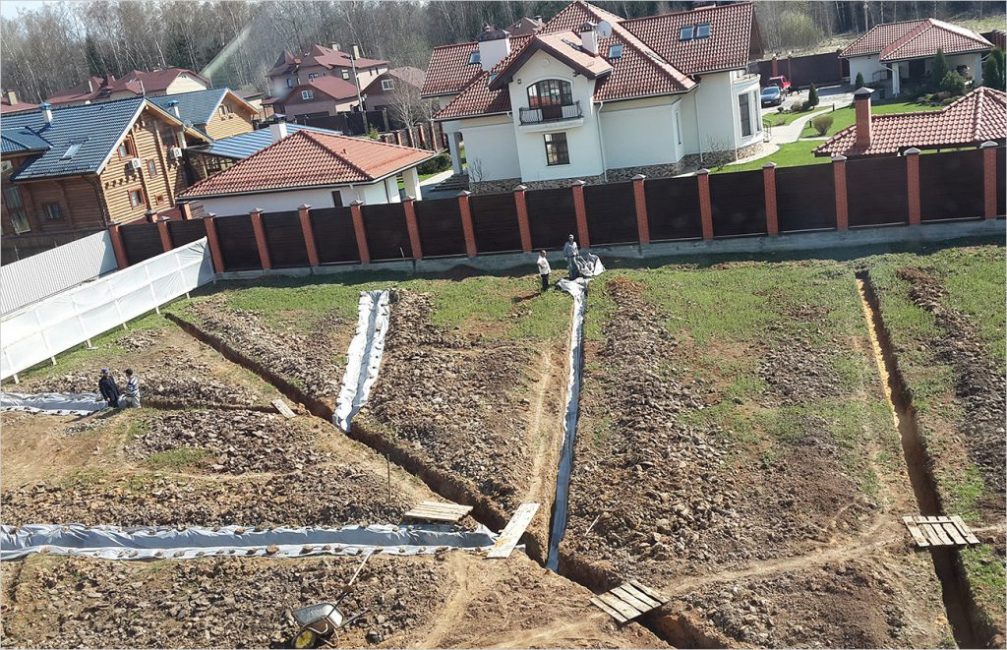
Drainage needs to be taken care of in wetlands.
When a site is located in a lowland or swampy area, growing many types of crops on it becomes a problem. Vegetables and berries on it, if they ripen, then due to excess moisture, they quickly deteriorate during storage.
Their taste also changes - much less sugar accumulates in them. To prevent this from happening, take care of the drainage of the wetland.
Most gardeners know that cabbage, gourds, zucchini and cucumbers require more moisture to grow than other crops. But it turns out to grow massive heads garlic also possible only in areas rich in moisture. On dry land, even with abundant watering, it is rarely large.
For the above types of plants, drainage is not required (unless, of course, stagnant water in the beds is insignificant). The area for growing other crops is better to drain.
For arrangement drainage in swampy areas and removal of excess moisture from the roots of plants
- lay a ditch 50-60 cm deep along the perimeter of the beds
- fill its bottom with a layer of 20-25 cm layer of a mixture of sand and gravel
- throw light sawdust or humus on top
- the very last, top layer is ordinary earth
 Read also: How to make a children's house with your own hands: from wood and other materials.Dimensional drawings | (80 Photo Ideas & Videos)
 Layered structures
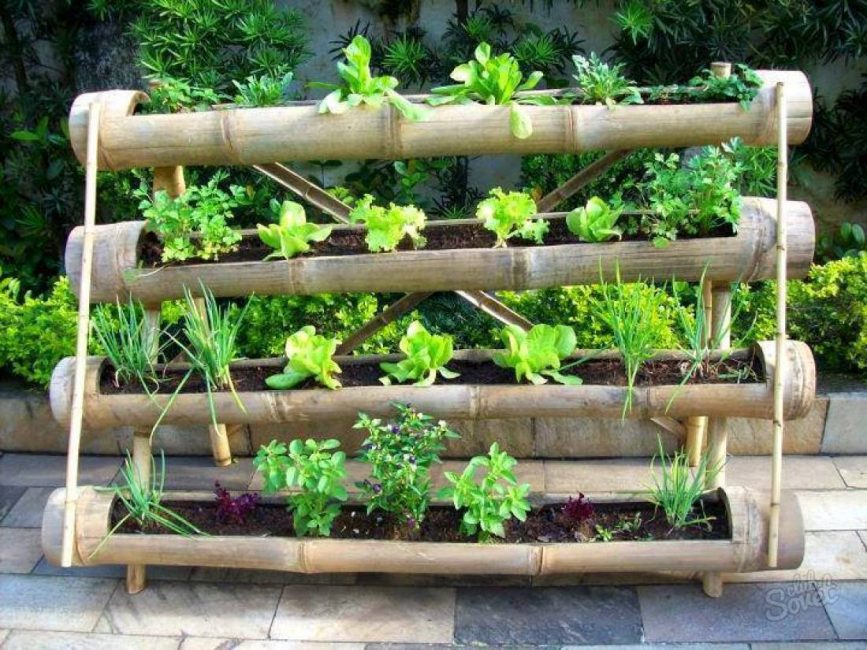
Layered structures
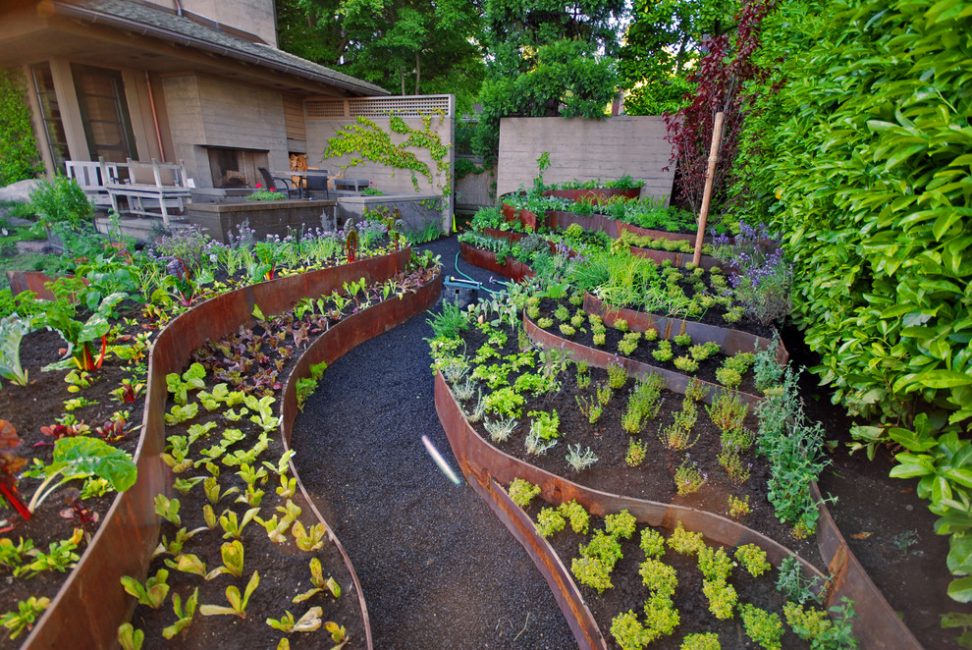
A similar technique is used mainly for decorative purposes - beds raised to different heights look very impressive. It makes sense to build such structures even with a lack of space for landing. However, their number is always limited. Caring for plants growing in multi-tiered structures is always more difficult.
Plus, it is necessary to plant in such structures only crops that have an underdeveloped root system: some varieties of flowers strawberries, lettuce, parsley, dill and other types greenery. Look very decorative on such beds and stunted tomato varieties.
For the construction of multi-tiered beds, special boxes can be knocked out of wood. It is highly undesirable to use metal - it quickly heats up in the sun, and the earth in them will dry out even faster. If necessary, paint metal containers with light paint - light surfaces heat up less.
Often used for such structures and ready-made boxes, racks or containers of a suitable size. You can also place large containers filled with earth on the shelves.
 Read also: How to make a greenhouse with your own hands: for seedlings, cucumbers, tomatoes, peppers and other plants. From polycarbonate, window frames, plastic pipes (75 Photos & Videos) + Reviews
 lazy beds
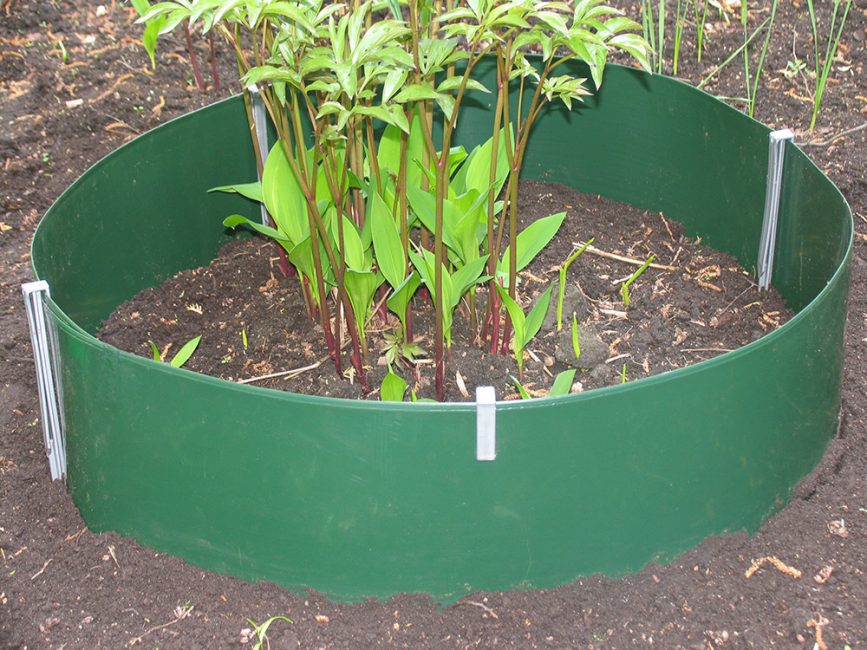
Planting plants without the use of fences
Such embankments are used when planting a large number of plants. They have a small height and outwardly look like bulk trapezoids without the use of a box. True, such embankments will have to be made every season - they settle over the winter.
Make a shallow ditch in the area of \u200b\u200bthe path, throwing the earth onto the ridge. Level the soil with a rake. The bed is ready.
We repeat - the drier the land on the site, the lower the height of the embankment should be. In marshy areas, dig paths as deep as possible and make the bed higher. On sandy soil, you don’t even need to do this - just tread the paths well on the dug-up ground with your feet, thus marking the location of the paths.
 Read also: How to make a booth for a dog with your own hands: building a home in the yard and in the apartment. Drawings, dimensions and original ideas (55+ Photos & Videos) + Reviews
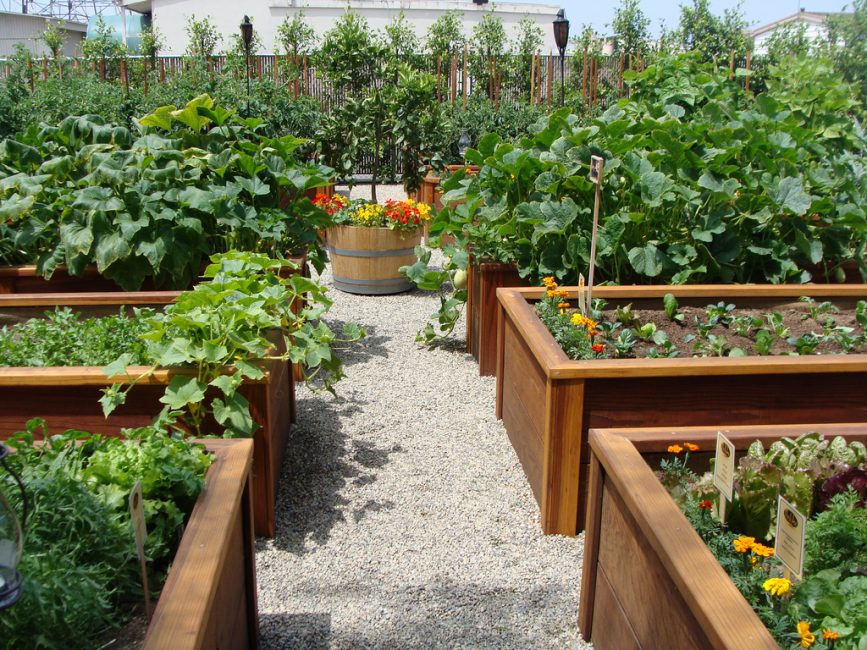
 Boxes for beds
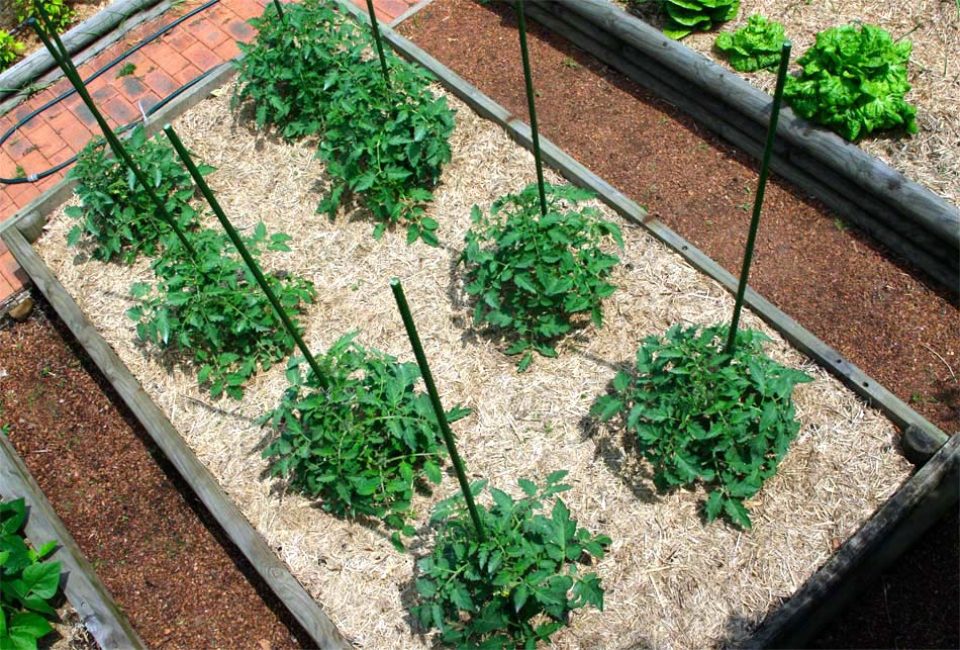
Decorative option, limited by a box - a favorite technique of many gardeners. After all, caring for them (watering and weeding) is greatly simplified. The use of boxes is a good way to protect against soil erosion. In addition, the paths between them will always be clean, without streaks and puddles.
As a rule, the paths are covered with wood, tiles or concrete so that the grass cannot break through the ground.
Planting plants in boxes
Before proceeding with the installation of the box, the place for the beds must be prepared - dig up the ground, carefully removing all weeds. Carefully level it with a rake so that water during irrigation or rain can be evenly distributed over the entire surface.
When digging, it is necessary to capture the area a little more. Otherwise, the roots of perennial plants will again make their way out of the ground. Pulling them out from under the box will be problematic. It is better to pre-dig the neglected area twice in spring and autumn.
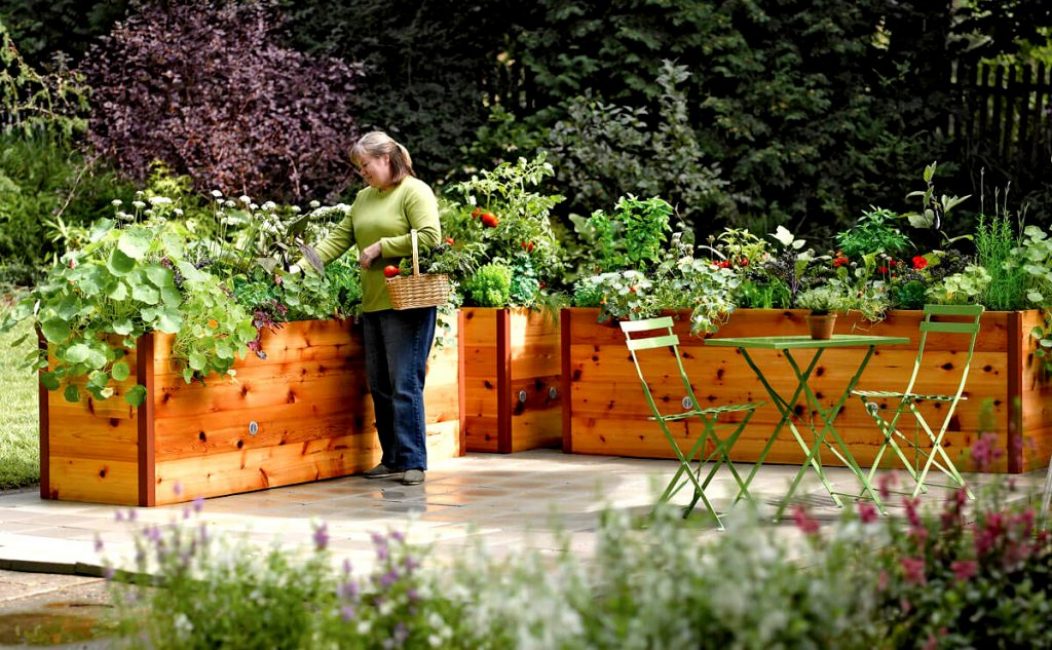
Wooden box
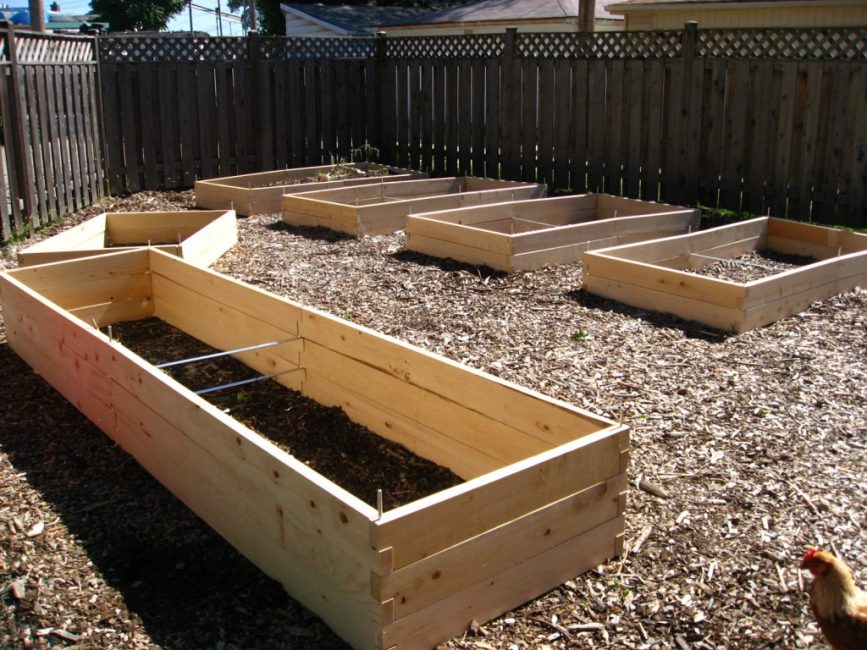
The simplest wooden box is assembled from 4 long and 8 short boards of a suitable size. They are connected in pairs with the help of bars. Nails, screws and metal corners are used as fasteners.
You will also need 4 pegs or trimming reinforcement 0.6 m long - they are driven into the ground from the outside to enhance the strength of the structure.To make the bed perfectly even, its walls are aligned with the building level horizontally and vertically.
Stone or concrete box
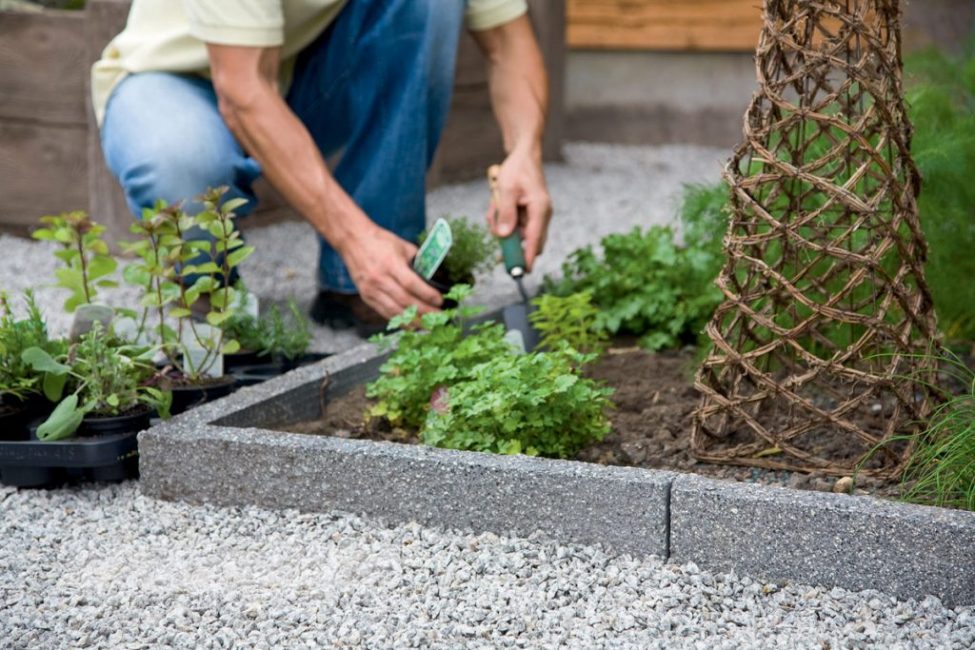
Such structures are characterized by high strength and long service life. However, they will cost a lot.
Plus, the process of building them takes a lot of time. Yes, and moving the garden bed will be a serious problem - the structure will have to be broken.
metal boxes
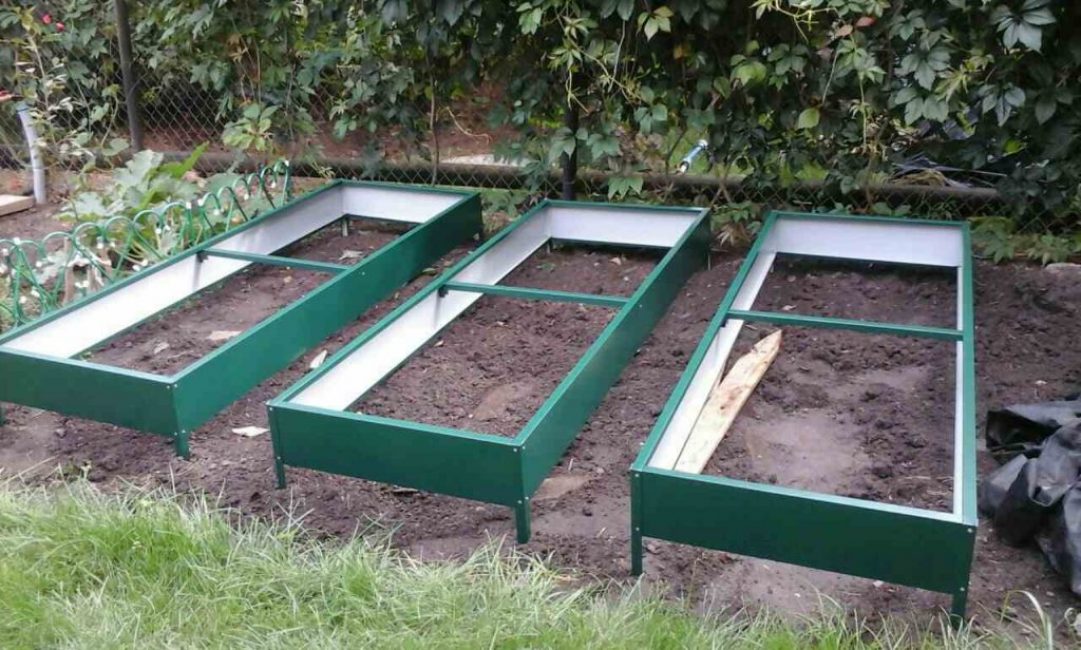
If you have waste metal at hand, you can make beds out of it. Such structures are lightweight and, if desired, they can be easily moved to another place. They are easily painted in any color, so they look quite decorative.
However, the creation of such products requires the ability to work with a welding machine. You can cut the metal at the nearest scrap metal collection point.
Slate fence
It is quite resistant to decay, even when buried in the ground and is able to last a long time.
The disadvantages of slate structures include increased fragility - when assembling and cutting them, high accuracy and accuracy are required.
Plastic structures
If you have a few plastic panels left after repair, you can make a fence out of it. Bright, they favorably stand out against the background of plants.
Moreover, plastic is able to lie in the ground for an infinitely long time - it is not afraid of moisture. However, under the bright rays of the sun, this material quickly fades and loses color.
![[Instructions] How to make beautiful and unusual wall shelves with your own hands: for flowers, books, TV, kitchen or garage (100+ Photo Ideas & Videos) + Reviews](https://iherb.bedbugus.biz/wp-content/uploads/2018/05/19-6-300x213.jpg) Read also: [Instructions] How to make beautiful and unusual wall shelves with your own hands: for flowers, books, TV, kitchen or garage (100+ Photo Ideas & Videos) + Reviews
Read also: [Instructions] How to make beautiful and unusual wall shelves with your own hands: for flowers, books, TV, kitchen or garage (100+ Photo Ideas & Videos) + Reviews Mulching
Weeding often takes a lot of time from summer residents. If the site is large, this becomes a serious problem. You just have to spend the day and night in the garden.

Mulching beds
To reduce the time spent on endless weeding, prepare the so-called smart beds. The principle of their manufacture is simple. To protect plants from weeds after planting, cover the gaps between the sprouts with sawdust, needles, straw, or dried last year's foliage of trees.
Mulch the soil and cover with a dark film. It is spread out before planting, making small holes for the plants. A transparent film is not suitable for these purposes - weeds will continue to develop with access to light.
It has been proven that mulching significantly (almost 30%) increases yields.
After all, the closure of the top layer of soil protects the fertile layer from weathering and rapid drying. Plus, under a layer of organic matter, beneficial microorganisms and earthworms multiply faster.
Using this method, even abandoned areas can be quickly put in order - it is enough to cover the land overgrown with weeds with mulch for a couple of years.
Unfortunately, in wetlands, mulching often leads to a sad result - covering the soil leads to stagnant water in the beds, and as a result, rotting of plants. But in this case, mulching can come in handy.
The only difference is that you should not cover the ground for the winter and early spring. Wait until the earth dries well.
Mulch should not be used during rainy seasons. If the summer turned out to be hot, with the help of mulch you will get rid of not only weeding, but also frequent watering. The moisture underneath will evaporate much more slowly. In wet areas, be sure to prepare drainage around the perimeter of the beds to drain its excess.
![[Instruction] Do-it-yourself laminate on a wooden floor: a complete description of the process. Laying schemes, what materials should be used (Photo & Video) + Reviews](https://iherb.bedbugus.biz/wp-content/uploads/2018/05/laminat-300x200.jpg) Read also: [Instruction] Do-it-yourself laminate on a wooden floor: a complete description of the process. Laying schemes, what materials should be used (Photo & Video) + Reviews
Read also: [Instruction] Do-it-yourself laminate on a wooden floor: a complete description of the process. Laying schemes, what materials should be used (Photo & Video) + Reviews Warm beds
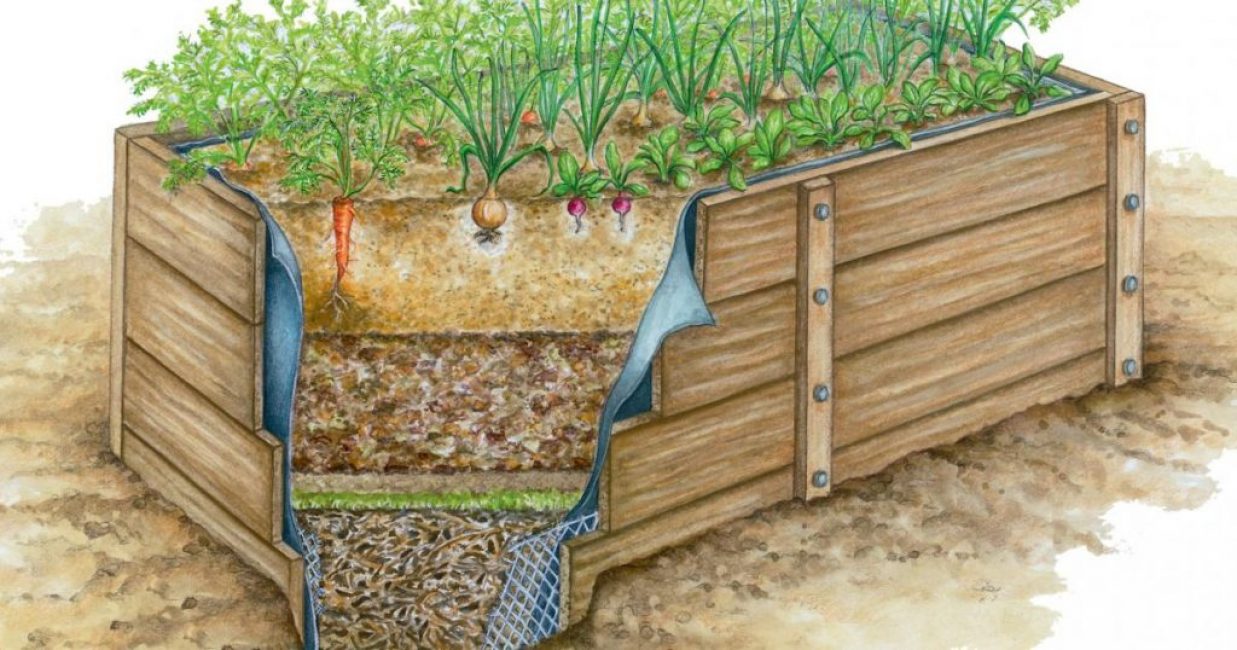
Soil raised above the ground warms up much faster
It is not so easy to achieve an early harvest in our climate. At the first return frosts, tender sprouts planted in open ground will simply die.Surviving plants will be stunted and diseased. The ideal outlet for growing in this case are warm beds.
They can be used for many types of crops: first greens and radishes, heat-loving cucumbers, zucchini, pumpkins, eggplant, tomatoes etc.
Consider the basic rules for creating warm beds and how to grow each of the crops on them:
They can rise above the ground or, conversely, be built below ground level.
They go deep into the ground by no more than 0.5 m. This is quite enough to protect the sprouts from spring frosts. At a greater depth, the plants will be in the shade and will be pulled.
They raise them to a height of up to 0.5-1 m. In principle, they can be made even higher - caring for them will only be simplified.
The first layer is a drainage layer of fine gravel and sand. You can replace it with broken bricks, but learn that over time this material can decompose under the influence of moisture.
The next layer is vegetable waste. The heat released during their decay will serve as natural heating. It is better to prepare such a bed in the fall, during the harvest. As a "warm layer" you can use cut tops or any weed grass left after weeding. The most important thing is that she does not have time to form seeds.
For cucumbers, pumpkins and zucchini, manure is often used as a warm layer. When overheated, it heats up much more. For the same crops as tomatoes, manure, as well as pure humus, is contraindicated. Plants on it will only increase the green mass. You can simply not wait for a harvest on manure - the ovaries will immediately fall off. Therefore, to warm up the tomato, use ordinary vegetable waste.
The last layer is fertile land. It is poured with a thickness of at least 30 cm.
Novice gardeners sometimes complain that their neighbors have high yields on warm beds, but for some reason nothing grows for them. Indeed, if a layer of grass or manure is only a little “powdered” with earth, it will simply be impossible for the roots of the plant to gain a foothold in it. Yes, and nutrition for sprouts will obviously not be enough. Overripe plants serve only as a layer of insulation. Therefore, without a solid layer of earth, you will not achieve a harvest.
Next, arcs are placed above the bed, which are covered with a film. Covering material such as spunbond (agrofibre) should not be used for these purposes. It can be spread directly on the ground in case of returning frosts or used as additional shelter. Unlike polyethylene, agrofibre has many holes through which precious heat will freely escape.
Such a bed "works" for about 4 years. After its complete exhaustion, a new one is prepared, and rotted plants are used as fertilizer when digging up beds. For the first two years, the most heat-loving crops are planted on a warm bed - cucumbers, pumpkins, zucchini, eggplants, etc.
In the third or fourth year in this place you can plant any garden crops - from carrots, beets, Luke before potatoes.
Paths between the beds
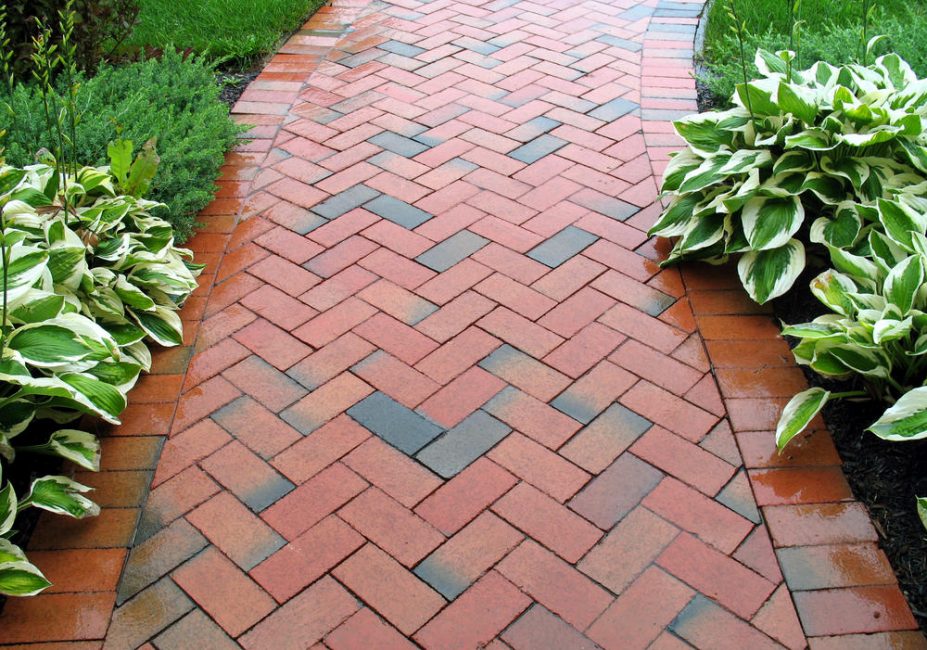
Paving slabs
Tracks between the beds is a sore subject for many gardeners. Weeding the ground rammed by constant walking is problematic. But it’s enough to run a little - and the weed grass immediately crawls from it to the beds. Plus, in rainy weather, the paths become too slippery.
For the manufacture of tracks, you can use any environmentally friendly and sufficiently moisture resistant material:
- paving slabs: its range is large enough, and you can easily choose the right color and shade
- concrete: paths filled with cement-sand mortar can serve faithfully for up to 15-20 years; there are several disadvantages of such structures - low decorativeness and low resistance to moisture; plus, concrete surfaces often crack under the influence of frost heaving, and they have to be periodically added; Yes, and moving the track to another place will be problematic - for this, the concrete coating will have to be completely destroyed
- small stones or rubble: so that they do not mix with fertile soil, for the manufacture of paths from them, it will be necessary to equip a fence made of metal, wood or plastic
- tree: since this material is easily rotten, the paths from it are often raised above the ground with the help of bars; so that the tree does not bend when walking, it is necessary to choose boards of sufficient thickness; the optimal section of the bars is 500x100 mm; the reverse side of the tree is treated with mastic to protect against moisture
- terrace (deck) board, of course, it costs a lot, but it looks very solid; and its service life even in conditions of high humidity and significant temperature changes is 20-30 years
Other materials can also be used for laying paths, for example, tree cuts or large stones. In this case, the space between them must be covered with sand or gravel and carefully compacted. Otherwise, weed grass will immediately appear on the path.
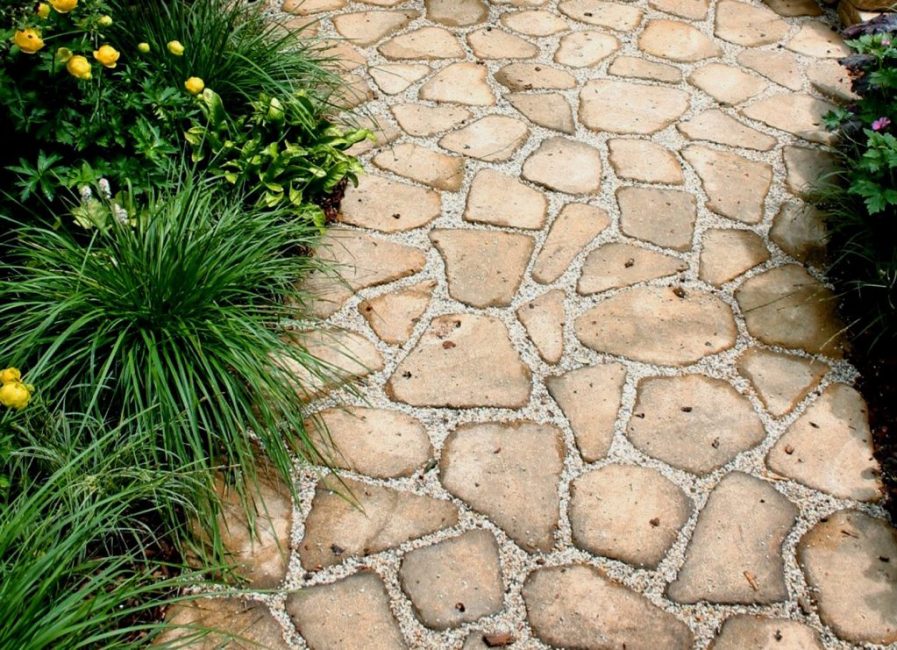
Path of stones
Make the central paths a little wider - from 60 cm, so that a wheelbarrow can freely drive along them. For the rest of the paths, a distance of 30 cm is left (that is, equal in length to the human foot). You should not make it smaller, otherwise, moving between too narrow paths when weeding or watering, you will constantly trample the planted plants.
Use to protect against weeds on the paths you can also old linoleum. But covering this slippery material with a decorative face up is not worth it. Flip it over and lay it upside down. It may not be very aesthetically pleasing, but it is absolutely safe.
Preparing beds for strawberries
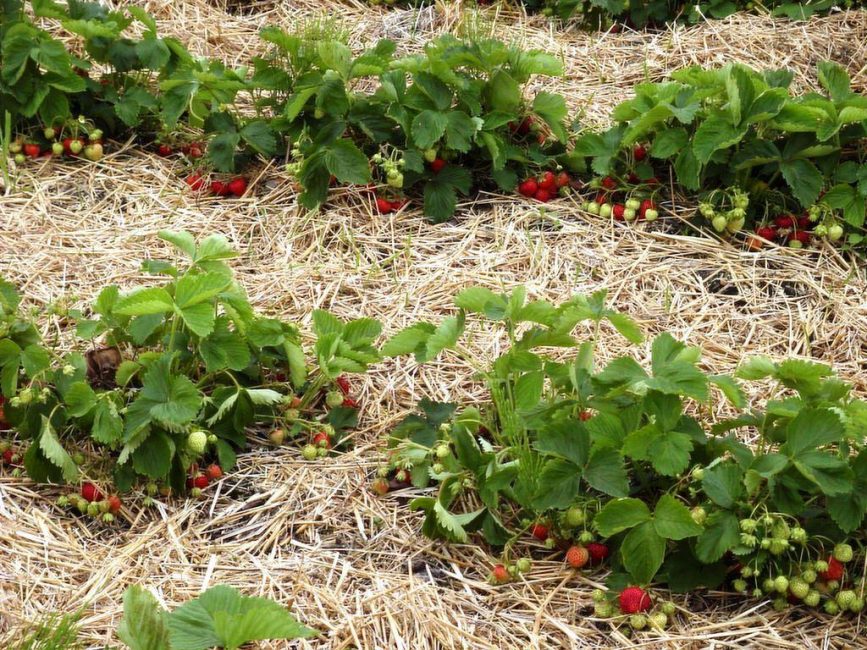
Mulching strawberries
The bright red berry is not only an ideal source of vitamins and minerals, but also an excellent decoration of the garden plot.
But, since this culture requires special care, let's talk about its cultivation separately:
- Strawberry very demanding on soil moisture: with an excess of moisture in the area, its roots quickly rot; and the berry turns out to be watery and not too tasty; so be sure to take care of its drainage
- it is better to grow it on warm beds, on the bottom of which drainage is laid from a 5-10 cm layer of sawdust, straw or rotted tops of plants, mineral supplements can also be added in small quantities; to protect against excess moisture, a waterproofing film is laid on the bottom of the box
- on its sides it is necessary to drill several holes to remove excess water
- it is better to make the beds high enough - it is possible to achieve high taste qualities of the berry only if the soil is sufficiently warmed up by the sun's rays
- capricious strawberries simply love humus; to get a good harvest, add a couple of handfuls of it to the prepared pits when planting seedlings
- the growing whiskers of the plant cause a lot of trouble - they have to be cut very often; if this is not done on time, the berry will begin to shrink, and the yield will decrease
- you can get rid of such laborious work by mulching the beds with a dark cloth; the mustache will simply have nowhere to take root; plus a layer of sawdust, needles or straw will protect strawberries from dirt: even after heavy rain, the berries will remain perfectly clean
Landing decoration
Garden plot decor
Even ordinary rectangular structures look very decorative if several crops are planted in them at once. You can also use unusually shaped beds as a decor. The only thing is that you should not make the embankments too wide so that they can be easily approached from either side.
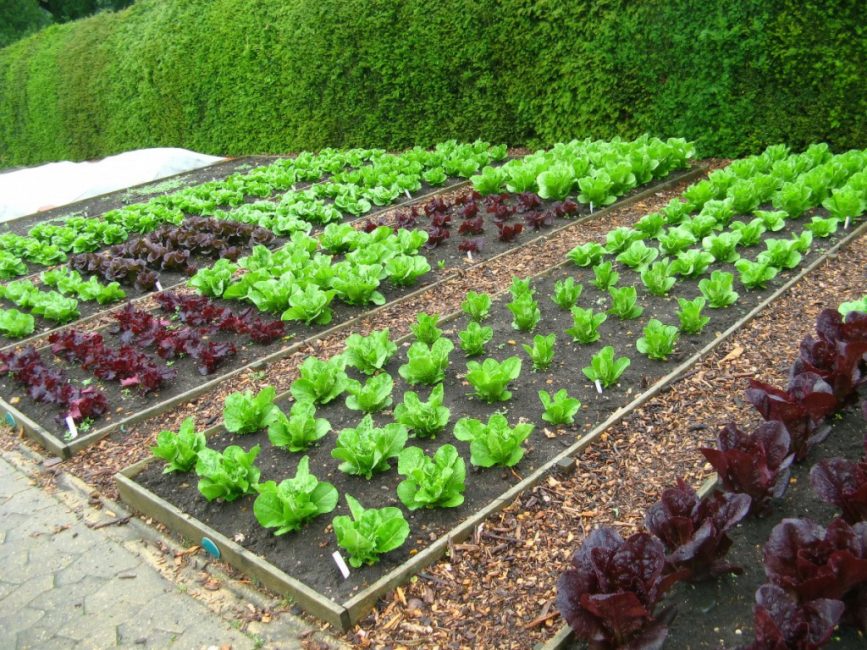
You can decorate the site simply by alternating the shades of the planted crops
The decor of the beds is also possible by planting undersized flowers along their edges. (tall plants will shade the main crops). Thus, you can not only decorate, but also protect plants. For example, marigold, located next to the cabbage heads, will help scare away the cabbage butterfly.
These flowers can be placed next to other plants, for example, beetroot. They are not very fond of the bear, who loves to feast on tender young sprouts. Able to scare away marigolds and aphids, as well as wireworms.
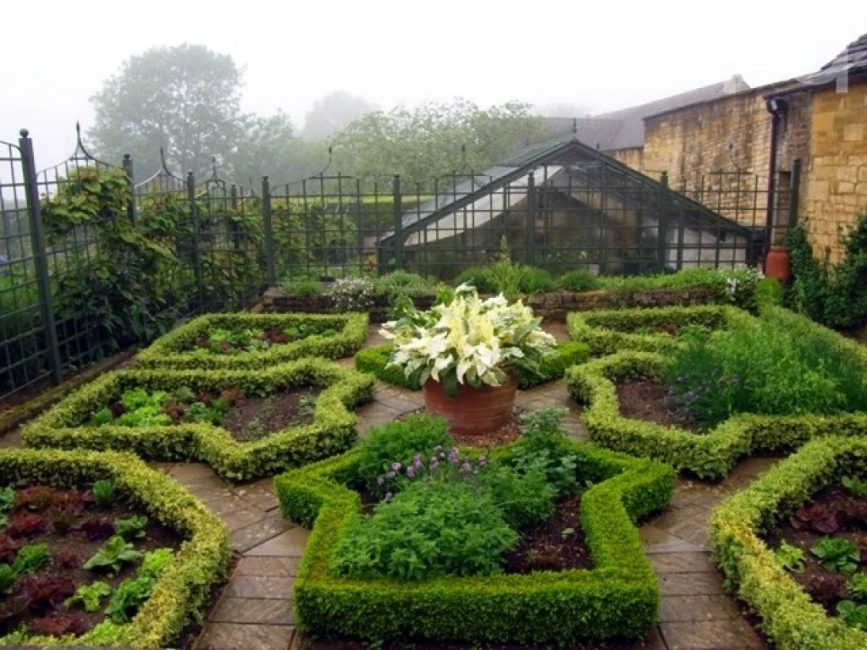
How do French beds differ from English ones?
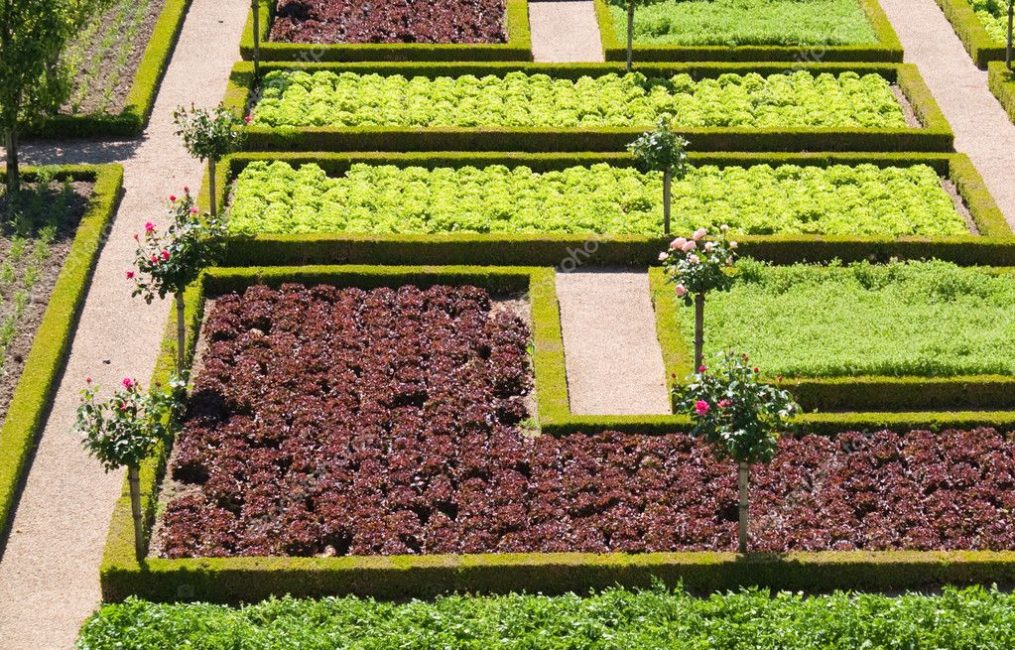
French way of planting crops
French variant - one of the ways to decorate the site. Unlike traditional planting methods, such a garden always has a strictly symmetrical shape. Moreover, it is absolutely not necessary to make the beds rectangular. They can be in the form of rhombuses, ovals or semi-ovals, etc. The most important thing is that each of the segments be strictly symmetrical to the neighboring one.
As a rule, for the convenience of caring for crops, French beds are located at a certain height.
It is desirable (but not necessary) to plant plants also symmetrically. For example, along the edge of all the beds there is a radish, in the center - a lettuce, and on the other side - a red-headed cabbage.
English variant
Unlike the French English do not require strict symmetry. The main emphasis in them is on the lawns, with which the site is decorated. Against the background of sown grass, plantings of even ordinary garden plants look like ornamental crops. In fact, it is a mixture of vegetable garden and flower garden.
The garden house with the English method of planting looks like a huge vertical bed. Climbing plants are planted near its walls. Pots and flowerpots of various shapes are placed along the building. Each of the plants is carefully cared for - despite the riot of vegetation, there is no smell of “wildness” here.
VIDEO: How to build universal warm beds

How to build universal warm beds
How to make and decorate beautiful beds in the country with your own hands: simple, tall, smart. For flowers and vegetables. Original Ideas (80+ Photos & Videos)


