
Some people think that laying electrical wiring in a house with their own hands is too difficult for a home master. Working with electricity is a serious issue that needs to be approached responsibly. Proper wiring in every home is a guarantee of people's safety, because 70% of fires occur due to malfunctions in electrical networks. But if there is a desire, basic knowledge and a little practice, then you can do the necessary work yourself.
Content:
- Sequence of work
- Number of phases
- Making a plan and receiving a project
- What power do you need?
- Consumer groups
- Where to install an electrical panel?
- How to choose the right cable
- Cable core cross section
- Cable sheath
- What are the best switches and sockets to use
- Do-it-yourself wiring
- How to connect the wiring
 Read also: Bath stoves with a water tank (120+ Photos): device and principles of operation, types, model selection, self-production (Video) + Reviews
Sequence of work
The wiring of the electrical network in your own house is carried out before the start of work on finishing the premises. The box of the building is already standing, the walls have been erected and the roof is in place - the time has come to think about electricity.
The sequence of work performed is as follows:
- Determining the required amount of ah - single-phase current (220 V) or you need to connect a three-phase current (380 V)
- Creation of an electrical circuit, calculation of the capacity of future consumers, submission of documentation to regulatory authorities and receipt of an approved project. It should be mentioned that you will not always be allowed the declared power, most often they will allocate up to 5 kW
- Selection of electrical components, purchase of a meter, electrical cables and automatic machines of the required power
- The supply of energy from the pole to the house, this work cannot be done independently, you need to invite specialists from the energy supply organization, place a common machine and an electric meter in a suitable place
- Fix the switchboard, conduct electricity to the house
- Laying cables inside the house, installing and connecting switches and sockets
- Installation and ground connection
- Checking the network and obtaining an act
But each object has its own characteristics, it is necessary to start with the study of technical conditions and the project. First you need to decide what type of input is needed, and determine how much electricity will be consumed.
 Read also: Water pump for a private house or cottage: types, principle of operation and selection criteria (Photo & Video) + Reviews
 Number of phases
Own house can be connected to single-phase or three-phase voltage. For private houses, single-phase networks are provided, with an allowable flow rate of up to 15 kW, and three-phase networks of more than 15 kW. Three-phase voltage is required if you need to use powerful equipment that connects to a 380 V network.
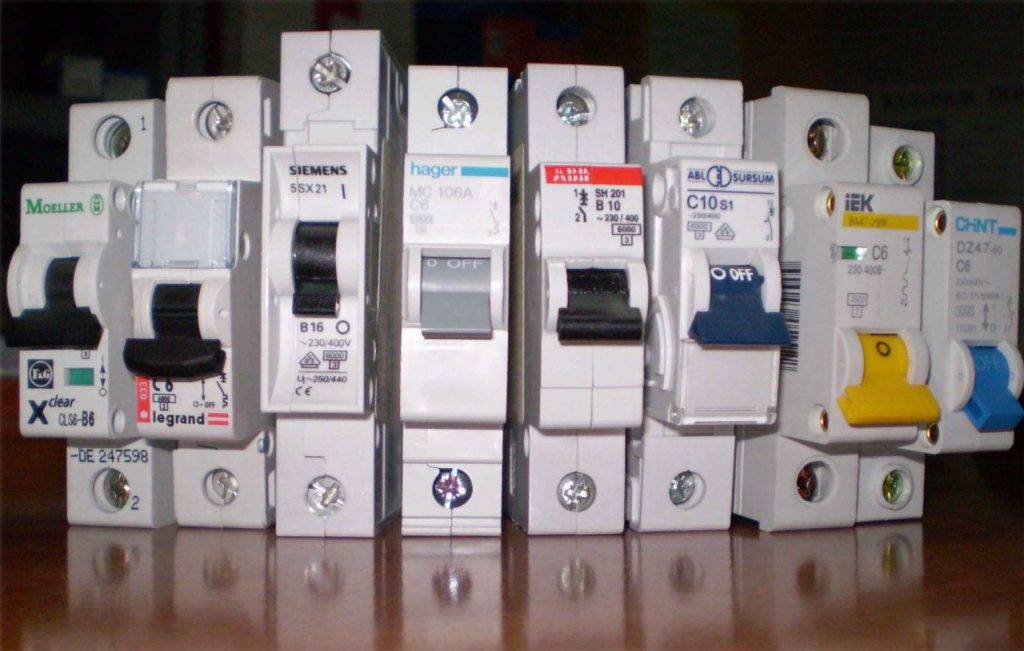
Single-phase machines
Electrical appliances such as efficient ovens, heating boilers or electric stoves are connected to a three-phase network. The requirements for a 380 V network are much higher - with a more powerful voltage, the risk of serious injury increases. For this reason, if the house does not exceed 100 m2 in area, and you do not plan to heat it with electricity, then it is better to connect a 220 V network.
 Read also: Gas cylinder in the country - for a stove, heater and other needs: terms of use (Photo & Video) + Reviews
Making a plan and receiving a project
Now you can create a plan for wiring and installing electrical outlets in the house. To do this, use the building plan on a scale, mark on it where the equipment should be located, think over the places where switches and sockets will be installed. It is necessary not to forget about the installation sites of massive furniture so that it does not cover switches and sockets.
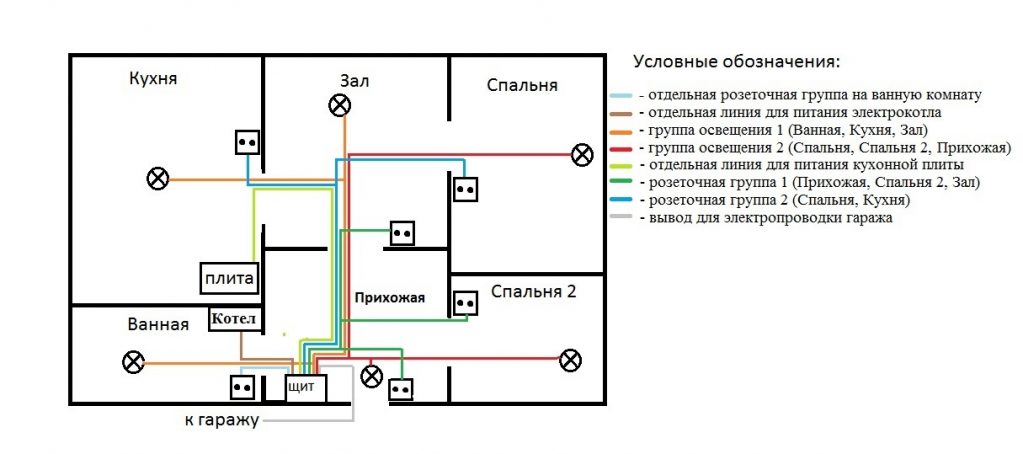
Wiring diagram in the house
On the plan it is necessary to note all the necessary lighting fixtures. Some will require switches to be installed, others will require their own outlets. After that, you need to think about what else you might have to include in each room.
For example: in the kitchen there are many different appliances that are constantly connected, they need their own sockets. But you may need to occasionally use other electrical devices. All these data are indicated on the plan, and the most convenient placement of the inclusion points is calculated.
 Read also: Projects of country houses for 6-10 acres: 120 photos, description and requirements | The most interesting ideas
 What power do you need?
After the distribution of electrical equipment throughout the premises, you need to add up its power. How much each device will require can be viewed in the table, but you need to remember that there are starting currents that exceed the average values. Approximately 20% is added to the amount received to create a small reserve.
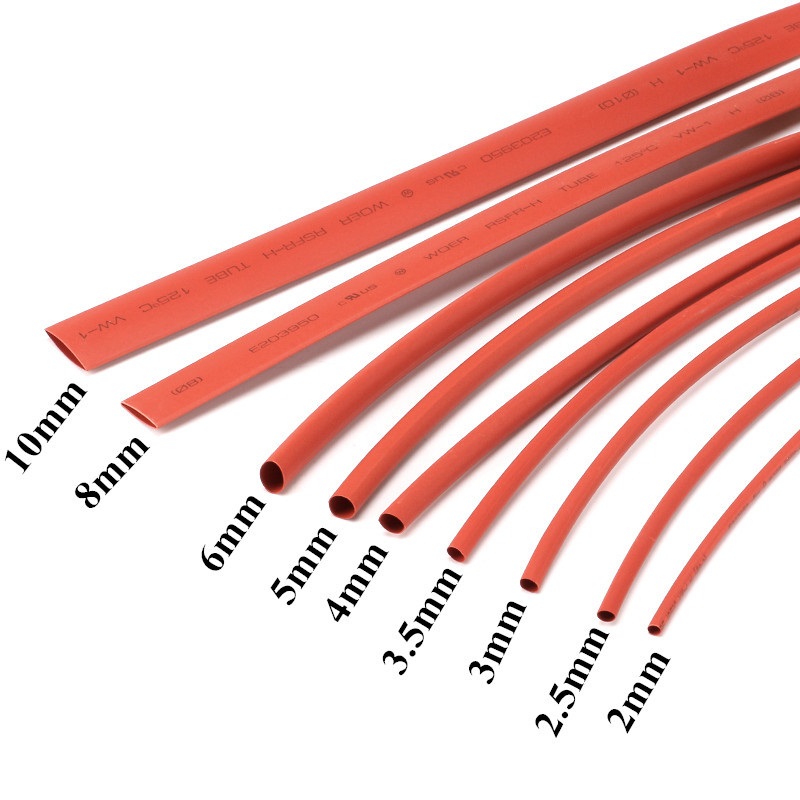
Shrink sleeve
The result obtained and indicate in the documents required to obtain permission. If the declared power is provided to you, then very well, but most likely, they will give you only 5 kW - the standard limit for private housing construction.
| electrical appliance | Power consumption kW | electrical appliance | Power consumption kW |
|---|---|---|---|
| TV set | 300 | Air conditioner | 1500 |
| a printer | 500 | water heater | 5000 |
| Computer | 500 | Boiler | 1500 |
| hair dryer | 1200 | Drill | 800 |
| Iron | 1700 | Perforator | 1200 |
| Electric kettle | 1200 | Electroemery | 900 |
| Fan | 1000 | Circular Saw | 1300 |
| Toaster | 800 | electric planer | 900 |
| Coffee maker | 1000 | Electric jigsaw | 700 |
| A vacuum cleaner | 1600 | Sanding machine | 1700 |
| Heater | 1500 | A circular saw | 2000 |
| microwave oven | 1400 | Compressor | 2000 |
| Oven | 2000 | Compressor | 1500 |
| electric stove | 3000 | Welding machine | 2300 |
| Refrigerator | 600 | Pump | 1000 |
| Washing machine | 2300 | electric motor | 1500 |
 Read also: Terrace attached to the house: 150+ Best photo ideas | Do-it-yourself step-by-step arrangement
Consumer groups
All consumers - sockets, switches, various electrical appliances are divided into groups. Lighting devices are carried out separately, often one is enough for them, but sometimes it is advisable to carry out 2 branches - for each floor or wing of the house. Also, street lighting, utility rooms and a basement are transferred to a separate group.
After that, the sockets are allocated into groups, their number on one cable depends on its cross section, but not more than 3-5 pieces. For powerful electrical appliances, it is advisable to provide a separate line, so the wire will last longer and be safer. As a result, you will get from 3 to 7 lines in the kitchen, a lot of equipment is installed here.
For a boiler, a powerful water heater and an electric stove, you definitely need your own lines. Washing machine, electric oven, microwave and refrigerator, it is desirable to connect separately. Weaker devices, a food processor and a blender, can also be connected separately.
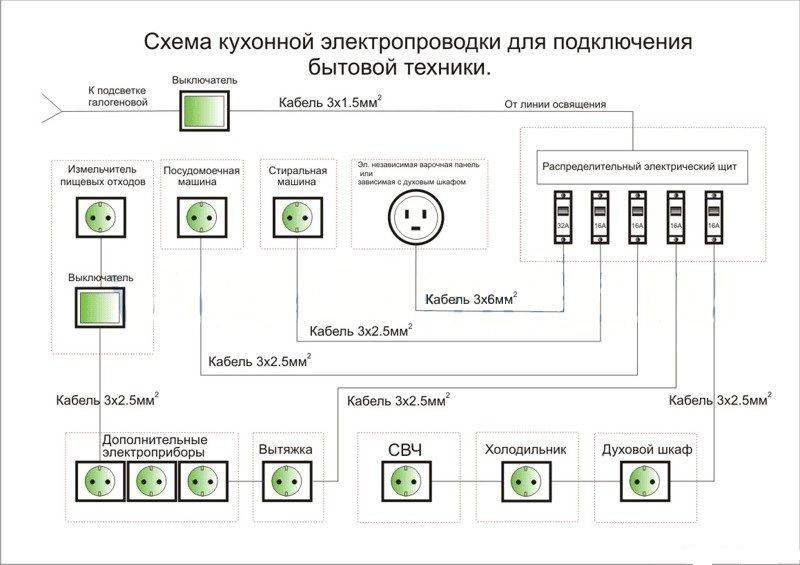
Cable groups
3-4 lines are carried out to the living rooms, in each room there is always something that needs to be connected to the outlet. One wire is used for lighting, another one will have sockets for the TV, router and computer. They have little power and can be combined into one group.
Electric heater and air conditioning - require their own line.
If you have a small house, for example, a summer house, then 2-3 groups will be enough - one is for all lighting, the second is for powering everything outside the house and another one for all sockets in the house. Simply put, the required number of groups in a private house is calculated individually and directly depends on the size and needs of the people living in the house.
The number of groups is determined by how many machines you need to install in the switchboard, you need to add 2-3 machines for development to the number of groups (if you need to install something more powerful or you forgot about something, then you will need to separate one of the groups). The switchboard is chosen so that it is convenient to place all the necessary machines in it. If you have a large house, then it is more convenient to install one powerful machine on each floor, and connect the machines of the groups of this floor to it.
 Read also: Plastic windows in a wooden house: a description of the main characteristics, how to install it yourself, photo and video instructions
 Where to install an electrical panel?

electrical panel
A specific place for mounting the shield is not indicated in any regulations. Only you can’t install it closer than 1 meter from any pipeline - a gas line, downpipes, sewerage, heating system, water conduit, you can’t even place gas meters nearby.
There are no prohibitions on the purpose of the premises, they often have shields in boiler rooms - it is convenient to collect all communications here, the selection committee will not express claims. If the shield has a high protection class, then you can place the switchboard near the front door.
 Read also: Veranda attached to the house - expanding the living space: projects, tips on how to create your own hands (200 original photo ideas)
 How to choose the right cable
When connecting a building to the mains, in our time it is required to place a common machine and an electric meter on the street. This requirement is not specified in the law, but in this case it is easier for the electric service to control energy consumption. If you agree to this, then select an automatic machine and a meter with high protection against moisture and dust - not lower than the IP-55 protection class. When placed indoors, at least IP-44 protection is acceptable, so you will spend less money.
To create an electrical network in a private house, it is advisable to use not a wire, but a cable. They have much better and more reliable insulation, and for this reason, the requirements for laying indoors are softer. Internal wiring must be done with grounding, these are new requirements and there were no electrical appliances with three pin plugs before.
The conductors in electrical cables are made of aluminum or copper. Of course, aluminum is much cheaper, but it is rarely used - this metal often breaks, it is difficult to work with it. In addition, it cannot be used inside wooden houses.
 Read also: How to insulate a private house with your own hands: roof, walls and foundation, description of thermal insulation materials offered on the market (Photo & Video) + Reviews
 Cable core cross section
When you select the material for the cable, you can calculate the required diameter of its cores. This is done taking into account the future load, which is calculated according to a special table.

Calculation of cable cores
The cross section of the conductors is selected according to the power, or the current consumed by all devices connected to one machine. Here again, you need a plan for the electrification of the building, which shows all consumer groups. The sum of the power of the installed devices is calculated, and according to the data indicated in the table, a suitable wire cross-section is selected.
- It is not difficult to use the table, if I use copper wires, and a voltage of 220 V is supplied, then the left side of the table and a suitable column are used to lay the wiring indoors.
- It is necessary to compare the total power of all connected devices (it is easier to calculate). Where a copper wire is indicated that is laid in channels, trays or voids, a larger value is selected in the “220 V” column.
- Moving to the right along this line, to the line “Section, sq. mm", find the required diameter of the cores. From cables of this diameter, they create a line from the machine to consumers of electricity.
- In order not to be confused, mark the cores of the same thickness on the plan with your own color (in order not to forget later, separately note what is indicated under which color).
- When the diameter for all cables is found, the total length is calculated for all cables for each diameter, and to this add 20-25% for insurance. After that, it is considered that you have calculated the cables for laying in the building.
 Read also: Secrets of soundproofing walls in an apartment: we use modern materials and technologies (25+ Photos & Videos) + Reviews
 Cable sheath
Requirements for the type of cable sheath exist only when creating an electrical network for wooden buildings, they must use double (VVG) or triple (NYM). In buildings made of fire-safe materials, it is possible to lay cables with any insulation.
Connecting an outlet and a switch
The main thing in this matter is that there are no damages, sagging, cracks on it. For insurance, you can use a wire with enhanced protection. This may be appropriate in wet areas (bathrooms, bathrooms, swimming pools).
- Water pump for a private house or cottage: types and selection criteria
- Do-it-yourself brick brazier: Step-by-step instructions, drawings (25+ Photos)
- Polycarbonate canopy in the courtyard of a private house (250 PHOTO IDEAS) - beautiful view, convenience and practicality
- Bath stoves with a water tank (120+ Photos): device and principles of operation, types, model selection, self-production
- Gazebos with barbecue and barbecue - (80+ PHOTOS) Drawings that you can implement with your own hands
- How to make paths in the country with your own hands? (80+ Photos) Options for great ideas
 Read also: Sliding gates: making a practical design with your own hands. Schemes, drawings and sketches (100+ Photos & Videos) + Reviews
 What are the best switches and sockets to use
Under any powerful devices, sockets with the maximum allowable starting current are installed. For low-power devices, you can use standard ones.
They can be:
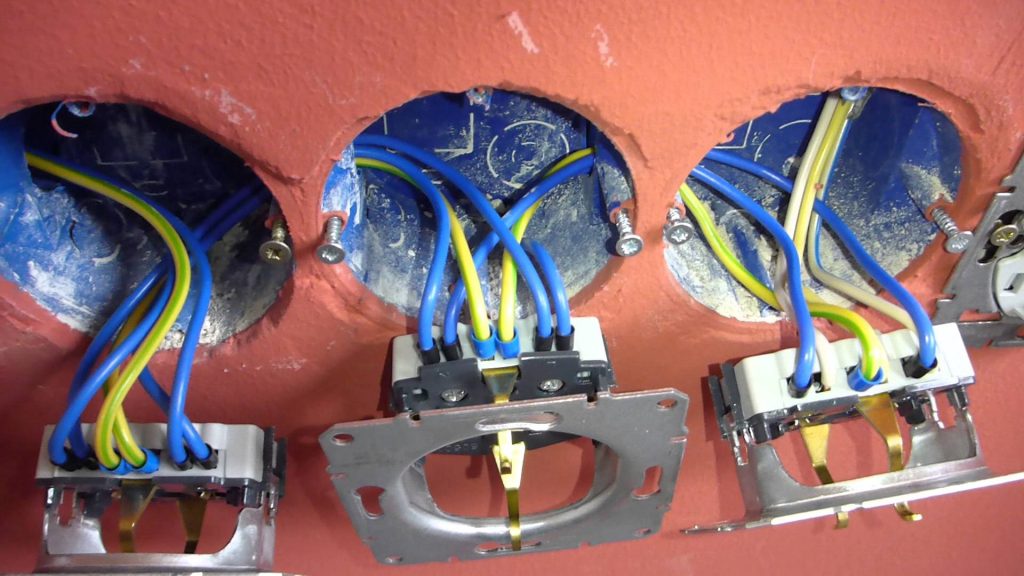
- (Domestic) To install a socket or switch, it is necessary to prepare a recess in the wall into which the box is mounted. In this box, the electrical filling of the switch or socket is fixed;
- (outdoor) In this case, the housing of the socket or switch protrudes from the wall. It is more convenient to mount them - a substrate is installed on the wall surface, on which a switch or socket is mounted.
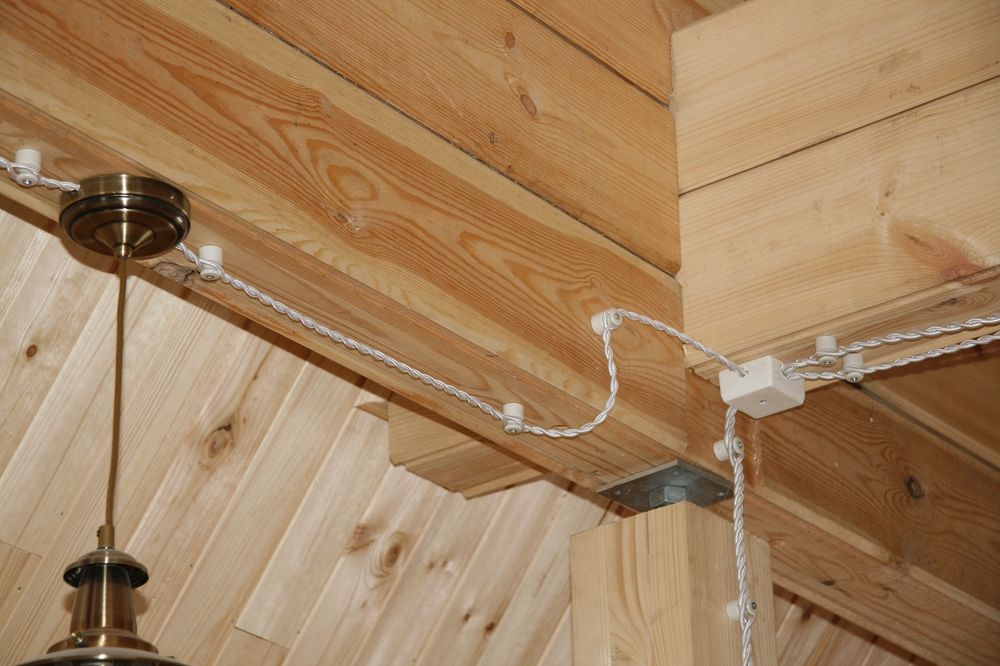
Laying wiring in a wooden house
Most often now use internal switches and sockets. Basically, they are selected taking into account the interior decoration of the room, or they simply install white appliances.
Do-it-yourself wiring
Nowadays, hidden wiring is mainly used, for its installation in the walls they make special channels - strobes. When the cable is laid and fixed, the strobes are sealed with putty to the level of the surface of the entire wall. If GVL, drywall, etc. are subsequently attached to the walls, then there is no need to punch strobes. In this case, the cable is simply placed in the void between the finishing material and the wall, but they are protected by corrugated sleeves.
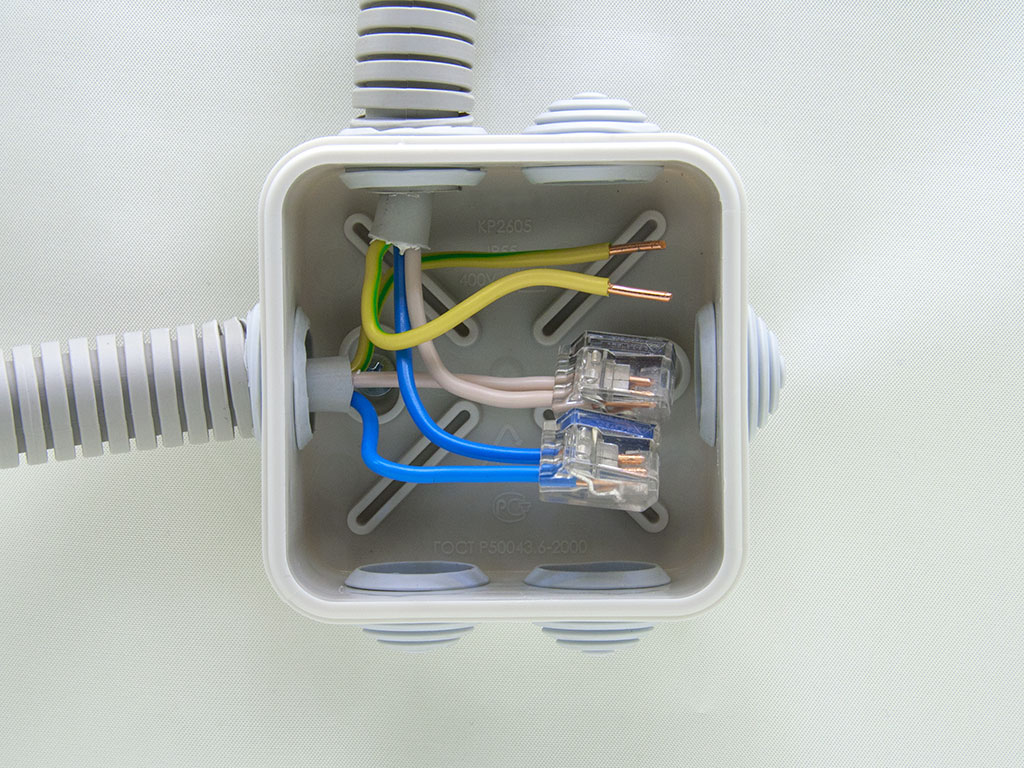
Junction box
When laying the wiring, do not forget that the electrical wiring is routed inside the building according to certain rules:
- Cables are laid only horizontally or vertically; oblique laying and any rounding of corners are not allowed.
- Connection points must be placed only in junction boxes
- Transitions above the doors can be made at least 2.5 m, from them the cable is led to switches or sockets
It is necessary to draw up a plan for laying the electrical route, and save it for the future. It will definitely be needed when repairing wiring or during redevelopment of the premises. It will need to be addressed, if necessary, drive a long nail or make a hole.
How to connect the wiring
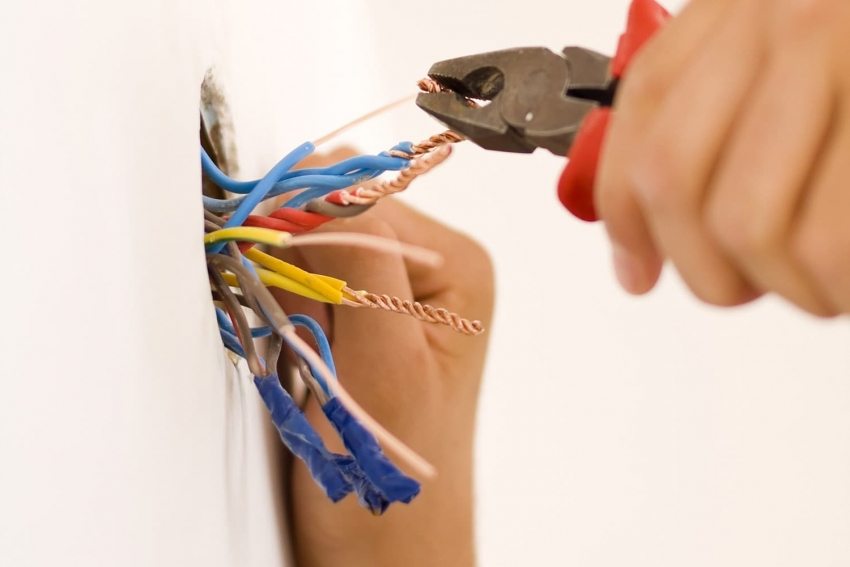
Wire connection
Basically, all troubles with electrical wiring occur as a result of poor-quality wire connections.
There are some of the most common ways:
- (twisting)The wires are connected together by folding 2 bare wires and twisting together, so you can only connect wiring from the same metal.It is strictly forbidden to connect aluminum and copper with twists. From above, the resulting connection is insulated with a heat shrink tube or ordinary insulating tape. If you need 100% reliable contact, with minimal losses, then the resulting twist must be well soldered;
- (Terminal box) This connection is made using screw fasteners fixed in a plastic case. The wire, stripped of insulation, is inserted under the metal bar and clamped with a screw. This is the most reliable type of connection in our time;
- (Spring connection pads) Contact in them is provided by a special spring that presses the bare wire.
Having finished laying the electrical wiring around the building, having checked all the sections, they call the specialists of the power supply organization. They check the quality of work, and give a test certificate.

VIDEO: TOP 10 Wiring Rules
What should be the wiring in a private house, do-it-yourself installation, instructions for beginners